
Quick Reference
Page 4
..., pulsing pattern The printer is in ready state. • Show the current printer status such as Ready or Busy. • Show printer conditions such as Imaging unit low or Cartridge Low. • Show intervention messages and the instructions on how to clear them. • Show a printer warning or error message whenever the...
..., pulsing pattern The printer is in ready state. • Show the current printer status such as Ready or Busy. • Show printer conditions such as Imaging unit low or Cartridge Low. • Show intervention messages and the instructions on how to clear them. • Show a printer warning or error message whenever the...
Quick Reference
Page 13
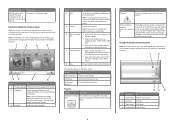
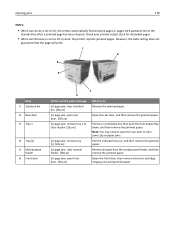
..., and then remove the jammed paper. 6 Front door [x]‑page jam, open front door. [20y.xx] Open the front door, then remove the toner cartridge, imaging unit, and jammed paper. [x]‑page jam, open Open the rear door, and rear door. [20y.xx] then remove the jammed paper. 3 Tray 1 [x]‑page jam...
..., and then remove the jammed paper. 6 Front door [x]‑page jam, open front door. [20y.xx] Open the front door, then remove the toner cartridge, imaging unit, and jammed paper. [x]‑page jam, open Open the rear door, and rear door. [20y.xx] then remove the jammed paper. 3 Tray 1 [x]‑page jam...

Quick Reference
Page 14
... the jam, press OK > . 14 3 Lift the green handle, and then pull out the imaging unit from the printer. 5 Lift the green flap in front of the printer. 7 Insert the imaging unit by aligning the side rails of the cartridge with the arrows on each side, and then gently pull... the arrows on the side rails inside the printer, and then insert the imaging unit into the printer. 4 Place the imaging unit aside on a flat, smooth surface. Warning-Potential Damage: Do not expose the imaging unit to clear the message and continue printing. Extended exposure to light may affect the quality...
... the jam, press OK > . 14 3 Lift the green handle, and then pull out the imaging unit from the printer. 5 Lift the green flap in front of the printer. 7 Insert the imaging unit by aligning the side rails of the cartridge with the arrows on each side, and then gently pull... the arrows on the side rails inside the printer, and then insert the imaging unit into the printer. 4 Place the imaging unit aside on a flat, smooth surface. Warning-Potential Damage: Do not expose the imaging unit to clear the message and continue printing. Extended exposure to light may affect the quality...

User's Guide
Page 57
.... E‑mail Only The printer generates an e-mail when the supply condition is reached. Notes: • Selectable alerts can be set on the toner cartridge, imaging unit, and maintenance kit. • All selectable alerts can be replaced to continue printing. 1 The printer generates an e-mail about the status of the supply will...
.... E‑mail Only The printer generates an e-mail when the supply condition is reached. Notes: • Selectable alerts can be set on the toner cartridge, imaging unit, and maintenance kit. • All selectable alerts can be replaced to continue printing. 1 The printer generates an e-mail about the status of the supply will...
User's Guide
Page 69
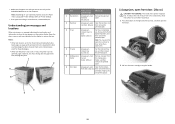
... printer menus. Note: Your home screen may vary depending on how to clear them. Note: This icon appears only when you return to as Imaging unit low or Cartridge Low. • Show intervention messages and the instructions on your home screen customization settings, administrative setup, and active embedded solutions.... in Ready state. The printer is idle or in pulsing pattern The printer is connected to initiate an action. Using MS610de 69 Sleep button light color and its corresponding printer status Sleep button light Off Solid amber Blinking amber Printer status The ...
... printer menus. Note: Your home screen may vary depending on how to clear them. Note: This icon appears only when you return to as Imaging unit low or Cartridge Low. • Show intervention messages and the instructions on your home screen customization settings, administrative setup, and active embedded solutions.... in Ready state. The printer is idle or in pulsing pattern The printer is connected to initiate an action. Using MS610de 69 Sleep button light color and its corresponding printer status Sleep button light Off Solid amber Blinking amber Printer status The ...

User's Guide
Page 97
...Continuable Stop1 The printer stops processing jobs when the supply condition is reached. Using MS610de 97 Finding advanced networking and administrator information This chapter covers basic administrative support tasks...For more advanced system support tasks, see the Networking Guide on the toner cartridge, imaging unit, and maintenance kit. • All selectable alerts can determine how you are using ... the printer home screen. The status of estimated remaining supply that appears at http://support.lexmark.com. Notes: • View the printer IP address on a printer control panel....
...Continuable Stop1 The printer stops processing jobs when the supply condition is reached. Using MS610de 97 Finding advanced networking and administrator information This chapter covers basic administrative support tasks...For more advanced system support tasks, see the Networking Guide on the toner cartridge, imaging unit, and maintenance kit. • All selectable alerts can determine how you are using ... the printer home screen. The status of estimated remaining supply that appears at http://support.lexmark.com. Notes: • View the printer IP address on a printer control panel....
User's Guide
Page 169
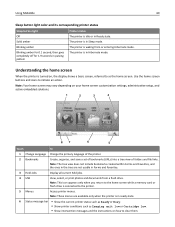
... 40X8282 40X8435 40X8436 Part name Lexmark Return Program Regular Imaging unit 500Z 500ZA Ordering a maintenance kit Notes: • Using certain types of paper may cause imaging unit parts to fail prior to replace the maintenance kit. Ordering an imaging unit Extremely low print coverage for ...toner cartridge. Recommended maintenance kits and part numbers Printer model MS510dn (100v) MS610dn (100v) MS610de (100v) MS510dn (110v) MS610dn (110v) MS610de (110v) MS510dn (220v) MS610dn (220v) MS610de (220v) * This kit is supported only in the maintenance kit and can be individually ...
... 40X8282 40X8435 40X8436 Part name Lexmark Return Program Regular Imaging unit 500Z 500ZA Ordering a maintenance kit Notes: • Using certain types of paper may cause imaging unit parts to fail prior to replace the maintenance kit. Ordering an imaging unit Extremely low print coverage for ...toner cartridge. Recommended maintenance kits and part numbers Printer model MS510dn (100v) MS610dn (100v) MS610de (100v) MS510dn (110v) MS610dn (110v) MS610de (110v) MS510dn (220v) MS610dn (220v) MS610de (220v) * This kit is supported only in the maintenance kit and can be individually ...
User's Guide
Page 171
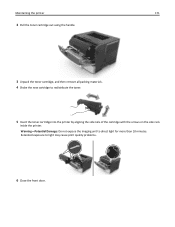
Warning-Potential Damage: Do not expose the imaging unit to redistribute the toner. 5 Insert the toner cartridge into the printer by aligning the side rails of the cartridge with the arrows on the side rails inside the printer. Maintaining the printer 171 2 Pull the toner cartridge out using the handle. 3 Unpack the toner cartridge, and then remove all packing materials. 4 Shake the new cartridge to direct light for more than 10 minutes. Extended exposure to light may cause print quality problems. 6 Close the front door.
Warning-Potential Damage: Do not expose the imaging unit to redistribute the toner. 5 Insert the toner cartridge into the printer by aligning the side rails of the cartridge with the arrows on the side rails inside the printer. Maintaining the printer 171 2 Pull the toner cartridge out using the handle. 3 Unpack the toner cartridge, and then remove all packing materials. 4 Shake the new cartridge to direct light for more than 10 minutes. Extended exposure to light may cause print quality problems. 6 Close the front door.

User's Guide
Page 172
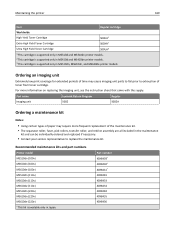
Maintaining the printer 172 Replacing the imaging unit 1 Press the button on the right side of the printer, and then open the front door. 1 2 2 Pull the toner cartridge out using the handle. 3 Lift the green handle, and then pull the imaging unit out of the printer.
Maintaining the printer 172 Replacing the imaging unit 1 Press the button on the right side of the printer, and then open the front door. 1 2 2 Pull the toner cartridge out using the handle. 3 Lift the green handle, and then pull the imaging unit out of the printer.

User's Guide
Page 173
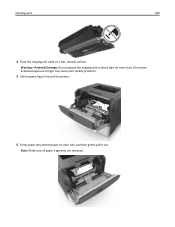
Doing so may cause print quality problems. Warning-Potential Damage: Do not touch the photoconductor drum. Extended exposure to direct light for more than 10 minutes. Maintaining the printer 173 4 Unpack the new imaging unit, and then shake it. 5 Remove all packing materials from the imaging unit. Warning-Potential Damage: Do not expose the imaging unit to light may affect the print quality of future print jobs. 6 Insert the imaging unit into the printer by aligning the arrows on the side rails of the imaging unit with the arrows on the side rails inside the printer.
Doing so may cause print quality problems. Warning-Potential Damage: Do not touch the photoconductor drum. Extended exposure to direct light for more than 10 minutes. Maintaining the printer 173 4 Unpack the new imaging unit, and then shake it. 5 Remove all packing materials from the imaging unit. Warning-Potential Damage: Do not expose the imaging unit to light may affect the print quality of future print jobs. 6 Insert the imaging unit into the printer by aligning the arrows on the side rails of the imaging unit with the arrows on the side rails inside the printer.
User's Guide
Page 178
... blank pages or pages with partial prints to On or Auto, the printer reprints jammed pages. Open the front door, then remove the toner cartridge, imaging unit, and jammed paper. Check your printed output stack for discarded pages. • When Jam Recovery is set to the standard bin after a jammed page has...
... blank pages or pages with partial prints to On or Auto, the printer reprints jammed pages. Open the front door, then remove the toner cartridge, imaging unit, and jammed paper. Check your printed output stack for discarded pages. • When Jam Recovery is set to the standard bin after a jammed page has...

User's Guide
Page 179
Warning-Potential Damage: Do not touch the shiny blue photoconductor drum under the imaging unit. Doing so may affect the quality of the printer might be hot. Clearing jams 179 [x]‑page jam, open the front door. 1 2 2 Pull out the ...toner cartridge using the handle. 3 Lift the green handle, and then pull out the imaging unit from the printer. To reduce the risk of injury from a hot component, allow the surface to cool before touching it. 1 Press the button on the...
Warning-Potential Damage: Do not touch the shiny blue photoconductor drum under the imaging unit. Doing so may affect the quality of the printer might be hot. Clearing jams 179 [x]‑page jam, open the front door. 1 2 2 Pull out the ...toner cartridge using the handle. 3 Lift the green handle, and then pull out the imaging unit from the printer. To reduce the risk of injury from a hot component, allow the surface to cool before touching it. 1 Press the button on the...
User's Guide
Page 180
Extended exposure to direct light for more than 10 minutes. Note: Make sure all paper fragments are removed. Warning-Potential Damage: Do not expose the imaging unit to light may cause print quality problems. 5 Lift the green flap in front of the printer. 6 Firmly grasp the jammed paper on a flat, smooth surface. Clearing jams 180 4 Place the imaging unit aside on each side, and then gently pull it out.
Extended exposure to direct light for more than 10 minutes. Note: Make sure all paper fragments are removed. Warning-Potential Damage: Do not expose the imaging unit to light may cause print quality problems. 5 Lift the green flap in front of the printer. 6 Firmly grasp the jammed paper on a flat, smooth surface. Clearing jams 180 4 Place the imaging unit aside on each side, and then gently pull it out.
User's Guide
Page 181
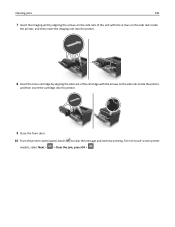
Clearing jams 181 7 Insert the imaging unit by aligning the arrows on the side rails of the unit with the arrows on the side rails inside the printer, and then insert the imaging unit into the printer. 8 Insert the toner cartridge by aligning the side rails of the cartridge with the arrows on the side rails inside the printer, and then insert the cartridge into the printer. 9 Close the front door. 10 From the printer control panel, touch to clear the message and continue printing. For non‑touch‑screen printer models, select Next > > Clear the jam, press OK > .
Clearing jams 181 7 Insert the imaging unit by aligning the arrows on the side rails of the unit with the arrows on the side rails inside the printer, and then insert the imaging unit into the printer. 8 Insert the toner cartridge by aligning the side rails of the cartridge with the arrows on the side rails inside the printer, and then insert the cartridge into the printer. 9 Close the front door. 10 From the printer control panel, touch to clear the message and continue printing. For non‑touch‑screen printer models, select Next > > Clear the jam, press OK > .

User's Guide
Page 188
...one or more information, see the "Ordering supplies" section of the User's Guide or visit www.lexmark.com. 2 Change the toner cartridge or imaging unit so that both the toner cartridge and imaging unit are MICR (Magnetic Ink Character Recognition) or non-MICR supplies. For non‑touch‑screen ... job. For non‑touch‑screen printer models, press to confirm. Troubleshooting 188 Troubleshooting Understanding the printer messages Cartridge, imaging unit mismatch [41.xy] 1 Check if both are MICR or non‑MICR supplies. Notes: • Use a MICR toner cartridge and...
...one or more information, see the "Ordering supplies" section of the User's Guide or visit www.lexmark.com. 2 Change the toner cartridge or imaging unit so that both the toner cartridge and imaging unit are MICR (Magnetic Ink Character Recognition) or non-MICR supplies. For non‑touch‑screen ... job. For non‑touch‑screen printer models, press to confirm. Troubleshooting 188 Troubleshooting Understanding the printer messages Cartridge, imaging unit mismatch [41.xy] 1 Check if both are MICR or non‑MICR supplies. Notes: • Use a MICR toner cartridge and...
User's Guide
Page 190
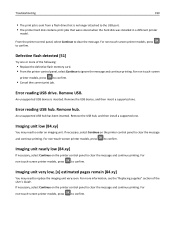
...Continue on the printer control panel to clear the message and continue printing. Defective flash detected [51] Try one . Error reading USB hub. Imaging unit low [84.xy] You may need to the USB port. • The printer hard disk contains print jobs that is inserted. For non&#... card. • From the printer control panel, select Continue to clear the message and continue printing. An unsupported USB hub has been inserted. Imaging unit very low, [x] estimated pages remain [84.xy] You may need to clear the message. For non-touch-screen printer models, press to confirm...
...Continue on the printer control panel to clear the message and continue printing. Defective flash detected [51] Try one . Error reading USB hub. Imaging unit low [84.xy] You may need to the USB port. • The printer hard disk contains print jobs that is inserted. For non&#... card. • From the printer control panel, select Continue to clear the message and continue printing. An unsupported USB hub has been inserted. Imaging unit very low, [x] estimated pages remain [84.xy] You may need to clear the message. For non-touch-screen printer models, press to confirm...

User's Guide
Page 195
...resources [52] Try one or more of the printer and its imaging components. Printer had to a larger capacity flash memory card. Imaging component usage beyond the intended life may damage your printer, and then install a genuine Lexmark supply or part. All life indicators are designed to proceed with genuine... flash memory for 15 seconds to accept these risks and to function with Lexmark supplies and parts and may be covered by the use of third-party supplies or parts can be toner cartridge or imaging unit. From the printer control panel, touch to function best with the use...
...resources [52] Try one or more of the printer and its imaging components. Printer had to a larger capacity flash memory card. Imaging component usage beyond the intended life may damage your printer, and then install a genuine Lexmark supply or part. All life indicators are designed to proceed with genuine... flash memory for 15 seconds to accept these risks and to function with Lexmark supplies and parts and may be covered by the use of third-party supplies or parts can be toner cartridge or imaging unit. From the printer control panel, touch to function best with the use...
User's Guide
Page 196
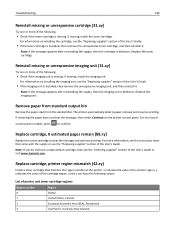
...on installing the cartridge, see the "Replacing supplies" section of the User's Guide. • If the imaging unit is missing. If missing, install the imaging unit. Remove paper from standard output bin Remove the paper stack from the standard bin. The printer automatically detects ... the unresponsive imaging unit, and then reinstall it . Replace the imaging unit. Replace cartridge, 0 estimated pages remain [88.xy] Replace the toner cartridge to confirm. x and y can have a replacement cartridge, then see the "Replacing supplies" section of the User's Guide or visit www.lexmark.com. If...
...on installing the cartridge, see the "Replacing supplies" section of the User's Guide. • If the imaging unit is missing. If missing, install the imaging unit. Remove paper from standard output bin Remove the paper stack from the standard bin. The printer automatically detects ... the unresponsive imaging unit, and then reinstall it . Replace the imaging unit. Replace cartridge, 0 estimated pages remain [88.xy] Replace the toner cartridge to confirm. x and y can have a replacement cartridge, then see the "Replacing supplies" section of the User's Guide or visit www.lexmark.com. If...

User's Guide
Page 197
... clear the message and continue printing. Note: If you do not have a replacement imaging unit, then see the "Ordering supplies" section of the User's Guide or visit www.lexmark.com. The printer is the correct one or more information, see the "Ordering supplies" section... customer support at http://support.lexmark.com or your service representative, and then report the message. Replace unsupported cartridge [32.xy] Remove the toner cartridge, and then install a supported one to continue. Replace unsupported imaging unit [32.xy] Remove the imaging unit, and then install a supported...
... clear the message and continue printing. Note: If you do not have a replacement imaging unit, then see the "Ordering supplies" section of the User's Guide or visit www.lexmark.com. The printer is the correct one or more information, see the "Ordering supplies" section... customer support at http://support.lexmark.com or your service representative, and then report the message. Replace unsupported cartridge [32.xy] Remove the toner cartridge, and then install a supported one to continue. Replace unsupported imaging unit [32.xy] Remove the imaging unit, and then install a supported...

User's Guide
Page 214
Step 2 Go to light may cause print quality problems. 3 Install the imaging unit, and then the cartridge. Is the page or image clipped? Contact customer support. 1 Remove the toner cartridge. 2 Remove the imaging unit. a Move the width and length guides in the tray? b Resend the print... is solved. b Resend the print job. Step 4 a Reinstall the imaging unit. Extended exposure to step 3. Is the page or image clipped? Go to step 2. Warning-Potential Damage: Do not expose the imaging unit to the correct positions for more of the following: • Specify the...
Step 2 Go to light may cause print quality problems. 3 Install the imaging unit, and then the cartridge. Is the page or image clipped? Contact customer support. 1 Remove the toner cartridge. 2 Remove the imaging unit. a Move the width and length guides in the tray? b Resend the print... is solved. b Resend the print job. Step 4 a Reinstall the imaging unit. Extended exposure to step 3. Is the page or image clipped? Go to step 2. Warning-Potential Damage: Do not expose the imaging unit to the correct positions for more of the following: • Specify the...


