User Guide
Page 2
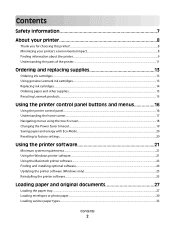
... Ordering and replacing supplies 13 Ordering ink cartridges...13 Using genuine Lexmark ink cartridges...13 Replacing ink cartridges...14 Ordering paper and other supplies...15 Recycling Lexmark products...15 Using the printer control panel buttons and menus 16 Using the printer control panel...16 Understanding the home screen...17 Navigating menus using the touch...
... Ordering and replacing supplies 13 Ordering ink cartridges...13 Using genuine Lexmark ink cartridges...13 Replacing ink cartridges...14 Ordering paper and other supplies...15 Recycling Lexmark products...15 Using the printer control panel buttons and menus 16 Using the printer control panel...16 Understanding the home screen...17 Navigating menus using the touch...

User Guide
Page 3
......59 Copying a two-sided document...59 Enlarging or reducing images...60 Adjusting copy quality...60 Making a copy lighter or darker...60 Collating copies using the printer control panel...61 Repeating an image on one page...61 Copying multiple pages on one sheet ...61 Making a duplex copy...62 Canceling copy jobs...63... drive or memory card...65 Scanning photos into an editing application...65 Scanning documents into an editing application 67 Scanning directly to e-mail using the printer software 68 Scanning to a PDF...68 Scanning FAQ...69 Contents 3
......59 Copying a two-sided document...59 Enlarging or reducing images...60 Adjusting copy quality...60 Making a copy lighter or darker...60 Collating copies using the printer control panel...61 Repeating an image on one page...61 Copying multiple pages on one sheet ...61 Making a duplex copy...62 Canceling copy jobs...63... drive or memory card...65 Scanning photos into an editing application...65 Scanning documents into an editing application 67 Scanning directly to e-mail using the printer software 68 Scanning to a PDF...68 Scanning FAQ...69 Contents 3
User Guide
Page 4
...90 Networking FAQ...91 Using SmartSolutions 103 What is SmartSolutions?...103 Creating or customizing printer solutions...104 Maintaining the printer 106 Maintaining ink cartridges...106 Cleaning the exterior of the printer...108 Cleaning the scanner glass...108 Cleaning the touch screen...109 Troubleshooting 110 ...Before you troubleshoot...110 Using the Service Center to solve printer problems 110 If Troubleshooting does not solve your problem 110 Setup troubleshooting...110 Jams and misfeeds troubleshooting...115 Print ...
...90 Networking FAQ...91 Using SmartSolutions 103 What is SmartSolutions?...103 Creating or customizing printer solutions...104 Maintaining the printer 106 Maintaining ink cartridges...106 Cleaning the exterior of the printer...108 Cleaning the scanner glass...108 Cleaning the touch screen...109 Troubleshooting 110 ...Before you troubleshoot...110 Using the Service Center to solve printer problems 110 If Troubleshooting does not solve your problem 110 Setup troubleshooting...110 Jams and misfeeds troubleshooting...115 Print ...

User Guide
Page 7
...and approved to abrasion or stress. SAVE THESE INSTRUCTIONS. Safety information Connect the power cord to a properly grounded electrical outlet that all cables from the printer before inspecting it. CAUTION-SHOCK HAZARD: To avoid the risk of electric shock when cleaning the exterior of specific manufacturer's components. Use only the power...documentation, to a professional service person. Inspect the power cord regularly for clearing a paper jam. This product is not responsible for the use of the printer, unplug the power cord from the electrical outlet before proceeding.
...and approved to abrasion or stress. SAVE THESE INSTRUCTIONS. Safety information Connect the power cord to a properly grounded electrical outlet that all cables from the printer before inspecting it. CAUTION-SHOCK HAZARD: To avoid the risk of electric shock when cleaning the exterior of specific manufacturer's components. Use only the power...documentation, to a professional service person. Inspect the power cord regularly for clearing a paper jam. This product is not responsible for the use of the printer, unplug the power cord from the electrical outlet before proceeding.
User Guide
Page 8
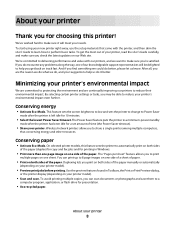
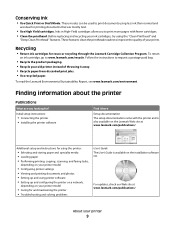
... are the reason we do what we could do it will be able to make sure you check the latest updates on your printer model). • Preview print jobs before printing. Conserving paper • Activate Eco-Mode. You can scan documents or photographs and save .... Minimizing your printer's environmental impact We are committed to a computer program, application, or flash drive for printing in Windows. • Print more than one side...
... are the reason we do what we could do it will be able to make sure you check the latest updates on your printer model). • Preview print jobs before printing. Conserving paper • Activate Eco-Mode. You can scan documents or photographs and save .... Minimizing your printer's environmental impact We are committed to a computer program, application, or flash drive for printing in Windows. • Print more than one side...
User Guide
Page 9
... documents using less ink than normal and are ideal for reuse or recycling through the Lexmark Cartridge Collection Program. To read the Lexmark Environmental Sustainability Report, see www.lexmark.com/environment. Additional setup and instructions for using the printer: • Selecting and storing paper and specialty media • Loading paper • Performing printing, copying...
... documents using less ink than normal and are ideal for reuse or recycling through the Lexmark Cartridge Collection Program. To read the Lexmark Environmental Sustainability Report, see www.lexmark.com/environment. Additional setup and instructions for using the printer: • Selecting and storing paper and specialty media • Loading paper • Performing printing, copying...
User Guide
Page 10
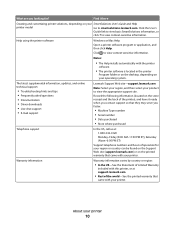
...; Serial number • Date purchased • Store where purchased Telephone support In the US, call us at support.lexmark.com. • Rest of the world-See the printed warranty that came with your printer. Click to view basic SmartSolutions information, or click ? Record the following information (located on the store receipt and...
...; Serial number • Date purchased • Store where purchased Telephone support In the US, call us at support.lexmark.com. • Rest of the world-See the printed warranty that came with your printer. Click to view basic SmartSolutions information, or click ? Record the following information (located on the store receipt and...
User Guide
Page 11
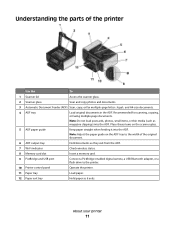
..., photos, small items, or thin media (such as it into the ADF. About your printer 11 Place these items on the ADF tray to the printer. 10 Printer control panel Operate the printer. 11 Paper tray Load paper. 12 Paper exit tray Hold paper as magazine clippings) into the... a memory card. 9 PictBridge and USB port Connect a PictBridge-enabled digital camera, a USB Bluetooth adapter, or a flash drive to the width of the printer Use the To 1 Scanner lid Access the scanner glass. 2 Scanner glass Scan and copy photos and documents. 3 Automatic Document Feeder (ADF) Scan, copy,...
..., photos, small items, or thin media (such as it into the ADF. About your printer 11 Place these items on the ADF tray to the printer. 10 Printer control panel Operate the printer. 11 Paper tray Load paper. 12 Paper exit tray Hold paper as magazine clippings) into the... a memory card. 9 PictBridge and USB port Connect a PictBridge-enabled digital camera, a USB Bluetooth adapter, or a flash drive to the width of the printer Use the To 1 Scanner lid Access the scanner glass. 2 Scanner glass Scan and copy photos and documents. 3 Automatic Document Feeder (ADF) Scan, copy,...
User Guide
Page 12
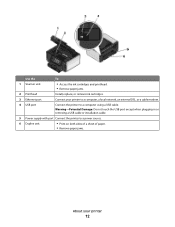
...Damage: Do not touch the USB port except when plugging in or removing a USB cable or installation cable. 5 Power supply with port Connect the printer to a computer using a USB cable. Use the To 1 Scanner unit • Access the ink cartridges and printhead. • Remove paper jams.... 2 Printhead Install, replace, or remove ink cartridges. 3 Ethernet port Connect your printer to a computer, a local network, an external DSL, or a cable modem. 4 USB port Connect the printer to a power source. 6 Duplex unit • Print on both sides of a sheet of paper. &#...
...Damage: Do not touch the USB port except when plugging in or removing a USB cable or installation cable. 5 Power supply with port Connect the printer to a computer using a USB cable. Use the To 1 Scanner unit • Access the ink cartridges and printhead. • Remove paper jams.... 2 Printhead Install, replace, or remove ink cartridges. 3 Ethernet port Connect your printer to a computer, a local network, an external DSL, or a cable modem. 4 USB port Connect the printer to a power source. 6 Duplex unit • Print on both sides of a sheet of paper. &#...
User Guide
Page 13
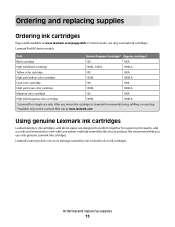
... cartridges Lexmark printers, ink cartridges, and photo paper are designed to perform together for superior print quality, and our inks are formulated to Lexmark for a single use only Lexmark ink cartridges. Lexmark Pro800 Series models Item Return Program Cartridge1 Regular cartridge2 Black cartridge 100 100A High yield black cartridge 100XL, 105XL 100XLA Yellow color cartridge 100...
... cartridges Lexmark printers, ink cartridges, and photo paper are designed to perform together for superior print quality, and our inks are formulated to Lexmark for a single use only Lexmark ink cartridges. Lexmark Pro800 Series models Item Return Program Cartridge1 Regular cartridge2 Black cartridge 100 100A High yield black cartridge 100XL, 105XL 100XLA Yellow color cartridge 100...
User Guide
Page 14
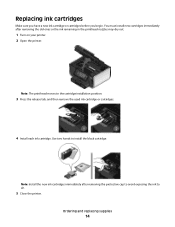
...: Install the new ink cartridges immediately after removing the old ones or the ink remaining in the printhead nozzles may dry out. 1 Turn on your printer. 2 Open the printer. Note: The printhead moves to air. 5 Close the printer. Use two hands to install the black cartridge.
...: Install the new ink cartridges immediately after removing the old ones or the ink remaining in the printhead nozzles may dry out. 1 Turn on your printer. 2 Open the printer. Note: The printhead moves to air. 5 Close the printer. Use two hands to install the black cartridge.
User Guide
Page 16
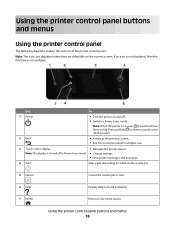
... • Switch to Power Saver mode. Press and hold for three seconds to turn off in Power Saver mode. • Change settings. • View printer messages and animation. 4 Start Start a job, depending on the current screen. If an icon is not displayed, then the function is not available. Note...: The display is turned off the printer. 2 Back • Return to the previous screen. • Exit from one menu level to a higher one. 3 Touch screen display • Navigate the...
... • Switch to Power Saver mode. Press and hold for three seconds to turn off in Power Saver mode. • Change settings. • View printer messages and animation. 4 Start Start a job, depending on the current screen. If an icon is not displayed, then the function is not available. Note...: The display is turned off the printer. 2 Back • Return to the previous screen. • Exit from one menu level to a higher one. 3 Touch screen display • Navigate the...
User Guide
Page 17
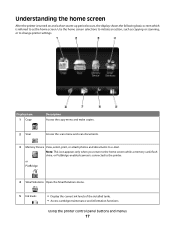
...8226; Display the current ink levels of the installed tanks. • Access cartridge maintenance and information functions. Understanding the home screen After the printer is turned on and a short warm-up period occurs, the display shows the following basic screen which is connected to the... make copies. 2 Scan Access the scan menu and scan documents. 3 Memory Device View, select, print, or attach photos and documents to change printer settings. Note: This icon appears only when you return to the home screen while a memory card, flash drive, or PictBridge-enabled camera is referred...
...8226; Display the current ink levels of the installed tanks. • Access cartridge maintenance and information functions. Understanding the home screen After the printer is turned on and a short warm-up period occurs, the display shows the following basic screen which is connected to the... make copies. 2 Scan Access the scan menu and scan documents. 3 Memory Device View, select, print, or attach photos and documents to change printer settings. Note: This icon appears only when you return to the home screen while a memory card, flash drive, or PictBridge-enabled camera is referred...
User Guide
Page 18
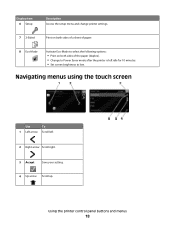
Navigating menus using the touch screen Use To 1 Left arrow Scroll left idle for 10 minutes. • Set screen brightness to Power Saver mode after the printer is left . 2 Right arrow Scroll right. 3 Accept Save your setting. 4 Up arrow Scroll up. Using the printer control panel buttons and menus 18 Display item 6 Setup Description Access the setup menu and change printer settings. 7 2-Sided Print on both sides of a sheet of paper. 8 Eco-Mode Activate Eco-Mode to select the following options: • Print on both sides of the paper (duplex). • Change to low.
Navigating menus using the touch screen Use To 1 Left arrow Scroll left idle for 10 minutes. • Set screen brightness to Power Saver mode after the printer is left . 2 Right arrow Scroll right. 3 Accept Save your setting. 4 Up arrow Scroll up. Using the printer control panel buttons and menus 18 Display item 6 Setup Description Access the setup menu and change printer settings. 7 2-Sided Print on both sides of a sheet of paper. 8 Eco-Mode Activate Eco-Mode to select the following options: • Print on both sides of the paper (duplex). • Change to low.
User Guide
Page 19
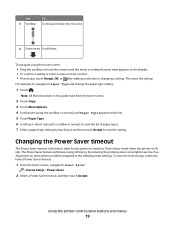
...5 Scrollbar To Scroll up or down (using the scrollbar or arrows) to view the list of paper types. 7 Select a paper type setting by reducing the printer power consumption (as much as 28 percent on the display. • To confirm a setting or select a menu or item, touch it. • If necessary...time it , and then touch Accept to save the most energy, select the lowest Power Saver timeout. 1 From the home screen, navigate to the default printer settings. For example, to navigate to Paper Type and change the paper type setting: 1 Touch . To navigate using the scrollbar or arrows) until Paper...
...5 Scrollbar To Scroll up or down (using the scrollbar or arrows) to view the list of paper types. 7 Select a paper type setting by reducing the printer power consumption (as much as 28 percent on the display. • To confirm a setting or select a menu or item, touch it. • If necessary...time it , and then touch Accept to save the most energy, select the lowest Power Saver timeout. 1 From the home screen, navigate to the default printer settings. For example, to navigate to Paper Type and change the paper type setting: 1 Touch . To navigate using the scrollbar or arrows) until Paper...

User Guide
Page 20
Resetting to factory settings Resetting to factory default settings will delete all the printer settings you have previously selected. 1 From the home screen, touch , and then touch Use Factory Defaults. 2 Touch Yes. 3 When prompted to activate, and then touch ... Note: If you want to set the initial settings of the paper (duplex) for copy and fax jobs, and for printing in Windows. Using the printer control panel buttons and menus 20 Saving paper and energy with Eco-Mode The Eco-Mode feature significantly cuts paper usage, reduces paper waste, optimizes...
Resetting to factory settings Resetting to factory default settings will delete all the printer settings you have previously selected. 1 From the home screen, touch , and then touch Use Factory Defaults. 2 Touch Yes. 3 When prompted to activate, and then touch ... Note: If you want to set the initial settings of the paper (duplex) for copy and fax jobs, and for printing in Windows. Using the printer control panel buttons and menus 20 Saving paper and energy with Eco-Mode The Eco-Mode feature significantly cuts paper usage, reduces paper waste, optimizes...
User Guide
Page 21
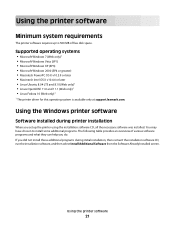
... When you set up to install some additional programs. The following table provides an overview of free disk space. Using the printer software 21 Supported operating systems • Microsoft Windows 7 (Web only)1 • Microsoft Windows Vista (SP1) • Microsoft Windows...OpenSUSE 11.0 and 11.1 (Web only)1 • Linux Fedora 10 (Web only)1 1 The printer driver for this operating system is available only at support.lexmark.com. Using the Windows printer software Software installed during initial installation, then reinsert the installation software CD, run the installation software, ...
... When you set up to install some additional programs. The following table provides an overview of free disk space. Using the printer software 21 Supported operating systems • Microsoft Windows 7 (Web only)1 • Microsoft Windows Vista (SP1) • Microsoft Windows...OpenSUSE 11.0 and 11.1 (Web only)1 • Linux Fedora 10 (Web only)1 1 The printer driver for this operating system is available only at support.lexmark.com. Using the Windows printer software Software installed during initial installation, then reinsert the installation software CD, run the installation software, ...
User Guide
Page 22
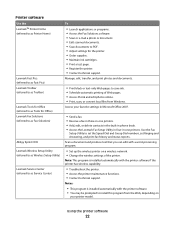
... prompted to save ink. • Schedule automatic printing of the printer. Printer software Use the LexmarkTM Printer Home (referred to as Printer Home) Lexmark Fast Pics (referred to as Fast Pics) Lexmark Toolbar (referred to as Toolbar) Lexmark Tools for Office (referred to as Tools for Office) Lexmark Fax Solutions (referred to as Fax Solutions) Abbyy Sprint OCR...
... prompted to save ink. • Schedule automatic printing of the printer. Printer software Use the LexmarkTM Printer Home (referred to as Printer Home) Lexmark Fast Pics (referred to as Fast Pics) Lexmark Toolbar (referred to as Toolbar) Lexmark Tools for Office (referred to as Tools for Office) Lexmark Fax Solutions (referred to as Fax Solutions) Abbyy Sprint OCR...

User Guide
Page 23
... in the Macintosh OS Use the To Print dialog Adjust the print settings and schedule print jobs. Using the Macintosh printer software Software installed during installation. Use the Lexmark All-In-One Center (referred to as All-In-One Center) To • Scan photos and documents. •...; Customize settings for the print job, such as the following: • Select the number of the printer that you select options for scan jobs. Lexmark AIO Setup Utility (referred to as AIO Setup Utility) • Customize settings for fax jobs. • Create and edit ...
... in the Macintosh OS Use the To Print dialog Adjust the print settings and schedule print jobs. Using the Macintosh printer software Software installed during installation. Use the Lexmark All-In-One Center (referred to as All-In-One Center) To • Scan photos and documents. •...; Customize settings for the print job, such as the following: • Select the number of the printer that you select options for scan jobs. Lexmark AIO Setup Utility (referred to as AIO Setup Utility) • Customize settings for fax jobs. • Create and edit ...
User Guide
Page 24
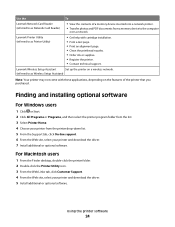
... users 1 Click or Start. 2 Click All Programs or Programs, and then select the printer program folder from the list. 3 Select Printer Home. 4 Choose your printer from a memory device to the computer over a network. Using the printer software 24 Lexmark Printer Utility (referred to as Printer Utility) • Get help with these applications, depending on a wireless network. (referred...
... users 1 Click or Start. 2 Click All Programs or Programs, and then select the printer program folder from the list. 3 Select Printer Home. 4 Choose your printer from a memory device to the computer over a network. Using the printer software 24 Lexmark Printer Utility (referred to as Printer Utility) • Get help with these applications, depending on a wireless network. (referred...


