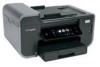

User Guide
Page 3
...documents...37 Printing specialty documents...41 Working with photos...43 Printing from a Bluetooth-enabled device...48 Printing on both sides of the paper (duplexing)...52 Managing print jobs...54 Copying 58 Tips for copying...58 Making copies...58 Copying photos...59 Copying an ID card...59 Copying a two...60 Collating copies using the printer control panel...61 Repeating an image on one page...61 Copying multiple pages on one sheet ...61 Making a duplex copy...62 Canceling copy jobs...63 Scanning 64 Tips for scanning...64 Scanning to a local or network computer...64 Scanning to a flash drive...
...documents...37 Printing specialty documents...41 Working with photos...43 Printing from a Bluetooth-enabled device...48 Printing on both sides of the paper (duplexing)...52 Managing print jobs...54 Copying 58 Tips for copying...58 Making copies...58 Copying photos...59 Copying an ID card...59 Copying a two...60 Collating copies using the printer control panel...61 Repeating an image on one page...61 Copying multiple pages on one sheet ...61 Making a duplex copy...62 Canceling copy jobs...63 Scanning 64 Tips for scanning...64 Scanning to a local or network computer...64 Scanning to a flash drive...
User Guide
Page 7
... service or repairs, other replacement parts. This product is not responsible for the use of specific manufacturer's components. CAUTION-POTENTIAL INJURY: The area behind the duplex cover has protruding ribs as part of fire or electrical shock results. Use only the power supply and power cord provided with the use of...
... service or repairs, other replacement parts. This product is not responsible for the use of specific manufacturer's components. CAUTION-POTENTIAL INJURY: The area behind the duplex cover has protruding ribs as part of fire or electrical shock results. Use only the power supply and power cord provided with the use of...
User Guide
Page 8
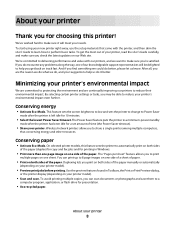
... representatives will meet your printer. This feature sets the screen brightness to low and sets the printer to change to reduce their environmental impact. Duplexing lets you print on both sides of the paper manually or automatically (depending on one side of the paper. After all, you find something...; Print on track fast. About your printer Thank you for choosing this feature sets the printer to automatically print on both sides of the paper (duplex) for copy and fax jobs and for printing in Windows. • Print more than one page image on your printer model). • Preview...
... representatives will meet your printer. This feature sets the screen brightness to low and sets the printer to change to reduce their environmental impact. Duplexing lets you print on both sides of the paper manually or automatically (depending on one side of the paper. After all, you find something...; Print on track fast. About your printer Thank you for choosing this feature sets the printer to automatically print on both sides of the paper (duplex) for copy and fax jobs and for printing in Windows. • Print more than one page image on your printer model). • Preview...
User Guide
Page 12
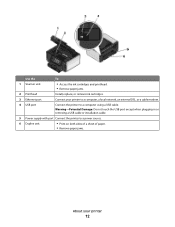
... touch the USB port except when plugging in or removing a USB cable or installation cable. 5 Power supply with port Connect the printer to a power source. 6 Duplex unit • Print on both sides of a sheet of paper. • Remove paper jams. About your printer to a computer, a local network, an external DSL, or...
... touch the USB port except when plugging in or removing a USB cable or installation cable. 5 Power supply with port Connect the printer to a power source. 6 Duplex unit • Print on both sides of a sheet of paper. • Remove paper jams. About your printer to a computer, a local network, an external DSL, or...
User Guide
Page 18
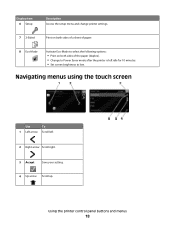
Using the printer control panel buttons and menus 18 Display item 6 Setup Description Access the setup menu and change printer settings. 7 2-Sided Print on both sides of a sheet of paper. 8 Eco-Mode Activate Eco-Mode to select the following options: • Print on both sides of the paper (duplex). • Change to Power Saver mode after the printer is left . 2 Right arrow Scroll right. 3 Accept Save your setting. 4 Up arrow Scroll up. Navigating menus using the touch screen Use To 1 Left arrow Scroll left idle for 10 minutes. • Set screen brightness to low.
Using the printer control panel buttons and menus 18 Display item 6 Setup Description Access the setup menu and change printer settings. 7 2-Sided Print on both sides of a sheet of paper. 8 Eco-Mode Activate Eco-Mode to select the following options: • Print on both sides of the paper (duplex). • Change to Power Saver mode after the printer is left . 2 Right arrow Scroll right. 3 Accept Save your setting. 4 Up arrow Scroll up. Navigating menus using the touch screen Use To 1 Left arrow Scroll left idle for 10 minutes. • Set screen brightness to low.

User Guide
Page 20
Resetting to factory settings Resetting to set the initial settings of the paper (duplex) for copy and fax jobs, and for printing in Windows. Saving paper and energy with Eco-Mode The Eco-Mode feature significantly cuts paper usage, ...
Resetting to factory settings Resetting to set the initial settings of the paper (duplex) for copy and fax jobs, and for printing in Windows. Saving paper and energy with Eco-Mode The Eco-Mode feature significantly cuts paper usage, ...
User Guide
Page 52
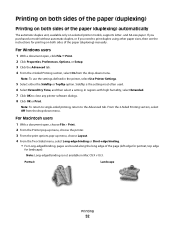
...From the 2-Sided Printing section, select On from the drop-down menu. Portrait Landscape Printing 52 Printing on both sides of the paper (duplexing) manually. Sideflip is not available in the printer, select Use Printer Settings. 5 Select either the Sideflip or Topflip option. Note: To..., return to close any printer software dialogs. 8 Click OK or Print. If you purchased a model without automatic duplex, or if you need to print duplex using other paper sizes, then see the instructions for landscape). Note: Long-edged binding is the setting most often used...
...From the 2-Sided Printing section, select On from the drop-down menu. Portrait Landscape Printing 52 Printing on both sides of the paper (duplexing) manually. Sideflip is not available in the printer, select Use Printer Settings. 5 Select either the Sideflip or Topflip option. Note: To..., return to close any printer software dialogs. 8 Click OK or Print. If you purchased a model without automatic duplex, or if you need to print duplex using other paper sizes, then see the instructions for landscape). Note: Long-edged binding is the setting most often used...

User Guide
Page 53
... 2-Sided Printing section, select Off from the drop-down menu. • For Short-edged binding, pages are bound along the short edge of the paper (duplexing) manually For Windows users 1 With a document open, click File Print. 2 Click Properties, Preferences, Options, or Setup. 3 Click the Advanced tab. 4 From the 2-Sided Printing...
... 2-Sided Printing section, select Off from the drop-down menu. • For Short-edged binding, pages are bound along the short edge of the paper (duplexing) manually For Windows users 1 With a document open, click File Print. 2 Click Properties, Preferences, Options, or Setup. 3 Click the Advanced tab. 4 From the 2-Sided Printing...

User Guide
Page 62
..., available only on the scanner glass. and A4-size paper. Copying 62 Note: You cannot make duplex copies using other paper sizes, then see the instructions for making a duplex copy manually. Making a duplex copy manually 1 Load paper. 2 Load an original document faceup into the ADF or facedown on the ... page of the document to the printer memory. 6 Follow the instructions on the display. If you purchased a model without automatic duplex, or if you need to make duplex copies on envelopes, card stock, or photo paper. 1 Load paper. 2 Load an original document faceup into the ADF or ...
..., available only on the scanner glass. and A4-size paper. Copying 62 Note: You cannot make duplex copies using other paper sizes, then see the instructions for making a duplex copy manually. Making a duplex copy manually 1 Load paper. 2 Load an original document faceup into the ADF or facedown on the ... page of the document to the printer memory. 6 Follow the instructions on the display. If you purchased a model without automatic duplex, or if you need to make duplex copies on envelopes, card stock, or photo paper. 1 Load paper. 2 Load an original document faceup into the ADF or ...
User Guide
Page 115
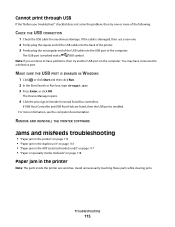
... controllers. REMOVE AND REINSTALL THE PRINTER SOFTWARE Jams and misfeeds troubleshooting • "Paper jam in the printer" on page 115 • "Paper jam in the duplex unit" on page 116 • "Paper jam in the ADF (selected models only)" on page 117 • "Paper or specialty media misfeeds" on the computer...
... controllers. REMOVE AND REINSTALL THE PRINTER SOFTWARE Jams and misfeeds troubleshooting • "Paper jam in the printer" on page 115 • "Paper jam in the duplex unit" on page 116 • "Paper jam in the ADF (selected models only)" on page 117 • "Paper or specialty media misfeeds" on the computer...
User Guide
Page 116
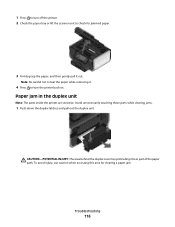
... not to tear the paper while removing it out. Avoid unnecessarily touching these parts while clearing jams. 1 Push down the duplex latches and pull out the duplex unit. Paper jam in the duplex unit Note: The parts inside the printer are sensitive. To avoid injury, use caution when accessing this area for jammed...
... not to tear the paper while removing it out. Avoid unnecessarily touching these parts while clearing jams. 1 Push down the duplex latches and pull out the duplex unit. Paper jam in the duplex unit Note: The parts inside the printer are sensitive. To avoid injury, use caution when accessing this area for jammed...
User Guide
Page 117
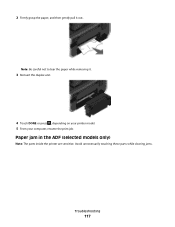
Paper jam in the ADF (selected models only) Note: The parts inside the printer are sensitive. Avoid unnecessarily touching these parts while clearing jams. Troubleshooting 117 2 Firmly grasp the paper, and then gently pull it . 3 Reinsert the duplex unit. 4 Touch DONE or press , depending on your printer model. 5 From your computer, resume the print job. Note: Be careful not to tear the paper while removing it out.
Paper jam in the ADF (selected models only) Note: The parts inside the printer are sensitive. Avoid unnecessarily touching these parts while clearing jams. Troubleshooting 117 2 Firmly grasp the paper, and then gently pull it . 3 Reinsert the duplex unit. 4 Touch DONE or press , depending on your printer model. 5 From your computer, resume the print job. Note: Be careful not to tear the paper while removing it out.
User Guide
Page 160
...scanning for editing 67 scanning to e-mail 74 scanning using the touch screen 64 duplex copying, automatic 62 copying, manual 62 extending drying time 52 printing, automatic 52 printing, manual 53 duplex unit location 12 E Eco-Mode using 20 editing photos using touch screen 45 emission...up printer on wireless network 77 informational solutions 103 infrastructure network 96 ink conserving 8 ink cartridges ordering 13 replacing 14 using genuine Lexmark 13 ink levels checking 106 inserting a memory card or flash drive 43 installation cable 95 installing network printer 102 installing optional ...
...scanning for editing 67 scanning to e-mail 74 scanning using the touch screen 64 duplex copying, automatic 62 copying, manual 62 extending drying time 52 printing, automatic 52 printing, manual 53 duplex unit location 12 E Eco-Mode using 20 editing photos using touch screen 45 emission...up printer on wireless network 77 informational solutions 103 infrastructure network 96 ink conserving 8 ink cartridges ordering 13 replacing 14 using genuine Lexmark 13 ink levels checking 106 inserting a memory card or flash drive 43 installation cable 95 installing network printer 102 installing optional ...

User Guide
Page 161
... configuring 80 IP address, assigning 102 iron-on transfers loading 34 J jams and misfeeds troubleshooting paper jam in the ADF 117 paper jam in the duplex unit 116 paper jam in the printer 115 paper or specialty media 118 K key index 102 L labels loading 34 printing 41 language changing 111 LiveBox... and other supplies ordering 15 paper default settings saving 35 paper exit tray location 11 paper jam in the ADF 117 paper jam in the duplex unit 116 paper jam in the printer 115 paper or specialty media misfeeds 118 paper tray loading envelopes or photo cards 30 location 11 partial...
... configuring 80 IP address, assigning 102 iron-on transfers loading 34 J jams and misfeeds troubleshooting paper jam in the ADF 117 paper jam in the duplex unit 116 paper jam in the printer 115 paper or specialty media 118 K key index 102 L labels loading 34 printing 41 language changing 111 LiveBox... and other supplies ordering 15 paper default settings saving 35 paper exit tray location 11 paper jam in the ADF 117 paper jam in the duplex unit 116 paper jam in the printer 115 paper or specialty media misfeeds 118 paper tray loading envelopes or photo cards 30 location 11 partial...
User Guide
Page 163
... 122 troubleshooting, e-mail cannot attach files 123 cannot send e-mail 122 troubleshooting, jams and misfeeds paper jam in the ADF 117 paper jam in the duplex unit 116 paper jam in the printer 115 paper or specialty media 118 troubleshooting, memory card cannot print from a flash drive 124 checklist 123 nothing...
... 122 troubleshooting, e-mail cannot attach files 123 cannot send e-mail 122 troubleshooting, jams and misfeeds paper jam in the ADF 117 paper jam in the duplex unit 116 paper jam in the printer 115 paper or specialty media 118 troubleshooting, memory card cannot print from a flash drive 124 checklist 123 nothing...


