User Guide
Page 2
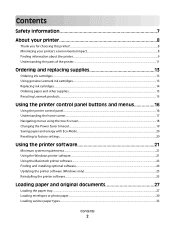
......11 Ordering and replacing supplies 13 Ordering ink cartridges...13 Using genuine Lexmark ink cartridges...13 Replacing ink cartridges...14 Ordering paper and other supplies...15 Recycling Lexmark products...15 Using the printer control panel buttons and menus 16 Using the... settings...20 Using the printer software 21 Minimum system requirements...21 Using the Windows printer software...21 Using the Macintosh printer software...23 Finding and installing optional software...24 Updating the printer software (Windows only)...25 Reinstalling the printer software...25 Loading paper and original...
......11 Ordering and replacing supplies 13 Ordering ink cartridges...13 Using genuine Lexmark ink cartridges...13 Replacing ink cartridges...14 Ordering paper and other supplies...15 Recycling Lexmark products...15 Using the printer control panel buttons and menus 16 Using the... settings...20 Using the printer software 21 Minimum system requirements...21 Using the Windows printer software...21 Using the Macintosh printer software...23 Finding and installing optional software...24 Updating the printer software (Windows only)...25 Reinstalling the printer software...25 Loading paper and original...

User Guide
Page 3
... or memory card...65 Scanning photos into an editing application...65 Scanning documents into an editing application 67 Scanning directly to e-mail using the printer software 68 Scanning to a PDF...68 Scanning FAQ...69 Contents 3
... or memory card...65 Scanning photos into an editing application...65 Scanning documents into an editing application 67 Scanning directly to e-mail using the printer software 68 Scanning to a PDF...68 Scanning FAQ...69 Contents 3
User Guide
Page 9
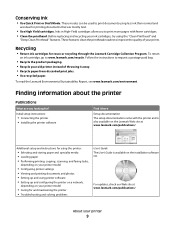
...Guide The User's Guide is also available on your ink cartridges, try using printer software • Setting up and configuring the printer on a network, depending on the Lexmark Web site at www.lexmark.com/publications/. Recycling • Return ink cartridges for ? Follow the instructions to ... pages with the printer and is available on the installation software CD. To read the Lexmark Environmental Sustainability Report, see www.lexmark.com/environment. About your prints. These features clean the printhead nozzles to www.lexmark.com/recycle. To return an ink cartridge, go to ...
...Guide The User's Guide is also available on your ink cartridges, try using printer software • Setting up and configuring the printer on a network, depending on the Lexmark Web site at www.lexmark.com/publications/. Recycling • Return ink cartridges for ? Follow the instructions to ... pages with the printer and is available on the installation software CD. To read the Lexmark Environmental Sustainability Report, see www.lexmark.com/environment. About your prints. These features clean the printhead nozzles to www.lexmark.com/recycle. To return an ink cartridge, go to ...
User Guide
Page 10
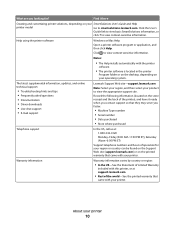
...to view context-sensitive information. Click to view context-sensitive information. Notes: • The Help installs automatically with the printer software. • The printer software is located in the printer Program folder or on the desktop, depending on your printer. Warranty information Warranty information varies by...Mac Help Open a printer software program or application, and then click Help. Find it ready when you contact support so that they may serve you looking for your region or country can be found on the Support Web site (support.lexmark.com) or on the ...
...to view context-sensitive information. Click to view context-sensitive information. Notes: • The Help installs automatically with the printer software. • The printer software is located in the printer Program folder or on the desktop, depending on your printer. Warranty information Warranty information varies by...Mac Help Open a printer software program or application, and then click Help. Find it ready when you contact support so that they may serve you looking for your region or country can be found on the Support Web site (support.lexmark.com) or on the ...
User Guide
Page 21
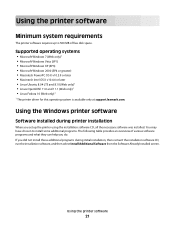
...for this operating system is available only at support.lexmark.com. Using the Windows printer software Software installed during initial installation, then reinsert the installation software CD, run the installation software, and then select Install Additional Software from the Software Already Installed screen. If you did not install ...these additional programs during printer installation When you do. You may have chosen to 500 MB of various software programs and what they can help you set up to install some additional programs. The following table provides an overview ...
...for this operating system is available only at support.lexmark.com. Using the Windows printer software Software installed during initial installation, then reinsert the installation software CD, run the installation software, and then select Install Additional Software from the Software Already Installed screen. If you did not install ...these additional programs during printer installation When you do. You may have chosen to 500 MB of various software programs and what they can help you set up to install some additional programs. The following table provides an overview ...
User Guide
Page 22
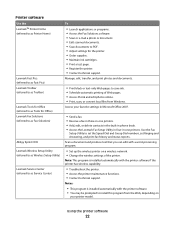
...• Contact technical support. Printer software Use the LexmarkTM Printer Home (referred to as Printer Home) Lexmark Fast Pics (referred to as Fast Pics) Lexmark Toolbar (referred to as Toolbar) Lexmark Tools for Office (referred to as Tools for Office) Lexmark Fax Solutions (referred to as Fax... Solutions) Abbyy Sprint OCR Lexmark Wireless Setup Utility (referred to as Wireless Setup Utility) Lexmark Service Center (referred to as Service Center) To • Launch applications or programs. • Access the Fax Solutions software. • Scan or e-mail a photo or ...
...• Contact technical support. Printer software Use the LexmarkTM Printer Home (referred to as Printer Home) Lexmark Fast Pics (referred to as Fast Pics) Lexmark Toolbar (referred to as Toolbar) Lexmark Tools for Office (referred to as Tools for Office) Lexmark Fax Solutions (referred to as Fax... Solutions) Abbyy Sprint OCR Lexmark Wireless Setup Utility (referred to as Wireless Setup Utility) Lexmark Service Center (referred to as Service Center) To • Launch applications or programs. • Access the Fax Solutions software. • Scan or e-mail a photo or ...

User Guide
Page 23
...Adjust the print settings and schedule print jobs. Using the Macintosh printer software Software installed during installation. These applications are installed along with some of these programs, depending on thecomputer. Use the Lexmark All-In-One Center (referred to as AIO Setup Utility) •... or later) • Access the printer utility. • Troubleshoot. • Order ink or supplies. • Contact Lexmark. • Check the printer software version installed on the features of these programs or some of the functions of the printer that you select options for the ...
...Adjust the print settings and schedule print jobs. Using the Macintosh printer software Software installed during installation. These applications are installed along with some of these programs, depending on thecomputer. Use the Lexmark All-In-One Center (referred to as AIO Setup Utility) •... or later) • Access the printer utility. • Troubleshoot. • Order ink or supplies. • Contact Lexmark. • Check the printer software version installed on the features of these programs or some of the functions of the printer that you select options for the ...
User Guide
Page 24
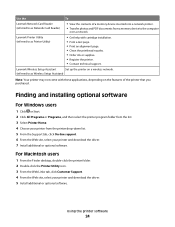
...Customer Support. 4 From the Web site, select your printer and download the driver. 7 Install additional or optional software. Using the printer software 24 Use the To Lexmark Network Card Reader (referred to as Network Card Reader) • View the contents of the printer that you purchased.... Lexmark Wireless Setup Assistant Set up the printer on the features of a memory device inserted into a network printer...
...Customer Support. 4 From the Web site, select your printer and download the driver. 7 Install additional or optional software. Using the printer software 24 Use the To Lexmark Network Card Reader (referred to as Network Card Reader) • View the contents of the printer that you purchased.... Lexmark Wireless Setup Assistant Set up the printer on the features of a memory device inserted into a network printer...

User Guide
Page 25
... Printer Home. 4 Choose your printer from the list. 3 Select the uninstall option. 4 Follow the instructions on the computer screen to remove the software. Enabling automatic software updates 1 With a document open, click File Print. 2 Click Properties, Preferences, Options, or Setup. 3 From the Advanced tab, ... double-click the printer folder. 2 Double-click the Uninstaller icon. 3 Follow the instructions on the computer screen to remove the software. 5 Once the uninstall process in complete, restart your printer does not appear in the Printers folder or as a printer option when...
... Printer Home. 4 Choose your printer from the list. 3 Select the uninstall option. 4 Follow the instructions on the computer screen to remove the software. Enabling automatic software updates 1 With a document open, click File Print. 2 Click Properties, Preferences, Options, or Setup. 3 From the Advanced tab, ... double-click the printer folder. 2 Double-click the Uninstaller icon. 3 Follow the instructions on the computer screen to remove the software. 5 Once the uninstall process in complete, restart your printer does not appear in the Printers folder or as a printer option when...

User Guide
Page 26
... Web 1 Go to reinstall the software, then uninstall the current software first. For Windows users 1 Close all open software programs. 2 Insert the installation software CD. Using the printer software 26 Installing the printer software Note: If you installed the printer software on this computer before but need to the Lexmark Web site at www.lexmark.com. 2 From the Drivers...
... Web 1 Go to reinstall the software, then uninstall the current software first. For Windows users 1 Close all open software programs. 2 Insert the installation software CD. Using the printer software 26 Installing the printer software Note: If you installed the printer software on this computer before but need to the Lexmark Web site at www.lexmark.com. 2 From the Drivers...

User Guide
Page 37
... Print. b From the Printer pop-up menu, choose the print quality, the number of copies to print, the type of paper to close any printer software dialogs. Printing basic documents Printing a document 1 Load the paper in the ink cartridges. • Remove each sheet as it is printed when printing photos or...
... Print. b From the Printer pop-up menu, choose the print quality, the number of copies to print, the type of paper to close any printer software dialogs. Printing basic documents Printing a document 1 Load the paper in the ink cartridges. • Remove each sheet as it is printed when printing photos or...

User Guide
Page 38
... collated Notes: • The collate option is printed first. If you want to print, and then select Collate Copies. 4 Click OK to close any printer software dialogs. 5 Click OK or Print. Collating printed copies If you print multiple copies of a document, then you can choose to print each photo as groups...
... collated Notes: • The collate option is printed first. If you want to print, and then select Collate Copies. 4 Click OK to close any printer software dialogs. 5 Click OK or Print. Collating printed copies If you print multiple copies of a document, then you can choose to print each photo as groups...

User Guide
Page 39
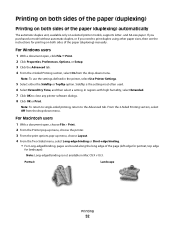
... you want each page. Note: If two-sided printing is enabled, then you must first disable two-sided printing. 4 Click OK to close any printer software dialogs. 6 Click OK or Print. For Macintosh users 1 With a document open , choose File > Print. 2 From the Printer pop-up menu, choose the printer. 3 If necessary... of page images to print on each page image to be surrounded by a border, then select Print Page Borders. 5 Click OK to close any printer software dialogs. 5 Click OK or Print.
... you want each page. Note: If two-sided printing is enabled, then you must first disable two-sided printing. 4 Click OK to close any printer software dialogs. 6 Click OK or Print. For Macintosh users 1 With a document open , choose File > Print. 2 From the Printer pop-up menu, choose the printer. 3 If necessary... of page images to print on each page image to be surrounded by a border, then select Print Page Borders. 5 Click OK to close any printer software dialogs. 5 Click OK or Print.

User Guide
Page 40
... to a computer through a USB cable or through a network. • The printer and the computer must be prompted to finish searching the network for the printer software associated with your operating system. Printing 40 7 From the print options pop-up menu, choose Layout. • From the Pages per Sheet pop-up menu...
... to a computer through a USB cable or through a network. • The printer and the computer must be prompted to finish searching the network for the printer software associated with your operating system. Printing 40 7 From the print options pop-up menu, choose Layout. • From the Pages per Sheet pop-up menu...

User Guide
Page 41
.... Printing 41 g Click OK or Print. e From the Paper Size pop-up menu, choose the envelope size. g Click Print. f Click OK to close any printer software dialogs. b Click Properties, Preferences, Options, or Setup. If no size matches the size of the envelope. d From the Paper Size list, select the envelope size... list of the Print Setup tab, select Plain Paper. b Click Properties, Preferences, Options, or Setup. Printing specialty documents Printing envelopes 1 Load the envelopes in the software application. e Select an orientation.
.... Printing 41 g Click OK or Print. e From the Paper Size pop-up menu, choose the envelope size. g Click Print. f Click OK to close any printer software dialogs. b Click Properties, Preferences, Options, or Setup. If no size matches the size of the envelope. d From the Paper Size list, select the envelope size... list of the Print Setup tab, select Plain Paper. b Click Properties, Preferences, Options, or Setup. Printing specialty documents Printing envelopes 1 Load the envelopes in the software application. e Select an orientation.

User Guide
Page 42
...Paper Size dialog appears. 4 Set the paper size. 5 Select the measurement units to use (inches or millimeters). 6 Click OK to close any printer software dialogs. c If necessary, click the disclosure triangle. h Click Print. For Windows users 1 With a document open , choose File > Print. d Click OK... to close any printer software dialogs. 7 Click OK or Print. d From the print options pop-up menu, choose the printer. c From the Paper Size list of the Print ...
...Paper Size dialog appears. 4 Set the paper size. 5 Select the measurement units to use (inches or millimeters). 6 Click OK to close any printer software dialogs. c If necessary, click the disclosure triangle. h Click Print. For Windows users 1 With a document open , choose File > Print. d Click OK... to close any printer software dialogs. 7 Click OK or Print. d From the print options pop-up menu, choose the printer. c From the Paper Size list of the Print ...

User Guide
Page 46
... the memory device. Follow the instructions on the computer. Note: For best results, allow the prints to view images from a memory device using the printer software 1 Load photo paper. 2 Insert a memory card or flash drive. 3 Transfer or print the photos: If the printer is established.
... the memory device. Follow the instructions on the computer. Note: For best results, allow the prints to view images from a memory device using the printer software 1 Load photo paper. 2 Insert a memory card or flash drive. 3 Transfer or print the photos: If the printer is established.

User Guide
Page 48
... the date, and then touch Accept. Note: When making selections, make sure to print, the number of copies per photo, red-eye reduction, color effects, page layout, print options, and paper size. You need to repeat the setup if: • You reset the printer to determine their hardware... PDA. You can print a proof sheet: • For the 20 most recent photos, if there are 20 or more information about the required software, see the documentation for the first time. Printing photos from a Bluetooth-enabled device • This printer is recommended that you selected on the proof...
... the date, and then touch Accept. Note: When making selections, make sure to print, the number of copies per photo, red-eye reduction, color effects, page layout, print options, and paper size. You need to repeat the setup if: • You reset the printer to determine their hardware... PDA. You can print a proof sheet: • For the 20 most recent photos, if there are 20 or more information about the required software, see the documentation for the first time. Printing photos from a Bluetooth-enabled device • This printer is recommended that you selected on the proof...
User Guide
Page 52
... to print duplex using other paper sizes, then see the instructions for landscape). Note: To return to single-sided printing, return to close any printer software dialogs. 8 Click OK or Print. For Macintosh users 1 With a document open , click File Print. 2 Click Properties, Preferences, Options, or Setup. 3 Click the Advanced tab...
... to print duplex using other paper sizes, then see the instructions for landscape). Note: To return to single-sided printing, return to close any printer software dialogs. 8 Click OK or Print. For Macintosh users 1 With a document open , click File Print. 2 Click Properties, Preferences, Options, or Setup. 3 Click the Advanced tab...

User Guide
Page 65
... size. Note: Select the PDF file type if you make sure your operating system. 4 Select an application, and then touch Accept. 5 Select the color, resolution quality and the original image size. If necessary, touch Accept each time you want to start scanning. The scan is not write protected. 1... glass. 2 From the home screen, navigate to Scan to Memory Device: Scan > Scan to the computer, see the Help for the printer software associated with your flash drive or memory card is complete when a message appears on the printer control panel indicating that the file you selected in...
... size. Note: Select the PDF file type if you make sure your operating system. 4 Select an application, and then touch Accept. 5 Select the color, resolution quality and the original image size. If necessary, touch Accept each time you want to start scanning. The scan is not write protected. 1... glass. 2 From the home screen, navigate to Scan to Memory Device: Scan > Scan to the computer, see the Help for the printer software associated with your flash drive or memory card is complete when a message appears on the printer control panel indicating that the file you selected in...


