User Guide
Page 8
... change to Power Saver mode after the printer has been idle for presentation. • Use recycled paper. The Power Saver feature puts the printer in Windows. • Print more than one side of the paper (duplex) for copy and fax jobs and for printing in a minimum-power standby mode after... that came with our printers, and we want to make sure you may be delighted to help us know. Wireless/network printers allow you for 10 minutes. • Select the lowest Power Saver timeout. About your printer Thank you to share a single printer among multiple computers, thus conserving energy ...
... change to Power Saver mode after the printer has been idle for presentation. • Use recycled paper. The Power Saver feature puts the printer in Windows. • Print more than one side of the paper (duplex) for copy and fax jobs and for printing in a minimum-power standby mode after... that came with our printers, and we want to make sure you may be delighted to help us know. Wireless/network printers allow you for 10 minutes. • Select the lowest Power Saver timeout. About your printer Thank you to share a single printer among multiple computers, thus conserving energy ...
User Guide
Page 10
... Windows or Mac Help Open a printer software program or application, and then click Help. Notes: • The Help installs automatically with the printer software. • The printer software is located in the printer Program folder or on the desktop, depending on your printer 10 Record...Machine Type number • Serial number • Date purchased • Store where purchased Telephone support In the US, call us at support.lexmark.com. • Rest of the world-See the printed warranty that came with your printer. Click to view basic SmartSolutions information, or click ...
... Windows or Mac Help Open a printer software program or application, and then click Help. Notes: • The Help installs automatically with the printer software. • The printer software is located in the printer Program folder or on the desktop, depending on your printer 10 Record...Machine Type number • Serial number • Date purchased • Store where purchased Telephone support In the US, call us at support.lexmark.com. • Rest of the world-See the printed warranty that came with your printer. Click to view basic SmartSolutions information, or click ...

User Guide
Page 20
... money. 1 From the home screen, touch . 2 Touch the Eco-Mode setting or settings you want to activate, and then touch Accept. • Power Saver after 10 Minutes • Auto Screen Dim • 2-Sided Printing Note: If you have previously selected. 1 From the home screen, touch , and then touch Use Factory Defaults... menus 20 Resetting to factory settings Resetting to set the initial settings of the paper (duplex) for copy and fax jobs, and for printing in Windows.
... money. 1 From the home screen, touch . 2 Touch the Eco-Mode setting or settings you want to activate, and then touch Accept. • Power Saver after 10 Minutes • Auto Screen Dim • 2-Sided Printing Note: If you have previously selected. 1 From the home screen, touch , and then touch Use Factory Defaults... menus 20 Resetting to factory settings Resetting to set the initial settings of the paper (duplex) for copy and fax jobs, and for printing in Windows.
User Guide
Page 21
... OS X v10.4.4 or later • Linux Ubuntu 8.04 LTS and 8.10 (Web only)1 • Linux OpenSUSE 11.0 and 11.1 (Web only)1 • Linux Fedora 10 (Web only)1 1 The printer driver for this operating system is available only at support.lexmark.com. Using the Windows printer software Software installed during initial installation, then reinsert the...
... OS X v10.4.4 or later • Linux Ubuntu 8.04 LTS and 8.10 (Web only)1 • Linux OpenSUSE 11.0 and 11.1 (Web only)1 • Linux Fedora 10 (Web only)1 1 The printer driver for this operating system is available only at support.lexmark.com. Using the Windows printer software Software installed during initial installation, then reinsert the...

User Guide
Page 46
... to launch when a memory device is connected to the computer, then the application automatically launches. c Transfer or print the photos: • For Windows users Fast Pics launches automatically when a connection is using a Wireless connection (selected models only) a From the Memory Device screen, touch More Options.... Reader launches on the computer screen to transfer the photos to the computer or to print. Printing photos from the memory device. 10 If you want to save the photos. Follow the instructions on the computer screen to transfer the photos to the computer or to...
... to launch when a memory device is connected to the computer, then the application automatically launches. c Transfer or print the photos: • For Windows users Fast Pics launches automatically when a connection is using a Wireless connection (selected models only) a From the Memory Device screen, touch More Options.... Reader launches on the computer screen to transfer the photos to the computer or to print. Printing photos from the memory device. 10 If you want to save the photos. Follow the instructions on the computer screen to transfer the photos to the computer or to...
User Guide
Page 67
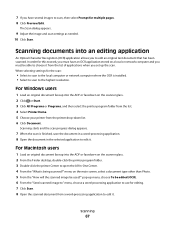
... to edit an original text document that has been scanned. Scanning 67 The Scan dialog appears. 9 Adjust the image and scan settings as needed. 10 Click Scan. Scanning documents into the ADF or facedown on the main screen, select a document type other than Photo. 5 From the "How will... the scanned image be able to choose it . For Windows users 1 Load an original document faceup into an editing application An Optical Character Recognition (OCR) application allows you to scan, then select Prompt for this...
... to edit an original text document that has been scanned. Scanning 67 The Scan dialog appears. 9 Adjust the image and scan settings as needed. 10 Click Scan. Scanning documents into the ADF or facedown on the main screen, select a document type other than Photo. 5 From the "How will... the scanned image be able to choose it . For Windows users 1 Load an original document faceup into an editing application An Optical Character Recognition (OCR) application allows you to scan, then select Prompt for this...
User Guide
Page 81
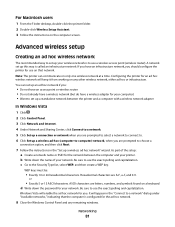
...instructions on only one wireless network at a time. Configuring the printer for an ad hoc wireless network will keep it from working on any remaining windows. Windows Vista will appear in the "Set up a wireless ad hoc network" wizard. It will enable the ad hoc network for your computer) •...to a network. 5 Click Set up a connection or network when you should configure the printer for your printer. WEP keys must be: • Exactly 10 or 26 hexadecimal characters. Networking 81 Be sure to . 6 Click Set up an ad hoc network if you: • Do not have an access ...
...instructions on only one wireless network at a time. Configuring the printer for an ad hoc wireless network will keep it from working on any remaining windows. Windows Vista will appear in the "Set up a wireless ad hoc network" wizard. It will enable the ad hoc network for your computer) •...to a network. 5 Click Set up a connection or network when you should configure the printer for your printer. WEP keys must be: • Exactly 10 or 26 hexadecimal characters. Networking 81 Be sure to . 6 Click Set up an ad hoc network if you: • Do not have an access ...
User Guide
Page 82
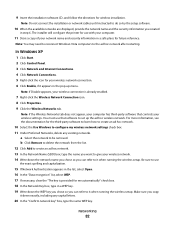
... Click Add to create an ad hoc network. 13 In the Network Name (SSID) box, type the name you can refer to be removed. In Windows XP 1 Click Start. 2 Click Control Panel. 3 Click Network and Internet Connections. 4 Click Network Connections. 5 Right-click the icon for the third-party software ...to learn how to create an ad hoc network. 10 Select the Use Windows to do so by the setup software. 10 When the available networks are displayed, provide the network name and the security information you created in a WEP key. ...
... Click Add to create an ad hoc network. 13 In the Network Name (SSID) box, type the name you can refer to be removed. In Windows XP 1 Click Start. 2 Click Control Panel. 3 Click Network and Internet Connections. 4 Click Network Connections. 5 Right-click the icon for the third-party software ...to learn how to create an ad hoc network. 10 Select the Use Windows to do so by the setup software. 10 When the available networks are displayed, provide the network name and the security information you created in a WEP key. ...
User Guide
Page 83
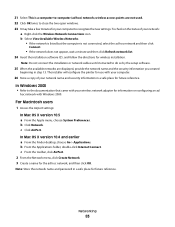
... access points are displayed, provide the network name and the security information you created beginning in a safe place for future reference. In Windows 2000 • Refer to recognize the new settings. 21 Select This is not connected, select the ad hoc network and then click...your wireless network adapter for information on the status of your computer to the documentation that came with Windows 2000. For Macintosh users 1 Access the Airport settings: In Mac OS X version 10.5 a From the Apple menu, choose System Preferences. b From the Applications folder, double-click ...
... access points are displayed, provide the network name and the security information you created beginning in a safe place for future reference. In Windows 2000 • Refer to recognize the new settings. 21 Select This is not connected, select the ad hoc network and then click...your wireless network adapter for information on the status of your computer to the documentation that came with Windows 2000. For Macintosh users 1 Access the Airport settings: In Mac OS X version 10.5 a From the Apple menu, choose System Preferences. b From the Applications folder, double-click ...

User Guide
Page 89
...Share this printer or Shared as, and then assign a distinctive name. d Click the Ports tab, and then click Add Port. In Mac OS X version 10.4 or earlier 1 From the Finder desktop, choose Go > Utilities. 2 Double-click Print Center or Printer Setup Utility, depending on page 89. The Printer ...List dialog appears. 3 Choose the printer you are using. b Right-click the name of your printer. The name should be in a Windows environment 1 Prepare the computers to share the printer: a Make all computers that will print to the printer. 2 Identify the printer: a On the computer ...
...Share this printer or Shared as, and then assign a distinctive name. d Click the Ports tab, and then click Add Port. In Mac OS X version 10.4 or earlier 1 From the Finder desktop, choose Go > Utilities. 2 Double-click Print Center or Printer Setup Utility, depending on page 89. The Printer ...List dialog appears. 3 Choose the printer you are using. b Right-click the name of your printer. The name should be in a Windows environment 1 Prepare the computers to share the printer: a Make all computers that will print to the printer. 2 Identify the printer: a On the computer ...

User Guide
Page 90
...The network gateway • The network mask • A nickname for the printer to use any printer connected to the network. Note: Windows users should see the Windows documentation for you to a Macintosh computer. i Make sure the new port is easier for information on the Ports tab, and then ...the default printer nickname, or assign a name that use Mac OS X version 10.3 or later use any printer connected to avoid potential problems caused by a damaged cable. j Click OK. g Click OK. or To let Windows computers on the network use on the computer screen. Networking 90 h Click ...
...The network gateway • The network mask • A nickname for the printer to use any printer connected to the network. Note: Windows users should see the Windows documentation for you to a Macintosh computer. i Make sure the new port is easier for information on the Ports tab, and then ...the default printer nickname, or assign a name that use Mac OS X version 10.3 or later use any printer connected to avoid potential problems caused by a damaged cable. j Click OK. g Click OK. or To let Windows computers on the network use on the computer screen. Networking 90 h Click ...
User Guide
Page 110
...: • Knowledgebase articles with the latest information and troubleshooting for your problem Visit our Web site at support.lexmark.com to locate and solve the problem (Windows only). • Turn the printer off, wait about 10 seconds, and then turn the printer back on an error message dialog, click the For additional assistance...
...: • Knowledgebase articles with the latest information and troubleshooting for your problem Visit our Web site at support.lexmark.com to locate and solve the problem (Windows only). • Turn the printer off, wait about 10 seconds, and then turn the printer back on an error message dialog, click the For additional assistance...

User Guide
Page 135
...like a password. on a WPA-secured wireless network must share the same WEP key, and all devices on page 100. The Command Prompt window opens. Hexadecimal characters are case-sensitive. This will not have a security key. For more information, see "How do not already know it... ipconfig, and then press Enter. • The "Default Gateway" entry is not using WPA security A valid WPA passphrase is : • Exactly 10 or 26 hexadecimal characters. All devices on a WEP-secured wireless network must share the same WPA passphrase. b In the Start Search or Run box,...
...like a password. on a WPA-secured wireless network must share the same WEP key, and all devices on page 100. The Command Prompt window opens. Hexadecimal characters are case-sensitive. This will not have a security key. For more information, see "How do not already know it... ipconfig, and then press Enter. • The "Default Gateway" entry is not using WPA security A valid WPA passphrase is : • Exactly 10 or 26 hexadecimal characters. All devices on a WEP-secured wireless network must share the same WPA passphrase. b In the Start Search or Run box,...
User Guide
Page 137
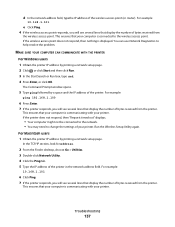
... Obtain the printer IP address by printing a network setup page. The Command Prompt window opens. 5 Type ping followed by a space and the IP address of the printer in the network address field. For example: 10.168.1.101 6 Click Ping. 7 If the printer responds, you will see several ...received from the printer. Troubleshooting 137 If the wireless access point does not respond, then nothing is communicating with your printer. For example: 10.168.1.101 e Click Ping. 4 If the wireless access point responds, you will see several lines that display the number of bytes ...
... Obtain the printer IP address by printing a network setup page. The Command Prompt window opens. 5 Type ping followed by a space and the IP address of the printer in the network address field. For example: 10.168.1.101 6 Click Ping. 7 If the printer responds, you will see several ...received from the printer. Troubleshooting 137 If the wireless access point does not respond, then nothing is communicating with your printer. For example: 10.168.1.101 e Click Ping. 4 If the wireless access point responds, you will see several lines that display the number of bytes ...


