
Wireless Setup Guide
Page 6
Press the door release button and lower the front door. Setting up the printer 6 Install the ADF tray. Remove the tape and packaging material. Remove the photoconductor kit and toner cartridge from the printer.
Press the door release button and lower the front door. Setting up the printer 6 Install the ADF tray. Remove the tape and packaging material. Remove the photoconductor kit and toner cartridge from the printer.

Wireless Setup Guide
Page 7
Press the button on the toner cartridge with the tracks. Firmly shake the cartridge side to side and front to back several times to distribute toner. Setting up and out using the handle. Close the front door. Push the toner cartridge until it clicks into the photoconductor kit by aligning the rollers on the base of the photoconductor kit. Insert the toner cartridge into place. Reinsert the photoconductor kit and toner cartridge into the printer. Pull the toner cartridge up the printer 7
Press the button on the toner cartridge with the tracks. Firmly shake the cartridge side to side and front to back several times to distribute toner. Setting up and out using the handle. Close the front door. Push the toner cartridge until it clicks into the photoconductor kit by aligning the rollers on the base of the photoconductor kit. Insert the toner cartridge into place. Reinsert the photoconductor kit and toner cartridge into the printer. Pull the toner cartridge up the printer 7

User's Guide
Page 2
... the printer software...25 Setting up wireless printing...27 Installing the printer on a wired network...32 Minimizing your printer's environmental impact 35 Saving paper and toner...35 Saving energy...36 Recycling...37 Reducing printer noise...38 Loading paper and specialty media 40 Setting the Paper Size and Paper Type...40 Configuring...
... the printer software...25 Setting up wireless printing...27 Installing the printer on a wired network...32 Minimizing your printer's environmental impact 35 Saving paper and toner...35 Saving energy...36 Recycling...37 Reducing printer noise...38 Loading paper and specialty media 40 Setting the Paper Size and Paper Type...40 Configuring...

User's Guide
Page 35
... impact on the environment. For more information on recycled papers that work well with the environment in laser printers. Saving paper and toner Studies show that may be able to reduce your printer's impact even further. Minimizing your printer, see : • "Printing ... sheet of paper, see : • The Notices chapter • The Environmental Sustainability section of paper. Minimizing your printer's environmental impact Lexmark is committed to environmental sustainability and is related to paper usage. To copy two or four consecutive pages of a multiple-page document onto...
... impact on the environment. For more information on recycled papers that work well with the environment in laser printers. Saving paper and toner Studies show that may be able to reduce your printer's impact even further. Minimizing your printer, see : • "Printing ... sheet of paper, see : • The Notices chapter • The Environmental Sustainability section of paper. Minimizing your printer's environmental impact Lexmark is committed to environmental sustainability and is related to paper usage. To copy two or four consecutive pages of a multiple-page document onto...

User's Guide
Page 38
..., and then select your country from the list. 3 Follow the instructions on the computer screen. When you return a cartridge to Lexmark, you select a Quiet Mode setting. You can reuse the box that came in your area. Minimizing your printer's environmental impact 38... not exist in fewer greenhouse emissions, energy savings, and natural resource savings. Recycling Lexmark products To return Lexmark products to Lexmark for recycling: 1 Visit our Web site at www.lexmark.com/recycle. 2 From the Toner Cartridges section, select your country from the list. 3 Follow the instructions on the...
..., and then select your country from the list. 3 Follow the instructions on the computer screen. When you return a cartridge to Lexmark, you select a Quiet Mode setting. You can reuse the box that came in your area. Minimizing your printer's environmental impact 38... not exist in fewer greenhouse emissions, energy savings, and natural resource savings. Recycling Lexmark products To return Lexmark products to Lexmark for recycling: 1 Visit our Web site at www.lexmark.com/recycle. 2 From the Toner Cartridges section, select your country from the list. 3 Follow the instructions on the...

User's Guide
Page 54
... lb bond) grain long paper. Extend the time several days if the storage or transportation environment is too smooth, it properly. Grain is too rough, toner cannot fuse to it can automatically feed paper weights up to 163 g/m2 (43 lb bond) grain long. Paper and specialty media guidelines 54 The...
... lb bond) grain long paper. Extend the time several days if the storage or transportation environment is too smooth, it properly. Grain is too rough, toner cannot fuse to it can automatically feed paper weights up to 163 g/m2 (43 lb bond) grain long. Paper and specialty media guidelines 54 The...

User's Guide
Page 55
... rough or heavily textured surfaces. latex inks might not. Inks that are not affected by hand. • Do not mix sizes, types, or weights in toner. When in jams. • Do not use new, undamaged paper. • Before loading paper, know the recommended print side. mixing results in doubt, contact the...
... rough or heavily textured surfaces. latex inks might not. Inks that are not affected by hand. • Do not mix sizes, types, or weights in toner. When in jams. • Do not use new, undamaged paper. • Before loading paper, know the recommended print side. mixing results in doubt, contact the...
User's Guide
Page 139
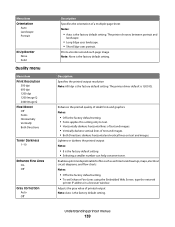
... Menu item Print Resolution 300 dpi 600 dpi 1200 dpi 1200 Image Q 2400 Image Q Pixel Boost Off Fonts Horizontally Vertically Both Directions Toner Darkness 1-10 Enhance Fine Lines On Off Gray Correction Auto Off Description Specifies the orientation of text and images. • Both Directions ...and images. Prints a border around each page image Note: None is the factory default setting. • Selecting a smaller number can help conserve toner. Enhances the printed quality of small fonts and graphics Notes: • Off is the factory default setting. • Fonts applies this setting only...
... Menu item Print Resolution 300 dpi 600 dpi 1200 dpi 1200 Image Q 2400 Image Q Pixel Boost Off Fonts Horizontally Vertically Both Directions Toner Darkness 1-10 Enhance Fine Lines On Off Gray Correction Auto Off Description Specifies the orientation of text and images. • Both Directions ...and images. Prints a border around each page image Note: None is the factory default setting. • Selecting a smaller number can help conserve toner. Enhances the printed quality of small fonts and graphics Notes: • Off is the factory default setting. • Fonts applies this setting only...

User's Guide
Page 140
... Menu item Format Flash No Yes Defragment Flash No Yes Hex Trace Activate Coverage Estimator Off On Description Adjusts or darkens printed output and conserves toner Notes: • 0 is the factory default setting. • A negative value will lighten them and conserve...
... Menu item Format Flash No Yes Defragment Flash No Yes Hex Trace Activate Coverage Estimator Off On Description Adjusts or darkens printed output and conserves toner Notes: • 0 is the factory default setting. • A negative value will lighten them and conserve...

User's Guide
Page 150
... produced by the manufacturer of life. At this procedure multiple times until the print remains faded, and then replace the cartridge. Recommended toner cartridges and part numbers Part Name Toner Cartridge High Yield Toner Cartridge Regular Cartridge X264A21G X264H21G Lexmark Return Program Cartridge X264A11G X264H11G Ordering a photoconductor kit The printer issues a message to redistribute...
... produced by the manufacturer of life. At this procedure multiple times until the print remains faded, and then replace the cartridge. Recommended toner cartridges and part numbers Part Name Toner Cartridge High Yield Toner Cartridge Regular Cartridge X264A21G X264H21G Lexmark Return Program Cartridge X264A11G X264H11G Ordering a photoconductor kit The printer issues a message to redistribute...

User's Guide
Page 151
... through the Automatic Document Feeder. Part name ADF input tray ADF separator pad ADF separator roll Part number 40X5470 40X5472 40X5471 Replacing supplies Replacing the toner cartridge When 88 Cartridge is left side of the printer and lowering the door. 1 2 Maintaining the printer 151 To replace the... toner cartridge: 1 Open the front door by pressing the button on the left in your cartridge by printing a menu settings page. When shaking the cartridge no ...
... through the Automatic Document Feeder. Part name ADF input tray ADF separator pad ADF separator roll Part number 40X5470 40X5472 40X5471 Replacing supplies Replacing the toner cartridge When 88 Cartridge is left side of the printer and lowering the door. 1 2 Maintaining the printer 151 To replace the... toner cartridge: 1 Open the front door by pressing the button on the left in your cartridge by printing a menu settings page. When shaking the cartridge no ...

User's Guide
Page 152
2 Press the button on the base of the photoconductor kit, and then pull the toner cartridge out using the handle. 1 2 3 Unpack the new toner cartridge. 4 Shake the cartridge in all directions to distribute the toner. Maintaining the printer 152
2 Press the button on the base of the photoconductor kit, and then pull the toner cartridge out using the handle. 1 2 3 Unpack the new toner cartridge. 4 Shake the cartridge in all directions to distribute the toner. Maintaining the printer 152

User's Guide
Page 153
Push the toner cartridge in as far as it will go. When 84 PC Kit life warning or 84 Replace PC Kit first appears, you before the photoconductor ... also see the status of -life, print quality significantly decreases. Maintaining the printer 153 Note: The photoconductor kit is one item only. 5 Install the new toner cartridge by aligning the rollers on the toner cartridge with the arrows on the display.
Push the toner cartridge in as far as it will go. When 84 PC Kit life warning or 84 Replace PC Kit first appears, you before the photoconductor ... also see the status of -life, print quality significantly decreases. Maintaining the printer 153 Note: The photoconductor kit is one item only. 5 Install the new toner cartridge by aligning the rollers on the toner cartridge with the arrows on the display.

User's Guide
Page 154
To replace the photoconductor kit: 1 Open the front door by pressing the button on the left side of the printer and lowering the front door. 2 Pull the photoconductor kit and toner cartridge out of the printer as a unit by pulling on the toner cartridge handle. 1 2 3 3 Place the unit on a flat, clean surface. 4 Press the button on the base of the photoconductor kit. Pull the toner cartridge up and out using the handle. 2 1 Maintaining the printer 154
To replace the photoconductor kit: 1 Open the front door by pressing the button on the left side of the printer and lowering the front door. 2 Pull the photoconductor kit and toner cartridge out of the printer as a unit by pulling on the toner cartridge handle. 1 2 3 3 Place the unit on a flat, clean surface. 4 Press the button on the base of the photoconductor kit. Pull the toner cartridge up and out using the handle. 2 1 Maintaining the printer 154

User's Guide
Page 155
... until it clicks into place. 7 Install the unit into the photoconductor kit by aligning the arrows on the toner cartridge with the arrows in the printer. Maintaining the printer 155 5 Unpack the new photoconductor kit. Push the unit as far as it exposed to ...touch the photoconductor drum. Extended light exposure can cause print quality problems. 6 Insert the toner cartridge into the printer by aligning the rollers on the guides of time.
... until it clicks into place. 7 Install the unit into the photoconductor kit by aligning the arrows on the toner cartridge with the arrows in the printer. Maintaining the printer 155 5 Unpack the new photoconductor kit. Push the unit as far as it exposed to ...touch the photoconductor drum. Extended light exposure can cause print quality problems. 6 Insert the toner cartridge into the printer by aligning the rollers on the guides of time.

User's Guide
Page 158
... either an Advanced Password or a User Password has been set , then only the Advanced Password is possible to see tray settings, the level of toner in the toner cartridge, the percentage of life remaining in the TCP/IP section. 2 Click Reports. Restricting access to printer menus You can view some reports from...
... either an Advanced Password or a User Password has been set , then only the Advanced Password is possible to see tray settings, the level of toner in the toner cartridge, the percentage of life remaining in the TCP/IP section. 2 Click Reports. Restricting access to printer menus You can view some reports from...

User's Guide
Page 161
... to access each jam" on page 162 for a list of the page that jammed. The following illustration and table indicate these locations. Inside are the toner cartridge and photoconductor kit. 2 Standard exit bin 3 Front door 4 Multipurpose or manual feeder door Note: Some printer models have a multipurpose feeder and some have a manual...
... to access each jam" on page 162 for a list of the page that jammed. The following illustration and table indicate these locations. Inside are the toner cartridge and photoconductor kit. 2 Standard exit bin 3 Front door 4 Multipurpose or manual feeder door Note: Some printer models have a multipurpose feeder and some have a manual...

User's Guide
Page 163
Clearing jams 163 2 Remove the jam if you see it here. 3 If you do not see the jam, open the front door, and then remove the photoconductor kit and toner cartridge. 1 2 3 4 Lift the flap at the front of the printer, and then remove any jammed sheets. 5 Insert the photoconductor kit and toner cartridge.
Clearing jams 163 2 Remove the jam if you see it here. 3 If you do not see the jam, open the front door, and then remove the photoconductor kit and toner cartridge. 1 2 3 4 Lift the flap at the front of the printer, and then remove any jammed sheets. 5 Insert the photoconductor kit and toner cartridge.

User's Guide
Page 164
6 Close the front door. 7 Press . 202 paper jam CAUTION-HOT SURFACE: The fuser and the inside of the printer, and then remove any jammed sheets. Clearing jams 164 To reduce the risk of injury from a hot component, allow the surface to cool before removing paper from this area. 1 Open the front door, and then remove the photoconductor kit and toner cartridge. 1 2 3 2 Lift the flap in front of the printer near the fuser may be hot.
6 Close the front door. 7 Press . 202 paper jam CAUTION-HOT SURFACE: The fuser and the inside of the printer, and then remove any jammed sheets. Clearing jams 164 To reduce the risk of injury from a hot component, allow the surface to cool before removing paper from this area. 1 Open the front door, and then remove the photoconductor kit and toner cartridge. 1 2 3 2 Lift the flap in front of the printer near the fuser may be hot.

User's Guide
Page 165
3 If you do not see any jammed sheets, open the rear door. 4 Remove the jam. 5 Close the rear door. 6 Insert the photoconductor kit and toner cartridge. 7 Close the front door. 8 Press . Clearing jams 165
3 If you do not see any jammed sheets, open the rear door. 4 Remove the jam. 5 Close the rear door. 6 Insert the photoconductor kit and toner cartridge. 7 Close the front door. 8 Press . Clearing jams 165

