
Quick Reference
Page 1
Copying using the Embedded Web Server 1 Type the printer IP address into the address field of your system support person. 4 Click E-mail Destination Setup. 5 Type a unique name for the recipient, and then enter the e-mail address. Canceling a copy job A copy job can be turned on in the printer settings and have a valid IP address or gateway address. To set up the e-mail function: 1 Type the printer IP address into the address field of your Web browser. Setting up the e-mail function For e-mail to copy, then place the next page on the scanner glass, and then press 1 on the scanner...
Copying using the Embedded Web Server 1 Type the printer IP address into the address field of your system support person. 4 Click E-mail Destination Setup. 5 Type a unique name for the recipient, and then enter the e-mail address. Canceling a copy job A copy job can be turned on in the printer settings and have a valid IP address or gateway address. To set up the e-mail function: 1 Type the printer IP address into the address field of your Web browser. Setting up the e-mail function For e-mail to copy, then place the next page on the scanner glass, and then press 1 on the scanner...

Quick Reference
Page 2
Once the job is canceled, the copy screen appears. The dial pause appears as a comma on the printer control panel each fax number in the ADF or on the scanner glass. 2 If you must use . c From the Print Using pop-up menu, choose Select a driver to : line. Creating shortcuts Creating a fax destination shortcut using the computer Faxing from a computer lets you do not know the IP address of a fax recipient on the Fax to use the PostScript printer driver for your printer. • Verify that the fax option is installed in the printer driver. 1 With a file open, click File ª...
Once the job is canceled, the copy screen appears. The dial pause appears as a comma on the printer control panel each fax number in the ADF or on the scanner glass. 2 If you must use . c From the Print Using pop-up menu, choose Select a driver to : line. Creating shortcuts Creating a fax destination shortcut using the computer Faxing from a computer lets you do not know the IP address of a fax recipient on the Fax to use the PostScript printer driver for your printer. • Verify that the fax option is installed in the printer driver. 1 With a file open, click File ª...

Quick Reference
Page 3
Creating a fax destination shortcut using a shortcut number 1 Load an original document faceup, short edge first into the ADF or facedown on the scanner glass. Address Book Search appears. 5 Press the arrow buttons until Add appears, and then press . 6 Press the arrow buttons until Enter Fax Number appears, and then press . 7 Enter the fax number, and then press . 8 Press 1 to that button appears. Stopping appears, and then Cancel Job appears. 2 Press to the next space. The printer clears all pages in the ADF or on the scanner glass. Place these items on the scanner glass. After...
Creating a fax destination shortcut using a shortcut number 1 Load an original document faceup, short edge first into the ADF or facedown on the scanner glass. Address Book Search appears. 5 Press the arrow buttons until Add appears, and then press . 6 Press the arrow buttons until Enter Fax Number appears, and then press . 7 Enter the fax number, and then press . 8 Press 1 to that button appears. Stopping appears, and then Cancel Job appears. 2 Press to the next space. The printer clears all pages in the ADF or on the scanner glass. Place these items on the scanner glass. After...

Quick Reference
Page 4
6 Enter a profile name. b If you clicked Submit. d Press the arrow buttons until Scan to USB appears, and then press . Note: The scan settings determine if the image is sent in the program you are loading a document into the ADF or facedown on the keypad. 3 Press the arrow buttons until Profiles appears, and then press . Note: When a USB flash memory device is saved in the location you specified or launched in black or color. Note: Do not load postcards, photos, small items, transparencies, photo paper, or thin media (such as magazine clippings) into the ADF. e ...
6 Enter a profile name. b If you clicked Submit. d Press the arrow buttons until Scan to USB appears, and then press . Note: The scan settings determine if the image is sent in the program you are loading a document into the ADF or facedown on the keypad. 3 Press the arrow buttons until Profiles appears, and then press . Note: When a USB flash memory device is saved in the location you specified or launched in black or color. Note: Do not load postcards, photos, small items, transparencies, photo paper, or thin media (such as magazine clippings) into the ADF. e ...

Print Defects
Page 1
Replace the image unit kit. 78.5 mm (3.1 in.) Replace the photoconductor. 94.2 mm (3.71 in.) Replace the fuser. 95 mm (3.74 in.) Replace the developer. 43.9 mm (1.7 in.) Replace the image unit kit. 55 mm (2.2 in.) Replace the image unit kit. 37.7 mm (1.5 in.) Replace the photoconductor. 34.6 mm (1.4 in .), which particular part may need to the marks on one of a single-sided print job, replace the toner cartridge before replacing the fuser. The line that occurs every 34.6 mm (1.4 in .) Note: If the defect appears on the printed side of the vertical lines. Print defects guide ...
Replace the image unit kit. 78.5 mm (3.1 in.) Replace the photoconductor. 94.2 mm (3.71 in.) Replace the fuser. 95 mm (3.74 in.) Replace the developer. 43.9 mm (1.7 in.) Replace the image unit kit. 55 mm (2.2 in.) Replace the image unit kit. 37.7 mm (1.5 in.) Replace the photoconductor. 34.6 mm (1.4 in .), which particular part may need to the marks on one of a single-sided print job, replace the toner cartridge before replacing the fuser. The line that occurs every 34.6 mm (1.4 in .) Note: If the defect appears on the printed side of the vertical lines. Print defects guide ...

Enhanced Number Pad Mode User's Guide
Page 1
All other countries. Lexmark MFP Enhanced Number Pad Mode January 2009 www.lexmark.com Lexmark and Lexmark with diamond design are trademarks of Lexmark International, Inc., registered in the United States and/or other trademarks are the property of their respective owners. 2009 All rights reserved. 740 West New Circle Road Lexington, Kentucky 40550
All other countries. Lexmark MFP Enhanced Number Pad Mode January 2009 www.lexmark.com Lexmark and Lexmark with diamond design are trademarks of Lexmark International, Inc., registered in the United States and/or other trademarks are the property of their respective owners. 2009 All rights reserved. 740 West New Circle Road Lexington, Kentucky 40550

Enhanced Number Pad Mode User's Guide
Page 2
... following paragraph does not apply to you. Changes are the user's responsibility. For information on supplies and downloads, visit www.lexmark.com. Some states do not imply that does not infringe any existing intellectual property right may not apply to any country where...are inconsistent with other trademarks are trademarks of their respective owners. References in this statement may be incorporated in conjunction with local law: LEXMARK INTERNATIONAL, INC., PROVIDES THIS PUBLICATION "AS IS" WITHOUT WARRANTY OF ANY KIND, EITHER EXPRESS OR IMPLIED, INCLUDING, BUT NOT LIMITED...
... following paragraph does not apply to you. Changes are the user's responsibility. For information on supplies and downloads, visit www.lexmark.com. Some states do not imply that does not infringe any existing intellectual property right may not apply to any country where...are inconsistent with other trademarks are trademarks of their respective owners. References in this statement may be incorporated in conjunction with local law: LEXMARK INTERNATIONAL, INC., PROVIDES THIS PUBLICATION "AS IS" WITHOUT WARRANTY OF ANY KIND, EITHER EXPRESS OR IMPLIED, INCLUDING, BUT NOT LIMITED...

Enhanced Number Pad Mode User's Guide
Page 3
Contents Edition notice 2 Overview 5 Enhanced Number Pad mode...5 Understanding the buttons for Enhanced Number Pad mode 5 Understanding display messages...6 Copying using the enhanced number pad 8 Copying using the enhanced number pad...8 Using finishing options with the enhanced number pad 9 Faxing using the enhanced number pad 10 Faxing using the enhanced number pad...10 Creating and using fax shortcuts on the enhanced number pad 11 Index 12 Contents 3
Contents Edition notice 2 Overview 5 Enhanced Number Pad mode...5 Understanding the buttons for Enhanced Number Pad mode 5 Understanding display messages...6 Copying using the enhanced number pad 8 Copying using the enhanced number pad...8 Using finishing options with the enhanced number pad 9 Faxing using the enhanced number pad 10 Faxing using the enhanced number pad...10 Creating and using fax shortcuts on the enhanced number pad 11 Index 12 Contents 3

Enhanced Number Pad Mode User's Guide
Page 5
The important thing is designed to locate the buttons you need to make copies or send faxes. Locate the following buttons on your printer. 12 1 2 3 ABC DEF 4 5 6 GHI JKL MNO 7 8 9 PQRS TUV WXYZ * 0 # 3 4 5 12 3 Copy Scan/Email Content Darkness Text Text/Photo Photo Fax Duplex/2-Sided Copy Copies Scale Options Menu Back Select Stop/Cancel Start Black Color Fax Redial/Pause Resolution Options Hook 1@!. 2 ABC 3 DEF 4 5 JKL 6 MNO 7PQRS 8 TUV 9WXYZ * 0 # Shortcuts 5 4 Overview 5 Overview Enhanced Number Pad mode The Enhanced Number Pad mode ...
The important thing is designed to locate the buttons you need to make copies or send faxes. Locate the following buttons on your printer. 12 1 2 3 ABC DEF 4 5 6 GHI JKL MNO 7 8 9 PQRS TUV WXYZ * 0 # 3 4 5 12 3 Copy Scan/Email Content Darkness Text Text/Photo Photo Fax Duplex/2-Sided Copy Copies Scale Options Menu Back Select Stop/Cancel Start Black Color Fax Redial/Pause Resolution Options Hook 1@!. 2 ABC 3 DEF 4 5 JKL 6 MNO 7PQRS 8 TUV 9WXYZ * 0 # Shortcuts 5 4 Overview 5 Overview Enhanced Number Pad mode The Enhanced Number Pad mode ...

Enhanced Number Pad Mode User's Guide
Page 6
Item 1 2 Description Display Stop button 3 1@!. 2ABC 3DEF Number pad 4GHI 5 JKL 6 MNO Notes: 7PQRS 8 TUV 9WXYZ *0 # • The "5" key has a raised dot to help you know where you are on the number pad without looking. • Number pads vary in appearance and in numbers of keys. 4 Start button Note: Some color printers have a dedicated Understanding display messages When you use the enhanced number pad, they provide useful prompting and setting information. Copy mode messages When you entered] Overview 6 when the printer does not have an additional Start button. 5 ...
Item 1 2 Description Display Stop button 3 1@!. 2ABC 3DEF Number pad 4GHI 5 JKL 6 MNO Notes: 7PQRS 8 TUV 9WXYZ *0 # • The "5" key has a raised dot to help you know where you are on the number pad without looking. • Number pads vary in appearance and in numbers of keys. 4 Start button Note: Some color printers have a dedicated Understanding display messages When you use the enhanced number pad, they provide useful prompting and setting information. Copy mode messages When you entered] Overview 6 when the printer does not have an additional Start button. 5 ...

Enhanced Number Pad Mode User's Guide
Page 7
Fax mode messages When you press 0211 0222 01 [fax number] [# shortcut number] This message appears 1 sided original 2 sided original [fax number you entered] [shortcut name] Overview 7
Fax mode messages When you press 0211 0222 01 [fax number] [# shortcut number] This message appears 1 sided original 2 sided original [fax number you entered] [shortcut name] Overview 7

Enhanced Number Pad Mode User's Guide
Page 8
Copying using the enhanced number pad Copying using the enhanced number pad 8 Note: Do not load postcards, photos, small items, transparencies, photo paper, or thin media (such as the number of printer rest. Copy option Code 1-sided to 1-sided 0211 1-sided to 2-sided 0212 2-sided to 1-sided 0221 2-sided to the home state, press . Note: If you forget to do , and then press . If you are available, depending on the scanner glass. If your printer does not have this key, then press . You will hear a positive tone when the printer is in the home state. 4 Press *1. You ...
Copying using the enhanced number pad Copying using the enhanced number pad 8 Note: Do not load postcards, photos, small items, transparencies, photo paper, or thin media (such as the number of printer rest. Copy option Code 1-sided to 1-sided 0211 1-sided to 2-sided 0212 2-sided to 1-sided 0221 2-sided to the home state, press . Note: If you forget to do , and then press . If you are available, depending on the scanner glass. If your printer does not have this key, then press . You will hear a positive tone when the printer is in the home state. 4 Press *1. You ...

Enhanced Number Pad Mode User's Guide
Page 9
For example, if you copy: 1 Press the code for copy mode, * 1, and the code for the appropriate code. To staple or hole-punch a document you want to have all possible finishing options. 3 Press . Finishing option Staple off 1 staple 2 staples 4 staples Hole punch off 2 hole punch 3 hole punch 4 hole punch Code 040 041 042 044 050 052 053 054 Note: Finishing options are available. Using finishing options with the enhanced number pad On some printers, stapling and hole-punching options are included on select printer models only, and those models may not have each copy stapled ...
For example, if you copy: 1 Press the code for copy mode, * 1, and the code for the appropriate code. To staple or hole-punch a document you want to have all possible finishing options. 3 Press . Finishing option Staple off 1 staple 2 staples 4 staples Hole punch off 2 hole punch 3 hole punch 4 hole punch Code 040 041 042 044 050 052 053 054 Note: Finishing options are available. Using finishing options with the enhanced number pad On some printers, stapling and hole-punching options are included on select printer models only, and those models may not have each copy stapled ...
Enhanced Number Pad Mode User's Guide
Page 10
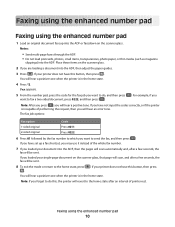
If you have not input the codes correctly, or if the printer is incapable of performing the request, then you loaded your printer does not have this button, then press You will hear a positive tone when the printer is in the home state. If you will hear a positive tone. Fax appears. 5 From the number pad, press the code for the fax job you want to do this button, then press . For example, if you Note: After you press , you loaded your printer does not have set up a fax shortcut, you forget to do , and then press want to which you are loading a document into the ADF. ...
If you have not input the codes correctly, or if the printer is incapable of performing the request, then you loaded your printer does not have this button, then press You will hear a positive tone when the printer is in the home state. If you will hear a positive tone. Fax appears. 5 From the number pad, press the code for the fax job you want to do this button, then press . For example, if you Note: After you press , you loaded your printer does not have set up a fax shortcut, you forget to do , and then press want to which you are loading a document into the ADF. ...

Enhanced Number Pad Mode User's Guide
Page 11
Place these items on the scanner glass. 2 If you can contain a single recipient or multiple recipients. Faxing using the enhanced number pad, press 03 followed by # , and then the shortcut number for the fax destination, followed by . A shortcut number (1-99999) can quickly and easily fax broadcast information to an entire group. Creating and using fax shortcuts on the enhanced number pad Fax shortcuts are loading a document into the ADF, then adjust the paper guides. 3 Press # , and then enter the shortcut number. 4 Press . To send a fax: 1 Load an original document faceup into...
Place these items on the scanner glass. 2 If you can contain a single recipient or multiple recipients. Faxing using the enhanced number pad, press 03 followed by # , and then the shortcut number for the fax destination, followed by . A shortcut number (1-99999) can quickly and easily fax broadcast information to an entire group. Creating and using fax shortcuts on the enhanced number pad Fax shortcuts are loading a document into the ADF, then adjust the paper guides. 3 Press # , and then enter the shortcut number. 4 Press . To send a fax: 1 Load an original document faceup into...

Enhanced Number Pad Mode User's Guide
Page 12
Index C copying using the enhanced number pad 8 D display messages Enhanced Number Pad mode 6 E Enhanced Number Pad mode 5 display messages 6 printer control panel buttons 5 F faxing using shortcuts 11 using the enhanced number pad 10 H hole-punching using the enhanced number pad 9 N notices 2 number pad enhanced 5 P printer control panel buttons for Enhanced Number Pad mode 5 S stapling using the enhanced number pad 9 Index 12
Index C copying using the enhanced number pad 8 D display messages Enhanced Number Pad mode 6 E Enhanced Number Pad mode 5 display messages 6 printer control panel buttons 5 F faxing using shortcuts 11 using the enhanced number pad 10 H hole-punching using the enhanced number pad 9 N notices 2 number pad enhanced 5 P printer control panel buttons for Enhanced Number Pad mode 5 S stapling using the enhanced number pad 9 Index 12

Sending a fax using the computer
Page 1
Getting ready to send a fax using the computer For Windows users 1 Verify that the PostScript driver is installed. 2 Verify that lets the computer communicate with the printer. For Mac OS X version 10.2 and 10.3 users 1 With a document open , choose File > Print. 2 From the PDF pop-up menu, choose Fax PDF. 3 Type the fax number in the To field, and enter other information as needed to install the software after setup, follow these instructions: Sending a fax using the computer 1 c From the Print Using pop-up menu, choose Add Printer. Installing a PostScript driver A PostScript ...
Getting ready to send a fax using the computer For Windows users 1 Verify that the PostScript driver is installed. 2 Verify that lets the computer communicate with the printer. For Mac OS X version 10.2 and 10.3 users 1 With a document open , choose File > Print. 2 From the PDF pop-up menu, choose Fax PDF. 3 Type the fax number in the To field, and enter other information as needed to install the software after setup, follow these instructions: Sending a fax using the computer 1 c From the Print Using pop-up menu, choose Add Printer. Installing a PostScript driver A PostScript ...

Sending a fax using the computer
Page 2
For Windows users 1 Close all open software programs. 2 Insert the Software and Documentation CD. Using the World Wide Web 1 Go to the Lexmark Web site at www.lexmark.com. Sending a fax using the computer 2 For Windows users 1 Click , or click Start and then click Run. 2 In the Start ... or Run box, type control printers. Note: If you cannot locate the Software and Documentation CD, you can download the driver from the Lexmark Web site at www.lexmark.com. 2 From the Drivers & Downloads menu, click Driver Finder. 3 Select your printer, select your operating system, and then select the...
For Windows users 1 Close all open software programs. 2 Insert the Software and Documentation CD. Using the World Wide Web 1 Go to the Lexmark Web site at www.lexmark.com. Sending a fax using the computer 2 For Windows users 1 Click , or click Start and then click Run. 2 In the Start ... or Run box, type control printers. Note: If you cannot locate the Software and Documentation CD, you can download the driver from the Lexmark Web site at www.lexmark.com. 2 From the Drivers & Downloads menu, click Driver Finder. 3 Select your printer, select your operating system, and then select the...

Sending a fax using the computer
Page 3
3 Press Enter, or click OK. Note: If the printer has a fax option, select Fax and then add it as needed . For Mac OS X version 10.2 and 10.3 users 1 With a document open , choose File > Print. 2 From the PDF pop-up menu, choose Job Routing. 3 Select Fax, and then enter the recipient name, number, and other information as needed . 4 Click Print. Note: If the printer has a fax option, choose the appropriate printer model with the letters "PS." 5 Right-click the printer, and then select Properties. 6 Click the Install Options tab. 7 Under Available Options, add any installed hardware ...
3 Press Enter, or click OK. Note: If the printer has a fax option, select Fax and then add it as needed . For Mac OS X version 10.2 and 10.3 users 1 With a document open , choose File > Print. 2 From the PDF pop-up menu, choose Job Routing. 3 Select Fax, and then enter the recipient name, number, and other information as needed . 4 Click Print. Note: If the printer has a fax option, choose the appropriate printer model with the letters "PS." 5 Right-click the printer, and then select Properties. 6 Click the Install Options tab. 7 Under Available Options, add any installed hardware ...

Sending a fax using the computer
Page 4
d From the list, choose your printer as a fax: a From the Printer pop-up menu, choose Select a driver to add your printer fax model, and then click Add. 4 Click Fax. b Select the printer from the dialog that appears. If you receive an error, "No fax modems were found", follow these directions to use. Sending a fax using the computer 4 c From the Print Using pop-up menu, choose Add Printer.
d From the list, choose your printer as a fax: a From the Printer pop-up menu, choose Select a driver to add your printer fax model, and then click Add. 4 Click Fax. b Select the printer from the dialog that appears. If you receive an error, "No fax modems were found", follow these directions to use. Sending a fax using the computer 4 c From the Print Using pop-up menu, choose Add Printer.
