
Sending a fax using the computer
Page 2
Updating available options in the printer driver Once the printer software and any options are installed, it may be necessary to manually add the options in the printer driver to accept the licensing agreement. 5 From the Drivers and Utilities dialog, select Custom, and then click ... choose your operating system, and then select the PostScript driver. 4 Download the driver and install the printer software. 5 Click Agree to the Lexmark Web site at www.lexmark.com. See "Using the World Wide Web" on the screen. For Windows users 1 Close all open software programs. 2 Insert the Software and...
Updating available options in the printer driver Once the printer software and any options are installed, it may be necessary to manually add the options in the printer driver to accept the licensing agreement. 5 From the Drivers and Utilities dialog, select Custom, and then click ... choose your operating system, and then select the PostScript driver. 4 Download the driver and install the printer software. 5 Click Agree to the Lexmark Web site at www.lexmark.com. See "Using the World Wide Web" on the screen. For Windows users 1 Close all open software programs. 2 Insert the Software and...

User Guide
Page 3
Contents 3 Recycling...46 Recycling Lexmark products ...46 Recycling Lexmark packaging...46 Returning Lexmark cartridges for reuse or recycling 46 Loading paper and specialty media 47 Linking and unlinking trays...47 Linking trays ...47 Unlinking trays ...47 Assigning a ...8209;sheet tray and optional 550‑sheet tray 49 Loading the 650‑sheet duo drawer...52 Using the multipurpose feeder...53 Using the manual feeder...55 Paper and specialty media guide 57 Paper guidelines...57 Paper characteristics...57 Unacceptable paper...58 Selecting paper ...58 Selecting preprinted forms and ...
Contents 3 Recycling...46 Recycling Lexmark products ...46 Recycling Lexmark packaging...46 Returning Lexmark cartridges for reuse or recycling 46 Loading paper and specialty media 47 Linking and unlinking trays...47 Linking trays ...47 Unlinking trays ...47 Assigning a ...8209;sheet tray and optional 550‑sheet tray 49 Loading the 650‑sheet duo drawer...52 Using the multipurpose feeder...53 Using the manual feeder...55 Paper and specialty media guide 57 Paper guidelines...57 Paper characteristics...57 Unacceptable paper...58 Selecting paper ...58 Selecting preprinted forms and ...

User Guide
Page 15
... 7 PQRS 8 TUV 6 MNO * 9 WXYZ 0 # 4 5 5 7 6 8 7 6 1 Printer control panel 2 Automatic Document Feeder (ADF) 3 Standard exit bin 4 Top door latch 5 Right side cover 6 Standard 250-sheet tray (Tray 1) 7 Manual feeder 8 650-sheet duo drawer with integrated multipurpose feeder (Tray 2) 9 Optional 550-sheet tray (Tray 3) 6 9 87 Basic functions of the scanner The scanner provides copy...
... 7 PQRS 8 TUV 6 MNO * 9 WXYZ 0 # 4 5 5 7 6 8 7 6 1 Printer control panel 2 Automatic Document Feeder (ADF) 3 Standard exit bin 4 Top door latch 5 Right side cover 6 Standard 250-sheet tray (Tray 1) 7 Manual feeder 8 650-sheet duo drawer with integrated multipurpose feeder (Tray 2) 9 Optional 550-sheet tray (Tray 3) 6 9 87 Basic functions of the scanner The scanner provides copy...
User Guide
Page 31
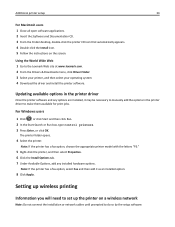
... setup 1@!. 4 GHI 2 ABC 5 JKL 3 DEF 7 PQRS 8 TUV 6 MNO * 9 WXYZ 0 # 31 Note: Once the printer software and any options are installed, it may be necessary to manually add the options in the printer driver" on . For more information, see "Updating available options in the printer driver to a computer or a network. • For...
... setup 1@!. 4 GHI 2 ABC 5 JKL 3 DEF 7 PQRS 8 TUV 6 MNO * 9 WXYZ 0 # 31 Note: Once the printer software and any options are installed, it may be necessary to manually add the options in the printer driver" on . For more information, see "Updating available options in the printer driver to a computer or a network. • For...
User Guide
Page 34
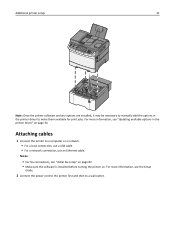
Note: If the printer has a fax option, select Fax and then add it may be necessary to manually add the options in the printer driver Once the printer software and any installed hardware options. Note: If the printer has a fax option, choose the ... software. Using the World Wide Web 1 Go to make them available for print jobs. Updating available options in the printer driver to the Lexmark Web site at www.lexmark.com. 2 From the Drivers & Downloads menu, click Driver Finder. 3 Select your printer, and then select your operating system. 4 Download the driver and install...
Note: If the printer has a fax option, select Fax and then add it may be necessary to manually add the options in the printer driver Once the printer software and any installed hardware options. Note: If the printer has a fax option, choose the ... software. Using the World Wide Web 1 Go to make them available for print jobs. Updating available options in the printer driver to the Lexmark Web site at www.lexmark.com. 2 From the Drivers & Downloads menu, click Driver Finder. 3 Select your printer, and then select your operating system. 4 Download the driver and install...
User Guide
Page 47
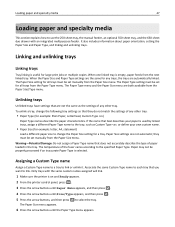
... Paper Size and Paper Type settings are the same for any other tray: • Paper Type (for a tray. The Paper Type setting must be set manually from the Paper Size menu. If the name that best describes your own custom name. • Paper Size (for large print jobs or multiple copies... Size menu appears. Loading paper and specialty media 47 Loading paper and specialty media This section explains how to use the 250-sheet tray, the manual feeder, an optional 550-sheet tray, and the 650-sheet duo drawer with the same custom names assigned will link. 1 Make sure the printer ...
... Paper Size and Paper Type settings are the same for any other tray: • Paper Type (for a tray. The Paper Type setting must be set manually from the Paper Size menu. If the name that best describes your own custom name. • Paper Size (for large print jobs or multiple copies... Size menu appears. Loading paper and specialty media 47 Loading paper and specialty media This section explains how to use the 250-sheet tray, the manual feeder, an optional 550-sheet tray, and the 650-sheet duo drawer with the same custom names assigned will link. 1 Make sure the printer ...

User Guide
Page 49
..., and then press . Note: Do not remove trays while a job prints or while Busy appears on one standard 250-sheet tray (Tray 1) with an attached manual feeder. Specify the paper height and width Defining a specific height and width measurement for the Universal paper size (in the same way. The 250-sheet...
..., and then press . Note: Do not remove trays while a job prints or while Busy appears on one standard 250-sheet tray (Tray 1) with an attached manual feeder. Specify the paper height and width Defining a specific height and width measurement for the Universal paper size (in the same way. The 250-sheet...
User Guide
Page 55
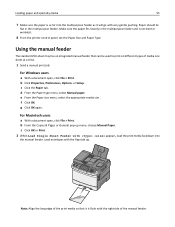
... and specialty media 55 7 Make sure the paper is as far into the manual feeder. Using the manual feeder The standard 250‑sheet tray has an integrated manual feeder that it will go with the right side of the manual feeder. For Macintosh users a With a document open , click File > Print. Make sure the...: Align the long edge of the print media so that can be used to print on different types of media one sheet at a time. 1 Send a manual print job: For Windows users a With a document open , click File > Print. c Click the Paper tab. d From the Paper type menu, select...
... and specialty media 55 7 Make sure the paper is as far into the manual feeder. Using the manual feeder The standard 250‑sheet tray has an integrated manual feeder that it will go with the right side of the manual feeder. For Macintosh users a With a document open , click File > Print. Make sure the...: Align the long edge of the print media so that can be used to print on different types of media one sheet at a time. 1 Send a manual print job: For Windows users a With a document open , click File > Print. c Click the Paper tab. d From the Paper type menu, select...

User Guide
Page 59
... The following tables provide information on top of paper they support. Paper size Dimensions 250‑sheet tray Optional Multipurpose 550‑sheet tray feeder Manual feeder A4 210 x 297 mm (8.3 x 11.7 in.) A5 148 x 210 mm (5.83 x 8.3 in.) JIS B5 182 x 257 mm (7.2 x 10.1 in.) A6 105 x 148 mm X X (4.1 x 5.8 in...
... The following tables provide information on top of paper they support. Paper size Dimensions 250‑sheet tray Optional Multipurpose 550‑sheet tray feeder Manual feeder A4 210 x 297 mm (8.3 x 11.7 in.) A5 148 x 210 mm (5.83 x 8.3 in.) JIS B5 182 x 257 mm (7.2 x 10.1 in.) A6 105 x 148 mm X X (4.1 x 5.8 in...
User Guide
Page 60
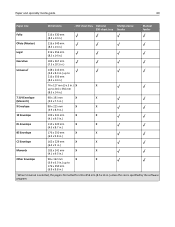
Paper and specialty media guide 60 Paper size Dimensions 250‑sheet tray Optional Multipurpose 550‑sheet tray feeder Manual feeder Folio 216 x 330 mm (8.5 x 13 in.) Oficio (Mexico) 216 x 340 mm (8.5 x 13 in.) Legal 216 x 356 mm (8.5 x 14 in.) Executive 184 x 267 mm (7.3 x 10.5 ...
Paper and specialty media guide 60 Paper size Dimensions 250‑sheet tray Optional Multipurpose 550‑sheet tray feeder Manual feeder Folio 216 x 330 mm (8.5 x 13 in.) Oficio (Mexico) 216 x 340 mm (8.5 x 13 in.) Legal 216 x 356 mm (8.5 x 14 in.) Executive 184 x 267 mm (7.3 x 10.5 ...

User Guide
Page 61
...;sheet tray. Paper type Paper Standard 250‑sheet Optional 550‑sheet Multipurpose feeder Manual feeder tray tray Card stock Transparencies* X Envelopes X X Paper labels * Lexmark transparency part numbers 12A8240 and 12A8241 are supported from the standard tray, manual feeder, and the multipurpose feeder. Paper and specialty media guide 61 Paper types supported...
...;sheet tray. Paper type Paper Standard 250‑sheet Optional 550‑sheet Multipurpose feeder Manual feeder tray tray Card stock Transparencies* X Envelopes X X Paper labels * Lexmark transparency part numbers 12A8240 and 12A8241 are supported from the standard tray, manual feeder, and the multipurpose feeder. Paper and specialty media guide 61 Paper types supported...

User Guide
Page 62
Paper and specialty media guide 62 Paper type 250‑sheet tray Optional 550‑sheet tray Multipurpose feeder Manual feeder Light1, 2 60 to 74.9 g/m2 grain 60 to 74.9 g/m2 grain long (16 to 19.9 lb long (16 to 19.9 lb bond) bond) 60 ..., transparencies, envelopes, or labels. 3 For 60 to 176 g/m2 (16 to 47 lb bond) paper, we recommend grain long fibers. 4 Lexmark transparency part numbers 12A8240 and 12A8241 are supported from the 250‑sheet tray, manual feeder, and multipurpose feeder. 5 The pressure sensitive area must be set to 25 percent cotton content.
Paper and specialty media guide 62 Paper type 250‑sheet tray Optional 550‑sheet tray Multipurpose feeder Manual feeder Light1, 2 60 to 74.9 g/m2 grain 60 to 74.9 g/m2 grain long (16 to 19.9 lb long (16 to 19.9 lb bond) bond) 60 ..., transparencies, envelopes, or labels. 3 For 60 to 176 g/m2 (16 to 47 lb bond) paper, we recommend grain long fibers. 4 Lexmark transparency part numbers 12A8240 and 12A8241 are supported from the 250‑sheet tray, manual feeder, and multipurpose feeder. 5 The pressure sensitive area must be set to 25 percent cotton content.

User Guide
Page 63
... (16-28 lb) grain long bond. Paper and specialty media guide 63 Paper type 250‑sheet tray Optional 550‑sheet tray Multipurpose feeder Manual feeder Envelopes6,7 X X 60 to 105 g/m2 (16 to 60 to 105 g/m2 (16 to 28 lb bond) 28 lb bond) 1 Paper types must..., envelopes, or labels. 3 For 60 to 176 g/m2 (16 to 47 lb bond) paper, we recommend grain long fibers. 4 Lexmark transparency part numbers 12A8240 and 12A8241 are supported from the 250‑sheet tray, manual feeder, and multipurpose feeder. 5 The pressure sensitive area must be set to 25 percent cotton content.
... (16-28 lb) grain long bond. Paper and specialty media guide 63 Paper type 250‑sheet tray Optional 550‑sheet tray Multipurpose feeder Manual feeder Envelopes6,7 X X 60 to 105 g/m2 (16 to 60 to 105 g/m2 (16 to 28 lb bond) 28 lb bond) 1 Paper types must..., envelopes, or labels. 3 For 60 to 176 g/m2 (16 to 47 lb bond) paper, we recommend grain long fibers. 4 Lexmark transparency part numbers 12A8240 and 12A8241 are supported from the 250‑sheet tray, manual feeder, and multipurpose feeder. 5 The pressure sensitive area must be set to 25 percent cotton content.

User Guide
Page 66
... faceup. When printing on transparencies: • Feed transparencies from sticking together. • We recommend Lexmark part number 12A8240 for letter‑size transparencies and Lexmark part number 12A8241 for laser printers. Check with the logo should enter the manual feeder last. Tips on using transparencies Print samples on the transparencies. • Before loading...
... faceup. When printing on transparencies: • Feed transparencies from sticking together. • We recommend Lexmark part number 12A8240 for letter‑size transparencies and Lexmark part number 12A8241 for laser printers. Check with the logo should enter the manual feeder last. Tips on using transparencies Print samples on the transparencies. • Before loading...

User Guide
Page 67
... up to 200°C (392°F) without sealing, wrinkling, curling excessively, or releasing hazardous emissions. • For the best performance, use envelopes made from the manual feeder or optional multipurpose feeder. • Set the Paper Type to 200°C (392°F) without delaminating, oozing around the edges, or releasing hazardous fumes...
... up to 200°C (392°F) without sealing, wrinkling, curling excessively, or releasing hazardous emissions. • For the best performance, use envelopes made from the manual feeder or optional multipurpose feeder. • Set the Paper Type to 200°C (392°F) without delaminating, oozing around the edges, or releasing hazardous fumes...
User Guide
Page 84
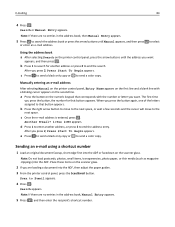
...book or press the arrow buttons until the address you want appears, and then press . Note: If there are no entries in the address book, Manual Entry appears. 5 Press # , and then enter the recipient's shortcut number. Sending an e‑mail using a shortcut number 1 Load an original ...you want . c Once the e‑mail address is entered, press . Search appears. Note: If there are no entries in the address book, then Manual Entry appears. 5 Press to E‑mail appears. 4 Press . After you press the button, the number for another address, or press 2 to end ...
...book or press the arrow buttons until the address you want appears, and then press . Note: If there are no entries in the address book, Manual Entry appears. 5 Press # , and then enter the recipient's shortcut number. Sending an e‑mail using a shortcut number 1 Load an original ...you want . c Once the e‑mail address is entered, press . Search appears. Note: If there are no entries in the address book, then Manual Entry appears. 5 Press to E‑mail appears. 4 Press . After you press the button, the number for another address, or press 2 to end ...

User Guide
Page 85
Place these items on the scanner glass. 2 If you are no entries in the address book, Manual Entry appears. 5 Press to search the address book. 6 Press the arrow buttons until the address you press 2, Press Start To Begin appears. 8 Press to send a ...
Place these items on the scanner glass. 2 If you are no entries in the address book, Manual Entry appears. 5 Press to search the address book. 6 Press the arrow buttons until the address you press 2, Press Start To Begin appears. 8 Press to send a ...
User Guide
Page 98
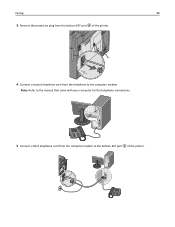
Faxing 98 3 Remove the protective plug from the bottom EXT port of the printer. Note: Refer to the manual that came with your computer for the telephone connections. 5 Connect a third telephone cord from the telephone to the bottom EXT port of the printer. 4 Connect a second telephone cord from the computer modem to the computer modem.
Faxing 98 3 Remove the protective plug from the bottom EXT port of the printer. Note: Refer to the manual that came with your computer for the telephone connections. 5 Connect a third telephone cord from the telephone to the bottom EXT port of the printer. 4 Connect a second telephone cord from the computer modem to the computer modem.

User Guide
Page 113
... a computer or USB flash memory device 113 Using the ScanBack utility Using the ScanBack Utility You can use the Lexmark ScanBackTM Utility instead of the Embedded Web Server to create Scan to manually search for an IP address or hostname. b Select the printer you want to your Scan to send the scanned...
... a computer or USB flash memory device 113 Using the ScanBack utility Using the ScanBack Utility You can use the Lexmark ScanBackTM Utility instead of the Embedded Web Server to create Scan to manually search for an IP address or hostname. b Select the printer you want to your Scan to send the scanned...
User Guide
Page 115
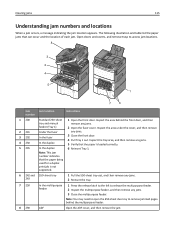
... locations. 8 3 2 4 K M C Y K M C Y 1@!. 4 GHI 2 ABC 5 JKL 3 DEF 7 PQRS 8 TUV 6 MNO * 9 WXYZ 0 # 5 1 7 6 Jam Jam location number Instructions 1 200 2 201 3 202 4 230 5 235 Standard 250‑sheet tray and manual feeder (Tray 1) Under the fuser In the fuser In the duplex In the duplex Note: This jam number indicates that can occur and the location...
... locations. 8 3 2 4 K M C Y K M C Y 1@!. 4 GHI 2 ABC 5 JKL 3 DEF 7 PQRS 8 TUV 6 MNO * 9 WXYZ 0 # 5 1 7 6 Jam Jam location number Instructions 1 200 2 201 3 202 4 230 5 235 Standard 250‑sheet tray and manual feeder (Tray 1) Under the fuser In the fuser In the duplex In the duplex Note: This jam number indicates that can occur and the location...


