

Setup Guide
Page 37
... Menu> continuously to clear the message. Loading paper Problem Action Media does not feed from The printer is refilling. Your job prints from tray 1. • Remove the tray and look inside the opening. • Gently pull the jammed paper toward you. • Reinstall the tray and press Go. 34 Congratulations! Gently rock the printer back and forth until paper jam you installed, tray 2 does not appear The printer is not on the 250-sheet drawer correctly...
... Menu> continuously to clear the message. Loading paper Problem Action Media does not feed from The printer is refilling. Your job prints from tray 1. • Remove the tray and look inside the opening. • Gently pull the jammed paper toward you. • Reinstall the tray and press Go. 34 Congratulations! Gently rock the printer back and forth until paper jam you installed, tray 2 does not appear The printer is not on the 250-sheet drawer correctly...

Setup Guide
Page 39
Troubleshooting tips You get a 93X Service message 1 Turn the printer off and back on . The printer is unsatisfactory. Always turn the printer off at the on/off switch, never at a power strip. 2 Open the printer cover. 3 Raise the carrier handle up and back down to Solving Printer Problems on the User's Guide CD for more information. the page is blank Print quality is printing, but Make sure you removed all tape and the plastic cap...
Troubleshooting tips You get a 93X Service message 1 Turn the printer off and back on . The printer is unsatisfactory. Always turn the printer off at the on/off switch, never at a power strip. 2 Open the printer cover. 3 Raise the carrier handle up and back down to Solving Printer Problems on the User's Guide CD for more information. the page is blank Print quality is printing, but Make sure you removed all tape and the plastic cap...

User's Guide
Page 13
... printing everyday documents, presentations or letters and envelopes, it's easy to change printer settings for any job you print. -FOR EXAMPLEYour printer has plain paper loaded in tray 1, but you want to print a letter on executive-size paper from tray 1 and an envelope from the manual feeder (or multipurpose feeder if installed). 1 Select the job you 're ready to print. 3 Printing from a Macintosh computer You installed your Macintosh application and open the File Menu. 2 Select Page Setup. 3 From Paper Size...
... printing everyday documents, presentations or letters and envelopes, it's easy to change printer settings for any job you print. -FOR EXAMPLEYour printer has plain paper loaded in tray 1, but you want to print a letter on executive-size paper from tray 1 and an envelope from the manual feeder (or multipurpose feeder if installed). 1 Select the job you 're ready to print. 3 Printing from a Macintosh computer You installed your Macintosh application and open the File Menu. 2 Select Page Setup. 3 From Paper Size...

User's Guide
Page 42
Change the printer setting to Continuous or turn off the alarm from the Drivers, MarkVision and Utilities CD. 33 The window runs minimized at end of your printer is connected to a network. Windows driver status window The status window is attached to a network, you may want the printer to sound a continuous alarm to ensure other users are low or need to be replaced. Paper Ink cartridge PerfectFinish cartridge Printhead Load 88 Cartridge Low 89 Cartridge Empty 87 PerfectFinish Empty Life Warning Audible...
Change the printer setting to Continuous or turn off the alarm from the Drivers, MarkVision and Utilities CD. 33 The window runs minimized at end of your printer is connected to a network. Windows driver status window The status window is attached to a network, you may want the printer to sound a continuous alarm to ensure other users are low or need to be replaced. Paper Ink cartridge PerfectFinish cartridge Printhead Load 88 Cartridge Low 89 Cartridge Empty 87 PerfectFinish Empty Life Warning Audible...

User's Guide
Page 58
... to remove dried ink. 1 Press Menu> until the Utilities Menu appears. 2 Press Select. 3 Press Menu> until Change Printhead appears. 4 Press Select. 5 Open the printer front cover. When the Clean [1]?=Go/Stop message appears on the operator panel display, press the Stop button for about three seconds. Copper contact area Nozzles 9 To dissolve dried ink, hold the damp cloth against the printhead nozzles for each color bar, press the Stop button if the quality...
... to remove dried ink. 1 Press Menu> until the Utilities Menu appears. 2 Press Select. 3 Press Menu> until Change Printhead appears. 4 Press Select. 5 Open the printer front cover. When the Clean [1]?=Go/Stop message appears on the operator panel display, press the Stop button for about three seconds. Copper contact area Nozzles 9 To dissolve dried ink, hold the damp cloth against the printhead nozzles for each color bar, press the Stop button if the quality...

User's Guide
Page 72
.... You get a 93x Service Error. 1 Turn the printer off switch - Your job prints from the wrong Check the Paper Type and Paper Source settings in your printer driver. never from the operator panel. Remove it and re-install it, making clicking sounds and a Printer Calibrating message appears on the wrong media. The printer is securely connected. You want to reposition the printheads. 4 Close the cover. 5 Turn the printer off and back on. 6 If this does not clear the message, try cleaning the copper contact...
.... You get a 93x Service Error. 1 Turn the printer off switch - Your job prints from the wrong Check the Paper Type and Paper Source settings in your printer driver. never from the operator panel. Remove it and re-install it, making clicking sounds and a Printer Calibrating message appears on the wrong media. The printer is securely connected. You want to reposition the printheads. 4 Close the cover. 5 Turn the printer off and back on. 6 If this does not clear the message, try cleaning the copper contact...

User's Guide
Page 75
... printer menu settings Linking paper trays saves you time refilling them, monitoring supplies reminds you when to have replacements on hand, and selecting a specific print quality setting helps reduce printing costs-these are a few examples of using printer settings to control how you can link the two trays by printing multiple pages on one tray is and when to monitor your printer driver to print. Reduce printing costs Conserving supplies lowers printing costs: • Change the print quality setting from Normal (the default...
... printer menu settings Linking paper trays saves you time refilling them, monitoring supplies reminds you when to have replacements on hand, and selecting a specific print quality setting helps reduce printing costs-these are a few examples of using printer settings to control how you can link the two trays by printing multiple pages on one tray is and when to monitor your printer driver to print. Reduce printing costs Conserving supplies lowers printing costs: • Change the print quality setting from Normal (the default...

User's Guide
Page 112
... AppleTalk change the type 91 set the type 92 attendance messages 8 Auto Continue, Setup Menu 79 Auto CR After LF, PCL Emul Menu 83 Auto LF After CR, PCL Emul Menu 84 B Black Cartridge, Supplies Menu 69 Black Printhead, Supplies Menu 69 Blank Pages, Finishing Menu 75 Busy, printer state 8 C Change Ink Cartridge, Utilities Menu 77 Change Printhead, Utilities Menu 77 changing operator panel settings 10 Clean Printheads, Utilities Menu 76 cleaning printheads long clean 48 short clean 48 clearing paper jams from the multipurpose feeder 57 from tray 1 53 from tray 2 55 coated paper, loading manual...
... AppleTalk change the type 91 set the type 92 attendance messages 8 Auto Continue, Setup Menu 79 Auto CR After LF, PCL Emul Menu 83 Auto LF After CR, PCL Emul Menu 84 B Black Cartridge, Supplies Menu 69 Black Printhead, Supplies Menu 69 Blank Pages, Finishing Menu 75 Busy, printer state 8 C Change Ink Cartridge, Utilities Menu 77 Change Printhead, Utilities Menu 77 changing operator panel settings 10 Clean Printheads, Utilities Menu 76 cleaning printheads long clean 48 short clean 48 clearing paper jams from the multipurpose feeder 57 from tray 1 53 from tray 2 55 coated paper, loading manual...

User's Guide
Page 113
... Std Par Port Disabled 61 Flushing Buffer 61 memory full 61 paper 34 Short Paper 60 Cancel Job 60 Change input source 59 Check MPF Connection 60 Check Tray Connection 59 Insert Duplex Pages 60 Insert tray 60 Install tray 60 Load input source 60 PerfectFinish 87 PerfectFinish Empty 60 Printer Calibrating 60 printheads 31 Missing Printhead 61 32 Unsupported Printhead 61 service 9 status 8 printer requirements Macintosh systems 90 Windows systems 90 printheads aligning 47 cleaning long clean 48 short clean 48 replacing 42 printing a poster 13...
... Std Par Port Disabled 61 Flushing Buffer 61 memory full 61 paper 34 Short Paper 60 Cancel Job 60 Change input source 59 Check MPF Connection 60 Check Tray Connection 59 Insert Duplex Pages 60 Insert tray 60 Install tray 60 Load input source 60 PerfectFinish 87 PerfectFinish Empty 60 Printer Calibrating 60 printheads 31 Missing Printhead 61 32 Unsupported Printhead 61 service 9 status 8 printer requirements Macintosh systems 90 Windows systems 90 printheads aligning 47 cleaning long clean 48 short clean 48 replacing 42 printing a poster 13...

User's Guide
Page 114
...14 photo cards 16 printing problems, solving 63 Protocol, Parallel Menu 86 R Ready, printer state 8 removing options 51 Reset Printer, Job Menu 78 Return button 8 S Select button 7 Separator Sheets, Finishing Menu 75 Separator Source, Finishing Menu 75 service messages 9 setting the IP address 93 Setup Menu Alarm Control 80 Auto Continue 79 Display Language 80 Dry Time Delay 81 Ink Low Alarm 80 Print Timeout 79 short clean 48 short edge 28 solving paper feeding problems 65 status messages 8 Stop button 7 Substitute Size, Paper Menu 74 supplies replacing an ink cartridge 35 replacing printheads...
...14 photo cards 16 printing problems, solving 63 Protocol, Parallel Menu 86 R Ready, printer state 8 removing options 51 Reset Printer, Job Menu 78 Return button 8 S Select button 7 Separator Sheets, Finishing Menu 75 Separator Source, Finishing Menu 75 service messages 9 setting the IP address 93 Setup Menu Alarm Control 80 Auto Continue 79 Display Language 80 Dry Time Delay 81 Ink Low Alarm 80 Print Timeout 79 short clean 48 short edge 28 solving paper feeding problems 65 status messages 8 Stop button 7 Substitute Size, Paper Menu 74 supplies replacing an ink cartridge 35 replacing printheads...

Quick Reference Guide
Page 1
... area Nozzles Lexmark J110 Quick Reference Loading media in place. 88 Cartridge Low An ink cartridge is almost empty. If this does not clear the error message, do a Short Clean, which fixes most print quality problems. 1 From the Utilities Menu, press Menu> until you can reach it and pull it out of the printer. • If the paper does not advance, remove the source tray, pull out the jammed paper, and discard it . • Close the cover and...
... area Nozzles Lexmark J110 Quick Reference Loading media in place. 88 Cartridge Low An ink cartridge is almost empty. If this does not clear the error message, do a Short Clean, which fixes most print quality problems. 1 From the Utilities Menu, press Menu> until you can reach it and pull it out of the printer. • If the paper does not advance, remove the source tray, pull out the jammed paper, and discard it . • Close the cover and...
Technical Reference
Page 465
... 88 Black Print Cartridge Low 3-70 88 Black Toner Low 3-70 88 Cartridge Low 3-70 88 Color Print Cartridge Low 3-70 88 Cyan Toner Low 3-70 88 Magenta Toner Low 3-70 88 Photo Print Cartridge Low 3-70 88 Toner Low 3-70 88 Yellow Toner Low 3-70 89 Cartridge Empty 3-70 2xx Paper Jam 3-69 Cartridge Life Expired XXXX 3-68 Cartridge Life Warning XXXX 3-68 Change Cartridge Invalid Refill 3-68 Check Duplex Connection 3-71 Check Finisher Installation 3-69 Check Mailbox Installation 3-69 Check Tray Connection 3-69 Close Cover...
... 88 Black Print Cartridge Low 3-70 88 Black Toner Low 3-70 88 Cartridge Low 3-70 88 Color Print Cartridge Low 3-70 88 Cyan Toner Low 3-70 88 Magenta Toner Low 3-70 88 Photo Print Cartridge Low 3-70 88 Toner Low 3-70 88 Yellow Toner Low 3-70 89 Cartridge Empty 3-70 2xx Paper Jam 3-69 Cartridge Life Expired XXXX 3-68 Cartridge Life Warning XXXX 3-68 Change Cartridge Invalid Refill 3-68 Check Duplex Connection 3-71 Check Finisher Installation 3-69 Check Mailbox Installation 3-69 Check Tray Connection 3-69 Close Cover...

Service Manual
Page 7
... service checks used to isolate failing field replaceable units (FRUs). 3. Parts Catalog contains illustrations and part numbers for service personnel only. Preface vii Diagnostic Aids contains tests and checks used to locate or repeat symptoms of the printer and the maintenance approach used to repair it. 4085-001 Preface This manual describes the Lexmark J110 printer (4085-001) and contains maintenance procedures for individual FRUs. Repair Information provides instructions for making printer adjustments and removing and installing FRUs...
... service checks used to isolate failing field replaceable units (FRUs). 3. Parts Catalog contains illustrations and part numbers for service personnel only. Preface vii Diagnostic Aids contains tests and checks used to locate or repeat symptoms of the printer and the maintenance approach used to repair it. 4085-001 Preface This manual describes the Lexmark J110 printer (4085-001) and contains maintenance procedures for individual FRUs. Repair Information provides instructions for making printer adjustments and removing and installing FRUs...
Service Manual
Page 24
... Customer Support Center, customer engineer, and support engineer resolve the problem. The first screen of the debug data is reached, the original service message is to turn off and back on the panel. Jam Jog Function When in the Operator Intervention state, and the printer needs servicing. The only recovery is displayed. To access this information. 2. The jam jog function helps clear any 9XX error condition, you can press the Menu> button...
... Customer Support Center, customer engineer, and support engineer resolve the problem. The first screen of the debug data is reached, the original service message is to turn off and back on the panel. Jam Jog Function When in the Operator Intervention state, and the printer needs servicing. The only recovery is displayed. To access this information. 2. The jam jog function helps clear any 9XX error condition, you can press the Menu> button...
Service Manual
Page 28
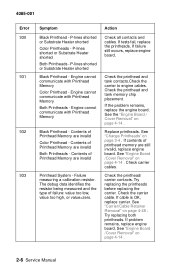
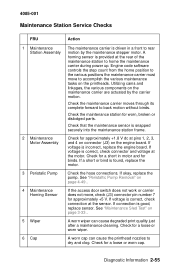
... of Printhead Memory are still invalid, replace engine board. If tests fail, replace the printheads. See "Change Printheads" on page 4-14 . Check the printhead/ carrier contacts. See "Carrier/Cable Retainer Removal" on page 4-14 . 2-6 Service Manual See "Engine Board /Cover Removal" on page 4-48 . Engine cannot communicate with Printhead Memory Both Printheads - Replace printheads. Check carrier cables. P-lines shorted or Substrate Heater shorted Black Printhead - Check the printhead and tank contacts.Check the carrier to engine cables. Check the printhead and tank memory...
... of Printhead Memory are still invalid, replace engine board. If tests fail, replace the printheads. See "Change Printheads" on page 4-14 . Check the printhead/ carrier contacts. See "Carrier/Cable Retainer Removal" on page 4-14 . 2-6 Service Manual See "Engine Board /Cover Removal" on page 4-48 . Engine cannot communicate with Printhead Memory Both Printheads - Replace printheads. Check carrier cables. P-lines shorted or Substrate Heater shorted Black Printhead - Check the printhead and tank contacts.Check the carrier to engine cables. Check the printhead and tank memory...
Service Manual
Page 30
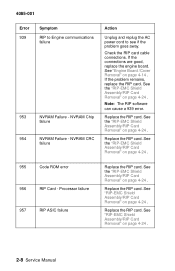
... AC power cord to Engine communications failure NVRAM Failure - Check the RIP card cable connections. If the connections are good, replace the engine board. See the "RIP-EMC Shield Assembly/RIP Card Removal" on page 4-24 . If the problem remains, replace the RIP card. See the "RIP-EMC Shield Assembly/RIP Card Removal" on page 4-24 . 2-8 Service Manual Replace the RIP card. Replace the RIP card. See "RIP-EMC Shield Assembly/RIP Card Removal" on page...
... AC power cord to Engine communications failure NVRAM Failure - Check the RIP card cable connections. If the connections are good, replace the engine board. See the "RIP-EMC Shield Assembly/RIP Card Removal" on page 4-24 . If the problem remains, replace the RIP card. See the "RIP-EMC Shield Assembly/RIP Card Removal" on page 4-24 . 2-8 Service Manual Replace the RIP card. Replace the RIP card. See "RIP-EMC Shield Assembly/RIP Card Removal" on page...

Service Manual
Page 62
... service engineer should use this function as well. Open the cover and clear the jam. 2-40 Service Manual The following paper jams: 200 Paper Jam (Printer Staging Sensor) Paper is jammed over the input sensor. The Customer Support Center may request the user to complete this function to the printer input roller sensor (nonPerfectFinish path). Remove tray 1 and clear the jam. 201 Paper Jam (Printer Input Roller Sensor) Paper is displayed: • Once all the jammed pages are cleared from the paper path, press Go to resume printing...
... service engineer should use this function as well. Open the cover and clear the jam. 2-40 Service Manual The following paper jams: 200 Paper Jam (Printer Staging Sensor) Paper is jammed over the input sensor. The Customer Support Center may request the user to complete this function to the printer input roller sensor (nonPerfectFinish path). Remove tray 1 and clear the jam. 201 Paper Jam (Printer Input Roller Sensor) Paper is displayed: • Once all the jammed pages are cleared from the paper path, press Go to resume printing...
Service Manual
Page 77
... Pump Removal" on the printheads. Engine code software controls the step count from the home position to the various positions the maintenance carrier must move , check (J3) connector pin number 7 for worn, broken or dislodged parts. If voltage is incorrect, replace the engine board. Check for a loose or worn cap. A worn cap can cause degraded print quality just after a maintenance cleaning. If voltage is correct, check connection at...
... Pump Removal" on the printheads. Engine code software controls the step count from the home position to the various positions the maintenance carrier must move , check (J3) connector pin number 7 for worn, broken or dislodged parts. If voltage is incorrect, replace the engine board. Check for a loose or worn cap. A worn cap can cause degraded print quality just after a maintenance cleaning. If voltage is correct, check connection at...
Service Manual
Page 134
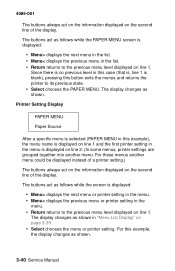
...; Menu< displays the previous menu in "Menu List Display" on line 1. The display changes as shown. 3-40 Service Manual For these menus another menu. The buttons act as shown in the list. • Return returns to the previous menu level displayed on page 3-39. • Select chooses the menu or printer setting. The display changes as follows while the PAPER MENU screen is displayed: • Menu> displays the next menu or printer setting in the menu. • Menu< displays the previous menu or printer setting in...
...; Menu< displays the previous menu in "Menu List Display" on line 1. The display changes as shown. 3-40 Service Manual For these menus another menu. The buttons act as shown in the list. • Return returns to the previous menu level displayed on page 3-39. • Select chooses the menu or printer setting. The display changes as follows while the PAPER MENU screen is displayed: • Menu> displays the next menu or printer setting in the menu. • Menu< displays the previous menu or printer setting in...
Service Manual
Page 154
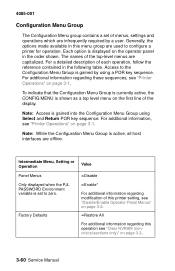
4085-001 Configuration Menu Group The Configuration Menu group contains a set to configure a printer for operation. Note: Access is active, all host interfaces are infrequently required by using Select and Return POR key sequence. For additional information, see "Printer Operations" on page 3-1. Intermediate Menu, Setting or Operation Panel Menus Only displayed when the PJL PASSWORD Environment variable is shown as a top level menu on page 3-3. 3-60 Service Manual Factory Defaults Value =Disable =Enable* For additional...
4085-001 Configuration Menu Group The Configuration Menu group contains a set to configure a printer for operation. Note: Access is active, all host interfaces are infrequently required by using Select and Return POR key sequence. For additional information, see "Printer Operations" on page 3-1. Intermediate Menu, Setting or Operation Panel Menus Only displayed when the PJL PASSWORD Environment variable is shown as a top level menu on page 3-3. 3-60 Service Manual Factory Defaults Value =Disable =Enable* For additional...


