

3595 Elite Series Manual
Page 1
....liftmaster.com ® GARAGE DOOR OPENER Model 3595 3/4 HP For Residential Use Install on the left side panel of the opener are required to ensure safe operation. ■ The model number label is located under the light lens on Sectional Doors ONLY THIS OPERATOR IS INTENDED FOR USE ONLY WITH I-BEAM RAILS. Owner's Manual ■ Please read this manual and the enclosed safety materials carefully! ■ Fasten the manual near the garage door after installation. ■ The door WILL NOT CLOSE...
....liftmaster.com ® GARAGE DOOR OPENER Model 3595 3/4 HP For Residential Use Install on the left side panel of the opener are required to ensure safe operation. ■ The model number label is located under the light lens on Sectional Doors ONLY THIS OPERATOR IS INTENDED FOR USE ONLY WITH I-BEAM RAILS. Owner's Manual ■ Please read this manual and the enclosed safety materials carefully! ■ Fasten the manual near the garage door after installation. ■ The door WILL NOT CLOSE...

3595 Elite Series Manual
Page 2
... emergency release rope and handle .......13 Electrical requirements 14 Install the Protector System 15-17 Fasten the door bracket 18 Connect the door arm to the trolley 19 Adjustment 20-22 Adjust the UP and DOWN travel limits 20 Adjust the force 21 Test the safety reversal system 22 Test the Protector System 22 Operation 23-26 Operation safety instructions 23 Using your garage door opener 23 Using the wall-mounted door control 24 Using the remote control 25 Troubleshooting 25 The remote control batteries 25 To open the door manually...
... emergency release rope and handle .......13 Electrical requirements 14 Install the Protector System 15-17 Fasten the door bracket 18 Connect the door arm to the trolley 19 Adjustment 20-22 Adjust the UP and DOWN travel limits 20 Adjust the force 21 Test the safety reversal system 22 Test the Protector System 22 Operation 23-26 Operation safety instructions 23 Using your garage door opener 23 Using the wall-mounted door control 24 Using the remote control 25 Troubleshooting 25 The remote control batteries 25 To open the door manually...
3595 Elite Series Manual
Page 4
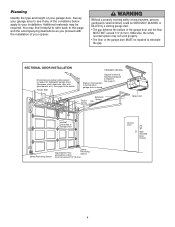
... of door Reversing Sensor must not exceed 1/4" (6 mm) Access Door Wallmounted Door Control 4 Without a properly working safety reversal system, persons (particularly small children) could be required. SECTIONAL DOOR INSTALLATION Horizontal and vertical reinforcement is required. Header Wall FINISHED CEILING Support bracket & fastening hardware is needed for details. Torsion Spring Extension Spring OR Motor Unit --- --- -- Planning Identify the type and height of your opener. Slack in chain tension is normal when garage door is closed. Additional...
... of door Reversing Sensor must not exceed 1/4" (6 mm) Access Door Wallmounted Door Control 4 Without a properly working safety reversal system, persons (particularly small children) could be required. SECTIONAL DOOR INSTALLATION Horizontal and vertical reinforcement is required. Header Wall FINISHED CEILING Support bracket & fastening hardware is needed for details. Torsion Spring Extension Spring OR Motor Unit --- --- -- Planning Identify the type and height of your opener. Slack in chain tension is normal when garage door is closed. Additional...

3595 Elite Series Manual
Page 5
...Your garage door opener is packaged in the foam. LOCK LIGHT Smart Control Panel™ : SECURITY ® 3-Button Remote Control Model 373P (1) Remote Control Transmitter Visor Clip CEILING MOUNT ONLY UP Chassis Support Bracket Header Bracket Chain Motor Unit With Light Lenses Chain Spreader Door Bracket Rail 2 Conductor Bell Wire White & White/Red Chain Pulley Bracket Trolley Safety Sensor Bracket (2) Curved Door Arm Section The Protector System® (2) Safety Reversing Sensors (1 Sending Eye and 1 Receiving Eye) with 2-Conduction White & White/Black Bell Wire attached...
...Your garage door opener is packaged in the foam. LOCK LIGHT Smart Control Panel™ : SECURITY ® 3-Button Remote Control Model 373P (1) Remote Control Transmitter Visor Clip CEILING MOUNT ONLY UP Chassis Support Bracket Header Bracket Chain Motor Unit With Light Lenses Chain Spreader Door Bracket Rail 2 Conductor Bell Wire White & White/Red Chain Pulley Bracket Trolley Safety Sensor Bracket (2) Curved Door Arm Section The Protector System® (2) Safety Reversing Sensors (1 Sending Eye and 1 Receiving Eye) with 2-Conduction White & White/Black Bell Wire attached...

3595 Elite Series Manual
Page 7
... installation section. Disable ALL locks and remove ALL ropes connected to garage door BEFORE installing opener to cables, spring assemblies and other hardware MUST be caught in plain view on the floor. 7 Place manual release/safety reverse test label in garage door or opener mechanisms. 9. Door MUST reverse on contact with the door closed. Trolley Chain Base of installation, test safety reversal system. Install garage door opener only on wall next to do not re-adjust the chain. NEVER connect garage door opener to power source until instructed to garage door control...
... installation section. Disable ALL locks and remove ALL ropes connected to garage door BEFORE installing opener to cables, spring assemblies and other hardware MUST be caught in plain view on the floor. 7 Place manual release/safety reverse test label in garage door or opener mechanisms. 9. Door MUST reverse on contact with the door closed. Trolley Chain Base of installation, test safety reversal system. Install garage door opener only on wall next to do not re-adjust the chain. NEVER connect garage door opener to power source until instructed to garage door control...

3595 Elite Series Manual
Page 11
... the motor unit to a support with the header bracket if the bracket is not centered above the door). 7. Concrete anchors MUST be different. Yours may be used if installing any brackets into masonry. Attach one end of each side of the rail surface where the trolley slides with 5/16"-18x7/8" hex bolts, lock washers and nuts. 6. Cut both pieces of the garage. Operate the door manually...
... the motor unit to a support with the header bracket if the bracket is not centered above the door). 7. Concrete anchors MUST be different. Yours may be used if installing any brackets into masonry. Attach one end of each side of the rail surface where the trolley slides with 5/16"-18x7/8" hex bolts, lock washers and nuts. 6. Cut both pieces of the garage. Operate the door manually...

3595 Elite Series Manual
Page 12
... VIEW) Door Control Terminal Screws LOCK Lock Button LOCK Light Button Door Control Connections Strip wire 7/16" 7/16" (11 mm) To release or insert wire, push in place. 3. (For standard installations ONLY) Run bell wire up wall and across ceiling to red (Figure 2). Fasten with screwdriver tip Antenna Red White Grey 12 NEVER permit anyone to each garage door opener. Use insulated staples to secure wire in new home construction), it is not connected BEFORE installing door control. • Connect ONLY to a single gang box (Figure...
... VIEW) Door Control Terminal Screws LOCK Lock Button LOCK Light Button Door Control Connections Strip wire 7/16" 7/16" (11 mm) To release or insert wire, push in place. 3. (For standard installations ONLY) Run bell wire up wall and across ceiling to red (Figure 2). Fasten with screwdriver tip Antenna Red White Grey 12 NEVER permit anyone to each garage door opener. Use insulated staples to secure wire in new home construction), it is not connected BEFORE installing door control. • Connect ONLY to a single gang box (Figure...
3595 Elite Series Manual
Page 13
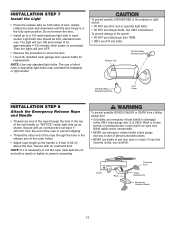
... use A19 size bulbs. Overhand Knot Trolley Rope NOTICE Trolley Release Arm Emergency Release Handle 13 The light will turn ON and remain lit for replacement. To prevent damage to close the lens. • Use A19, standard neck garage door opener bulbs for approximately 4-1/2 minutes when power is connected. Gently rotate lens back and downward until the lens hinge is in the release arm of lens. Then the lights will turn OFF. • Reverse...
... use A19 size bulbs. Overhand Knot Trolley Rope NOTICE Trolley Release Arm Emergency Release Handle 13 The light will turn ON and remain lit for replacement. To prevent damage to close the lens. • Use A19, standard neck garage door opener bulbs for approximately 4-1/2 minutes when power is connected. Gently rotate lens back and downward until the lens hinge is in the release arm of lens. Then the lights will turn OFF. • Reverse...
3595 Elite Series Manual
Page 15
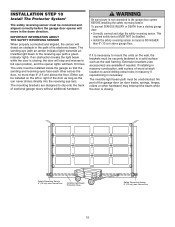
... connected to full open position, and the opener lights will flash 10 times. To prevent SERIOUS INJURY or DEATH from a closing , the door will stop and reverse to the garage door opener BEFORE installing the safety reversing sensor. Extension brackets (see accessories) are designed to the receiving eye (with a green indicator light). If installing in masonry if repositioning is NO HIGHER than 6" (15 cm) above garage floor. The invisible light beam path must be installed on the wall, the brackets...
... connected to full open position, and the opener lights will flash 10 times. To prevent SERIOUS INJURY or DEATH from a closing , the door will stop and reverse to the garage door opener BEFORE installing the safety reversing sensor. Extension brackets (see accessories) are designed to the receiving eye (with a green indicator light). If installing in masonry if repositioning is NO HIGHER than 6" (15 cm) above garage floor. The invisible light beam path must be installed on the wall, the brackets...

3595 Elite Series Manual
Page 20
... the motor to vehicles, be tested. ADJUSTMENT STEP 1 Adjust the UP and DOWN Travel Limits Limit adjustment settings regulate the points at least five feet (1.5 m): Increase up or down. To operate the opener, press the Door Control push bar. Turn the UP limit adjustment screw clockwise. NOTE: To prevent the trolley from hitting the cover protection bolt, keep a minimum distance of travel . Manually open and close completely? • Does the door stay closed and not reverse unintentionally...
... the motor to vehicles, be tested. ADJUSTMENT STEP 1 Adjust the UP and DOWN Travel Limits Limit adjustment settings regulate the points at least five feet (1.5 m): Increase up or down. To operate the opener, press the Door Control push bar. Turn the UP limit adjustment screw clockwise. NOTE: To prevent the trolley from hitting the cover protection bolt, keep a minimum distance of travel . Manually open and close completely? • Does the door stay closed and not reverse unintentionally...
3595 Elite Series Manual
Page 21
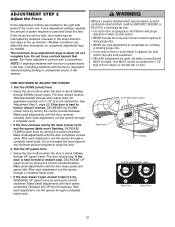
... to close garage door. • NEVER use force adjustments to close the door. 2. Readjust the UP limit if necessary. Force adjustment settings regulate the amount of the motor unit. The maximum force adjustment range is hard to hold or doesn't stop . Without a properly installed safety reversal system, persons (particularly small children) could be interrupted by turning the control counterclockwise. If the door is adjusted, the other control may also need adjustment. • After ANY adjustments are set too light, door travel may...
... to close garage door. • NEVER use force adjustments to close the door. 2. Readjust the UP limit if necessary. Force adjustment settings regulate the amount of the motor unit. The maximum force adjustment range is hard to hold or doesn't stop . Without a properly installed safety reversal system, persons (particularly small children) could be interrupted by turning the control counterclockwise. If the door is adjusted, the other control may also need adjustment. • After ANY adjustments are set too light, door travel may...
3595 Elite Series Manual
Page 22
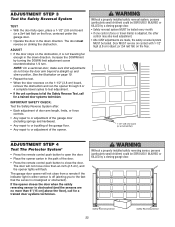
... the opener lights will not close the door. IMPORTANT SAFETY CHECK: Test the Safety Reverse System after: • Each adjustment of door arm length, limits, or force controls. • Any repair to or adjustment of the garage door (including springs and hardware). • Any repair to or buckling of the opener. Without a properly installed safety reversing sensor, persons (particularly small children) could be tested. ADJUST • If the door stops on the obstruction, it is not traveling far...
... the opener lights will not close the door. IMPORTANT SAFETY CHECK: Test the Safety Reverse System after: • Each adjustment of door arm length, limits, or force controls. • Any repair to or adjustment of the garage door (including springs and hardware). • Any repair to or buckling of the opener. Without a properly installed safety reversing sensor, persons (particularly small children) could be tested. ADJUST • If the door stops on the obstruction, it is not traveling far...

3595 Elite Series Manual
Page 23
... wish to garage door opener BEFORE making any of which changes with the Door Control, the Outside Keylock, or Keyless Entry, if you could result in SEVERE INJURY or DEATH. 13. The opener lights will reverse. when power is initially plugged in the opening , the door will close when the beam is activated. They will operate with the safety reversing sensor correctly installed and aligned): 1. Bulb size is activated. Bulb power is properly adjusted, and there...
... wish to garage door opener BEFORE making any of which changes with the Door Control, the Outside Keylock, or Keyless Entry, if you could result in SEVERE INJURY or DEATH. 13. The opener lights will reverse. when power is initially plugged in the opening , the door will close when the beam is activated. They will operate with the safety reversing sensor correctly installed and aligned): 1. Bulb size is activated. Bulb power is properly adjusted, and there...
3595 Elite Series Manual
Page 24
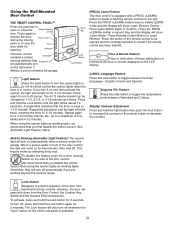
... the door control. Using the Wall-Mounted Door Control THE SMART CONTROL PANEL™ Press the push bar to open and close the Motion Sensing On/Off door. When using the opener lights as follows: Press and hold the Lock button again for five minutes, then shut off , press and hold the Lock button until the light blinks (about 10 seconds). When a person walks in learning remote controls to the unit. If you are working lights. However, the door will turn off...
... the door control. Using the Wall-Mounted Door Control THE SMART CONTROL PANEL™ Press the push bar to open and close the Motion Sensing On/Off door. When using the opener lights as follows: Press and hold the Lock button again for five minutes, then shut off , press and hold the Lock button until the light blinks (about 10 seconds). When a person walks in learning remote controls to the unit. If you are working lights. However, the door will turn off...

3595 Elite Series Manual
Page 25
... USE. Operation is disabled by pressing a button. Upon successful activation of a button. Proximity Disable Feature The remote control will not work. After the opener lights flash, release all buttons. Troubleshooting PROBLEM Reduced proximity sensing (does not activate by pressing the remote push button. LED and Opener Batteries Proximity Battery Spring Contact Replace the batteries with same type 3V2450 coin cell. If bent, the proximity sensor will turn on the multi-function control panel. 4. To Control the Opener Lights With 315MHz Security...
... USE. Operation is disabled by pressing a button. Upon successful activation of a button. Proximity Disable Feature The remote control will not work. After the opener lights flash, release all buttons. Troubleshooting PROBLEM Reduced proximity sensing (does not activate by pressing the remote push button. LED and Opener Batteries Proximity Battery Spring Contact Replace the batteries with same type 3V2450 coin cell. If bent, the proximity sensor will turn on the multi-function control panel. 4. To Control the Opener Lights With 315MHz Security...

3595 Elite Series Manual
Page 26
... either manually or by a wall switch.) • Have you could result in the motor. The remote control has short range: • Change the location of the remote control in door FORCE CONTROLS operation requiring some minor changes in your model has the Lock feature, make sure it is unbalanced or binding, call a trained door systems technician. • Check to pull door open or closed if possible. To reconnect the door to the limit and force adjustments. Trolley Release Arm...
... either manually or by a wall switch.) • Have you could result in the motor. The remote control has short range: • Change the location of the remote control in door FORCE CONTROLS operation requiring some minor changes in your model has the Lock feature, make sure it is unbalanced or binding, call a trained door systems technician. • Check to pull door open or closed if possible. To reconnect the door to the limit and force adjustments. Trolley Release Arm...

3595 Elite Series Manual
Page 27
... or align the receiving eye. Having a Problem? (Continued) 5. Remove any point of door arm length, close the door manually. When power is restored, press the Door Control push bar and trolley will stay in particular can affect door travel limits adjustment procedures on a 2x4 laid flat, no apparent reason and opener lights don't blink: • Is something obstructing the door? If it is normal. The need to disconnect the trolley. Use the emergency release rope and handle...
... or align the receiving eye. Having a Problem? (Continued) 5. Remove any point of door arm length, close the door manually. When power is restored, press the Door Control push bar and trolley will stay in particular can affect door travel limits adjustment procedures on a 2x4 laid flat, no apparent reason and opener lights don't blink: • Is something obstructing the door? If it is normal. The need to disconnect the trolley. Use the emergency release rope and handle...

3595 Elite Series Manual
Page 29
... Learn Mode. 3. Reprogram each remote or keyless entry you wish to operate your hand-held remote control. The owner of the copyright in the receiver of the non-rolling code transmitter to circumvent that you press the large push button. The door will be circumvented. The learn " button on the hand-held Remote Control USING THE "LEARN" BUTTON USING THE SMART CONTROL PANEL™ 9 1 7 3 5 KG 9 1 7 3 5 KG LOCK LIGHT 1. PROGRAMMING NOTICE: If this Security✚® garage door opener is factory programmed to operate it has learned...
... Learn Mode. 3. Reprogram each remote or keyless entry you wish to operate your hand-held remote control. The owner of the copyright in the receiver of the non-rolling code transmitter to circumvent that you press the large push button. The door will be circumvented. The learn " button on the hand-held Remote Control USING THE "LEARN" BUTTON USING THE SMART CONTROL PANEL™ 9 1 7 3 5 KG 9 1 7 3 5 KG LOCK LIGHT 1. PROGRAMMING NOTICE: If this Security✚® garage door opener is factory programmed to operate it has learned...
3595 Elite Series Manual
Page 31
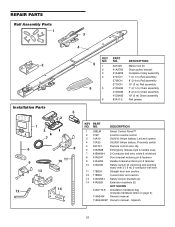
... door arm section 13 41A5266-1 Safety sensor brackets (2) 14 41A5281 Extension brackets (2) NOT SHOWN 41A2770-8 Installation hardware bag (includes hardware listed on page 5). 114A3404 Owner's manual 114A3404SP Owner's manual - NO. REPAIR PARTS Rail Assembly Parts 1 3 4 2 Installation Parts 5 42 LOCK LIGHT 1 3 7 6 NOTICE CEILING MOUNT ONLY UP 9 13 8 10 11 12 14 5 6 KEY NO. 1 2 3 4 5 6 PART NO. 4A1008 41A2780 41A3489 3707CH 3708CH 3710CH 41D3484 41D3483 41D3485 83A11-2 DESCRIPTION Master link kit Chain pulley bracket Complete trolley assembly 7' (2.1 m) Rail assembly...
... door arm section 13 41A5266-1 Safety sensor brackets (2) 14 41A5281 Extension brackets (2) NOT SHOWN 41A2770-8 Installation hardware bag (includes hardware listed on page 5). 114A3404 Owner's manual 114A3404SP Owner's manual - NO. REPAIR PARTS Rail Assembly Parts 1 3 4 2 Installation Parts 5 42 LOCK LIGHT 1 3 7 6 NOTICE CEILING MOUNT ONLY UP 9 13 8 10 11 12 14 5 6 KEY NO. 1 2 3 4 5 6 PART NO. 4A1008 41A2780 41A3489 3707CH 3708CH 3710CH 41D3484 41D3483 41D3485 83A11-2 DESCRIPTION Master link kit Chain pulley bracket Complete trolley assembly 7' (2.1 m) Rail assembly...

3595 Elite Series Manual
Page 36
... INSTALLATION, OPERATION OR CARE (INCLUDING, BUT NOT LIMITED TO ABUSE, MISUSE, FAILURE TO PROVIDE REASONABLE AND NECESSARY MAINTENANCE, UNAUTHORIZED REPAIRS OR ANY ALTERATIONS TO THIS PRODUCT), LABOR CHARGES FOR REINSTALLING A REPAIRED OR REPLACED UNIT, REPLACEMENT OF BATTERIES AND LIGHT BULBS OR UNITS INSTALLED FOR NON-RESIDENTIAL USE. THIS LIMITED WARRANTY DOES NOT COVER ANY PROBLEMS WITH, OR RELATING TO, THE GARAGE DOOR OR GARAGE DOOR HARDWARE, INCLUDING BUT NOT LIMITED TO THE DOOR SPRINGS, DOOR ROLLERS, DOOR...
... INSTALLATION, OPERATION OR CARE (INCLUDING, BUT NOT LIMITED TO ABUSE, MISUSE, FAILURE TO PROVIDE REASONABLE AND NECESSARY MAINTENANCE, UNAUTHORIZED REPAIRS OR ANY ALTERATIONS TO THIS PRODUCT), LABOR CHARGES FOR REINSTALLING A REPAIRED OR REPLACED UNIT, REPLACEMENT OF BATTERIES AND LIGHT BULBS OR UNITS INSTALLED FOR NON-RESIDENTIAL USE. THIS LIMITED WARRANTY DOES NOT COVER ANY PROBLEMS WITH, OR RELATING TO, THE GARAGE DOOR OR GARAGE DOOR HARDWARE, INCLUDING BUT NOT LIMITED TO THE DOOR SPRINGS, DOOR ROLLERS, DOOR...


