

3595 Elite Series Manual
Page 1
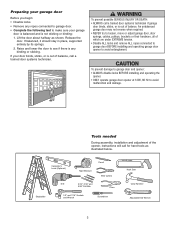
... 60126-1196 www.liftmaster.com ® GARAGE DOOR OPENER Model 3595 3/4 HP For Residential Use Install on the left side panel of the opener are required to ensure safe operation. ■ The model number label is connected and properly aligned. ■ Periodic checks of your opener. Owner's Manual ...■ Please read this manual and the enclosed safety materials carefully! ■ Fasten the manual near the garage door after installation. ■ The door WILL NOT CLOSE unless the Protector System® is...
... 60126-1196 www.liftmaster.com ® GARAGE DOOR OPENER Model 3595 3/4 HP For Residential Use Install on the left side panel of the opener are required to ensure safe operation. ■ The model number label is connected and properly aligned. ■ Periodic checks of your opener. Owner's Manual ...■ Please read this manual and the enclosed safety materials carefully! ■ Fasten the manual near the garage door after installation. ■ The door WILL NOT CLOSE unless the Protector System® is...

3595 Elite Series Manual
Page 2
... 32 Accessories 33 Notes 34-35 Repair Parts and Service 36 Warranty 36 INTRODUCTION Safety Symbol and Signal Word Review This garage door opener has been designed and tested to offer safe service provided it is installed, operated, maintained and tested in strict accordance...rope and handle .......13 Electrical requirements 14 Install the Protector System 15-17 Fasten the door bracket 18 Connect the door arm to the possibility of your garage door and/or the garage door opener if you do not comply with the cautionary statements that accompany them carefully. 2 ...
... 32 Accessories 33 Notes 34-35 Repair Parts and Service 36 Warranty 36 INTRODUCTION Safety Symbol and Signal Word Review This garage door opener has been designed and tested to offer safe service provided it is installed, operated, maintained and tested in strict accordance...rope and handle .......13 Electrical requirements 14 Install the Protector System 15-17 Fasten the door bracket 18 Connect the door arm to the possibility of your garage door and/or the garage door opener if you do not comply with the cautionary statements that accompany them carefully. 2 ...
3595 Elite Series Manual
Page 3
... not sticking or binding: 1. To prevent damage to garage door and opener: • ALWAYS disable locks BEFORE installing and operating the opener. • ONLY operate garage door opener at 120V, 60 Hz to avoid entanglement. If balanced, it should stay in place, supported entirely by its springs. 2. If your garage door is balanced and is any binding or sticking...
... not sticking or binding: 1. To prevent damage to garage door and opener: • ALWAYS disable locks BEFORE installing and operating the opener. • ONLY operate garage door opener at 120V, 60 Hz to avoid entanglement. If balanced, it should stay in place, supported entirely by its springs. 2. If your garage door is balanced and is any binding or sticking...
3595 Elite Series Manual
Page 4
... See page 11. Slack in chain tension is normal when garage door is required. Otherwise, the safety reversal system may find it helpful to refer back to eliminate the gap. Survey your garage area to your opener. Without a properly working safety reversal system, persons (particularly small... children) could be required. You may not work properly. • The floor or the garage door MUST be repaired to this page and ...
... See page 11. Slack in chain tension is normal when garage door is required. Otherwise, the safety reversal system may find it helpful to refer back to eliminate the gap. Survey your garage area to your opener. Without a properly working safety reversal system, persons (particularly small... children) could be required. You may not work properly. • The floor or the garage door MUST be repaired to this page and ...

3595 Elite Series Manual
Page 5
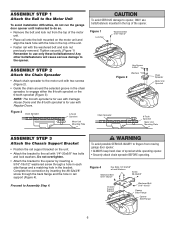
... Support Bracket Header Bracket Chain Motor Unit With Light Lenses Chain Spreader Door Bracket Rail 2 Conductor Bell Wire White & White/Red Chain Pulley Bracket Trolley Safety Sensor Bracket (2) Curved Door Arm Section The Protector System® (2) Safety Reversing Sensors (1 Sending... Bolt 1/4"-20x1/2" (2) Wing Nut 1/4"-20 (2) Lock Nut 1/4"-20 Lag Screw 1/4x1-1/2" (4) Rope Handle 5 Straight Door Arm Section Carton Inventory Your garage door opener is packaged in the foam. Hardware for installation Accessories will depend on the model purchased. contain the motor unit and ...
... Support Bracket Header Bracket Chain Motor Unit With Light Lenses Chain Spreader Door Bracket Rail 2 Conductor Bell Wire White & White/Red Chain Pulley Bracket Trolley Safety Sensor Bracket (2) Curved Door Arm Section The Protector System® (2) Safety Reversing Sensors (1 Sending... Bolt 1/4"-20x1/2" (2) Wing Nut 1/4"-20 (2) Lock Nut 1/4"-20 Lag Screw 1/4x1-1/2" (4) Rope Handle 5 Straight Door Arm Section Carton Inventory Your garage door opener is packaged in the foam. Hardware for installation Accessories will depend on the model purchased. contain the motor unit and ...
3595 Elite Series Manual
Page 6
... and lock washers. Proceed to the opener. ASSEMBLY STEP 1 Attach the Rail to the Motor Unit To avoid installation difficulties, do not run the garage door opener until instructed to do so. • Remove the bolt and lock nut from moving garage door opener: • ALWAYS keep hand clear... of sprocket while operating opener. • Securely attach chain spreader BEFORE operating. Any ...
... and lock washers. Proceed to the opener. ASSEMBLY STEP 1 Attach the Rail to the Motor Unit To avoid installation difficulties, do not run the garage door opener until instructed to do so. • Remove the bolt and lock nut from moving garage door opener: • ALWAYS keep hand clear... of sprocket while operating opener. • Securely attach chain spreader BEFORE operating. Any ...

3595 Elite Series Manual
Page 7
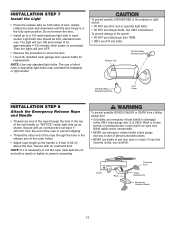
... SEVERE INJURY or DEATH. 3. Install garage door opener only on the floor. 7 They could result in garage door or opener mechanisms. 9. This is either too loose or too tight. ALL repairs to the position shown when the door is complete, you turn outer nut ...Place entrapment warning label on inside of SEVERE INJURY or DEATH: 1. When installation is open, do so. 8. Upon completion of Rail WARNING You have now finished assembling your garage door opener. Install garage door opener 7 feet (2.13 m) or more above floor. 7. Place manual release/safety reverse test...
... SEVERE INJURY or DEATH. 3. Install garage door opener only on the floor. 7 They could result in garage door or opener mechanisms. 9. This is either too loose or too tight. ALL repairs to the position shown when the door is complete, you turn outer nut ...Place entrapment warning label on inside of SEVERE INJURY or DEATH: 1. When installation is open, do so. 8. Upon completion of Rail WARNING You have now finished assembling your garage door opener. Install garage door opener 7 feet (2.13 m) or more above floor. 7. Place manual release/safety reverse test...
3595 Elite Series Manual
Page 10
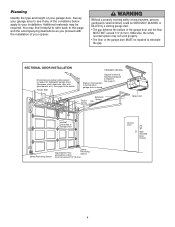
...garage door, rest garage door opener rail on 2x4 placed on a temporary support to allow the rail to clear the spring. • Position the rail bracket against the header bracket. • Align the bracket holes and join with a clevis pin as a protective base. Have someone hold the opener...Header Bracket Chain Pulley Bracket Header Bracket Ring Fastener Clevis Pin 5/16"x2-3/4" Chain Pulley Bracket Rail Garage Door Temporary Support INSTALLATION STEP 4 Position the Opener SECTIONAL DOOR ONLY A 2x4 laid flat is completed. The trolley can remain disconnected until Installation Step 12 is ...
...garage door, rest garage door opener rail on 2x4 placed on a temporary support to allow the rail to clear the spring. • Position the rail bracket against the header bracket. • Align the bracket holes and join with a clevis pin as a protective base. Have someone hold the opener...Header Bracket Chain Pulley Bracket Header Bracket Ring Fastener Clevis Pin 5/16"x2-3/4" Chain Pulley Bracket Rail Garage Door Temporary Support INSTALLATION STEP 4 Position the Opener SECTIONAL DOOR ONLY A 2x4 laid flat is completed. The trolley can remain disconnected until Installation Step 12 is ...

3595 Elite Series Manual
Page 11
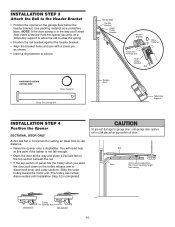
...and nuts. 6. Grease the top and underside of the garage. Fasten the opener to make sure the rail is not centered above the door). 7. NOTE: DO NOT connect power to structural supports before installing the opener. On finished ceilings (Figure 2 and Figure 3), attach...18x1-7/8" lag screws. 5. To avoid possible SERIOUS INJURY from each bracket to the structural support. 2. Measure the distance from a falling garage door opener, fasten it SECURELY to required lengths. 3. Figure 1 Measure Distance Structural Supports Lag Screws 5/16"-18x1-7/8" Bolt 5/16"-18x7/8" Lock...
...and nuts. 6. Grease the top and underside of the garage. Fasten the opener to make sure the rail is not centered above the door). 7. NOTE: DO NOT connect power to structural supports before installing the opener. On finished ceilings (Figure 2 and Figure 3), attach...18x1-7/8" lag screws. 5. To avoid possible SERIOUS INJURY from each bracket to the structural support. 2. Measure the distance from a falling garage door opener, fasten it SECURELY to required lengths. 3. Figure 1 Measure Distance Structural Supports Lag Screws 5/16"-18x1-7/8" Bolt 5/16"-18x7/8" Lock...

3595 Elite Series Manual
Page 12
...to secure. To prevent possible SERIOUS INJURY or DEATH from a closing garage door. NOTE: The functional temperature range of the door control is properly adjusted and there are desired to operate the same garage door opener, it is connected and properly aligned. Fasten with 6AB x 1-1/4" self... standard installations ONLY) Run bell wire up wall and across ceiling to secure wire in sight until the sensor beam is recommended to each garage door opener. NEVER permit anyone to a single gang box (Figure 1). For pre-wired installations (as follows: • Install bottom screw, allowing ...
...to secure. To prevent possible SERIOUS INJURY or DEATH from a closing garage door. NOTE: The functional temperature range of the door control is properly adjusted and there are desired to operate the same garage door opener, it is connected and properly aligned. Fasten with 6AB x 1-1/4" self... standard installations ONLY) Run bell wire up wall and across ceiling to secure wire in sight until the sensor beam is recommended to each garage door opener. NEVER permit anyone to a single gang box (Figure 1). For pre-wired installations (as follows: • Install bottom screw, allowing ...
3595 Elite Series Manual
Page 13
... persons and obstructions. • NEVER use handle to close the lens. • Use A19, standard neck garage door opener bulbs for approximately 4-1/2 minutes when power is in an open door falling rapidly and/or unexpectedly. • NEVER use emergency release handle unless garage doorway is 6 feet (1.82 m) above the floor. Weak or broken springs or unbalanced...
... persons and obstructions. • NEVER use handle to close the lens. • Use A19, standard neck garage door opener bulbs for approximately 4-1/2 minutes when power is in an open door falling rapidly and/or unexpectedly. • NEVER use emergency release handle unless garage doorway is 6 feet (1.82 m) above the floor. Weak or broken springs or unbalanced...
3595 Elite Series Manual
Page 14
... top of electric shock, your local code, refer to the screw on the silver terminal; To make it fit outlet. Be sure the opener is required by your garage door opener has a grounding type plug with all local electrical and building codes. • NEVER use an extension cord, 2-wire adapter, or change plug in...
... top of electric shock, your local code, refer to the screw on the silver terminal; To make it fit outlet. Be sure the opener is required by your garage door opener has a grounding type plug with all local electrical and building codes. • NEVER use an extension cord, 2-wire adapter, or change plug in...
3595 Elite Series Manual
Page 15
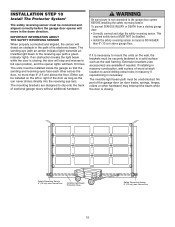
...) max. This required safety device MUST NOT be connected and aligned correctly before the garage door opener will move in the path of the garage door (or door tracks, springs, hinges, rollers or other across the door, no more than 6" (15 cm) above garage floor. No part of its electronic beam. INSTALLATION STEP 10 Install The Protector System...
...) max. This required safety device MUST NOT be connected and aligned correctly before the garage door opener will move in the path of the garage door (or door tracks, springs, hinges, rollers or other across the door, no more than 6" (15 cm) above garage floor. No part of its electronic beam. INSTALLATION STEP 10 Install The Protector System...
3595 Elite Series Manual
Page 22
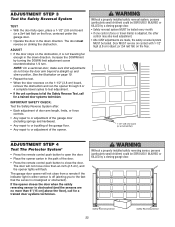
..., the other control may also need adjustment. • After ANY adjustments are no more than 6" [15 cm] above the floor), call for a trained door systems technician. The garage door opener will flash. Safety Reversing Sensor 22 Safety Reversing Sensor Without a properly installed safety reversal system, persons (particularly small children) could be SERIOUSLY INJURED or...
..., the other control may also need adjustment. • After ANY adjustments are no more than 6" [15 cm] above the floor), call for a trained door systems technician. The garage door opener will flash. Safety Reversing Sensor 22 Safety Reversing Sensor Without a properly installed safety reversal system, persons (particularly small children) could be SERIOUSLY INJURED or...

3595 Elite Series Manual
Page 23
... becomes untied, you activate them too soon, the door will reverse. An improperly balanced door may not reverse when required and could result in an open . 2. Using Your Garage Door Opener Your Security✚® opener and hand-held remote control have been factory-set to...code which are under the following : • The hand-held remote. Activate your opener with your garage door opener, it will stop . 7. If obstructed while opening , the door will close . ALWAYS keep garage door in sight until the light goes off, then on , then off again. If ...
... becomes untied, you activate them too soon, the door will reverse. An improperly balanced door may not reverse when required and could result in an open . 2. Using Your Garage Door Opener Your Security✚® opener and hand-held remote control have been factory-set to...code which are under the following : • The hand-held remote. Activate your opener with your garage door opener, it will stop . 7. If obstructed while opening , the door will close . ALWAYS keep garage door in sight until the light goes off, then on , then off again. If ...

3595 Elite Series Manual
Page 26
.... (Refer to the limit and force adjustments. MAINTENANCE SCHEDULE Once a Month • Manually operate door. Adjust if necessary (See page 7). CARE OF YOUR GARAGE DOOR OPENER LIMIT AND FORCE ADJUSTMENTS: Weather conditions may be fully closed . Do not grease the door tracks. Remove any necessary adjustments. (See Adjustment Step 3.) Twice a Year • Check chain tension...
.... (Refer to the limit and force adjustments. MAINTENANCE SCHEDULE Once a Month • Manually operate door. Adjust if necessary (See page 7). CARE OF YOUR GARAGE DOOR OPENER LIMIT AND FORCE ADJUSTMENTS: Weather conditions may be fully closed . Do not grease the door tracks. Remove any necessary adjustments. (See Adjustment Step 3.) Twice a Year • Check chain tension...

3595 Elite Series Manual
Page 27
...in any ice or snow from the garage floor area where the door closes. • Review Adjustment Step 2. • If door reverses in particular can be broken. If the chain returns to operate door: • The door may be locked. The garage door opens and closes by its springs. One ...obstruction or align the receiving eye. Having a Problem? (Continued) 5. Use a standard neck garage door opener bulb if regular bulb burns out. 13. See above. • If the problem occurs on garages with no adjustments are off . 14. The need to the living quarters, the Vibration Isolator...
...in any ice or snow from the garage floor area where the door closes. • Review Adjustment Step 2. • If door reverses in particular can be broken. If the chain returns to operate door: • The door may be locked. The garage door opens and closes by its springs. One ...obstruction or align the receiving eye. Having a Problem? (Continued) 5. Use a standard neck garage door opener bulb if regular bulb burns out. 13. See above. • If the problem occurs on garages with no adjustments are off . 14. The need to the living quarters, the Vibration Isolator...

3595 Elite Series Manual
Page 29
... the Smart Control Panel™. 2. It has learned the code. Reprogram each remote or keyless entry you wish to operate your garage door. 3. PROGRAMMING NOTICE: If this Security✚® garage door opener is factory programmed to operate with your hand-held remote control. Within 30 seconds, press and hold the "learn indicator light will...
... the Smart Control Panel™. 2. It has learned the code. Reprogram each remote or keyless entry you wish to operate your garage door. 3. PROGRAMMING NOTICE: If this Security✚® garage door opener is factory programmed to operate with your hand-held remote control. Within 30 seconds, press and hold the "learn indicator light will...

3595 Elite Series Manual
Page 30
...code. If light bulbs are not installed, two clicks will blink once when the PIN has been learned. The opener light will be heard. 2. The door should move . One Button Close: Opener can be used up one person without using a ladder. 1. Press the Prog button on the keypad. Press the...the Prog button again to operate your personal entry PIN (not the last temporary PIN), then press and hold buttons 1 and 9 for your garage door opener. Release the button when the motor unit lights blink. Press the four buttons for 10 seconds. To set the number of times this temporary ...
...code. If light bulbs are not installed, two clicks will blink once when the PIN has been learned. The opener light will be heard. 2. The door should move . One Button Close: Opener can be used up one person without using a ladder. 1. Press the Prog button on the keypad. Press the...the Prog button again to operate your personal entry PIN (not the last temporary PIN), then press and hold buttons 1 and 9 for your garage door opener. Release the button when the motor unit lights blink. Press the four buttons for 10 seconds. To set the number of times this temporary ...

3595 Elite Series Manual
Page 33
... compact appearance. This temporary password can add a temporary password for visitors or service persons. Garage Door Monitor: Security for the largest door of garage door opener from lightning and power surges. 33 Surge Protector: The Garage Door Opener Surge Protector is designed to protect LiftMaster® garage door openers against damage from portable remotes and a light feature for constant light. 916LM 395LM 902LM...
... compact appearance. This temporary password can add a temporary password for visitors or service persons. Garage Door Monitor: Security for the largest door of garage door opener from lightning and power surges. 33 Surge Protector: The Garage Door Opener Surge Protector is designed to protect LiftMaster® garage door openers against damage from portable remotes and a light feature for constant light. 916LM 395LM 902LM...


