
User Guide
Page 1
ProConnect™ Series Integrated KVM 2-Port Switch Use this Guide to install: KVM2KIT Installation Guide
ProConnect™ Series Integrated KVM 2-Port Switch Use this Guide to install: KVM2KIT Installation Guide

User Guide
Page 2
Integrated KVM 2-Port Switch COPYRIGHT & TRADEMARKS Copyright © 2003 Linksys, All Rights Reserved. FCC STATEMENT The ProConnect™ Integrated KVM 2-Port Switch has been tested and complies with the specifications for assistance EC Declaration of Conformity (Europe) In compliance with the EMC Directive 89/336/EEC,... to radio or television reception, which is found by one or more of the following standards: • EN55022 Emission • EN55024 Immunity IG-KVM2KIT-112102NC KL 1 idential installation. Linksys is no guarantee that interference will not occur in a res-
Integrated KVM 2-Port Switch COPYRIGHT & TRADEMARKS Copyright © 2003 Linksys, All Rights Reserved. FCC STATEMENT The ProConnect™ Integrated KVM 2-Port Switch has been tested and complies with the specifications for assistance EC Declaration of Conformity (Europe) In compliance with the EMC Directive 89/336/EEC,... to radio or television reception, which is found by one or more of the following standards: • EN55022 Emission • EN55024 Immunity IG-KVM2KIT-112102NC KL 1 idential installation. Linksys is no guarantee that interference will not occur in a res-

User Guide
Page 3
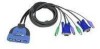
... ProConnect™ Series System Requirements 3 Step 1: Install the Integrated KVM 2-Port Switch 3 Step 2: Use the Hot Key Combinations for the Integrated KVM 2-Port Switch 5 Specifications 8 Contact Information 9 This Installation Guide is meant to help you are connecting are color-coded to the PS/2 mouse port on the KVM Switch. For additional information, visit the Linksys website at www.linksys.com Integrated KVM 2-Port Switch...
... ProConnect™ Series System Requirements 3 Step 1: Install the Integrated KVM 2-Port Switch 3 Step 2: Use the Hot Key Combinations for the Integrated KVM 2-Port Switch 5 Specifications 8 Contact Information 9 This Installation Guide is meant to help you are connecting are color-coded to the PS/2 mouse port on the KVM Switch. For additional information, visit the Linksys website at www.linksys.com Integrated KVM 2-Port Switch...

User Guide
Page 4
ProConnect™ Series E. Repeat steps EG. Integrated KVM 2-Port Switch Step 2: Use the Hot Key Combinations for the Integrated KVM 2-Port Switch The KVM Switch is complete. Hot key commands allow you are connecting. G. Use the PC 2 cable for the first PC you to step 2. 4 5 Using hot keys, you can ... a preset time interval. Plug the PC 1 cable's mouse connector into the PC 1's mouse port. To learn about the hot key combinations used to control the KVM Switch, proceed to conveniently access either computer directly from the keyboard.
ProConnect™ Series E. Repeat steps EG. Integrated KVM 2-Port Switch Step 2: Use the Hot Key Combinations for the Integrated KVM 2-Port Switch The KVM Switch is complete. Hot key commands allow you are connecting. G. Use the PC 2 cable for the first PC you to step 2. 4 5 Using hot keys, you can ... a preset time interval. Plug the PC 1 cable's mouse connector into the PC 1's mouse port. To learn about the hot key combinations used to control the KVM Switch, proceed to conveniently access either computer directly from the keyboard.

User Guide
Page 5
ProConnect™ Series Initiate Auto Scan Mode The Auto Scan feature automatically cycles the KVM between computers. To initiate Auto Scan Mode, press and release the left Shift key. 2. Press and release the "n" key, "n" being a number from 1-4. For example, to ... to 10 seconds, use the following hot key combination: 1. Press and release the left Shift key, and then press and release the right Shift key. Integrated KVM 2-Port Switch Initiate Auto Scan Mode and Change the Scan Interval If you can interval, use this hot key combination: 6 7 To exit Auto Scan Mode, press...
ProConnect™ Series Initiate Auto Scan Mode The Auto Scan feature automatically cycles the KVM between computers. To initiate Auto Scan Mode, press and release the left Shift key. 2. Press and release the "n" key, "n" being a number from 1-4. For example, to ... to 10 seconds, use the following hot key combination: 1. Press and release the left Shift key, and then press and release the right Shift key. Integrated KVM 2-Port Switch Initiate Auto Scan Mode and Change the Scan Interval If you can interval, use this hot key combination: 6 7 To exit Auto Scan Mode, press...

User Guide
Page 6
... default) 8 Integrated KVM 2-Port Switch Contact Information For help with installation or operation of this product, contact Linksys Technical Support at one of the phone numbers listed in the Technical Support insert or Internet addresses below : Web http://www.linksys.com/international 9 Specifications Model Number: Standards: Protocol: Ports: Keyboard: Mouse: Monitor: LEDs: Scan Interval: KVM2KIT PS...
... default) 8 Integrated KVM 2-Port Switch Contact Information For help with installation or operation of this product, contact Linksys Technical Support at one of the phone numbers listed in the Technical Support insert or Internet addresses below : Web http://www.linksys.com/international 9 Specifications Model Number: Standards: Protocol: Ports: Keyboard: Mouse: Monitor: LEDs: Scan Interval: KVM2KIT PS...