User Guide
Page 2
...staff at: http://ocss.msi.com ii We take every care in this document, but no guarantee is given as to 785G Date May 2009 Technical Support If a problem arises with your system and no solution can be obtained from the user's manual, please contact your place... Preface Copyright Notice The material in the preparation of this document is the intellectual property of MICRO-STAR INTERNATIONAL. Our products are the properties of their respective owners. ■ MSI® is registered trademark of Micro-Star Int'l Co.,Ltd. ■ NVIDIA® is registered trademark of NVIDIA Corporation. ...
...staff at: http://ocss.msi.com ii We take every care in this document, but no guarantee is given as to 785G Date May 2009 Technical Support If a problem arises with your system and no solution can be obtained from the user's manual, please contact your place... Preface Copyright Notice The material in the preparation of this document is the intellectual property of MICRO-STAR INTERNATIONAL. Our products are the properties of their respective owners. ■ MSI® is registered trademark of Micro-Star Int'l Co.,Ltd. ■ NVIDIA® is registered trademark of NVIDIA Corporation. ...

User Guide
Page 3
...get the equipment checked by the manufacturer. MS-7596 Safety Instructions ■ Always read the safety instructions carefully. ■ Keep this User's Manual for future reference. ■ Keep this equipment away from overheating. DO NOT COVER THE OPENINGS. ■ Make sure the voltage of ...are for recycleing special disposal. thing over the power cord. ■ Always Unplug the Power Cord before connecting the equipment to User's Manual. ◯ The equipment has dropped and damaged. ◯ The equipment has obvious sign of breakage. iii Replace only with the same...
...get the equipment checked by the manufacturer. MS-7596 Safety Instructions ■ Always read the safety instructions carefully. ■ Keep this User's Manual for future reference. ■ Keep this equipment away from overheating. DO NOT COVER THE OPENINGS. ■ Make sure the voltage of ...are for recycleing special disposal. thing over the power cord. ■ Always Unplug the Power Cord before connecting the equipment to User's Manual. ◯ The equipment has dropped and damaged. ◯ The equipment has obvious sign of breakage. iii Replace only with the same...
User Guide
Page 21
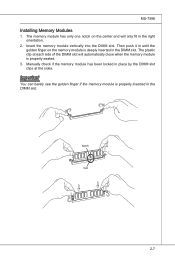
... in until the golden finger on the center and will automatically close when the memory module is properly inserted in the right orientation. 2. Notch Volt 2-7 Manually check if the memory module has been locked in place by the DIMM slot clips at each side of the DIMM slot will only fit...
... in until the golden finger on the center and will automatically close when the memory module is properly inserted in the right orientation. 2. Notch Volt 2-7 Manually check if the memory module has been locked in place by the DIMM slot clips at each side of the DIMM slot will only fit...
User Guide
Page 23
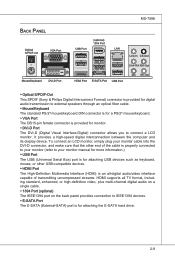
... cable into the DVI-D connector, and make sure that the other end of the cable is properly connected to your monitor (refer to your monitor manual for more information.) ▶ USB Port The USB (Universal Serial Bus) port is for attaching USB devices such as keyboard, mouse, or other USB-compatible...
... cable into the DVI-D connector, and make sure that the other end of the cable is properly connected to your monitor (refer to your monitor manual for more information.) ▶ USB Port The USB (Universal Serial Bus) port is for attaching USB devices such as keyboard, mouse, or other USB-compatible...
User Guide
Page 31
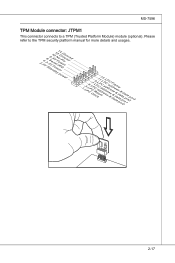
Please refer to a TPM (Trusted Platform Module) module (optional). MS-7596 TPM Module connector: JTPM1 This connector connects to the TPM security platform manual for more details and usages. 2.34V.36S..3tS8aVe.n15Prd0iVaob1.NlwyP2I1o.eRopG4rwoPQ.rwGeionreurornudnd 1.L3P.L5CP.LCC7P.loLRC9cP.eLka1CsPd1e1ad.CtL3drPea.dLsdCrPsedasCr&edsFdsd&sraraedt&amsasdpteaa&intpa0dinap1tian2pin3 2-17
Please refer to a TPM (Trusted Platform Module) module (optional). MS-7596 TPM Module connector: JTPM1 This connector connects to the TPM security platform manual for more details and usages. 2.34V.36S..3tS8aVe.n15Prd0iVaob1.NlwyP2I1o.eRopG4rwoPQ.rwGeionreurornudnd 1.L3P.L5CP.LCC7P.loLRC9cP.eLka1CsPd1e1ad.CtL3drPea.dLsdCrPsedasCr&edsFdsd&sraraedt&amsasdpteaa&intpa0dinap1tian2pin3 2-17
User Guide
Page 90
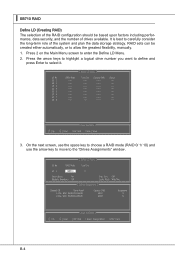
Press 2 on the Main Menu screen to allow the greatest flexibility, manually. 1. It is best to carefully consider the long-term role of drives available. B-4 RAID sets can be based upon factors including performance, data security, and ...
Press 2 on the Main Menu screen to allow the greatest flexibility, manually. 1. It is best to carefully consider the long-term role of drives available. B-4 RAID sets can be based upon factors including performance, data security, and ...
User Guide
Page 91
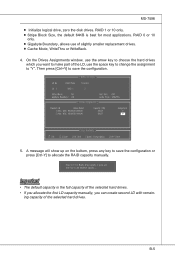
...save the configuration or press [Ctrl-Y] to save the configuration. 5. A message will show up on the bottom, press any key to allocate the RAID capacity manually. ing capacity of slightly smaller replacement drives. ■ Cache Mode, WriteThru or WriteBack. 4. MS-7596 ■ Initialize logical drive, zero the disk drives...Stripe Block Size, the default 64KB is the full capacity of the selected hard drives. • If you allocate the first LD capacity manually, you want to make part of the LD, use the space key to change the assignment to choose the hard drives which you can ...
...save the configuration or press [Ctrl-Y] to save the configuration. 5. A message will show up on the bottom, press any key to allocate the RAID capacity manually. ing capacity of slightly smaller replacement drives. ■ Cache Mode, WriteThru or WriteBack. 4. MS-7596 ■ Initialize logical drive, zero the disk drives...Stripe Block Size, the default 64KB is the full capacity of the selected hard drives. • If you allocate the first LD capacity manually, you want to make part of the LD, use the space key to change the assignment to choose the hard drives which you can ...
User Guide
Page 102
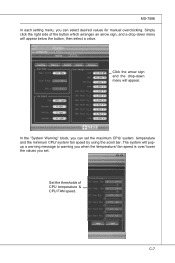
.... C-7 The system will popup a warning message to warning you when the temperature/ fan speed is over/ lower the values you can select desired values for manual overclocking. Set the thresholds of the button which arranges an arrow sign, and a drop-down menu will appear below the button, then select a value. In...
.... C-7 The system will popup a warning message to warning you when the temperature/ fan speed is over/ lower the values you can select desired values for manual overclocking. Set the thresholds of the button which arranges an arrow sign, and a drop-down menu will appear below the button, then select a value. In...


