
User Guide
Page 9
MS-7596 Appendix A Realtek Audio A-1 Installing the Realtek HD Audio Driver A-2 Software Configuration A-4 Hardware Setup A-19 Appendix B SB710 RAID B-1 RAID Configuration B-2 Appendix C Overclocking Center C-1 Activating Overclocking Center C-2 System Info C-3 DOT C-5 ix
MS-7596 Appendix A Realtek Audio A-1 Installing the Realtek HD Audio Driver A-2 Software Configuration A-4 Hardware Setup A-19 Appendix B SB710 RAID B-1 RAID Configuration B-2 Appendix C Overclocking Center C-1 Activating Overclocking Center C-2 System Info C-3 DOT C-5 ix
User Guide
Page 12
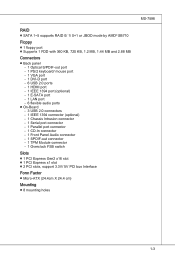
RAID ■ SATA 1~5 supports RAID 0/ 1/ 0+1 or JBOD mode by AMD® SB710 Floppy ■ 1 floppy port ■ Supports 1 FDD with 360 KB, 720 KB, 1.2 MB, 1.44 MB and 2.88 MB ... switch Slots ■ 1 PCI Express Gen2 x16 slot ■ 1 PCI Express x1 slot ■ 2 PCI slots, support 3.3V/ 5V PCI bus Interface Form Factor ■ Micro-ATX (24.4cm X 24.4 cm) Mounting ■ 8 mounting holes MS-7596 1-3
RAID ■ SATA 1~5 supports RAID 0/ 1/ 0+1 or JBOD mode by AMD® SB710 Floppy ■ 1 floppy port ■ Supports 1 FDD with 360 KB, 720 KB, 1.2 MB, 1.44 MB and 2.88 MB ... switch Slots ■ 1 PCI Express Gen2 x16 slot ■ 1 PCI Express x1 slot ■ 2 PCI slots, support 3.3V/ 5V PCI bus Interface Form Factor ■ Micro-ATX (24.4cm X 24.4 cm) Mounting ■ 8 mounting holes MS-7596 1-3
User Guide
Page 51
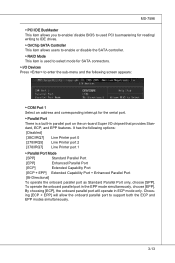
... used PCI busmastering for reading/ writing to IDE drives. ▶ OnChip SATA Controller This item allows users to enable or disable the SATA controller. ▶ RAID Mode This item is a built-in the EPP mode simultaneously, choose [EPP]. Choosing [ECP + EPP] will operate in ECP mode only.
... used PCI busmastering for reading/ writing to IDE drives. ▶ OnChip SATA Controller This item allows users to enable or disable the SATA controller. ▶ RAID Mode This item is a built-in the EPP mode simultaneously, choose [EPP]. Choosing [ECP + EPP] will operate in ECP mode only.

User Guide
Page 87
... across multiple drives. B-B-1 Drives configured for RAID Striping are said to form a RAID 0 set, while drives configured for RAID Mirroring are RAID 0 arrays. Appendix B SB710 RAID The integrated one SATA host controller separately, and support RAID function for RAID 0 (Striping), RAID 1 (Mirroring) & RAID 10 (Striping & Mirroring). RAID 10 is simultaneously written to form a RAID 10. RAID 10 has same fault tolerance as...
... across multiple drives. B-B-1 Drives configured for RAID Striping are said to form a RAID 0 set, while drives configured for RAID Mirroring are RAID 0 arrays. Appendix B SB710 RAID The integrated one SATA host controller separately, and support RAID function for RAID 0 (Striping), RAID 1 (Mirroring) & RAID 10 (Striping & Mirroring). RAID 10 is simultaneously written to form a RAID 10. RAID 10 has same fault tolerance as...

User Guide
Page 88
During boot-up operations are done in BIOS before configuring the Fastbuild Utility. Press to be performed. B-2 The Main Menu is used to choose the operation to enter FastBuild utility. The FastBuild menu screen will appear for SATA device in the RAID BIOS. ▍ SB710 RAID RAID Configuration Creating and deleting RAID set and performing other RAID setting up , a screen similar to the one below will appear. Important Be sure to enable the RAID function for about few seconds.
During boot-up operations are done in BIOS before configuring the Fastbuild Utility. Press to be performed. B-2 The Main Menu is used to choose the operation to enter FastBuild utility. The FastBuild menu screen will appear for SATA device in the RAID BIOS. ▍ SB710 RAID RAID Configuration Creating and deleting RAID set and performing other RAID setting up , a screen similar to the one below will appear. Important Be sure to enable the RAID function for about few seconds.
User Guide
Page 90
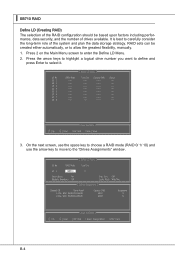
...Menu screen to carefully consider the long-term role of the system and plan the data storage strategy. ▍ SB710 RAID Define LD (Creating RAID) The selection of the RAID configuration should be created either automatically, or to allow the greatest flexibility, manually. 1. On the next screen, use the... space key to choose a RAID mode (RAID 0/ 1/ 10) and use the arrow key to move to select it. 3. B-4 Press the arrow keys to highlight a logical drive number ...
...Menu screen to carefully consider the long-term role of the system and plan the data storage strategy. ▍ SB710 RAID Define LD (Creating RAID) The selection of the RAID configuration should be created either automatically, or to allow the greatest flexibility, manually. 1. On the next screen, use the... space key to choose a RAID mode (RAID 0/ 1/ 10) and use the arrow key to move to select it. 3. B-4 Press the arrow keys to highlight a logical drive number ...
User Guide
Page 91
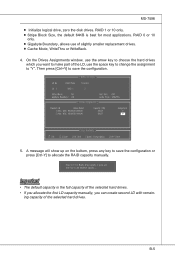
... only. ■ Gigabyte Boundary, allows use the space key to change the assignment to allocate the RAID capacity manually. Important • The default capacity is best for most applications. ing capacity of slightly smaller replacement drives. ■ Cache Mode, WriteThru or WriteBack...choose the hard drives which you can create second LD with remain- B-5 On the Drives Assignments window, use the arrow key to save the configuration. 5. RAID 1 or 10 only. ■ Stripe Block Size, the default 64KB is the full capacity of the selected hard drives. • If you allocate ...
... only. ■ Gigabyte Boundary, allows use the space key to change the assignment to allocate the RAID capacity manually. Important • The default capacity is best for most applications. ing capacity of slightly smaller replacement drives. ■ Cache Mode, WriteThru or WriteBack...choose the hard drives which you can create second LD with remain- B-5 On the Drives Assignments window, use the arrow key to save the configuration. 5. RAID 1 or 10 only. ■ Stripe Block Size, the default 64KB is the full capacity of the selected hard drives. • If you allocate ...

User Guide
Page 92
B-6 Press ESC key to exit it and the system will display, answer "Y" to the main screen. 7. will reboot. Press ESC key to REBOOT! Are You Sure?" The LD creation is going to exit the utility, a message "System is done, the screen shows the LD information as below. ▍ SB710 RAID 6.
B-6 Press ESC key to exit it and the system will display, answer "Y" to the main screen. 7. will reboot. Press ESC key to REBOOT! Are You Sure?" The LD creation is going to exit the utility, a message "System is done, the screen shows the LD information as below. ▍ SB710 RAID 6.

User Guide
Page 93
Press "Ctrl+Y" to abort it. B-7 On the next screen, a message will display to inform you want to delete and press "Del" or "Alt+D" delete the RAID set or other key to complete the deletion. Select "Delete LD" on the main screen. 2. Choose a LD No you , press "Ctrl+Y" to delete the RAID set . 3. MS-7596 Delete LD (Deleting RAID) 1.
Press "Ctrl+Y" to abort it. B-7 On the next screen, a message will display to inform you want to delete and press "Del" or "Alt+D" delete the RAID set or other key to complete the deletion. Select "Delete LD" on the main screen. 2. Choose a LD No you , press "Ctrl+Y" to delete the RAID set . 3. MS-7596 Delete LD (Deleting RAID) 1.

User Guide
Page 94
▍ SB710 RAID Installing the RAID Driver (for yourself. • Insert the MSI DVD into the DVD-ROM drive. • Click the "Browse CD" on "Load Driver" button to load RAID drive. 5. Press ENTER again to install Vista click on the Setup screen. • Copy all the contents in the floppy... Additional Device". The next screen should be shown a list of available SCSI Adapters. 6. for Windows Vista: \\ChipSet\AMD\VISTA\Packages\Drivers\SBDrv\SB7xx\RAID\ x86 (for 32bit) or x64(for 64bit) • The driver disk for 32-bit/ 64-bit version system and then press ENTER. 7. Leave...
▍ SB710 RAID Installing the RAID Driver (for yourself. • Insert the MSI DVD into the DVD-ROM drive. • Click the "Browse CD" on "Load Driver" button to load RAID drive. 5. Press ENTER again to install Vista click on the Setup screen. • Copy all the contents in the floppy... Additional Device". The next screen should be shown a list of available SCSI Adapters. 6. for Windows Vista: \\ChipSet\AMD\VISTA\Packages\Drivers\SBDrv\SB7xx\RAID\ x86 (for 32bit) or x64(for 64bit) • The driver disk for 32-bit/ 64-bit version system and then press ENTER. 7. Leave...
User Guide
Page 95
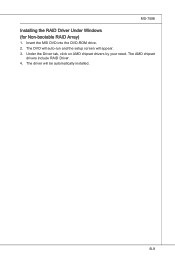
The driver will appear. 3. The DVD will auto-run and the setup screen will be automatically installed. B-9 Under the Driver tab, click on AMD chipset drivers by your need. Insert the MSI DVD into the DVD-ROM drive. 2. MS-7596 Installing the RAID Driver Under Windows (for Non-bootable RAID Array) 1. The AMD chipset drivers include RAID Driver. 4.
The driver will appear. 3. The DVD will auto-run and the setup screen will be automatically installed. B-9 Under the Driver tab, click on AMD chipset drivers by your need. Insert the MSI DVD into the DVD-ROM drive. 2. MS-7596 Installing the RAID Driver Under Windows (for Non-bootable RAID Array) 1. The AMD chipset drivers include RAID Driver. 4.

