

User Manual
Page 2
...Tool 3-17 4. System Operations (Windows 8 4-1 System Booting Setup for the first time 3-2 Network Connection under Windows 4-3 Sound Blaster Cinema (Optional 4-9 On-Screen Display (OSD 4-13 Power Management 4-16 Creating System Recovery Disc 4-18 System Recovery 4-23 A. Preface Contents Copyright Notice iii Trademarks iii Revision iii Upgrade and Warranty iv Acquisition of Replaceable Parts iv Technical Support iv Green Product Features iv Environmental Policy v Chemical Substances Information v Battery Information v Safety Instructions vi CE...
...Tool 3-17 4. System Operations (Windows 8 4-1 System Booting Setup for the first time 3-2 Network Connection under Windows 4-3 Sound Blaster Cinema (Optional 4-9 On-Screen Display (OSD 4-13 Power Management 4-16 Creating System Recovery Disc 4-18 System Recovery 4-23 A. Preface Contents Copyright Notice iii Trademarks iii Revision iii Upgrade and Warranty iv Acquisition of Replaceable Parts iv Technical Support iv Green Product Features iv Environmental Policy v Chemical Substances Information v Battery Information v Safety Instructions vi CE...
User Manual
Page 4
... For any upgrade or replace service. Do not attempt to the environment and health ◙ Easily dismantled and recycled ◙ Reduced use of spare parts. Alternatively, please iv try the following help resources for further guidance. ◙ Visit the MSI website for technical guide, BIOS updates, driver updates and other information via http://www.msi.com/service/download/ ◙ Contact our technical staff via http://support.msi.com...
... For any upgrade or replace service. Do not attempt to the environment and health ◙ Easily dismantled and recycled ◙ Reduced use of spare parts. Alternatively, please iv try the following help resources for further guidance. ◙ Visit the MSI website for technical guide, BIOS updates, driver updates and other information via http://www.msi.com/service/download/ ◙ Contact our technical staff via http://support.msi.com...

User Manual
Page 7
... Series Never pour any of the following situations arises, get it work well or you can not get the equipment checked by service personnel: vii ◙ The power cord or plug is prohibited. 2� Do not touch the lens inside the drive. Place the power cord in particular Section 820.93, Grounding of Outer Conductive Shield of a Coaxial Cable...
... Series Never pour any of the following situations arises, get it work well or you can not get the equipment checked by service personnel: vii ◙ The power cord or plug is prohibited. 2� Do not touch the lens inside the drive. Place the power cord in particular Section 820.93, Grounding of Outer Conductive Shield of a Coaxial Cable...

User Manual
Page 8
... to comply with the instruction manual, may cause undesired operation. Notice 2 Shielded interface cables and AC power cord, if any, must accept any interference received, including interference that may cause harmful interference to which can radiate radio frequency energy and, if not installed and used in a residential installation. This equipment generates, uses and can be used in accordance with the...
... to comply with the instruction manual, may cause undesired operation. Notice 2 Shielded interface cables and AC power cord, if any, must accept any interference received, including interference that may cause harmful interference to which can radiate radio frequency energy and, if not installed and used in a residential installation. This equipment generates, uses and can be used in accordance with the...

User Manual
Page 18
... rate is selected. 10 Microphone Jack This connector is provided for microphones. 11 Line-Out Jack This connector is established. You can connect a network cable to the Local Area Network (LAN). Important High-speed devices are suggested to be plugged into the USB 2.0 ports on the rear panel. Yellow Green/ Orange LED Left Right Color Yellow Green Orange LED State Off On (steady state) On (brighter...
... rate is selected. 10 Microphone Jack This connector is provided for microphones. 11 Line-Out Jack This connector is established. You can connect a network cable to the Local Area Network (LAN). Important High-speed devices are suggested to be plugged into the USB 2.0 ports on the rear panel. Yellow Green/ Orange LED Left Right Color Yellow Green Orange LED State Off On (steady state) On (brighter...
User Manual
Page 20
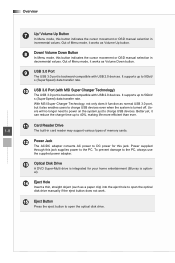
... Button Press the eject button to open the optical disk drive. Power supplied through this jack supplies power to charge USB devices. Out of Menu mode, it works as Volume Up button. 8 Down/ Volume Down Button In Menu mode, this button indicates the cursor movement or OSD manual selection in incremental values. Better yet, it also enables users to 5Gbit/ s (SuperSpeed) data transfer rate. Out of memory cards. 12 Power Jack The AC/DC adapter converts AC power...
... Button Press the eject button to open the optical disk drive. Power supplied through this jack supplies power to charge USB devices. Out of Menu mode, it works as Volume Up button. 8 Down/ Volume Down Button In Menu mode, this button indicates the cursor movement or OSD manual selection in incremental values. Better yet, it also enables users to 5Gbit/ s (SuperSpeed) data transfer rate. Out of memory cards. 12 Power Jack The AC/DC adapter converts AC power...

User Manual
Page 21
... ■ 1 RJ-45 LAN jack ■ 1 serial port (Optional) ■ 1 HDMI-out port (Optional) ■ 1 TV tuner antenna connector (Optional) Side Input/ Output ■ 2 USB 3.0 ports ■ 1 DC power jack Storage ■ Hard Disk Drive: 3.5", SATAIII ■ Optical Disk Drive: Slim DVD Super Multi (Blu-ray is optional) ■ Card Reader: 3-in Bluetooth module ■ Wired LAN: supported by Realtek® ALC887 ■ Compliant with Azalia 1.0 specs Display ■ 21.5-inch Full HD display with LED backlight - An optimal...
... ■ 1 RJ-45 LAN jack ■ 1 serial port (Optional) ■ 1 HDMI-out port (Optional) ■ 1 TV tuner antenna connector (Optional) Side Input/ Output ■ 2 USB 3.0 ports ■ 1 DC power jack Storage ■ Hard Disk Drive: 3.5", SATAIII ■ Optical Disk Drive: Slim DVD Super Multi (Blu-ray is optional) ■ Card Reader: 3-in Bluetooth module ■ Wired LAN: supported by Realtek® ALC887 ■ Compliant with Azalia 1.0 specs Display ■ 21.5-inch Full HD display with LED backlight - An optimal...
User Manual
Page 23
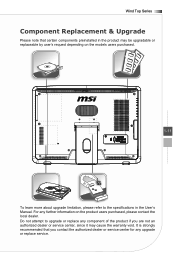
For any upgrade or replace service. It is strongly recommended that certain components preinstalled in the User's Manual. Do not attempt to the specifications in the product may cause the warranty void. Wind Top Series Component Replacement & Upgrade Please note that you are not an authorized dealer or service center, since it may be upgradable or replaceable by user's request depending on the models users purchased. 1-11...
For any upgrade or replace service. It is strongly recommended that certain components preinstalled in the User's Manual. Do not attempt to the specifications in the product may cause the warranty void. Wind Top Series Component Replacement & Upgrade Please note that you are not an authorized dealer or service center, since it may be upgradable or replaceable by user's request depending on the models users purchased. 1-11...
User Manual
Page 32
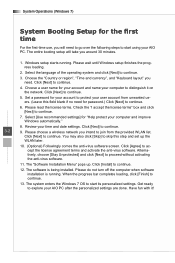
... [Next] to continue. 3-2 9. Click [Next] to continue. 4. The software is running . Please do not turn off the computer when software installation is being installed. The system enters the Windows 7 OS to start using your user account from the provided WLAN list. The "Software Installation Menu" pops up the WLAN later. 10. (Optional) Followingly comes the anti-virus software screen. When the progress bar completes loading, click [Finish] to...
... [Next] to continue. 3-2 9. Click [Next] to continue. 4. The software is running . Please do not turn off the computer when software installation is being installed. The system enters the Windows 7 OS to start using your user account from the provided WLAN list. The "Software Installation Menu" pops up the WLAN later. 10. (Optional) Followingly comes the anti-virus software screen. When the progress bar completes loading, click [Finish] to...

User Manual
Page 41
... To change . ■ Software Update... - Click on the screen to apply the SBX Pro Studio effects. The About Box shows the version number of supported languages. Wind Top Series ■ Audio Device Selection... - To update this program. Choose the desired language from the drop down list of the Sound Blaster Cinema Application. And follow the instructions on the "Software Update" option. To select the desired audio output device...
... To change . ■ Software Update... - Click on the screen to apply the SBX Pro Studio effects. The About Box shows the version number of supported languages. Wind Top Series ■ Audio Device Selection... - To update this program. Choose the desired language from the drop down list of the Sound Blaster Cinema Application. And follow the instructions on the "Software Update" option. To select the desired audio output device...

User Manual
Page 44
Important Whenever any error takes place and incurs abnormal display or volume malfunction, enter the OSD menu and reset your monitor to restore all settings to select PC/ HDMI/ monitor off mode. Press it again to manufacturer default for optimal performance. System Operations (Windows 7) Resetting system Adjusting wide screen mode 2. Press the Up & Down buttons to view the signal source. Press the Mode button to adjust the system volume. 3-14 3.
Important Whenever any error takes place and incurs abnormal display or volume malfunction, enter the OSD menu and reset your monitor to restore all settings to select PC/ HDMI/ monitor off mode. Press it again to manufacturer default for optimal performance. System Operations (Windows 7) Resetting system Adjusting wide screen mode 2. Press the Up & Down buttons to view the signal source. Press the Mode button to adjust the system volume. 3-14 3.

User Manual
Page 45
... display, hard drive, and battery. Go to [Start] > [Control Panel] > [System and Security]. You may also fine-tune the settings by clicking [Change plan settings]. To be energy efficient, turn off your display or set your PC to sleep mode after a period of user inactivity. Power Management in Windows OS ■ [Power Options] in Windows OS allow you to control the power management features of electricity as well as deliver environmental benefits. Wind Top Series Power Management Power management...
... display, hard drive, and battery. Go to [Start] > [Control Panel] > [System and Security]. You may also fine-tune the settings by clicking [Change plan settings]. To be energy efficient, turn off your display or set your PC to sleep mode after a period of user inactivity. Power Management in Windows OS ■ [Power Options] in Windows OS allow you to control the power management features of electricity as well as deliver environmental benefits. Wind Top Series Power Management Power management...
User Manual
Page 47
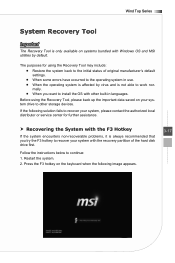
... Top Series System Recovery Tool Important The Recovery Tool is always recommended that you want to install the OS with the recovery partition of original manufacturer's default settings. ■ When some errors have occurred to the operating system in languages. Before using the Recovery Tool may include: ■ Restore the system back to the initial status of the hard disk drive first. Follow the instructions below to...
... Top Series System Recovery Tool Important The Recovery Tool is always recommended that you want to install the OS with the recovery partition of original manufacturer's default settings. ■ When some errors have occurred to the operating system in languages. Before using the Recovery Tool may include: ■ Restore the system back to the initial status of the hard disk drive first. Follow the instructions below to...

User Manual
Page 68
... the instructions on the "Software Update" option. And follow the instructions on the dialog box to complete the change into the desired display language of this program. Click on the screen to apply the SBX Pro Studio effects. System Operations (Windows 8) ■ Audio Device Selection... - To update this program. To select the desired audio output device to complete the update. ■ About Sound Blaster Cinema... - To change . ■ Software Update... -
... the instructions on the "Software Update" option. And follow the instructions on the dialog box to complete the change into the desired display language of this program. Click on the screen to apply the SBX Pro Studio effects. System Operations (Windows 8) ■ Audio Device Selection... - To update this program. To select the desired audio output device to complete the update. ■ About Sound Blaster Cinema... - To change . ■ Software Update... -

User Manual
Page 71
Press it again to select PC/ HDMI/ monitor off mode. 4-15 Important Whenever any error takes place and incurs abnormal display or volume malfunction, enter the OSD menu and reset your monitor to restore all settings to view the signal source. Press the Mode button to manufacturer default for optimal performance. Resetting system Wind Top Series Adjusting wide screen mode 2. Press the Up & Down buttons to adjust the system volume. 3.
Press it again to select PC/ HDMI/ monitor off mode. 4-15 Important Whenever any error takes place and incurs abnormal display or volume malfunction, enter the OSD menu and reset your monitor to restore all settings to view the signal source. Press the Mode button to manufacturer default for optimal performance. Resetting system Wind Top Series Adjusting wide screen mode 2. Press the Up & Down buttons to adjust the system volume. 3.

User Manual
Page 72
... [Change plan settings]. To be energy efficient, turn off your display or set your PC to sleep mode after a period of user inactivity. Power Management in Windows OS ■ [Power Options] in Windows OS allow you to control the power management features of your personal needs. Select a power plan that suits your display, hard drive, and battery. Go to save significant amounts of electricity as well as deliver environmental benefits. System Operations (Windows 8) Power Management Power management of...
... [Change plan settings]. To be energy efficient, turn off your display or set your PC to sleep mode after a period of user inactivity. Power Management in Windows OS ■ [Power Options] in Windows OS allow you to control the power management features of your personal needs. Select a power plan that suits your display, hard drive, and battery. Go to save significant amounts of electricity as well as deliver environmental benefits. System Operations (Windows 8) Power Management Power management of...

User Manual
Page 80
Insert the recovery disc into the optical disc drive. 2. After booting up, following screen will pop up, select the [Use a device] to restart the system. 4-24 3. Select [Settings] on Desktop, then "Change PC settings" to enter PC settings main page > General > Advanced startup, and click [Restart now] to continue. System Operations (Windows 8) Recovering the System with the recovery discs that you created beforehand. Follow the instructions below to restore your system with the Recovery Discs This section is meant for users to continue: 1.
Insert the recovery disc into the optical disc drive. 2. After booting up, following screen will pop up, select the [Use a device] to restart the system. 4-24 3. Select [Settings] on Desktop, then "Change PC settings" to enter PC settings main page > General > Advanced startup, and click [Restart now] to continue. System Operations (Windows 8) Recovering the System with the recovery discs that you created beforehand. Follow the instructions below to restore your system with the Recovery Discs This section is meant for users to continue: 1.

User Manual
Page 81
The Windows OS starts loading files. 7. Wind Top Series 5. Select [Hard Disk Recovery] only when your HDD is infected with fatal viruses and no solution can be erased while all settings will format the whole HDD. The system recovery menu pops up. [Hard Disk Recovery] will be restored to reconfirm the selection when the following message appears. 6. Press any key to manufacturer default. 4. All data on the HDD will be found except a clear cleanup of the HDD. 4-25 Select recovery disc the boot device.
The Windows OS starts loading files. 7. Wind Top Series 5. Select [Hard Disk Recovery] only when your HDD is infected with fatal viruses and no solution can be erased while all settings will format the whole HDD. The system recovery menu pops up. [Hard Disk Recovery] will be restored to reconfirm the selection when the following message appears. 6. Press any key to manufacturer default. 4. All data on the HDD will be found except a clear cleanup of the HDD. 4-25 Select recovery disc the boot device.
User Manual
Page 90
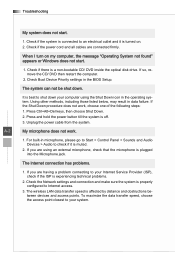
... the BIOS Setup. The wireless LAN data transfer speed is a non-bootable CD/ DVD inside the optical disk drive. Press and hold the power button till the system is properly configured to an electrical outlet and it is experiencing technical problems. 2. If you are having a problem connecting to your Internet Service Provider (ISP), check if the ISP is muted. 2. Check if the system is connected to Internet access. 3. If so, remove the CD/ DVD...
... the BIOS Setup. The wireless LAN data transfer speed is a non-bootable CD/ DVD inside the optical disk drive. Press and hold the power button till the system is properly configured to an electrical outlet and it is experiencing technical problems. 2. If you are having a problem connecting to your Internet Service Provider (ISP), check if the ISP is muted. 2. Check if the system is connected to Internet access. 3. If so, remove the CD/ DVD...
User Manual
Page 91
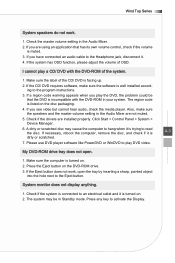
... work . 1. Wind Top Series System speakers do not work , open . 1. If the system has OSD function, please adjust the volume of the system. 1. The region code is well installed according to hang when it is incompatible with the DVD-ROM of OSD. Click Start > Control Panel > System > Device Manager. 6. If you see video but cannot hear audio, check the media player. Press the Eject button on the disc packaging. 4. Make...
... work . 1. Wind Top Series System speakers do not work , open . 1. If the system has OSD function, please adjust the volume of the system. 1. The region code is well installed according to hang when it is incompatible with the DVD-ROM of OSD. Click Start > Control Panel > System > Device Manager. 6. If you see video but cannot hear audio, check the media player. Press the Eject button on the disc packaging. 4. Make...


