

User Manual
Page 1
Wind Top AE220 All-in-One (AIO) PC MS-AC15 System G52-AC151X1
Wind Top AE220 All-in-One (AIO) PC MS-AC15 System G52-AC151X1

User Manual
Page 16
Overview Rear View 1 1 1-4 12 34 8 7 10 5 11 9 6 Important We suggest that you connect the AC/DC adapter to your AIO PC first and then connect the AC power cord to the socket-outlet for safety concerns.
Overview Rear View 1 1 1-4 12 34 8 7 10 5 11 9 6 Important We suggest that you connect the AC/DC adapter to your AIO PC first and then connect the AC power cord to the socket-outlet for safety concerns.

User Manual
Page 17
...such as keyboard, mouse, or other USB-compatible devices. The end of the cable has a small loop which allows users to secure the AIO PC in place. 3 Stand Use this stand to avoid cable spaghetti when connecting devices. 5 TV Tuner Antenna Connector (Optional) This connector is provided for... (HDMI) is for air convection and to 480Mbit/s (Hi-Speed) data transfer rate. Do not cover the ventilator. 2 Kensington Lock Port This AIO PC provides a Kensington lock port, which allows the whole cable to be looped around a permanent object, such as a heavy table or other similar equipment, ...
...such as keyboard, mouse, or other USB-compatible devices. The end of the cable has a small loop which allows users to secure the AIO PC in place. 3 Stand Use this stand to avoid cable spaghetti when connecting devices. 5 TV Tuner Antenna Connector (Optional) This connector is provided for... (HDMI) is for air convection and to 480Mbit/s (Hi-Speed) data transfer rate. Do not cover the ventilator. 2 Kensington Lock Port This AIO PC provides a Kensington lock port, which allows the whole cable to be looped around a permanent object, such as a heavy table or other similar equipment, ...

User Manual
Page 19
... is turned on or off. 5 Monitor Power/ Mode Button This button works both as the monitor power button and as the signal input switch between PC & HDMI. 6 Menu/ Enter Button Press this button to turn the system on and goes off when the monitor is detected. 4 System Power Button Press the...
... is turned on or off. 5 Monitor Power/ Mode Button This button works both as the monitor power button and as the signal input switch between PC & HDMI. 6 Menu/ Enter Button Press this button to turn the system on and goes off when the monitor is detected. 4 System Power Button Press the...
User Manual
Page 20
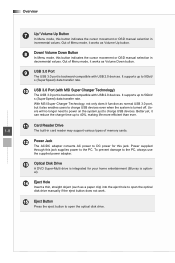
With MSI Super Charger Technology, not only does it function as normal USB 3.0 port, but it works as Volume Down button. 9 USB 3.0 Port The USB 3.0 port is backward-compatible with USB 2.0 devices. Overview 7 Up/ Volume Up Button In Menu mode, this jack supplies power to the PC. Power supplied through ...1-8 The built-in card reader may support various types of memory cards. 12 Power Jack The AC/DC adapter converts AC power to the PC, always use the supplied power adapter. 13 Optical Disk Drive A DVD Super-Multi drive is integrated for this button indicates the cursor movement ...
With MSI Super Charger Technology, not only does it function as normal USB 3.0 port, but it works as Volume Down button. 9 USB 3.0 Port The USB 3.0 port is backward-compatible with USB 2.0 devices. Overview 7 Up/ Volume Up Button In Menu mode, this jack supplies power to the PC. Power supplied through ...1-8 The built-in card reader may support various types of memory cards. 12 Power Jack The AC/DC adapter converts AC power to the PC, always use the supplied power adapter. 13 Optical Disk Drive A DVD Super-Multi drive is integrated for this button indicates the cursor movement ...

User Manual
Page 26
...) to have an optimal view. 7. Place you to avoid personal injury. 2-2 1 15-20 38-76 cm 6 3 4 90-120 5 4 2 2 4 Avoid using your PC in a place where discomfort may occur (such as on the chair, sit straight and keep a good posture. Adjust the angle/position of time. 1. Getting Started... platform that your knees and elbows have the proper position (about 90-degree) when operating. 5. Please treat it with your PC for a long period of the AIO PC to support your back comfortably. 4. However, choosing a good workspace is an electrical device. Choose the proper desk and chair ...
...) to have an optimal view. 7. Place you to avoid personal injury. 2-2 1 15-20 38-76 cm 6 3 4 90-120 5 4 2 2 4 Avoid using your PC in a place where discomfort may occur (such as on the chair, sit straight and keep a good posture. Adjust the angle/position of time. 1. Getting Started... platform that your knees and elbows have the proper position (about 90-degree) when operating. 5. Please treat it with your PC for a long period of the AIO PC to support your back comfortably. 4. However, choosing a good workspace is an electrical device. Choose the proper desk and chair ...

User Manual
Page 28
Plug the male end of the adapter to the socket-outlet for safety concerns. Assemble the AC/DC adapter and the AC power cord. 2. Getting Started Connecting the AC Power 1. Plug the DC end of the AC power cord to the electrical outlet. 1 3 2 2-4 Important We suggest that you connect the AC/DC adapter to your AIO PC first and then connect the AC power cord to the AIO PC. 3.
Plug the male end of the adapter to the socket-outlet for safety concerns. Assemble the AC/DC adapter and the AC power cord. 2. Getting Started Connecting the AC Power 1. Plug the DC end of the AC power cord to the electrical outlet. 1 3 2 2-4 Important We suggest that you connect the AC/DC adapter to your AIO PC first and then connect the AC power cord to the AIO PC. 3.
User Manual
Page 32
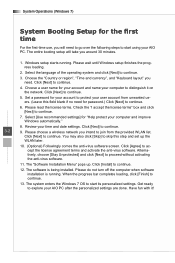
... you need to go over the following steps to skip this field blank if no need for password.) Click [Next] to protect your AIO PC. Please choose a wireless network you intend to join from unwanted users. (Leave this step and set up . Alternatively, choose [Stay Unprotected]... the anti-virus software. You may also click [Skip] to start its personalized settings. Click [Install] to continue. 7. Review your AIO PC after the personalized settings are done. The entire booting setup will need . Please read the license terms. Check the "I accept the license terms...
... you need to go over the following steps to skip this field blank if no need for password.) Click [Next] to protect your AIO PC. Please choose a wireless network you intend to join from unwanted users. (Leave this step and set up . Alternatively, choose [Stay Unprotected]... the anti-virus software. You may also click [Skip] to start its personalized settings. Click [Install] to continue. 7. Review your AIO PC after the personalized settings are done. The entire booting setup will need . Please read the license terms. Check the "I accept the license terms...

User Manual
Page 44
Press the Mode button to manufacturer default for optimal performance. Important Whenever any error takes place and incurs abnormal display or volume malfunction, enter the OSD menu and reset your monitor to restore all settings to view the signal source. Press the Up & Down buttons to select PC/ HDMI/ monitor off mode. System Operations (Windows 7) Resetting system Adjusting wide screen mode 2. Press it again to adjust the system volume. 3-14 3.
Press the Mode button to manufacturer default for optimal performance. Important Whenever any error takes place and incurs abnormal display or volume malfunction, enter the OSD menu and reset your monitor to restore all settings to view the signal source. Press the Up & Down buttons to select PC/ HDMI/ monitor off mode. System Operations (Windows 7) Resetting system Adjusting wide screen mode 2. Press it again to adjust the system volume. 3-14 3.

User Manual
Page 45
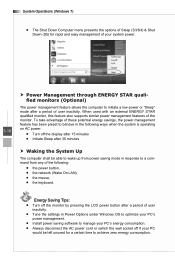
You may also fine-tune the settings by clicking [Change plan settings]. To be energy efficient, turn off your display or set your PC to sleep mode after a period of user inactivity. Power Management in Windows OS ■ [Power Options] in Windows OS allow you to [Start] > [Control ... [Power Options] link. 3-15 Select a power plan that suits your display, hard drive, and battery. Wind Top Series Power Management Power management of personal computers (PCs) and monitors has the potential to save significant amounts of your personal needs.
You may also fine-tune the settings by clicking [Change plan settings]. To be energy efficient, turn off your display or set your PC to sleep mode after a period of user inactivity. Power Management in Windows OS ■ [Power Options] in Windows OS allow you to [Start] > [Control ... [Power Options] link. 3-15 Select a power plan that suits your display, hard drive, and battery. Wind Top Series Power Management Power management of personal computers (PCs) and monitors has the potential to save significant amounts of your personal needs.
User Manual
Page 46
...button after a period of user inactivity. ■ Tune the settings in Power Options under Windows OS to optimize your PC's power management. ■ Install power saving software to manage your PC's energy consumption. ■ Always disconnect the AC power cord or switch the wall socket off the display after 15 minutes... to behave in response to a command from any of the following ways when the system is operating on AC power: ■ Turn off if your PC would be able to wake up from power saving mode in the following : ■ the power button, ■ the network (Wake On LAN), ■...
...button after a period of user inactivity. ■ Tune the settings in Power Options under Windows OS to optimize your PC's power management. ■ Install power saving software to manage your PC's energy consumption. ■ Always disconnect the AC power cord or switch the wall socket off the display after 15 minutes... to behave in response to a command from any of the following ways when the system is operating on AC power: ■ Turn off if your PC would be able to wake up from power saving mode in the following : ■ the power button, ■ the network (Wake On LAN), ■...
User Manual
Page 58
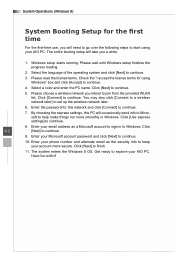
Please wait until Windows setup finishes the progress loading. 2. Please read the license terms. Check the "I accept the license terms for using your AIO PC. Click [Next] to continue. 8. Click [Use express settings] to continue. 5. Get ready to continue. 3. Select the language of the ... occasionally send info to Microsoft to help make things run more secure. Enter your email address as the security info to keep your AIO PC. You may also click [Connect to a wireless network later] to continue. 7. Click 4-2 [Next] to continue. 10. Enter your phone ...
Please wait until Windows setup finishes the progress loading. 2. Please read the license terms. Check the "I accept the license terms for using your AIO PC. Click [Next] to continue. 8. Click [Use express settings] to continue. 5. Get ready to continue. 3. Select the language of the ... occasionally send info to Microsoft to help make things run more secure. Enter your email address as the security info to keep your AIO PC. You may also click [Connect to a wireless network later] to continue. 7. Click 4-2 [Next] to continue. 10. Enter your phone ...

User Manual
Page 71
Press the Mode button to manufacturer default for optimal performance. Press it again to select PC/ HDMI/ monitor off mode. 4-15 Important Whenever any error takes place and incurs abnormal display or volume malfunction, enter the OSD menu and reset your monitor to restore all settings to view the signal source. Resetting system Wind Top Series Adjusting wide screen mode 2. Press the Up & Down buttons to adjust the system volume. 3.
Press the Mode button to manufacturer default for optimal performance. Press it again to select PC/ HDMI/ monitor off mode. 4-15 Important Whenever any error takes place and incurs abnormal display or volume malfunction, enter the OSD menu and reset your monitor to restore all settings to view the signal source. Resetting system Wind Top Series Adjusting wide screen mode 2. Press the Up & Down buttons to adjust the system volume. 3.

User Manual
Page 72
To be energy efficient, turn off your display or set your PC to sleep mode after a period of user inactivity. Power Management in Windows OS ■ [Power Options] in Windows OS allow you to control the ... clicking [Change plan settings]. Select a power plan that suits your display, hard drive, and battery. System Operations (Windows 8) Power Management Power management of personal computers (PCs) and monitors has the potential to save significant amounts of your personal needs. Go to [Start] > [Control Panel] > [System and Security]. 4-16 Then click on...
To be energy efficient, turn off your display or set your PC to sleep mode after a period of user inactivity. Power Management in Windows OS ■ [Power Options] in Windows OS allow you to control the ... clicking [Change plan settings]. Select a power plan that suits your display, hard drive, and battery. System Operations (Windows 8) Power Management Power management of personal computers (PCs) and monitors has the potential to save significant amounts of your personal needs. Go to [Start] > [Control Panel] > [System and Security]. 4-16 Then click on...

User Manual
Page 73
... Series ■ The Shut Down Computer menu presents the options of Sleep (S3/S4) & Shut Down (S5) for rapid and easy management of your PC would be able to wake up from power saving mode in response to a command from any of the following ways when the system is operating..." mode after a period of user inactivity. ■ Tune the settings in Power Options under Windows OS to optimize your PC's power management. ■ Install power saving software to manage your PC's energy consumption. ■ Always disconnect the AC power cord or switch the wall socket off the monitor by pressing the...
... Series ■ The Shut Down Computer menu presents the options of Sleep (S3/S4) & Shut Down (S5) for rapid and easy management of your PC would be able to wake up from power saving mode in response to a command from any of the following ways when the system is operating..." mode after a period of user inactivity. ■ Tune the settings in Power Options under Windows OS to optimize your PC's power management. ■ Install power saving software to manage your PC's energy consumption. ■ Always disconnect the AC power cord or switch the wall socket off the monitor by pressing the...

User Manual
Page 80
Select [Settings] on Desktop, then "Change PC settings" to enter PC settings main page > General > Advanced startup, and click [Restart now] to continue: 1. Insert the recovery disc into the optical disc drive. 2. Follow the instructions below to restart the system. 4-24 3. System Operations (Windows 8) Recovering the System with the Recovery Discs This section is meant for users to continue. After booting up, following screen will pop up, select the [Use a device] to restore your system with the recovery discs that you created beforehand.
Select [Settings] on Desktop, then "Change PC settings" to enter PC settings main page > General > Advanced startup, and click [Restart now] to continue: 1. Insert the recovery disc into the optical disc drive. 2. Follow the instructions below to restart the system. 4-24 3. System Operations (Windows 8) Recovering the System with the Recovery Discs This section is meant for users to continue. After booting up, following screen will pop up, select the [Use a device] to restore your system with the recovery discs that you created beforehand.

User Manual
Page 84
...your files, and click [Get started]. 4-28 2. System Operations (Windows 8) Recovery from the Operating System Refresh PC The Refresh PC utility checks whether the system files, Windows registry, and other important system components are working fine or not; It will show the changes... which will attempt to enter PC settings main page > General > Refresh your PC without losing your PC isn't running well, you can refresh it will be made during the process, click [Next] to continue.
...your files, and click [Get started]. 4-28 2. System Operations (Windows 8) Recovery from the Operating System Refresh PC The Refresh PC utility checks whether the system files, Windows registry, and other important system components are working fine or not; It will show the changes... which will attempt to enter PC settings main page > General > Refresh your PC without losing your PC isn't running well, you can refresh it will be made during the process, click [Next] to continue.

User Manual
Page 85
A message indicates that your PC is ready to be back to Windows Start Screen where you will be refreshed, click [refresh] to start. This might take a while. 4. After the refresh process ends, you can find all default Windows 8 utilities and widgets. 4-29 Wind Top Series 3.
A message indicates that your PC is ready to be back to Windows Start Screen where you will be refreshed, click [refresh] to start. This might take a while. 4. After the refresh process ends, you can find all default Windows 8 utilities and widgets. 4-29 Wind Top Series 3.

User Manual
Page 86
System Operations (Windows 8) Reset PC The Reset utility will show the changes to be made during the process, click [Next] to continue. It will bring the system back to enter PC settings main page > General > Remove everything and reinstall Windows, and click [Get started]. 4-30 2. Select [Settings] on Desktop, then "Change PC settings" to original factory settings. 1.
System Operations (Windows 8) Reset PC The Reset utility will show the changes to be made during the process, click [Next] to continue. It will bring the system back to enter PC settings main page > General > Remove everything and reinstall Windows, and click [Get started]. 4-30 2. Select [Settings] on Desktop, then "Change PC settings" to original factory settings. 1.

User Manual
Page 88
System Operations (Windows 8) 5. It is now ready to reset your PC, click [Reset] and follow the on-screen instructions to restart your PC. 4-32
System Operations (Windows 8) 5. It is now ready to reset your PC, click [Reset] and follow the on-screen instructions to restart your PC. 4-32
