User Manual
Page 2
... Tips 2-2 Hardware Setup 2-3 3. System Operations 3-1 On-Screen Display (OSD) (Optional 3-2 On-Screen Display (OSD) (Optional 3-5 Power Management 3-8 Network Connection (Windows 7 3-10 Network Connection (Windows 8.x 3-13 System Recovery (Windows 7 3-16 System Recovery (Windows 8.x 3-26 A. Preface Contents Copyright Notice iii Trademarks iii Revision iii Upgrade and Warranty iv Acquisition of Replaceable Parts iv Technical Support iv Green Product Features iv Environmental Policy v Chemical Substances Information v Battery Information v Safety Instructions vi CE...
... Tips 2-2 Hardware Setup 2-3 3. System Operations 3-1 On-Screen Display (OSD) (Optional 3-2 On-Screen Display (OSD) (Optional 3-5 Power Management 3-8 Network Connection (Windows 7 3-10 Network Connection (Windows 8.x 3-13 System Recovery (Windows 7 3-16 System Recovery (Windows 8.x 3-26 A. Preface Contents Copyright Notice iii Trademarks iii Revision iii Upgrade and Warranty iv Acquisition of Replaceable Parts iv Technical Support iv Green Product Features iv Environmental Policy v Chemical Substances Information v Battery Information v Safety Instructions vi CE...
User Manual
Page 4
... for technical guide, BIOS updates, driver updates and other information via http://www.msi.com/service/download/ ◙ Contact our technical staff via http://support.msi.com/ for any upgrade or replace service. It is strongly recommended that the acquisition of replaceable parts (or...support.msi.com/ Green Product Features ◙ Reduced energy consumption during use and stand-by ◙ Limited use of the product users purchased in the product may be obtained from the user's manual, please contact your system and no solution can be upgradable or replaceable by user...
... for technical guide, BIOS updates, driver updates and other information via http://www.msi.com/service/download/ ◙ Contact our technical staff via http://support.msi.com/ for any upgrade or replace service. It is strongly recommended that the acquisition of replaceable parts (or...support.msi.com/ Green Product Features ◙ Reduced energy consumption during use and stand-by ◙ Limited use of the product users purchased in the product may be obtained from the user's manual, please contact your system and no solution can be upgradable or replaceable by user...
User Manual
Page 6
...disable the protective earth pin from humidity and high temperature. Do not cover the ventilator. Preface Safety Instructions ◙ Read the safety instructions carefully and thoroughly. ◙ All cautions and warnings on the equipment or user's manual should be connected to an earthed mains socket-outlet. ◙ Always unplug the AC power cord before setting it up. The ventilator on card...the package for air convection and to achieve zero energy consumption. Keep this equipment on a reliable flat surface before installing any add-on the enclosure is used for future reference.
...disable the protective earth pin from humidity and high temperature. Do not cover the ventilator. Preface Safety Instructions ◙ Read the safety instructions carefully and thoroughly. ◙ All cautions and warnings on the equipment or user's manual should be connected to an earthed mains socket-outlet. ◙ Always unplug the AC power cord before setting it up. The ventilator on card...the package for air convection and to achieve zero energy consumption. Keep this equipment on a reliable flat surface before installing any add-on the enclosure is used for future reference.

User Manual
Page 7
...Use of controls or adjustments or performance of procedures other than those specified is reliably connected to step on the power cord. ◙ When installing the coaxial cable to the TV Tuner, it is necessary to ensure that the metal shield is prohibited. 2� Do not touch the lens inside the drive... service personnel: vii ◙ The power cord or plug is damaged. ◙ Liquid has penetrated into the opening that people are classified as CLASS 1 LASER PRODUCT. Place the power cord in a way that could damage or cause electrical shock. Do not place anything on it work ...
...Use of controls or adjustments or performance of procedures other than those specified is reliably connected to step on the power cord. ◙ When installing the coaxial cable to the TV Tuner, it is necessary to ensure that the metal shield is prohibited. 2� Do not touch the lens inside the drive... service personnel: vii ◙ The power cord or plug is damaged. ◙ Liquid has penetrated into the opening that people are classified as CLASS 1 LASER PRODUCT. Place the power cord in a way that could damage or cause electrical shock. Do not place anything on it work ...
User Manual
Page 8
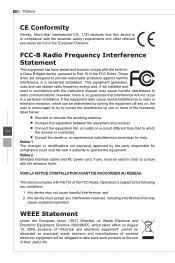
... the instruction manual, may cause undesired operation. Notice 2 Shielded interface cables and AC power cord, if any, must accept any interference received, including interference that may cause harmful interference to the following two conditions: 1� this device may not cause harmful interference, and 2� this device must be used in a particular installation. Operation is subject to radio communications. viii ■ Connect...
... the instruction manual, may cause undesired operation. Notice 2 Shielded interface cables and AC power cord, if any, must accept any interference received, including interference that may cause harmful interference to the following two conditions: 1� this device may not cause harmful interference, and 2� this device must be used in a particular installation. Operation is subject to radio communications. viii ■ Connect...
User Manual
Page 13
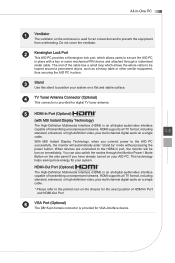
... through the Monitor Power / Mode Button on the side panel if you connect power to the printed icon on the chassis for the exact position of HDMI-In Port and HDMI-Out Port. 6 VGA Port (Optional) The DB15-pin female connector is provided for your AIO PC. The end of the cable has a small loop which allows users to secure the AIO PC in place with MSI Instant Display Technology...
... through the Monitor Power / Mode Button on the side panel if you connect power to the printed icon on the chassis for the exact position of HDMI-In Port and HDMI-Out Port. 6 VGA Port (Optional) The DB15-pin female connector is provided for your AIO PC. The end of the cable has a small loop which allows users to secure the AIO PC in place with MSI Instant Display Technology...

User Manual
Page 14
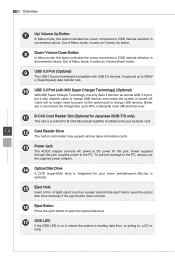
... on the rear panel. Important High-speed devices are suggested to 480Mbit/s (Hi-Speed) data transfer rate. 10 Microphone Jack This connector is provided for microphones. 11 Line-Out Jack This connector is for attaching USB devices such as mouse or keyboard, are recommended for USB 3.0 ports whereas low-speed devices, such as keyboard, mouse, or other USB-compatible devices. It supports up to be plugged into the USB 2.0 ports on the LAN. 10...
... on the rear panel. Important High-speed devices are suggested to 480Mbit/s (Hi-Speed) data transfer rate. 10 Microphone Jack This connector is provided for microphones. 11 Line-Out Jack This connector is for attaching USB devices such as mouse or keyboard, are recommended for USB 3.0 ports whereas low-speed devices, such as keyboard, mouse, or other USB-compatible devices. It supports up to be plugged into the USB 2.0 ports on the LAN. 10...
User Manual
Page 16
..., not only does it also enables users to the PC, always use the supplied power adapter. 14 Optical Disk Drive A DVD Super-Multi drive is turned off. Power supplied through this jack supplies power to 5Gbit/ s (SuperSpeed) data transfer rate. 10 USB 3.0 Port (with USB 2.0 devices. Out of memory cards. 13 Power Jack The AC/DC adapter converts AC power to , a CD or DVD. Overview 7 Up/ Volume Up Button In Menu mode, this button indicates the cursor movement or OSD...
..., not only does it also enables users to the PC, always use the supplied power adapter. 14 Optical Disk Drive A DVD Super-Multi drive is turned off. Power supplied through this jack supplies power to 5Gbit/ s (SuperSpeed) data transfer rate. 10 USB 3.0 Port (with USB 2.0 devices. Out of memory cards. 13 Power Jack The AC/DC adapter converts AC power to , a CD or DVD. Overview 7 Up/ Volume Up Button In Menu mode, this button indicates the cursor movement or OSD...
User Manual
Page 17
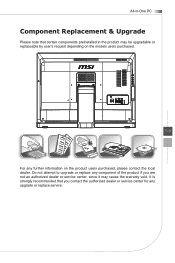
Do not attempt to upgrade or replace any component of the product if you contact the authorized dealer or service center for any upgrade or replace service. It is strongly recommended that certain components preinstalled in -One PC Component Replacement & Upgrade Please note that you are not an authorized dealer or service center, since it may be upgradable or replaceable by user's request depending on the product users purchased, please contact the local dealer. All-in the product may cause the warranty void. TV 1-9 For any further information on the models users purchased.
Do not attempt to upgrade or replace any component of the product if you contact the authorized dealer or service center for any upgrade or replace service. It is strongly recommended that certain components preinstalled in -One PC Component Replacement & Upgrade Please note that you are not an authorized dealer or service center, since it may be upgradable or replaceable by user's request depending on the product users purchased, please contact the local dealer. All-in the product may cause the warranty void. TV 1-9 For any further information on the models users purchased.

User Manual
Page 26
Important Whenever any error takes place and incurs abnormal display or volume malfunction, enter the OSD menu and reset your monitor to restore all settings to select PC/ HDMI/ monitor off mode. Press it again to manufacturer default for optimal performance. Press the Up & Down buttons to view the signal source. System Operations Resetting system Adjusting wide screen mode 2. Press the Mode button to adjust the system volume. 3-4 3.
Important Whenever any error takes place and incurs abnormal display or volume malfunction, enter the OSD menu and reset your monitor to restore all settings to select PC/ HDMI/ monitor off mode. Press it again to manufacturer default for optimal performance. Press the Up & Down buttons to view the signal source. System Operations Resetting system Adjusting wide screen mode 2. Press the Mode button to adjust the system volume. 3-4 3.

User Manual
Page 28
Factory Default: Resets monitor to exit. Menu Language (function available under Monitor mode): Changes language of menu. System Operations Information: Shows resolution, refresh rate, and product details. Scaling: Expands image to full screen. 3-6 After the settings are done, press the Mode button to original settings.
Factory Default: Resets monitor to exit. Menu Language (function available under Monitor mode): Changes language of menu. System Operations Information: Shows resolution, refresh rate, and product details. Scaling: Expands image to full screen. 3-6 After the settings are done, press the Mode button to original settings.

User Manual
Page 29
Press the Up & Down buttons to manufacturer default for optimal performance. Press it again to select PC/ HDMI/ monitor off mode. 3-7 Important Whenever any error takes place and incurs abnormal display or volume malfunction, enter the OSD menu and reset your monitor to restore all settings to adjust the system volume. 3. All-in-One PC 2. Press the Mode button to view the signal source.
Press the Up & Down buttons to manufacturer default for optimal performance. Press it again to select PC/ HDMI/ monitor off mode. 3-7 Important Whenever any error takes place and incurs abnormal display or volume malfunction, enter the OSD menu and reset your monitor to restore all settings to adjust the system volume. 3. All-in-One PC 2. Press the Mode button to view the signal source.

User Manual
Page 30
... Windows 8.x ■ [Power Options] in Windows OS allow you to control the power management features of electricity as well as deliver environmental benefits. Select a power plan that suits your display, hard drive, and battery. To be energy efficient, turn off your display or set your PC to sleep mode after a period of user inactivity. Power Management in Windows 7 ■ [Power Options] in Windows OS allow you to control the power management features of your personal needs. System Operations Power Management Power management...
... Windows 8.x ■ [Power Options] in Windows OS allow you to control the power management features of electricity as well as deliver environmental benefits. Select a power plan that suits your display, hard drive, and battery. To be energy efficient, turn off your display or set your PC to sleep mode after a period of user inactivity. Power Management in Windows 7 ■ [Power Options] in Windows OS allow you to control the power management features of your personal needs. System Operations Power Management Power management...
User Manual
Page 31
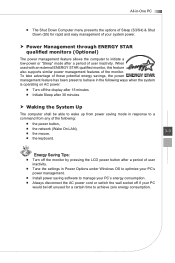
...; the power button, ■ the network (Wake On LAN), ■ the mouse, 3-9 ■ the keyboard. When used with an external ENERGY STAR qualified monitor, this feature also supports similar power management features of the following ways when the system is operating on AC power: ■ Turn off if your system power. Power Management through ENERGY STAR qualified monitors (Optional) The power management feature allows the computer to initiate a low-power or "Sleep" mode after 30...
...; the power button, ■ the network (Wake On LAN), ■ the mouse, 3-9 ■ the keyboard. When used with an external ENERGY STAR qualified monitor, this feature also supports similar power management features of the following ways when the system is operating on AC power: ■ Turn off if your system power. Power Management through ENERGY STAR qualified monitors (Optional) The power management feature allows the computer to initiate a low-power or "Sleep" mode after 30...

User Manual
Page 35
To establish a new connection, select [Network and Sharing Center]. 4. Select [Set up a new connection or network]. 3-13 All-in-One PC Network Connection (Windows 8.x) Wired LAN 1. Select [View network status and tasks] under [Network and Internet]. 3. Go to [Start] > [Control Panel]. 2.
To establish a new connection, select [Network and Sharing Center]. 4. Select [Set up a new connection or network]. 3-13 All-in-One PC Network Connection (Windows 8.x) Wired LAN 1. Select [View network status and tasks] under [Network and Internet]. 3. Go to [Start] > [Control Panel]. 2.
User Manual
Page 37
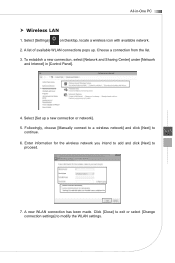
All-in [Control Panel]. 4. Choose a connection from the list. 3. To establish a new connection, select [Network and Sharing Center] under [Network and Internet] in -One PC Wireless LAN 1. Click [Close] to exit or select [Change connection settings] to proceed. 3-15 7. A list of available WLAN connections pops up a new connection or network]. 5. Enter information for the wireless network you intend to add and click [Next] to modify the WLAN settings. Select [Settings] on Desktop, locate a wireless icon with available network. 2. A new WLAN connection has...
All-in [Control Panel]. 4. Choose a connection from the list. 3. To establish a new connection, select [Network and Sharing Center] under [Network and Internet] in -One PC Wireless LAN 1. Click [Close] to exit or select [Change connection settings] to proceed. 3-15 7. A list of available WLAN connections pops up a new connection or network]. 5. Enter information for the wireless network you intend to add and click [Next] to modify the WLAN settings. Select [Settings] on Desktop, locate a wireless icon with available network. 2. A new WLAN connection has...
User Manual
Page 48
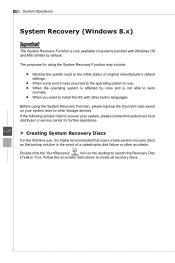
... work normally. ■ When you want to install the OS with Windows OS and MSI utilities by default. Follow the on the desktop to launch the Recovery Disc Creation Tool. Double-click the "BurnRecovery" icon on -screen instructions to create all recovery discs. Before using the System Recovery Function may include: ■ Restore the system back to the initial status of a catastrophic disk failure or other storage devices. System Operations...
... work normally. ■ When you want to install the OS with Windows OS and MSI utilities by default. Follow the on the desktop to launch the Recovery Disc Creation Tool. Double-click the "BurnRecovery" icon on -screen instructions to create all recovery discs. Before using the System Recovery Function may include: ■ Restore the system back to the initial status of a catastrophic disk failure or other storage devices. System Operations...

User Manual
Page 50
The system recovery menu pops up , select [Continue]. 5. Press any key to manufacturer default. All data on the HDD will be erased while all settings will be found except a clear cleanup of the HDD. System Operations 4. Select [Hard Disk Recovery] only when your HDD is infected with fatal viruses and no solution can be restored to reconfirm the selection when the following screen will pop up . [Hard Disk Recovery] will format the whole HDD. After booting up, the following message appears. 6. The Windows OS starts loading files. 3-28 7.
The system recovery menu pops up , select [Continue]. 5. Press any key to manufacturer default. All data on the HDD will be erased while all settings will be found except a clear cleanup of the HDD. System Operations 4. Select [Hard Disk Recovery] only when your HDD is infected with fatal viruses and no solution can be restored to reconfirm the selection when the following screen will pop up . [Hard Disk Recovery] will format the whole HDD. After booting up, the following message appears. 6. The Windows OS starts loading files. 3-28 7.
User Manual
Page 58
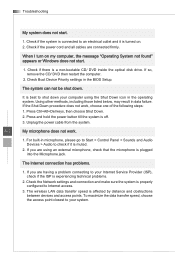
... Boot Device Priority settings in data failure. If the Shut Down procedure does not work . 1. The wireless LAN data transfer speed is a non-bootable CD/ DVD inside the optical disk drive. Press Ctrl+Alt+Del keys, then choose Shut Down. 2. The Internet connection has problems. 1. If you are connected firmly. Check the Network settings and connection and make sure the system is properly configured to an electrical outlet and it is muted. 2. When I turn...
... Boot Device Priority settings in data failure. If the Shut Down procedure does not work . 1. The wireless LAN data transfer speed is a non-bootable CD/ DVD inside the optical disk drive. Press Ctrl+Alt+Del keys, then choose Shut Down. 2. The Internet connection has problems. 1. If you are connected firmly. Check the Network settings and connection and make sure the system is properly configured to an electrical outlet and it is muted. 2. When I turn...
User Manual
Page 59
... installed properly. Make sure the label of OSD. Check the master volume setting in the Audio Mixer. 2. Please use DVD player software like PowerDVD or WinDVD to read the disc. If you have connected an audio cable to activate the Display. If the system has OSD function, please adjust the volume of the CD/ DVD is turned on the DVD-ROM drive. 3. Click Start > Control Panel > System > Device Manager. 6. If you play DVD video...
... installed properly. Make sure the label of OSD. Check the master volume setting in the Audio Mixer. 2. Please use DVD player software like PowerDVD or WinDVD to read the disc. If you have connected an audio cable to activate the Display. If the system has OSD function, please adjust the volume of the CD/ DVD is turned on the DVD-ROM drive. 3. Click Start > Control Panel > System > Device Manager. 6. If you play DVD video...


