

User Guide
Page 10
Packing Contents All-in-One PC AC/DC Adapter AC Power Cord Display Wiper 1-2 Driver/ Utility Disc User Manual & Quick Guide Keyboard (Optional) Mouse (Optional) * Please contact us immediately if any of the items is damaged or missing. * The illustrations are for reference only and your packing contents may slightly vary depending on the model you purchased.
Packing Contents All-in-One PC AC/DC Adapter AC Power Cord Display Wiper 1-2 Driver/ Utility Disc User Manual & Quick Guide Keyboard (Optional) Mouse (Optional) * Please contact us immediately if any of the items is damaged or missing. * The illustrations are for reference only and your packing contents may slightly vary depending on the model you purchased.

User Guide
Page 12
...the whole cable to prevent the equipment from overheating. The end of the cable has a small loop which allows users to secure the AIO PC in place. 3 Stand Use this stand to position your system on the enclosure is used for air convection and to be looped around a... permanent object, such as a heavy table or other similar equipment, thus securing the AIO PC in place with a key or some mechanical PIN device and attached through a rubberised metal cable. Rear View 1 1-4 1 2 3 1 1 Ventilator The ventilator on a...
...the whole cable to prevent the equipment from overheating. The end of the cable has a small loop which allows users to secure the AIO PC in place. 3 Stand Use this stand to position your system on the enclosure is used for air convection and to be looped around a... permanent object, such as a heavy table or other similar equipment, thus securing the AIO PC in place with a key or some mechanical PIN device and attached through a rubberised metal cable. Rear View 1 1-4 1 2 3 1 1 Ventilator The ventilator on a...

User Guide
Page 13
... when the system is detected. 4 Monitor Power/ Mode Button This button works both as the monitor power button and as the signal input switch between PC & HDMI. 5 Menu/ Enter Button Press this button to view the OSD menu or enter into the submenu. 6 Brightness/ Volume Up Button Press this button to...
... when the system is detected. 4 Monitor Power/ Mode Button This button works both as the monitor power button and as the signal input switch between PC & HDMI. 5 Menu/ Enter Button Press this button to view the OSD menu or enter into the submenu. 6 Brightness/ Volume Up Button Press this button to...
User Guide
Page 16
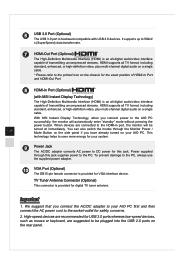
... digital audio on a single cable. * Please refer to the printed icon on the side panel if you connect power to your AIO PC. High-speed devices are recommended for USB 3.0 ports whereas low-speed devices, such as mouse or keyboard, are connected to the HDMI...(with USB 2.0 devices. It supports up to be 1-8 turned on a single cable. TV Tuner Antenna Connector (Optional) This connector is backward-compatible with MSI Instant Display Technology) The High-Definition Multimedia Interface (HDMI) is provided for VGA-interface device. 6 USB 3.0 Port (Optional) The USB 3.0 port is ...
... digital audio on a single cable. * Please refer to the printed icon on the side panel if you connect power to your AIO PC. High-speed devices are recommended for USB 3.0 ports whereas low-speed devices, such as mouse or keyboard, are connected to the HDMI...(with USB 2.0 devices. It supports up to be 1-8 turned on a single cable. TV Tuner Antenna Connector (Optional) This connector is backward-compatible with MSI Instant Display Technology) The High-Definition Multimedia Interface (HDMI) is provided for VGA-interface device. 6 USB 3.0 Port (Optional) The USB 3.0 port is ...

User Guide
Page 20
... great care to avoid personal injury. 1 2-2 15-20 38-76 cm 6 3 4 90-120 5 4 2 2 4 Please treat it with your PC for a long period of the AIO PC to have an optimal view. 7� Avoid using your posture when operating. 3� When sitting on the chair, sit straight and keep... Adjust the chair's back (if available) to support your back comfortably. 4� Place you have to work anywhere. Safety & Comfort Tips The AIO PC is a portable platform that your knees and elbows have the proper position (about 90-degree) when operating. 5� Put your hands on the desk ...
... great care to avoid personal injury. 1 2-2 15-20 38-76 cm 6 3 4 90-120 5 4 2 2 4 Please treat it with your PC for a long period of the AIO PC to have an optimal view. 7� Avoid using your posture when operating. 3� When sitting on the chair, sit straight and keep... Adjust the chair's back (if available) to support your back comfortably. 4� Place you have to work anywhere. Safety & Comfort Tips The AIO PC is a portable platform that your knees and elbows have the proper position (about 90-degree) when operating. 5� Put your hands on the desk ...

User Guide
Page 26
Press it again to select PC/ HDMI/ monitor off mode. 3-4 Important Whenever any error takes place and incurs abnormal display or volume malfunction, enter the OSD menu and reset your monitor to restore all settings to view the signal source. 2. Press the Mode button to manufacturer default for optimal performance. Press the Up & Down buttons to adjust the system volume. 3.
Press it again to select PC/ HDMI/ monitor off mode. 3-4 Important Whenever any error takes place and incurs abnormal display or volume malfunction, enter the OSD menu and reset your monitor to restore all settings to view the signal source. 2. Press the Mode button to manufacturer default for optimal performance. Press the Up & Down buttons to adjust the system volume. 3.

User Guide
Page 27
You may also fine-tune the settings by clicking [Change plan settings]. To be energy efficient, turn off your display or set your PC to sleep mode after a period of user inactivity. Power Management in Windows 7 ■ [Power Options] in Windows OS ...Power Options] link. Go to save significant amounts of electricity as well as deliver environmental benefits. System Operations Power Management Power management of personal computers (PCs) and monitors has the potential to [Start] > [Control Panel] > [System and Security]. You may also fine-tune the settings by clicking [...
You may also fine-tune the settings by clicking [Change plan settings]. To be energy efficient, turn off your display or set your PC to sleep mode after a period of user inactivity. Power Management in Windows 7 ■ [Power Options] in Windows OS ...Power Options] link. Go to save significant amounts of electricity as well as deliver environmental benefits. System Operations Power Management Power management of personal computers (PCs) and monitors has the potential to [Start] > [Control Panel] > [System and Security]. You may also fine-tune the settings by clicking [...

User Guide
Page 28
... after a period of user inactivity. ■ Tune the settings in Power Options under Windows OS to optimize your PC's power management. ■ Install power saving software to manage your PC's energy consumption. ■ Always disconnect the AC power cord or switch the wall socket off the display after 15...consumption. ■ The Shut Down Computer menu presents the options of Sleep (S3/S4) & Shut Down (S5) for rapid and easy management of your PC would be able to wake up from power saving mode in response to a command from any of the following: ■ the power button, 3-6 ■...
... after a period of user inactivity. ■ Tune the settings in Power Options under Windows OS to optimize your PC's power management. ■ Install power saving software to manage your PC's energy consumption. ■ Always disconnect the AC power cord or switch the wall socket off the display after 15...consumption. ■ The Shut Down Computer menu presents the options of Sleep (S3/S4) & Shut Down (S5) for rapid and easy management of your PC would be able to wake up from power saving mode in response to a command from any of the following: ■ the power button, 3-6 ■...

User Guide
Page 46
...can refresh it will be made during the process, click [Next] to repair your personal files. 1. Click [Recovery] > [Refresh your PC without losing your PC. It will show the changes which will attempt to continue. Click [Settings] recovery]. on finding issues with Windows files, it without affecting... your files], and select [Get started]. 3-24 3. Recovery from the Operating System Refresh PC The Refresh PC utility checks whether the system files, Windows registry, and other important system components are working fine or not;
...can refresh it will be made during the process, click [Next] to repair your personal files. 1. Click [Recovery] > [Refresh your PC without losing your PC. It will show the changes which will attempt to continue. Click [Settings] recovery]. on finding issues with Windows files, it without affecting... your files], and select [Get started]. 3-24 3. Recovery from the Operating System Refresh PC The Refresh PC utility checks whether the system files, Windows registry, and other important system components are working fine or not;

User Guide
Page 47
This might take a while. 5. System Operations 4. A message indicates that your PC is ready to be refreshed, click [Refresh] to Windows Start Screen where you will be back to start. After the refresh process ends, you can find all default Windows utilities and widgets. 3-25
This might take a while. 5. System Operations 4. A message indicates that your PC is ready to be refreshed, click [Refresh] to Windows Start Screen where you will be back to start. After the refresh process ends, you can find all default Windows utilities and widgets. 3-25

User Guide
Page 48
Reset PC The Reset utility will show the changes to be made during the process, click [Next] to original factory settings. 1. Click [Settings] recovery]. It will bring the system back to continue. on desktop, then select [Change PC settings] > [Update and 2. Click [Recovery] > [Remove everything and reinstall Windows], and select [Get started]. 3-26 3.
Reset PC The Reset utility will show the changes to be made during the process, click [Next] to original factory settings. 1. Click [Settings] recovery]. It will bring the system back to continue. on desktop, then select [Change PC settings] > [Update and 2. Click [Recovery] > [Remove everything and reinstall Windows], and select [Get started]. 3-26 3.

User Guide
Page 49
System Operations 4. You will be prompted to choose which drive you want to restart your PC. It is now ready to reset your needs. 3-27 6. Now, select either to remove files or to fully clean drives according to your PC, click [Reset] and follow the on-screen instructions to clean for a hard disk with multiple partitions. 5.
System Operations 4. You will be prompted to choose which drive you want to restart your PC. It is now ready to reset your needs. 3-27 6. Now, select either to remove files or to fully clean drives according to your PC, click [Reset] and follow the on-screen instructions to clean for a hard disk with multiple partitions. 5.
