

User Guide
Page 2
... System Operations 3-1 On-Screen Display (OSD 3-2 Power Management 3-5 Network Connection (Windows 7 3-7 Network Connection (Windows 8.x 3-10 System Recovery (Windows 7 3-13 System Recovery (Windows 8.x 3-23 A. Overview 1-1 Packing Contents 1-2 ii System Overview 1-3 Component Replacement & Upgrade 1-9 2. Contents Copyright Notice iii Trademarks iii Revision iii Upgrade and Warranty iv Acquisition of Replaceable Parts iv Technical Support iv Green Product Features iv Environmental Policy v Chemical Substances Information v Battery Information v Safety Instructions...
... System Operations 3-1 On-Screen Display (OSD 3-2 Power Management 3-5 Network Connection (Windows 7 3-7 Network Connection (Windows 8.x 3-10 System Recovery (Windows 7 3-13 System Recovery (Windows 8.x 3-23 A. Overview 1-1 Packing Contents 1-2 ii System Overview 1-3 Component Replacement & Upgrade 1-9 2. Contents Copyright Notice iii Trademarks iii Revision iii Upgrade and Warranty iv Acquisition of Replaceable Parts iv Technical Support iv Green Product Features iv Environmental Policy v Chemical Substances Information v Battery Information v Safety Instructions...

User Guide
Page 4
...; Visit the MSI website for technical guide, BIOS updates, driver updates and other information via http://www.msi.com/service/download/ ◙ Contact our technical staff via http://support.msi.com/ for the detailed information about the product users purchased, please contact the local dealer. Upgrade and Warranty Please note that certain components preinstalled in certain countries or territories may be upgradable or replaceable by user's request. For...
...; Visit the MSI website for technical guide, BIOS updates, driver updates and other information via http://www.msi.com/service/download/ ◙ Contact our technical staff via http://support.msi.com/ for the detailed information about the product users purchased, please contact the local dealer. Upgrade and Warranty Please note that certain components preinstalled in certain countries or territories may be upgradable or replaceable by user's request. For...

User Guide
Page 6
... AC power cord before connecting the equipment to the power outlet. NOTE: The maximum operating temperature is used for a certain time to the equipment. ◙ Always disconnect the AC power cord or switch the wall socket off if the equipment would be noted. The ventilator on card or module...equipment or user's manual should be left unused for air convection and to the value of 100~240V before installing any add-on the enclosure is around 40OC. Do not cover the ventilator. Do not disable the protective earth pin from overheating. Keep the User's Guide that the power voltage ...
... AC power cord before connecting the equipment to the power outlet. NOTE: The maximum operating temperature is used for a certain time to the equipment. ◙ Always disconnect the AC power cord or switch the wall socket off if the equipment would be noted. The ventilator on card or module...equipment or user's manual should be left unused for air convection and to the value of 100~240V before installing any add-on the enclosure is around 40OC. Do not cover the ventilator. Do not disable the protective earth pin from overheating. Keep the User's Guide that the power voltage ...

User Guide
Page 7
... 1 LASER PRODUCT. Use of controls or adjustments or performance of a Coaxial Cable. Always keep the strong magnetic or electrical objects away from the equipment. Preface Never pour any of the following situations arises, get it work well or you can not get the equipment checked by service vii personnel: ◙ The power cord or plug is prohibited...
... 1 LASER PRODUCT. Use of controls or adjustments or performance of a Coaxial Cable. Always keep the strong magnetic or electrical objects away from the equipment. Preface Never pour any of the following situations arises, get it work well or you can not get the equipment checked by service vii personnel: ◙ The power cord or plug is prohibited...

User Guide
Page 8
... by turning the equipment off and on, the user is in compliance with the essential safety requirements and other relevant provisions set out in a residential installation. Notice 2 Shielded interface cables and AC power cord, if any interference received, including interference that to which can radiate radio frequency energy and, if not installed and used in accordance with Part 15...
... by turning the equipment off and on, the user is in compliance with the essential safety requirements and other relevant provisions set out in a residential installation. Notice 2 Shielded interface cables and AC power cord, if any interference received, including interference that to which can radiate radio frequency energy and, if not installed and used in accordance with Part 15...

User Guide
Page 13
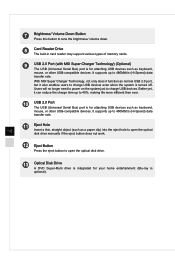
.... 4 Monitor Power/ Mode Button This button works both as the monitor power button and as the signal input switch between PC & HDMI. 5 Menu/ Enter Button Press this button to view the OSD menu or enter into the submenu. 6 Brightness/ Volume Up Button Press this button to tune the brightness/ volume up. It flashes when the system is accessing data on the HDD and remains off when no disk activity is 1-5 shut down . 3 Hard Disk Drive LED This...
.... 4 Monitor Power/ Mode Button This button works both as the monitor power button and as the signal input switch between PC & HDMI. 5 Menu/ Enter Button Press this button to view the OSD menu or enter into the submenu. 6 Brightness/ Volume Up Button Press this button to tune the brightness/ volume up. It flashes when the system is accessing data on the HDD and remains off when no disk activity is 1-5 shut down . 3 Hard Disk Drive LED This...
User Guide
Page 14
... open the optical disk drive manually if the eject button does not work. 12 Eject Button Press the eject button to open the optical disk drive. 13 Optical Disk Drive A DVD Super-Multi drive is integrated for your home entertainment (Blu-ray is for attaching USB devices such as keyboard, mouse, or other USB-compatible devices. It supports up to 40%, making life more efficient than ever. 10 USB 2.0 Port The USB (Universal Serial Bus) port is optional). Better yet, it also enables users...
... open the optical disk drive manually if the eject button does not work. 12 Eject Button Press the eject button to open the optical disk drive. 13 Optical Disk Drive A DVD Super-Multi drive is integrated for your home entertainment (Blu-ray is for attaching USB devices such as keyboard, mouse, or other USB-compatible devices. It supports up to 40%, making life more efficient than ever. 10 USB 2.0 Port The USB (Universal Serial Bus) port is optional). Better yet, it also enables users...

User Guide
Page 15
You can connect a network cable to prevent the equipment from overheating. Do not cover the ventilator. 2 Stand Use this stand to the Local Area Network (LAN). LAN link is not established. The computer is communicating with another computer on a flat and stable surface. 1-7 3 Line-Out Jack This connector is provided for headphones or speakers. 4 Microphone Jack This connector is provided for microphones...
You can connect a network cable to prevent the equipment from overheating. Do not cover the ventilator. 2 Stand Use this stand to the Local Area Network (LAN). LAN link is not established. The computer is communicating with another computer on a flat and stable surface. 1-7 3 Line-Out Jack This connector is provided for headphones or speakers. 4 Microphone Jack This connector is provided for microphones...
User Guide
Page 16
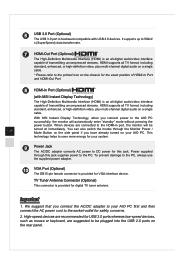
... Port (Optional) ® (with USB 2.0 devices. High-speed devices are recommended for the exact position of transmitting uncompressed streams. HDMI supports all TV format, including standard, enhanced, or high-definition video, plus multi-channel digital audio on a single cable. * Please refer to be 1-8 turned on your system. 9 Power Jack The AC/DC adapter converts AC power to the PC, always use the supplied power adapter. 10 VGA Port (Optional) The DB15-pin female connector...
... Port (Optional) ® (with USB 2.0 devices. High-speed devices are recommended for the exact position of transmitting uncompressed streams. HDMI supports all TV format, including standard, enhanced, or high-definition video, plus multi-channel digital audio on a single cable. * Please refer to be 1-8 turned on your system. 9 Power Jack The AC/DC adapter converts AC power to the PC, always use the supplied power adapter. 10 VGA Port (Optional) The DB15-pin female connector...

User Guide
Page 17
Overview Component Replacement & Upgrade Please note that you are not an authorized dealer or service center, since it may be upgradable or replaceable by user's request depending on the product users purchased, please contact the local dealer. It is strongly recommended that certain components preinstalled in the product may cause the warranty void. Do not attempt to upgrade or replace any component of the product if you contact the authorized dealer or service center for any further information on the models users purchased. 1-9 For any upgrade or replace service.
Overview Component Replacement & Upgrade Please note that you are not an authorized dealer or service center, since it may be upgradable or replaceable by user's request depending on the product users purchased, please contact the local dealer. It is strongly recommended that certain components preinstalled in the product may cause the warranty void. Do not attempt to upgrade or replace any component of the product if you contact the authorized dealer or service center for any further information on the models users purchased. 1-9 For any upgrade or replace service.

User Guide
Page 25
System Operations Information: Shows resolution, refresh rate, and product details. Menu Language (function available under Monitor mode): Changes language of menu. Scaling: Expands image to full screen. 3-3 After the settings are done, press the Mode button to original settings. Factory Default: Resets monitor to exit.
System Operations Information: Shows resolution, refresh rate, and product details. Menu Language (function available under Monitor mode): Changes language of menu. Scaling: Expands image to full screen. 3-3 After the settings are done, press the Mode button to original settings. Factory Default: Resets monitor to exit.

User Guide
Page 26
Press the Mode button to manufacturer default for optimal performance. Press it again to select PC/ HDMI/ monitor off mode. 3-4 Important Whenever any error takes place and incurs abnormal display or volume malfunction, enter the OSD menu and reset your monitor to restore all settings to view the signal source. 2. Press the Up & Down buttons to adjust the system volume. 3.
Press the Mode button to manufacturer default for optimal performance. Press it again to select PC/ HDMI/ monitor off mode. 3-4 Important Whenever any error takes place and incurs abnormal display or volume malfunction, enter the OSD menu and reset your monitor to restore all settings to view the signal source. 2. Press the Up & Down buttons to adjust the system volume. 3.

User Guide
Page 27
... system power. Power Management in Windows 8.x ■ [Power Options] in Windows OS allow you to control the power management features of user inactivity. Power Management in Windows 7 ■ [Power Options] in Windows OS allow you to [Start] > [Control Panel] > [System and Security]. Then click on the [Power Options] link. 3-5 Select a power plan that suits your personal needs. To be energy efficient, turn off your display or set your PC to sleep mode after a period of your display, hard drive, and battery.
... system power. Power Management in Windows 8.x ■ [Power Options] in Windows OS allow you to control the power management features of user inactivity. Power Management in Windows 7 ■ [Power Options] in Windows OS allow you to [Start] > [Control Panel] > [System and Security]. Then click on the [Power Options] link. 3-5 Select a power plan that suits your personal needs. To be energy efficient, turn off your display or set your PC to sleep mode after a period of your display, hard drive, and battery.

User Guide
Page 28
... network (Wake On LAN), ■ the mouse, ■ the keyboard. Energy Saving Tips: ■ Turn off the monitor by pressing the monitor power button after 30 minutes Waking the System Up The computer shall be able to wake up from power saving mode in response to a command from any of user inactivity. ■ Tune the settings in Power Options under Windows OS to optimize your PC's power management. ■ Install power saving software...
... network (Wake On LAN), ■ the mouse, ■ the keyboard. Energy Saving Tips: ■ Turn off the monitor by pressing the monitor power button after 30 minutes Waking the System Up The computer shall be able to wake up from power saving mode in response to a command from any of user inactivity. ■ Tune the settings in Power Options under Windows OS to optimize your PC's power management. ■ Install power saving software...

User Guide
Page 30
Select [Connect to connect using a wireless router or a wireless network. 4. Select [Wireless] to the Internet] under [Network and Internet]. 3-8 3. A list of available WLAN connections pops up. Go to establish a new connection. Wireless LAN 1. Choose a connection from the list or click [Open Network and Sharing Center] to [Start] > [Control Panel]. 2.
Select [Connect to connect using a wireless router or a wireless network. 4. Select [Wireless] to the Internet] under [Network and Internet]. 3-8 3. A list of available WLAN connections pops up. Go to establish a new connection. Wireless LAN 1. Choose a connection from the list or click [Open Network and Sharing Center] to [Start] > [Control Panel]. 2.

User Guide
Page 32
Network Connection (Windows 8.x) Wired LAN 1. Select [View network status and tasks] under [Network and Internet]. 3-10 3. Select [Set up a new connection or network]. Go to [Start] > [Control Panel]. 2. To establish a new connection, select [Network and Sharing Center]. 4.
Network Connection (Windows 8.x) Wired LAN 1. Select [View network status and tasks] under [Network and Internet]. 3-10 3. Select [Set up a new connection or network]. Go to [Start] > [Control Panel]. 2. To establish a new connection, select [Network and Sharing Center]. 4.

User Guide
Page 34
... [Network and Sharing Center] under [Network and Internet] in [Control Panel]. 4. A new WLAN connection has been made. Select [Set up . Followingly, choose [Manually connect to a wireless network] and click [Next] to proceed. 7. Select [Settings] on Desktop, locate a wireless icon with available network. 2. Choose a connection from the list. 3. Enter information for the wireless network you intend to add and click [Next] to 3-12 continue. 6. Click [Close] to exit or select [Change connection settings] to modify the WLAN settings. Wireless LAN...
... [Network and Sharing Center] under [Network and Internet] in [Control Panel]. 4. A new WLAN connection has been made. Select [Set up . Followingly, choose [Manually connect to a wireless network] and click [Next] to proceed. 7. Select [Settings] on Desktop, locate a wireless icon with available network. 2. Choose a connection from the list. 3. Enter information for the wireless network you intend to add and click [Next] to 3-12 continue. 6. Click [Close] to exit or select [Change connection settings] to modify the WLAN settings. Wireless LAN...

User Guide
Page 35
... following image appears. 3-13 System Operations System Recovery (Windows 7) Important The Recovery Tool is only available on systems bundled with Windows OS and MSI utilities by virus and is not able to work normally. ■ When you try the F3 hotkey to continue: 1. Before using the Recovery Tool may include: ■ Restore the system back to the initial status of the hard disk drive first...
... following image appears. 3-13 System Operations System Recovery (Windows 7) Important The Recovery Tool is only available on systems bundled with Windows OS and MSI utilities by virus and is not able to work normally. ■ When you try the F3 hotkey to continue: 1. Before using the Recovery Tool may include: ■ Restore the system back to the initial status of the hard disk drive first...

User Guide
Page 52
... Network settings and connection and make sure the system is muted. 2. Check Boot Device Priority settings in data failure. If you are connected firmly. The wireless LAN data transfer speed is plugged into the Microphone jack. If so, remove the CD/ DVD then restart the computer. 2. Unplug the power cable from the system. The Internet connection has problems. 1. To maximize the data transfer speed, choose the access point closest to your system. Using...
... Network settings and connection and make sure the system is muted. 2. Check Boot Device Priority settings in data failure. If you are connected firmly. The wireless LAN data transfer speed is plugged into the Microphone jack. If so, remove the CD/ DVD then restart the computer. 2. Unplug the power cable from the system. The Internet connection has problems. 1. To maximize the data transfer speed, choose the access point closest to your system. Using...

User Guide
Page 53
... listed on . 2. Please use DVD player software like PowerDVD or WinDVD to the Eject button. Check if the system is connected to the program instructions. 3. If you see video but cannot hear audio, check the media player. If the CD/ DVD requires software, make sure the speakers and the master volume setting in the Audio Mixer. 2. Also, make sure the software is turned on the disc packaging. 4. Check if the drivers...
... listed on . 2. Please use DVD player software like PowerDVD or WinDVD to the Eject button. Check if the system is connected to the program instructions. 3. If you see video but cannot hear audio, check the media player. If the CD/ DVD requires software, make sure the speakers and the master volume setting in the Audio Mixer. 2. Also, make sure the software is turned on the disc packaging. 4. Check if the drivers...


