User Guide
Page 11
The feature packed platform also gives you an exciting PC experience. The Axis 690 Series barebone is your best Slim PC choice. Chapter 1 Getting Started Congratulations for purchasing the Axis 690 Series (MS-6478) barebone. W ith the fantastic appearance and ultra-small form factor, it can easily be set anywhere.
The feature packed platform also gives you an exciting PC experience. The Axis 690 Series barebone is your best Slim PC choice. Chapter 1 Getting Started Congratulations for purchasing the Axis 690 Series (MS-6478) barebone. W ith the fantastic appearance and ultra-small form factor, it can easily be set anywhere.
User Guide
Page 12
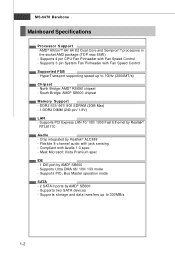
... Pinheader with Fan Speed Control Supported FSB - Supports storage and data transfers up to 300MB/s 1-2 South Bridge: AMD® SB600 chipset Memory Support - MS-6478 Barebone Mainboard Specifications Processor Support - DDR2 533/ 667/ 800 SDRAM (2GB Max) - 1 DDR2 DIMM (240 pin/ 1.8V) LAN - Supports 3 pin System Fan Pinheader with Fan Speed...
... Pinheader with Fan Speed Control Supported FSB - Supports storage and data transfers up to 300MB/s 1-2 South Bridge: AMD® SB600 chipset Memory Support - MS-6478 Barebone Mainboard Specifications Processor Support - DDR2 533/ 667/ 800 SDRAM (2GB Max) - 1 DDR2 DIMM (240 pin/ 1.8V) LAN - Supports 3 pin System Fan Pinheader with Fan Speed...

User Guide
Page 14
Power LED 8. Eject/ Close Button (for ODD) 6. USB Ports 3. MS-6478 Barebone System Configuration Front View 1. HDD LED 5. Audio Jacks 2. Optical Disk Drive (ODD) (Optional) 1-4 Power Button 4. Card Reader (Optional) 7.
Power LED 8. Eject/ Close Button (for ODD) 6. USB Ports 3. MS-6478 Barebone System Configuration Front View 1. HDD LED 5. Audio Jacks 2. Optical Disk Drive (ODD) (Optional) 1-4 Power Button 4. Card Reader (Optional) 7.
User Guide
Page 16
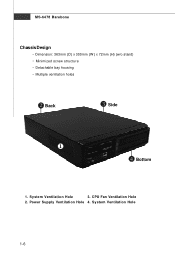
Power Supply Ventilation Hole 4. MS-6478 Barebone Chassis Design - Detachable bay housing - System Ventilation Hole 1-6 Dimension: 363mm (D) x 300mm (W ) x 72mm (H) (w/o stand) - Multiple ventilation holes Back Side Bottom 1. CPU Fan Ventilation Hole 2. System Ventilation Hole 3. Minimized screw structure -
Power Supply Ventilation Hole 4. MS-6478 Barebone Chassis Design - Detachable bay housing - System Ventilation Hole 1-6 Dimension: 363mm (D) x 300mm (W ) x 72mm (H) (w/o stand) - Multiple ventilation holes Back Side Bottom 1. CPU Fan Ventilation Hole 2. System Ventilation Hole 3. Minimized screw structure -

User Guide
Page 24
....Lower the CPU down the CPU 2-4 Correct CPU placement O Incorrect CPU placement Close the lever Sliding the plate Open the lever 90 degree 2. MS-6478 Barebone Installing AMD® Socket AM2 CPU 1. The gold arrow should be seen.
....Lower the CPU down the CPU 2-4 Correct CPU placement O Incorrect CPU placement Close the lever Sliding the plate Open the lever 90 degree 2. MS-6478 Barebone Installing AMD® Socket AM2 CPU 1. The gold arrow should be seen.
User Guide
Page 26
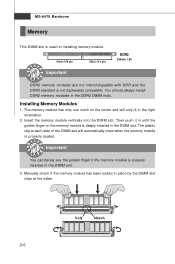
... if the memory module has been locked in the DIMM slot. You should always install DDR2 memory modules in the DDR2 DIMM slots. MS-6478 Barebone Memory This DIMM slot is used for installing memory module. 64x2=128 pin Important 56x2=112 pin DDR2 240 pin/ 1.8V DDR2 memory modules are...
... if the memory module has been locked in the DIMM slot. You should always install DDR2 memory modules in the DDR2 DIMM slots. MS-6478 Barebone Memory This DIMM slot is used for installing memory module. 64x2=128 pin Important 56x2=112 pin DDR2 240 pin/ 1.8V DDR2 memory modules are...
User Guide
Page 28
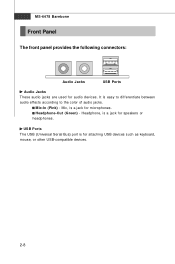
It is for speakers or h eadp h on es . Mic-In (Pink) - USB Ports The USB (Universal Serial Bus) port is easy to differentiate between audio effects according to the color of audio jacks. Mic, is a jack for attaching USB devices such as keyboard, mouse, or other USB-compatible devices. 2-8 Headphone, is a jack for audio devices. Headphone-Out (Green) - MS-6478 Barebone Front Panel The front panel provides the following connectors: Audio Jacks USB Ports Audio Jacks These audio jacks are used for microphones.
It is for speakers or h eadp h on es . Mic-In (Pink) - USB Ports The USB (Universal Serial Bus) port is easy to differentiate between audio effects according to the color of audio jacks. Mic, is a jack for attaching USB devices such as keyboard, mouse, or other USB-compatible devices. 2-8 Headphone, is a jack for audio devices. Headphone-Out (Green) - MS-6478 Barebone Front Panel The front panel provides the following connectors: Audio Jacks USB Ports Audio Jacks These audio jacks are used for microphones.
User Guide
Page 30
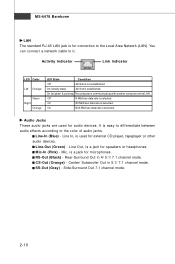
On 1000 Mbit/sec data rate is a jack for speakers or headphones. Line Out, is selected. Mic-In (Pink) - CS-Out (Orange) - MS-6478 Barebone LAN The standard RJ-45 LAN jack is communicating with another computer on the LAN. On (brighter & pulsing) The computer is for external CD player, ...
On 1000 Mbit/sec data rate is a jack for speakers or headphones. Line Out, is selected. Mic-In (Pink) - CS-Out (Orange) - MS-6478 Barebone LAN The standard RJ-45 LAN jack is communicating with another computer on the LAN. On (brighter & pulsing) The computer is for external CD player, ...
User Guide
Page 32
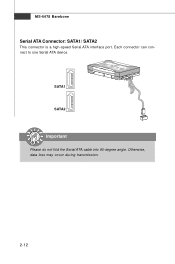
Otherwise, data loss may occur during transmission. 2-12 Each connector can connect to one Serial ATA device. SATA1 SATA2 Important Please do not fold the Serial ATA cable into 90-degree angle. MS-6478 Barebone Serial ATA Connector: SATA1/ SATA2 This connector is a high-speed Serial ATA interface port.
Otherwise, data loss may occur during transmission. 2-12 Each connector can connect to one Serial ATA device. SATA1 SATA2 Important Please do not fold the Serial ATA cable into 90-degree angle. MS-6478 Barebone Serial ATA Connector: SATA1/ SATA2 This connector is a high-speed Serial ATA interface port.
User Guide
Page 34
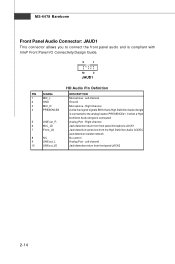
... Active low signal-signals BIOS that a High Definition Audio dongle is connected to connect the front panel audio and is connected Analog Port - MS-6478 Barebone Front Panel Audio Connector: JAUD1 This connector allows you to the analog header.
... Active low signal-signals BIOS that a High Definition Audio dongle is connected to connect the front panel audio and is connected Analog Port - MS-6478 Barebone Front Panel Audio Connector: JAUD1 This connector allows you to the analog header.
User Guide
Page 36
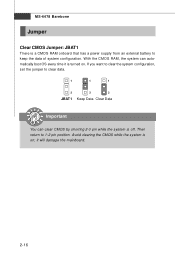
it is off. W ith the CMOS RAM, the system can clear CMOS by shorting 2-3 pin while the system is turned on ; MS-6478 Barebone Jumper Clear CMOS Jumper: JBAT1 There is on . Avoid clearing the CMOS while the system is a CMOS RAM onboard that has a power supply from an external battery to keep the data of system configuration. Then return to clear data. 1 1 1 3 3 3 JBAT1 Keep Data Clear Data Important You can automatically boot OS every time it will damage the mainboard. 2-16 If you want to clear the system configuration, set the jumper to 1-2 pin position.
it is off. W ith the CMOS RAM, the system can clear CMOS by shorting 2-3 pin while the system is turned on ; MS-6478 Barebone Jumper Clear CMOS Jumper: JBAT1 There is on . Avoid clearing the CMOS while the system is a CMOS RAM onboard that has a power supply from an external battery to keep the data of system configuration. Then return to clear data. 1 1 1 3 3 3 JBAT1 Keep Data Clear Data Important You can automatically boot OS every time it will damage the mainboard. 2-16 If you want to clear the system configuration, set the jumper to 1-2 pin position.
User Guide
Page 40
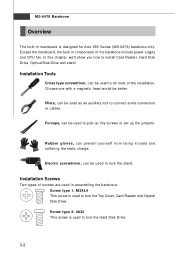
.... Pliers, can be used to lock the Top Cover, Card Reader and Optical Disk Drive. Screw type 2: 6#32 This screw is designed for Axis 690 Series (MS-6478) barebone only. Rubber gloves, can be better. Choose one with a magnetic head would be used as an auxiliary tool to lock the Hard Disk Drive...set up the jumpers. Electric screwdriver, can prevent yourself f rom being incised and suffering the static charge. Except the mainboard, the built-in assembling the barebone: Screw type 1: M3XL4 This screw is used to install Card Reader, Hard Disk Drive, Optical Disk Drive and stand.
.... Pliers, can be used to lock the Top Cover, Card Reader and Optical Disk Drive. Screw type 2: 6#32 This screw is designed for Axis 690 Series (MS-6478) barebone only. Rubber gloves, can be better. Choose one with a magnetic head would be used as an auxiliary tool to lock the Hard Disk Drive...set up the jumpers. Electric screwdriver, can prevent yourself f rom being incised and suffering the static charge. Except the mainboard, the built-in assembling the barebone: Screw type 1: M3XL4 This screw is used to install Card Reader, Hard Disk Drive, Optical Disk Drive and stand.
User Guide
Page 42
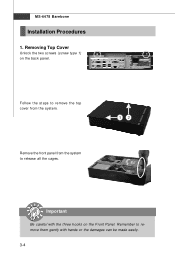
Remember to release all the cages. Important Be careful with hands or the damages can be made easily. 3-4 Remove the front panel from the system. Removing Top Cover Unlock the two screws (screw type 1) on the Front Panel. MS-6478 Barebone Installation Procedures 1. Follow the steps to remove the top cover from the system to remove them gently with the three hooks on the back panel.
Remember to release all the cages. Important Be careful with hands or the damages can be made easily. 3-4 Remove the front panel from the system. Removing Top Cover Unlock the two screws (screw type 1) on the Front Panel. MS-6478 Barebone Installation Procedures 1. Follow the steps to remove the top cover from the system to remove them gently with the three hooks on the back panel.
User Guide
Page 44
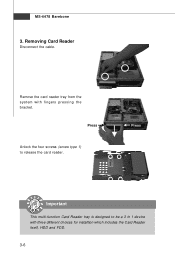
Removing Card Reader Disconnect the cable. MS-6478 Barebone 3. Press Important This multi-function Card Reader tray is designed to release the card reader. Press Unlock the four screws (screw type 1) to be a 3 in 1 device with f ingers pressing the bracket. Remove the card reader tray from the system with three different choices for installtion which includes the Card Reader itself, HDD and FDD. 3-6
Removing Card Reader Disconnect the cable. MS-6478 Barebone 3. Press Important This multi-function Card Reader tray is designed to release the card reader. Press Unlock the four screws (screw type 1) to be a 3 in 1 device with f ingers pressing the bracket. Remove the card reader tray from the system with three different choices for installtion which includes the Card Reader itself, HDD and FDD. 3-6
User Guide
Page 46
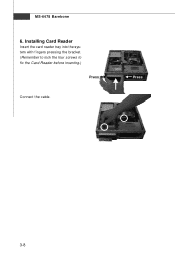
Press 3-8 MS-6478 Barebone 6. Installing Card Reader Insert the card reader tray into the system with fingers pressing the bracket. (Remember to lock the four screws to fix the Card Reader before inserting.) Press Connect the cable.
Press 3-8 MS-6478 Barebone 6. Installing Card Reader Insert the card reader tray into the system with fingers pressing the bracket. (Remember to lock the four screws to fix the Card Reader before inserting.) Press Connect the cable.
User Guide
Page 48
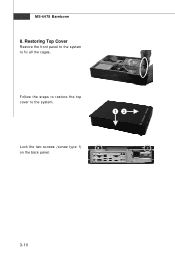
Follow the steps to restore the top cover to fix all the cages. MS-6478 Barebone 8. Lock the two screws (screw type 1) on the back panel. 3-10 Restoring Top Cover Restore the front panel to the system to the system.
Follow the steps to restore the top cover to fix all the cages. MS-6478 Barebone 8. Lock the two screws (screw type 1) on the back panel. 3-10 Restoring Top Cover Restore the front panel to the system to the system.
User Guide
Page 52
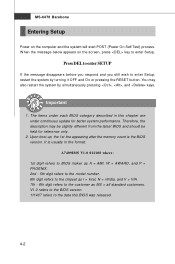
... SETUP If the message disappears before you respond and you still wish to enter Setup, restart the system by simultaneously pressing , , and keys. MS-6478 Barebone Entering Setup Power on the screen, press key to enter Setup.
... SETUP If the message disappears before you respond and you still wish to enter Setup, restart the system by simultaneously pressing , , and keys. MS-6478 Barebone Entering Setup Power on the screen, press key to enter Setup.
User Guide
Page 54
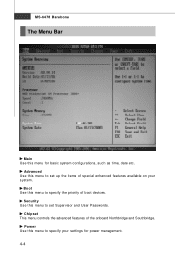
Security Use this menu to set up the items of special enhanced features available on your settings for basic system configurations, such as time, date etc. Power Use this menu to specify your system. Chipset This menu controls the advanced features of boot devices. Boot Use this menu to specify the priority of the onboard Northbridge and Southbridge. Ad v a nc e d Use this menu to set Supervisor and User Passwords. MS-6478 Barebone The Menu Bar Main Use this menu for power management. 4-4
Security Use this menu to set up the items of special enhanced features available on your settings for basic system configurations, such as time, date etc. Power Use this menu to specify your system. Chipset This menu controls the advanced features of boot devices. Boot Use this menu to specify the priority of the onboard Northbridge and Southbridge. Ad v a nc e d Use this menu to set Supervisor and User Passwords. MS-6478 Barebone The Menu Bar Main Use this menu for power management. 4-4
User Guide
Page 56
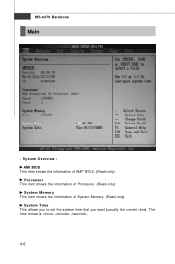
The time format is . 4-6 MS-6478 Barebone Main - System Overview AMI BIOS This item shows the information of AMI® BIOS. (Read-only) Processor This item shows the information of Processor. (Read-only) System Memory This item shows the information of System Memory. (Read-only) System Time This allows you to set the system time that you want (usually the current time).
The time format is . 4-6 MS-6478 Barebone Main - System Overview AMI BIOS This item shows the information of AMI® BIOS. (Read-only) Processor This item shows the information of Processor. (Read-only) System Memory This item shows the information of System Memory. (Read-only) System Time This allows you to set the system time that you want (usually the current time).
User Guide
Page 58
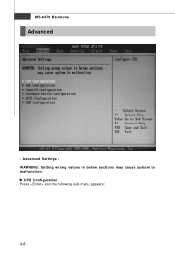
MS-6478 Barebone Advanced - Advanced Settings WARNING: Setting wrong values in below sections may cause system to malfunction. CPU Configuration Press and the following sub-menu appears: 4-8
MS-6478 Barebone Advanced - Advanced Settings WARNING: Setting wrong values in below sections may cause system to malfunction. CPU Configuration Press and the following sub-menu appears: 4-8