
User Guide
Page 2
...iv Environmental Policy v Chemical Substances Information v Battery Information v Safety Instructions vi CE Conformity viii FCC-B Radio Frequency Interference Statement viii WEEE Statement viii 1. Overview 1-1 Packing Contents 1-2 ii System Overview 1-3 Component Replacement & Upgrade 1-10 2. System Operations 3-1 Power Management 3-2 Network Connection (Windows 7 3-4 Network Connection (Windows 8.x 3-7 System Recovery (Windows 7 3-10 System Recovery (Windows 8.x 3-20 A. Getting Started 2-1 Safety & Comfort Tips 2-2 Hardware Setup 2-3 3. Troubleshooting A-1
...iv Environmental Policy v Chemical Substances Information v Battery Information v Safety Instructions vi CE Conformity viii FCC-B Radio Frequency Interference Statement viii WEEE Statement viii 1. Overview 1-1 Packing Contents 1-2 ii System Overview 1-3 Component Replacement & Upgrade 1-10 2. System Operations 3-1 Power Management 3-2 Network Connection (Windows 7 3-4 Network Connection (Windows 8.x 3-7 System Recovery (Windows 7 3-10 System Recovery (Windows 8.x 3-20 A. Getting Started 2-1 Safety & Comfort Tips 2-2 Hardware Setup 2-3 3. Troubleshooting A-1
User Guide
Page 4
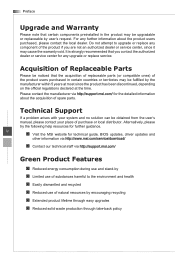
.... iv ◙ Visit the MSI website for technical guide, BIOS updates, driver updates and other information via http://www.msi.com/service/download/ ◙ Contact our technical staff via http://support.msi.com/ for the detailed information about the product users purchased, please contact the local dealer. It is strongly recommended that you are not an authorized dealer or service center, since the product has been...
.... iv ◙ Visit the MSI website for technical guide, BIOS updates, driver updates and other information via http://www.msi.com/service/download/ ◙ Contact our technical staff via http://support.msi.com/ for the detailed information about the product users purchased, please contact the local dealer. It is strongly recommended that you are not an authorized dealer or service center, since the product has been...

User Guide
Page 6
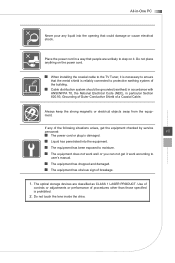
... on a reliable flat surface before setting it up. Do not disable the protective earth pin from overheating. Do not cover the ventilator. Preface Safety Instructions ◙ Read the safety instructions carefully and thoroughly. ◙ All cautions and warnings on card or module to the equipment. ◙ Always disconnect the AC power cord or switch the wall socket off if...
... on a reliable flat surface before setting it up. Do not disable the protective earth pin from overheating. Do not cover the ventilator. Preface Safety Instructions ◙ Read the safety instructions carefully and thoroughly. ◙ All cautions and warnings on card or module to the equipment. ◙ Always disconnect the AC power cord or switch the wall socket off if...
User Guide
Page 7
... checked by service personnel: vii ◙ The power cord or plug is damaged. ◙ Liquid has penetrated into the opening that the metal shield is reliably connected to user's manual. ◙ The equipment has dropped and damaged. ◙ The equipment has obvious sign of breakage. 1� The optical storage devices are classified as CLASS 1 LASER PRODUCT. Use of controls or adjustments...
... checked by service personnel: vii ◙ The power cord or plug is damaged. ◙ Liquid has penetrated into the opening that the metal shield is reliably connected to user's manual. ◙ The equipment has dropped and damaged. ◙ The equipment has obvious sign of breakage. 1� The optical storage devices are classified as CLASS 1 LASER PRODUCT. Use of controls or adjustments...
User Guide
Page 8
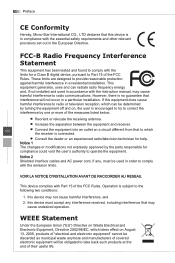
... not cause harmful interference, and 2� this device must accept any , must be used in accordance with the essential safety requirements and other relevant provisions set out in the European Directive. This device complies with Part 15 of covered electronic equipment will not occur in a residential installation. Operation is subject to take back such products at the end...
... not cause harmful interference, and 2� this device must accept any , must be used in accordance with the essential safety requirements and other relevant provisions set out in the European Directive. This device complies with Part 15 of covered electronic equipment will not occur in a residential installation. Operation is subject to take back such products at the end...

User Guide
Page 13
... power saving, the LED blinks in S3 (Suspend to RAM) mode and goes off in -One PC 12 1 System Power Button/ LED Press the system power button to turn the system on or off. 1-5 The power LED glows when the system is turned on or off when the monitor is shut down . 3 Hard Disk Drive LED This indicator shows the activity status of the HDD. It flashes when the system is accessing...
... power saving, the LED blinks in S3 (Suspend to RAM) mode and goes off in -One PC 12 1 System Power Button/ LED Press the system power button to turn the system on or off. 1-5 The power LED glows when the system is turned on or off when the monitor is shut down . 3 Hard Disk Drive LED This indicator shows the activity status of the HDD. It flashes when the system is accessing...
User Guide
Page 14
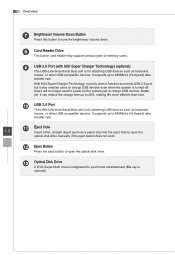
... eject hole to open the optical disk drive manually if the eject button does not work. 12 Eject Button Press the eject button to open the optical disk drive. 13 Optical Disk Drive A DVD Super-Multi drive is integrated for attaching USB devices such as keyboard, mouse, or other USB-compatible devices. It supports up to 40%, making life more efficient than ever. 10 USB 2.0 Port The USB (Universal Serial Bus) port is for attaching USB devices such as normal USB 2.0 port, but it can...
... eject hole to open the optical disk drive manually if the eject button does not work. 12 Eject Button Press the eject button to open the optical disk drive. 13 Optical Disk Drive A DVD Super-Multi drive is integrated for attaching USB devices such as keyboard, mouse, or other USB-compatible devices. It supports up to 40%, making life more efficient than ever. 10 USB 2.0 Port The USB (Universal Serial Bus) port is for attaching USB devices such as normal USB 2.0 port, but it can...

User Guide
Page 16
... can connect a network cable to the Local Area Network (LAN). The computer is communicating with USB 2.0 devices. To prevent damage to DC power for this jack supplies power to be plugged into the USB 2.0 ports on a single cable. 8 Power Jack The AC/DC adapter converts AC power to the PC, always use the supplied power adapter. 9 TV Tuner Antenna Connector (optional) This connector is provided for VGA-interface device. LAN link is not established. It supports up to...
... can connect a network cable to the Local Area Network (LAN). The computer is communicating with USB 2.0 devices. To prevent damage to DC power for this jack supplies power to be plugged into the USB 2.0 ports on a single cable. 8 Power Jack The AC/DC adapter converts AC power to the PC, always use the supplied power adapter. 9 TV Tuner Antenna Connector (optional) This connector is provided for VGA-interface device. LAN link is not established. It supports up to...
User Guide
Page 17
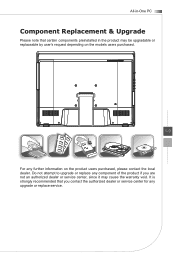
All-in-One PC Component Replacement & Upgrade Please note that you are not an authorized dealer or service center, since it may be upgradable or replaceable by user's request depending on the product users purchased, please contact the local dealer. Do not attempt to upgrade or replace any component of the product if you contact the authorized dealer or service center for any further information on the models users purchased. 1-9 For any upgrade or replace service. It is strongly recommended that certain components preinstalled in the product may cause the warranty void.
All-in-One PC Component Replacement & Upgrade Please note that you are not an authorized dealer or service center, since it may be upgradable or replaceable by user's request depending on the product users purchased, please contact the local dealer. Do not attempt to upgrade or replace any component of the product if you contact the authorized dealer or service center for any further information on the models users purchased. 1-9 For any upgrade or replace service. It is strongly recommended that certain components preinstalled in the product may cause the warranty void.

User Guide
Page 24
... [Power Options] link. Go to [Start] > [Control Panel] > [System and Security]. 3-2 Then click on the [Power Options] link. System Operations Power Management Power management of personal computers (PCs) and monitors has the potential to save significant amounts of your personal needs. Go to [Start] > [Control Panel] > [System and Security]. To be energy efficient, turn off your display or set your PC to sleep mode after a period of user inactivity. Power Management in Windows 7 ■ [Power Options] in Windows...
... [Power Options] link. Go to [Start] > [Control Panel] > [System and Security]. 3-2 Then click on the [Power Options] link. System Operations Power Management Power management of personal computers (PCs) and monitors has the potential to save significant amounts of your personal needs. Go to [Start] > [Control Panel] > [System and Security]. To be energy efficient, turn off your display or set your PC to sleep mode after a period of user inactivity. Power Management in Windows 7 ■ [Power Options] in Windows...
User Guide
Page 25
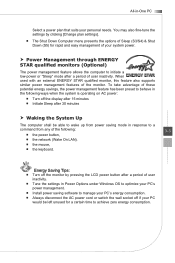
... : 3-3 ■ the power button, ■ the network (Wake On LAN), ■ the mouse, ■ the keyboard. All-in-One PC Select a power plan that suits your system power. Power Management through ENERGY STAR qualified monitors (Optional) The power management feature allows the computer to initiate a low-power or "Sleep" mode after a period of user inactivity. When used with an external ENERGY STAR qualified monitor, this feature also supports similar power management features of the...
... : 3-3 ■ the power button, ■ the network (Wake On LAN), ■ the mouse, ■ the keyboard. All-in-One PC Select a power plan that suits your system power. Power Management through ENERGY STAR qualified monitors (Optional) The power management feature allows the computer to initiate a low-power or "Sleep" mode after a period of user inactivity. When used with an external ENERGY STAR qualified monitor, this feature also supports similar power management features of the...

User Guide
Page 26
System Operations Network Connection (Windows 7) Wired LAN 1. Select [Broadband (PPPoE)] to establish your Internet Service Provider (ISP) and click [Connect] to connect using DSL or cable that requires a user name and password. 4. Type the information from your LAN connection. Select [Connect to [Start] > [Control Panel]. 2. Go to the Internet] under [Network and Internet]. 3-4 3.
System Operations Network Connection (Windows 7) Wired LAN 1. Select [Broadband (PPPoE)] to establish your Internet Service Provider (ISP) and click [Connect] to connect using DSL or cable that requires a user name and password. 4. Type the information from your LAN connection. Select [Connect to [Start] > [Control Panel]. 2. Go to the Internet] under [Network and Internet]. 3-4 3.

User Guide
Page 27
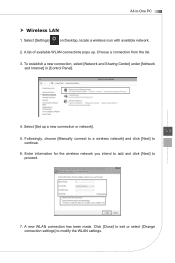
A list of available WLAN connections pops up. Select [Wireless] to [Start] > [Control Panel]. 2. Go to connect using a wireless router or a wireless network. 4. All-in-One PC Wireless LAN 1. Select [Connect to establish a new connection. Choose a connection from the list or click [Open Network and Sharing Center] to the Internet] under [Network and Internet]. 3-5 3.
A list of available WLAN connections pops up. Select [Wireless] to [Start] > [Control Panel]. 2. Go to connect using a wireless router or a wireless network. 4. All-in-One PC Wireless LAN 1. Select [Connect to establish a new connection. Choose a connection from the list or click [Open Network and Sharing Center] to the Internet] under [Network and Internet]. 3-5 3.
User Guide
Page 28
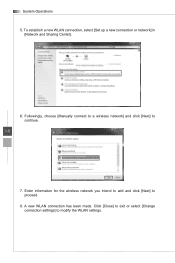
Click [Close] to exit or select [Change connection settings] to proceed. 8. A new WLAN connection has been made. System Operations 5. Enter information for the wireless network you intend to add and click [Next] to modify the WLAN settings. To establish a new WLAN connection, select [Set up a new connection or network] in [Network and Sharing Center]. 6. Followingly, choose [Manually connect to a wireless network] and click [Next] to continue. 3-6 7.
Click [Close] to exit or select [Change connection settings] to proceed. 8. A new WLAN connection has been made. System Operations 5. Enter information for the wireless network you intend to add and click [Next] to modify the WLAN settings. To establish a new WLAN connection, select [Set up a new connection or network] in [Network and Sharing Center]. 6. Followingly, choose [Manually connect to a wireless network] and click [Next] to continue. 3-6 7.

User Guide
Page 29
Go to [Start] > [Control Panel]. 2. Select [Set up a new connection or network]. To establish a new connection, select [Network and Sharing Center]. 4. All-in-One PC Network Connection (Windows 8.x) Wired LAN 1. Select [View network status and tasks] under [Network and Internet]. 3-7 3.
Go to [Start] > [Control Panel]. 2. Select [Set up a new connection or network]. To establish a new connection, select [Network and Sharing Center]. 4. All-in-One PC Network Connection (Windows 8.x) Wired LAN 1. Select [View network status and tasks] under [Network and Internet]. 3-7 3.
User Guide
Page 31
... select [Change connection settings] to proceed. 7. To establish a new connection, select [Network and Sharing Center] under [Network and Internet] in -One PC Wireless LAN 1. Select [Set up . Enter information for the wireless network you intend to add and click [Next] to modify the WLAN settings. Choose a connection from the list. 3. Followingly, choose [Manually connect to a wireless network] and click [Next] to continue. 6. Select [Settings] on Desktop, locate a wireless icon with available network. 2. All-in [Control Panel]. 4. A new WLAN connection has been...
... select [Change connection settings] to proceed. 7. To establish a new connection, select [Network and Sharing Center] under [Network and Internet] in -One PC Wireless LAN 1. Select [Set up . Enter information for the wireless network you intend to add and click [Next] to modify the WLAN settings. Choose a connection from the list. 3. Followingly, choose [Manually connect to a wireless network] and click [Next] to continue. 6. Select [Settings] on Desktop, locate a wireless icon with available network. 2. All-in [Control Panel]. 4. A new WLAN connection has been...
User Guide
Page 32
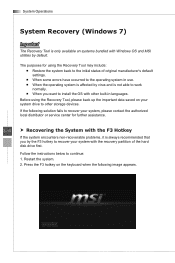
... with Windows OS and MSI utilities by virus and is not able to work normally. ■ When you try the F3 hotkey to install the OS with other storage devices. Restart the system. 2. Before using the Recovery Tool may include: ■ Restore the system back to the initial status of the hard disk drive first. If the following image appears. Follow the instructions below...
... with Windows OS and MSI utilities by virus and is not able to work normally. ■ When you try the F3 hotkey to install the OS with other storage devices. Restart the system. 2. Before using the Recovery Tool may include: ■ Restore the system back to the initial status of the hard disk drive first. If the following image appears. Follow the instructions below...

User Guide
Page 33
Enter the Recovery Tool. A��l�te��r�n�a�t�iv��e�l�y�,��s��e�&#...;]��o�n��t�h�e� keyboard to enter. This tool contains three features: Backup System, Restore System and Recover to continue: 1. All-in the event of a catastrophic disk failure or other accidents. Select [Backup System] to exit. 3-11 Follow the instructions below to factory default. System Backup It is highly recommended ...
Enter the Recovery Tool. A��l�te��r�n�a�t�iv��e�l�y�,��s��e�&#...;]��o�n��t�h�e� keyboard to enter. This tool contains three features: Backup System, Restore System and Recover to continue: 1. All-in the event of a catastrophic disk failure or other accidents. Select [Backup System] to exit. 3-11 Follow the instructions below to factory default. System Backup It is highly recommended ...
User Guide
Page 48
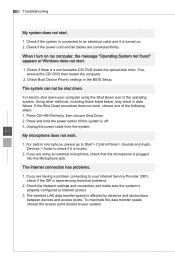
... failure. If you are having a problem connecting to check if it is muted. 2. The Internet connection has problems. 1. Press Ctrl+Alt+Del keys, then choose Shut Down. 2. The wireless LAN data transfer speed is off. 3. Using other methods, including those listed below, may result in microphone, please go to Start > Control Panel > Sounds and Audio Devices > Audio to your system. Check the Network settings and connection and make sure the system is properly configured...
... failure. If you are having a problem connecting to check if it is muted. 2. The Internet connection has problems. 1. Press Ctrl+Alt+Del keys, then choose Shut Down. 2. The wireless LAN data transfer speed is off. 3. Using other methods, including those listed below, may result in microphone, please go to Start > Control Panel > Sounds and Audio Devices > Audio to your system. Check the Network settings and connection and make sure the system is properly configured...
User Guide
Page 49
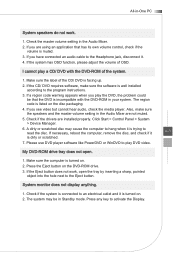
... turned on the DVD-ROM drive. 3. Press any key to play the DVD, the problem could be in your system. If you play DVD video. If the CD/ DVD requires software, make sure the speakers and the master volume setting in the Audio Mixer are installed properly. Click Start > Control Panel > System > Device Manager. 6. Make sure the computer is well installed according to the Eject button. Check if the drivers are not muted. 5. Please use DVD player software...
... turned on the DVD-ROM drive. 3. Press any key to play the DVD, the problem could be in your system. If you play DVD video. If the CD/ DVD requires software, make sure the speakers and the master volume setting in the Audio Mixer are installed properly. Click Start > Control Panel > System > Device Manager. 6. Make sure the computer is well installed according to the Eject button. Check if the drivers are not muted. 5. Please use DVD player software...


