
User Manual
Page 1
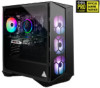
Aegis R 10th Gaming Desktop
Aegis R 10th Gaming Desktop
User Manual
Page 2
System Operations 3-1 Power Management 3-2 Network Connection (Windows 10 3-4 ii System Recovery (Windows 10 3-7 Contents Copyright and Trademarks Notice iii Revision iii Upgrade and Warranty iv Acquisition of Replaceable Parts iv Technical Support iv Safety Instructions v 1. Overview 1-1 Packing Contents 1-2 System Overview 1-3 2. Getting Started 2-1 Safety & Comfort Tips 2-2 Hardware Setup 2-3 3.
System Operations 3-1 Power Management 3-2 Network Connection (Windows 10 3-4 ii System Recovery (Windows 10 3-7 Contents Copyright and Trademarks Notice iii Revision iii Upgrade and Warranty iv Acquisition of Replaceable Parts iv Technical Support iv Safety Instructions v 1. Overview 1-1 Packing Contents 1-2 System Overview 1-3 2. Getting Started 2-1 Safety & Comfort Tips 2-2 Hardware Setup 2-3 3.

User Manual
Page 4
... MSI website for technical guide, BIOS updates, driver updates and other information via https://us .msi.com/support/ or contact MSI technical support at the time. to the specifications in the User's Manual. Do not attempt to upgrade or replace any component of the computer users ... help . Acquisition of Replaceable Parts Please be upgradable or replaceable by user's request. For any upgrade or replace service. Technical Support If a problem arises with your place of spare parts. Please contact the manufacturer via https://us .msi.com/support/ for further guidance. ...
... MSI website for technical guide, BIOS updates, driver updates and other information via https://us .msi.com/support/ or contact MSI technical support at the time. to the specifications in the User's Manual. Do not attempt to upgrade or replace any component of the computer users ... help . Acquisition of Replaceable Parts Please be upgradable or replaceable by user's request. For any upgrade or replace service. Technical Support If a problem arises with your place of spare parts. Please contact the manufacturer via https://us .msi.com/support/ for further guidance. ...
User Manual
Page 5
... environment that the power voltage is around 35OC. Replace only with a 3-pin plug, do not place the computer on a soft, unsteady surface or obstruct the computer air ventilators. ◙ Use this computer comes with a battery. ◙ Danger of explosion if battery is swallowed, it . If the coin/button cell battery is incorrectly replaced. The computer must be connected to an earthed...
... environment that the power voltage is around 35OC. Replace only with a 3-pin plug, do not place the computer on a soft, unsteady surface or obstruct the computer air ventilators. ◙ Use this computer comes with a battery. ◙ Danger of explosion if battery is swallowed, it . If the coin/button cell battery is incorrectly replaced. The computer must be connected to an earthed...

User Manual
Page 6
...; Reduced use of natural resources by service personnel: ◙ The power cord or plug is damaged. ◙ Liquid has penetrated into the opening that could damage or cause electrical shock. If any liquid into the computer. ◙ The computer has been exposed to moisture. ◙ The computer does not work according to enable proper reuse of parts and...
...; Reduced use of natural resources by service personnel: ◙ The power cord or plug is damaged. ◙ Liquid has penetrated into the opening that could damage or cause electrical shock. If any liquid into the computer. ◙ The computer has been exposed to moisture. ◙ The computer does not work according to enable proper reuse of parts and...
User Manual
Page 8
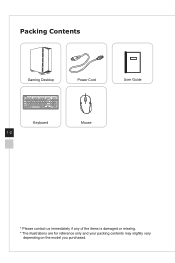
Packing Contents Gaming Desktop Power Cord User Guide Keyboard 1-2 Mouse * Please contact us immediately if any of the items is damaged or missing. * The illustrations are for reference only and your packing contents may slightly vary depending on the model you purchased.
Packing Contents Gaming Desktop Power Cord User Guide Keyboard 1-2 Mouse * Please contact us immediately if any of the items is damaged or missing. * The illustrations are for reference only and your packing contents may slightly vary depending on the model you purchased.
User Manual
Page 9
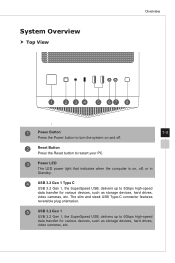
... Power button to turn the system on and off. 2 Reset Button Press the Reset button to restart your PC. 3 Power LED The LED power light that indicates when the computer is on, off, or in Standby. 4 USB 3.2 Gen 1 Type C USB 3.2 Gen 1, the SuperSpeed USB, delivers up to 5Gbps high-speed data transfer for various devices, such as storage devices, hard drives, video cameras, etc. The slim and sleek USB Type-C connector features reversible plug orientation. 5 USB 3.2 Gen 1 USB...
... Power button to turn the system on and off. 2 Reset Button Press the Reset button to restart your PC. 3 Power LED The LED power light that indicates when the computer is on, off, or in Standby. 4 USB 3.2 Gen 1 Type C USB 3.2 Gen 1, the SuperSpeed USB, delivers up to 5Gbps high-speed data transfer for various devices, such as storage devices, hard drives, video cameras, etc. The slim and sleek USB Type-C connector features reversible plug orientation. 5 USB 3.2 Gen 1 USB...

User Manual
Page 10
h Rear View 1 5 1-4 2 6 3 7 4 8 9 10 11 12 16 13 14 15 6 Microphone Jack This connector is provided for microphones. 7 Headphone Jack This connector is provided for headphones or speakers. 8 MSI LED Button Unlock all your RGB lighting effects.
h Rear View 1 5 1-4 2 6 3 7 4 8 9 10 11 12 16 13 14 15 6 Microphone Jack This connector is provided for microphones. 7 Headphone Jack This connector is provided for headphones or speakers. 8 MSI LED Button Unlock all your RGB lighting effects.
User Manual
Page 11
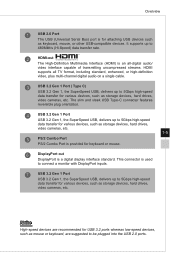
... devices, hard drives, video cameras, etc. This connector is used to connect a monitor with DisplayPort inputs. 7 USB 3.2 Gen 1 Port USB 3.2 Gen 1, the SuperSpeed USB, delivers up to 5Gbps high-speed data transfer for various devices, such as storage devices, hard drives, video cameras, etc. 1-5 5 PS/2 Combo Port PS/2 Combo Port is provided for various devices, such as storage devices, hard drives, video cameras, etc. Overview 1 USB 2.0 Port The USB (Universal Serial Bus) port is for USB 3.2 ports whereas low-speed devices, such as mouse or keyboard...
... devices, hard drives, video cameras, etc. This connector is used to connect a monitor with DisplayPort inputs. 7 USB 3.2 Gen 1 Port USB 3.2 Gen 1, the SuperSpeed USB, delivers up to 5Gbps high-speed data transfer for various devices, such as storage devices, hard drives, video cameras, etc. 1-5 5 PS/2 Combo Port PS/2 Combo Port is provided for various devices, such as storage devices, hard drives, video cameras, etc. Overview 1 USB 2.0 Port The USB (Universal Serial Bus) port is for USB 3.2 ports whereas low-speed devices, such as mouse or keyboard...
User Manual
Page 12
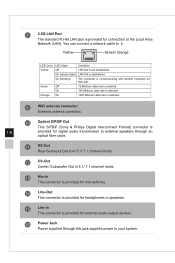
... headphones or speakers. 15 Line In This connector is provided for connection to the Local Area Network (LAN). Green Off 10 Mbit/sec data rate is not established. 8 2.5G LAN Port The standard RJ-45 LAN jack is provided for external audio output devices. 16 Power Jack Power supplied through this jack supplies power to your system. Yellow Green/ Orange LED Color LED State Condition Yellow Off LAN link...
... headphones or speakers. 15 Line In This connector is provided for connection to the Local Area Network (LAN). Green Off 10 Mbit/sec data rate is not established. 8 2.5G LAN Port The standard RJ-45 LAN jack is provided for external audio output devices. 16 Power Jack Power supplied through this jack supplies power to your system. Yellow Green/ Orange LED Color LED State Condition Yellow Off LAN link...

User Manual
Page 15
... 4 CONNECT YOUR MONITOR Connect your new computer, please do not hesitate to contact us either display ports or HDMI ports on the rear of the USB ports. And gently remove the tempered glass panel away from 9:00 a.m. Pacific Standard Time. We will reply to 4:00 a.m. Step 5 CONNECT WIFI ANTENNAE, KEYBOARD & MOUSE Screw the Wi-Fi Antennae to the gold contact points on the graphics cards. Step 6 POWER ON YOUR DESKTOP Plug the power cable...
... 4 CONNECT YOUR MONITOR Connect your new computer, please do not hesitate to contact us either display ports or HDMI ports on the rear of the USB ports. And gently remove the tempered glass panel away from 9:00 a.m. Pacific Standard Time. We will reply to 4:00 a.m. Step 5 CONNECT WIFI ANTENNAE, KEYBOARD & MOUSE Screw the Wi-Fi Antennae to the gold contact points on the graphics cards. Step 6 POWER ON YOUR DESKTOP Plug the power cable...

User Manual
Page 17
... user inactivity. When used with an external ENERGY STAR qualified monitor, this feature also supports similar power management features of these potential energy savings, the power management feature has been preset to behave in Windows OS allow you to control the power management features of your PC to sleep mode after 30 minutes Right-click [Start] [Control Panel] from the list and then click [System and Security]. , select Select [Power Options...
... user inactivity. When used with an external ENERGY STAR qualified monitor, this feature also supports similar power management features of these potential energy savings, the power management feature has been preset to behave in Windows OS allow you to control the power management features of your PC to sleep mode after 30 minutes Right-click [Start] [Control Panel] from the list and then click [System and Security]. , select Select [Power Options...

User Manual
Page 18
... following: ■ the power button, ■ the network (Wake On LAN), ■ the mouse, ■ the keyboard. Energy Saving Tips: ■ Turn off the monitor by pressing the monitor power button after a period of user inactivity. ■ Tune the settings in Power Options under Windows OS to optimize your PC's power management. ■ Install power saving software to manage your PC's energy consumption. ■ Always disconnect the AC power cord or switch the wall socket...
... following: ■ the power button, ■ the network (Wake On LAN), ■ the mouse, ■ the keyboard. Energy Saving Tips: ■ Turn off the monitor by pressing the monitor power button after a period of user inactivity. ■ Tune the settings in Power Options under Windows OS to optimize your PC's power management. ■ Install power saving software to manage your PC's energy consumption. ■ Always disconnect the AC power cord or switch the wall socket...

User Manual
Page 19
Network Connection (Windows 10) h Wired Network 1. Select [Ethernet] and then [Network and Sharing Center]. 3-4 3. Select [Set up a new connection or network]. Right-click [Start] and select [Network Connections] from the list. 2.
Network Connection (Windows 10) h Wired Network 1. Select [Ethernet] and then [Network and Sharing Center]. 3-4 3. Select [Set up a new connection or network]. Right-click [Start] and select [Network Connections] from the list. 2.

User Manual
Page 20
Type the information from your Internet Service Provider (ISP) and click [Connect] to the Internet] and click [Next]. 5. Choose [Connect to establish your LAN connection. 3-5 System Operations 4. Select [Broadband (PPPoE)] to connect using DSL or cable that requires a user name and password. 6.
Type the information from your Internet Service Provider (ISP) and click [Connect] to the Internet] and click [Next]. 5. Choose [Connect to establish your LAN connection. 3-5 System Operations 4. Select [Broadband (PPPoE)] to connect using DSL or cable that requires a user name and password. 6.

User Manual
Page 21
Enter information for the wireless network you intend to add and click [Next] to continue. 6. Select [Set up . A new WLAN connection has been made. A list of available WLAN connections pops up a new connection or network]. 5. h Wireless Network 1. Followingly, choose [Manually connect to a wireless network] and click [Next] to proceed. 7. Choose a connection from the list. 3. Go to [Start] , click [Settings] and select [Network and Internet]. 2. To establish a new connection, select [Network and Sharing Center]. 3-6 4.
Enter information for the wireless network you intend to add and click [Next] to continue. 6. Select [Set up . A new WLAN connection has been made. A list of available WLAN connections pops up a new connection or network]. 5. h Wireless Network 1. Followingly, choose [Manually connect to a wireless network] and click [Next] to proceed. 7. Choose a connection from the list. 3. Go to [Start] , click [Settings] and select [Network and Internet]. 2. To establish a new connection, select [Network and Sharing Center]. 3-6 4.

User Manual
Page 22
... Operations System Recovery (Windows 10) The purposes for using the System Recovery Function, please back up the important data saved on your system drive to other built-in use. ■ When the operating system is affected by virus and is not able to work ...service center for further assistance. 3-7 If the following solution fails to install the OS with other storage devices. Before using the System Recovery Function may include: ■ Restore the system back to the initial status of original manufacturer's default settings. ■ When some errors have occurred to the operating...
... Operations System Recovery (Windows 10) The purposes for using the System Recovery Function, please back up the important data saved on your system drive to other built-in use. ■ When the operating system is affected by virus and is not able to work ...service center for further assistance. 3-7 If the following solution fails to install the OS with other storage devices. Before using the System Recovery Function may include: ■ Restore the system back to the initial status of original manufacturer's default settings. ■ When some errors have occurred to the operating...

User Manual
Page 23
Select [Recovery] and click [Get started] under [Reset this PC 1. The [Choose an option] screen pops up. Go to start the system recovery. 3-8 3. Keep my files Only the drive where Reset this PC Windows is installed Remove everything ]. Choose between [Keep my files] and [Remove everything All drives Just remove my files Remove files and clean the drive Just remove my files Remove files and clean the drive Reset this PC] to [Start] , click [Settings] and select [Update and security]. 2.
Select [Recovery] and click [Get started] under [Reset this PC 1. The [Choose an option] screen pops up. Go to start the system recovery. 3-8 3. Keep my files Only the drive where Reset this PC Windows is installed Remove everything ]. Choose between [Keep my files] and [Remove everything All drives Just remove my files Remove files and clean the drive Just remove my files Remove files and clean the drive Reset this PC] to [Start] , click [Settings] and select [Update and security]. 2.

User Manual
Page 24
Click [Next] to start the system reset. Select [Keep my files]. The [Your apps will be removed] screen shows a list of apps that will show the changes to be made during the process. Click [Reset] to continue. 3-9 3. The next screen will need to be reinstalled from the web or installation discs. System Operations 2. h Keep my files 1.
Click [Next] to start the system reset. Select [Keep my files]. The [Your apps will be removed] screen shows a list of apps that will show the changes to be made during the process. Click [Reset] to continue. 3-9 3. The next screen will need to be reinstalled from the web or installation discs. System Operations 2. h Keep my files 1.

User Manual
Page 25
If you have multiple hard drives, a screen will show the changes to start the system reset. The next screen will pop up, asking you to choose between [Just remove my files] and [Remove files and clean the drive]. 3-10 4. Click [Reset] to be made during the process. Then select between [Only the drive where Windows is installed] and [All drives]. 3. h Remove everything ]. 2. Select [Remove everything 1.
If you have multiple hard drives, a screen will show the changes to start the system reset. The next screen will pop up, asking you to choose between [Just remove my files] and [Remove files and clean the drive]. 3-10 4. Click [Reset] to be made during the process. Then select between [Only the drive where Windows is installed] and [All drives]. 3. h Remove everything ]. 2. Select [Remove everything 1.


