
User Manual
Page 3
... Side View ...2-22 Getting Started Power Management ...3-2 Connecting the AC Power ...3-2 Using the Battery Power...3-4 ECO Power Saving Function...3-9 3D Boost Function...3-11 Power Management in Windows OS 3-13 Energy Saving Tips...3-15 Basic Operations ...3-16 Safety and Comfort Tips...3-16 Having a Good Work Habit...3-17 Knowing the Keyboard ...3-18 Knowing the Touchpad ...3-24 About Hard Disk Drive...3-27 Using the Optical Storage Device 3-28 Connecting the External Devices 3-31 Connecting the Peripheral Devices 3-31 Connecting the Communication Devices 3-34
... Side View ...2-22 Getting Started Power Management ...3-2 Connecting the AC Power ...3-2 Using the Battery Power...3-4 ECO Power Saving Function...3-9 3D Boost Function...3-11 Power Management in Windows OS 3-13 Energy Saving Tips...3-15 Basic Operations ...3-16 Safety and Comfort Tips...3-16 Having a Good Work Habit...3-17 Knowing the Keyboard ...3-18 Knowing the Touchpad ...3-24 About Hard Disk Drive...3-27 Using the Optical Storage Device 3-28 Connecting the External Devices 3-31 Connecting the Peripheral Devices 3-31 Connecting the Communication Devices 3-34
User Manual
Page 24
... in using keyboard, touchpad, hard disk drive, and optical storage drive. We are also provided to tell our users that this notebook. Chapter 3, Getting Started, gives the basic operation instructions on how to using this notebook. It is recommended to check out that is thoroughly tested and certified by our reputation for the first time. Beside, the steps of this notebook. This brand-new exquisite notebook will...
... in using keyboard, touchpad, hard disk drive, and optical storage drive. We are also provided to tell our users that this notebook. Chapter 3, Getting Started, gives the basic operation instructions on how to using this notebook. It is recommended to check out that is thoroughly tested and certified by our reputation for the first time. Beside, the steps of this notebook. This brand-new exquisite notebook will...
User Manual
Page 25
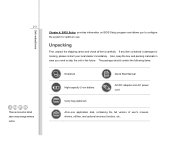
... user's manual, drivers, utilities, and optional recovery function, etc.. 2-3 These accessories listed above may change without notice. Unpacking First, unpack the shipping carton and check all items carefully. The package should contain the following items: Notebook Quick Start Manual High-capacity Li-ion battery AC/DC adapter and AC power cord Carry bag (optional) All-in the future. Introductions Chapter 4, BIOS Setup, provides information on BIOS Setup program and allows you need...
... user's manual, drivers, utilities, and optional recovery function, etc.. 2-3 These accessories listed above may change without notice. Unpacking First, unpack the shipping carton and check all items carefully. The package should contain the following items: Notebook Quick Start Manual High-capacity Li-ion battery AC/DC adapter and AC power cord Carry bag (optional) All-in the future. Introductions Chapter 4, BIOS Setup, provides information on BIOS Setup program and allows you need...

User Manual
Page 28
ExpressCard Slot ExpressCard Slot x 1 Communication Port (Items listed here may vary without notice) 56K Fax/ MODEM Optional LAN 10/100/1000 (optional) Wireless LAN 802.11b/g/n Bluetooth Yes 2-6 Introductions I/O Port Monitor (VGA) 15 pin D-Sub x 1 USB x 3 (USB version 2.0) Mic-in x 1 Headphone-out/ Line-out x 1 Internal Microphone x 1 RJ11 x 1 (optional) RJ45 x 1 HDMI x 1 Card Reader x 1 (SD/ MS/ MS Pro/ MMC) The supported memory cards may vary without notice.
ExpressCard Slot ExpressCard Slot x 1 Communication Port (Items listed here may vary without notice) 56K Fax/ MODEM Optional LAN 10/100/1000 (optional) Wireless LAN 802.11b/g/n Bluetooth Yes 2-6 Introductions I/O Port Monitor (VGA) 15 pin D-Sub x 1 USB x 3 (USB version 2.0) Mic-in x 1 Headphone-out/ Line-out x 1 Internal Microphone x 1 RJ11 x 1 (optional) RJ45 x 1 HDMI x 1 Card Reader x 1 (SD/ MS/ MS Pro/ MMC) The supported memory cards may vary without notice.

User Manual
Page 33
... User Defined (optional) Š Press this button to activate the Internet browser. 6. Quick Launch [Fn] Buttons Use the [Fn] buttons on the models users purchased. The descriptions mentioned here are for reference only, and may be optional supported depending on the keyboard to help extending the battery running time. 5. Introductions 2-11 Power-Saving GPU mode Press this button to select the Power-Saving GPU mode, and the internal graphic card will be functioned...
... User Defined (optional) Š Press this button to activate the Internet browser. 6. Quick Launch [Fn] Buttons Use the [Fn] buttons on the models users purchased. The descriptions mentioned here are for reference only, and may be optional supported depending on the keyboard to help extending the battery running time. 5. Introductions 2-11 Power-Saving GPU mode Press this button to select the Power-Saving GPU mode, and the internal graphic card will be functioned...

User Manual
Page 40
..., displays and consumer electronics devices that the supported memory cards may support various types of the cable has a small loop which allows users to secure the notebook in place. 7. Kensington Lock Hole This notebook provides a Kensington Lock hole, which allows the whole cable to cool the system. HDMI Connector HDMI (High Definition Multimedia Interface Support) is designed to be noted that supports standard, enhanced and high-definition video, plus...
..., displays and consumer electronics devices that the supported memory cards may support various types of the cable has a small loop which allows users to secure the notebook in place. 7. Kensington Lock Hole This notebook provides a Kensington Lock hole, which allows the whole cable to cool the system. HDMI Connector HDMI (High Definition Multimedia Interface Support) is designed to be noted that supports standard, enhanced and high-definition video, plus...

User Manual
Page 43
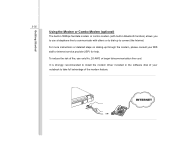
... notebook will be powered by the battery pack when the AC adapter is used to connect a LAN cable for a great view of the computer display. 3. RJ-11 Connector (optional) This notebook provides a built-in modem that allows you can make a dial-up connection. RJ-11 Connector 1. With the 56K V.90 modem, you to connect an external monitor or other standard VGA-compatible device (such as a projector) for network connection...
... notebook will be powered by the battery pack when the AC adapter is used to connect a LAN cable for a great view of the computer display. 3. RJ-11 Connector (optional) This notebook provides a built-in modem that allows you can make a dial-up connection. RJ-11 Connector 1. With the 56K V.90 modem, you to connect an external monitor or other standard VGA-compatible device (such as a projector) for network connection...
User Manual
Page 52
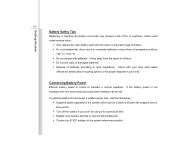
... or damaged batteries. Š Dispose of batteries according to maintain a normal operation. If the battery power is critical to local regulations. Getting Started 3-7 Battery Safety Tips Replacing or handling the battery incorrectly may be using it for a period of time. Š Disable unnecessary settings or remove idle peripherals. Š Connect an AC/DC adapter to the system whenever possible. Conserving Battery Power Efficient battery power is not managed well, the...
... or damaged batteries. Š Dispose of batteries according to maintain a normal operation. If the battery power is critical to local regulations. Getting Started 3-7 Battery Safety Tips Replacing or handling the battery incorrectly may be using it for a period of time. Š Disable unnecessary settings or remove idle peripherals. Š Connect an AC/DC adapter to the system whenever possible. Conserving Battery Power Efficient battery power is not managed well, the...

User Manual
Page 54
... button repeatedly to switch among various power saving modes provided by ECO Engine, or to turn this mode while playing multimedia applications Movie Mode Select this function off recurrently. 2. Getting Started 3-9 ECO Power Saving Function (Optional Supported) Enabling the ECO Engine ECO Engine, the outstanding and unique power saving function, provides various power saving modes - Gaming Mode Select this notebook. Gaming mode, Movie mode, Presentation mode, Office mode, and Turbo Battery mode, to activate the ECO Engine power...
... button repeatedly to switch among various power saving modes provided by ECO Engine, or to turn this mode while playing multimedia applications Movie Mode Select this function off recurrently. 2. Getting Started 3-9 ECO Power Saving Function (Optional Supported) Enabling the ECO Engine ECO Engine, the outstanding and unique power saving function, provides various power saving modes - Gaming Mode Select this notebook. Gaming mode, Movie mode, Presentation mode, Office mode, and Turbo Battery mode, to activate the ECO Engine power...

User Manual
Page 58
... keyboard. Then click on the Control Panel. Then select a power plan that meets your computer. 5. Follow the instructions below to adjust the power management settings in Windows OS Power management of personal computers (PCs) and monitors has the potential to the Start menu and click on the Power Options. 3. The computer should be energy efficient, turn off your display or set your PC to a command from any of your display, hard drive, and battery. Power Options...
... keyboard. Then click on the Control Panel. Then select a power plan that meets your computer. 5. Follow the instructions below to adjust the power management settings in Windows OS Power management of personal computers (PCs) and monitors has the potential to the Start menu and click on the Power Options. 3. The computer should be energy efficient, turn off your display or set your PC to a command from any of your display, hard drive, and battery. Power Options...

User Manual
Page 60
Getting Started 3-15 Energy Saving Tips Š Activate the ECO power saving function to manage the computer's energy consumption. Š Turn off the monitor after a period of user inactivity. Š Utilize the Fn and F12 sleep mode keys to turn into power saving mode. Š Tune the settings in Power Options under Windows OS to optimize the computer's power management. Š Always disconnect the AC power cord or uninstall the battery pack or switch off the wall socket if the computer would be left unused for a certain time to achieve zero energy consumption.
Getting Started 3-15 Energy Saving Tips Š Activate the ECO power saving function to manage the computer's energy consumption. Š Turn off the monitor after a period of user inactivity. Š Utilize the Fn and F12 sleep mode keys to turn into power saving mode. Š Tune the settings in Power Options under Windows OS to optimize the computer's power management. Š Always disconnect the AC power cord or uninstall the battery pack or switch off the wall socket if the computer would be left unused for a certain time to achieve zero energy consumption.

User Manual
Page 67
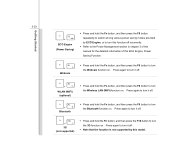
Getting Started 3-22 Enable or disable the touchpad function. + Decrease the LCD brightness. + Increase the LCD brightness. + Decrease the built-in speaker's volume. + Increase the built-in speaker's volume. + Disable the computer's audio function. + Force the computer into sleep mode (depending on the system + configuration). „ Quick Launch [Fn] Buttons + User Defined Š Press and hold the Fn button, and then press the F4 button to launch the User Defined application.
Getting Started 3-22 Enable or disable the touchpad function. + Decrease the LCD brightness. + Increase the LCD brightness. + Decrease the built-in speaker's volume. + Increase the built-in speaker's volume. + Disable the computer's audio function. + Force the computer into sleep mode (depending on the system + configuration). „ Quick Launch [Fn] Buttons + User Defined Š Press and hold the Fn button, and then press the F4 button to launch the User Defined application.
User Manual
Page 68
... to switch among various power saving modes provided by this ECO Engine, Power Saving Function. + Webcam Š Press and hold the Fn button, and then press the F6 button to turn the Bluetooth function on. Press again to turn it off. Š Press and hold the Fn button, and then press the F9 button to turn the Wireless LAN (WiFi) function on. Press again to turn it off. + 3G (not supported...
... to switch among various power saving modes provided by this ECO Engine, Power Saving Function. + Webcam Š Press and hold the Fn button, and then press the F6 button to turn the Bluetooth function on. Press again to turn it off. Š Press and hold the Fn button, and then press the F9 button to turn the Wireless LAN (WiFi) function on. Press again to turn it off. + 3G (not supported...
User Manual
Page 76
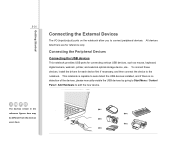
... then connect the device to the notebook. To connect these devices, install the drivers for connecting various USB devices, such as mouse, keyboard, digital camera, webcam, printer, and external optical storage device, ete.. The devices shown in the reference figures here may be different from the devices users have. All devices listed here are for reference only. Getting Started 3-31 Connecting the External Devices The I/O (input/output) ports on the notebook allow you to add the new device. This notebook...
... then connect the device to the notebook. To connect these devices, install the drivers for connecting various USB devices, such as mouse, keyboard, digital camera, webcam, printer, and external optical storage device, ete.. The devices shown in the reference figures here may be different from the devices users have. All devices listed here are for reference only. Getting Started 3-31 Connecting the External Devices The I/O (input/output) ports on the notebook allow you to add the new device. This notebook...

User Manual
Page 77
Getting Started 3-32 Connecting the External Display Devices This notebook provides a VGA port for a great view of the notebook display. To connect the external display, make sure the notebook and the external display are both powered off, and then connect the display to connect an external monitor or other standard VGA-compatible device (such as a projector) for connecting a larger display with higher resolution. The 15-pin D-sub VGA port allows users to the notebook.
Getting Started 3-32 Connecting the External Display Devices This notebook provides a VGA port for a great view of the notebook display. To connect the external display, make sure the notebook and the external display are both powered off, and then connect the display to connect an external monitor or other standard VGA-compatible device (such as a projector) for connecting a larger display with higher resolution. The 15-pin D-sub VGA port allows users to the notebook.

User Manual
Page 78
Alternately, you can change the display mode by pressing [Fn]+[F2]. If not, you can switch the display mode by configuring the settings in Display Properties of Windows operating system. Getting Started 3-33 HDMI (High Definition Multimedia Interface Support) is connected to the notebook, power on a single cable. Once the display is a new interface standard for PCs, displays and consumer electronics devices that supports standard, enhanced and high-definition video, plus multi-channel digital audio on the notebook and the external display should respond by default.
Alternately, you can change the display mode by pressing [Fn]+[F2]. If not, you can switch the display mode by configuring the settings in Display Properties of Windows operating system. Getting Started 3-33 HDMI (High Definition Multimedia Interface Support) is connected to the notebook, power on a single cable. Once the display is a new interface standard for PCs, displays and consumer electronics devices that supports standard, enhanced and high-definition video, plus multi-channel digital audio on the notebook and the external display should respond by default.
User Manual
Page 80
.... For more instructions or detailed steps on dialing-up to connect the Internet. To reduce the risk of fire, use a telephone line to communicate with built-in the software disk of the modem feature. It is strongly recommended to install the modem driver included in Bluetooth function) allows you to take full advantage of your MIS staff or Internet service provider (ISP...
.... For more instructions or detailed steps on dialing-up to connect the Internet. To reduce the risk of fire, use a telephone line to communicate with built-in the software disk of the modem feature. It is strongly recommended to install the modem driver included in Bluetooth function) allows you to take full advantage of your MIS staff or Internet service provider (ISP...

User Manual
Page 86
Getting Started 3-41 Components Replacement and Upgrade Please be noticed that the memory, hard disk drive, wireless LAN module and battery pack preinstalled in the product users purchased may be upgradable or replaceable by user's request depending on the models users purchased. 1 3 4 2 5
Getting Started 3-41 Components Replacement and Upgrade Please be noticed that the memory, hard disk drive, wireless LAN module and battery pack preinstalled in the product users purchased may be upgradable or replaceable by user's request depending on the models users purchased. 1 3 4 2 5
User Manual
Page 87
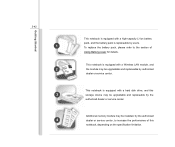
Additional memory module may be installed, by the authorized dealer or service center. This notebook is equipped with a hard disk drive, and this storage device may be upgradable and replaceable by the authorized dealer or service center, to the section of this notebook, depending on the specification limitation. This notebook is equipped with a Wireless LAN module, and the module may be upgradable and replaceable by users. Getting Started 3-42 1 2 3 4 This notebook is equipped with a high...
Additional memory module may be installed, by the authorized dealer or service center. This notebook is equipped with a hard disk drive, and this storage device may be upgradable and replaceable by the authorized dealer or service center, to the section of this notebook, depending on the specification limitation. This notebook is equipped with a Wireless LAN module, and the module may be upgradable and replaceable by users. Getting Started 3-42 1 2 3 4 This notebook is equipped with a high...

User Manual
Page 98
... password setting same as below: Enter New Password Type a maximum of the BIOS SETUP UTILITY, while User Password field only allows users to enter the BIOS SETUP UTILITY without having the authorization to make any previously set , new items User Password and Password Check will replace any change the settings of eight-digit password and press [Enter]. BIOS Setup 4-10 Security Menu Š Administrator Password / User Password When this item is set password from CMOS memory. When the Administrator Password is selected, a message box shall appear on the screen...
... password setting same as below: Enter New Password Type a maximum of the BIOS SETUP UTILITY, while User Password field only allows users to enter the BIOS SETUP UTILITY without having the authorization to make any previously set , new items User Password and Password Check will replace any change the settings of eight-digit password and press [Enter]. BIOS Setup 4-10 Security Menu Š Administrator Password / User Password When this item is set password from CMOS memory. When the Administrator Password is selected, a message box shall appear on the screen...


