

User Manual
Page 24
...check out that if you have all the accessories of this notebook. Chapter 2, Introductions, includes the descriptions of all the accessories included when you a delightful and professional experience in using notebook. and the procedures of installing and uninstalling the battery; ...are also provided to read this manual carefully before using this notebook. It is recommended to help users getting familiar with this notebook. It is recommended to using this notebook, the finely designed notebook. Beside, the steps of connecting the various external devices, ...
...check out that if you have all the accessories of this notebook. Chapter 2, Introductions, includes the descriptions of all the accessories included when you a delightful and professional experience in using notebook. and the procedures of installing and uninstalling the battery; ...are also provided to read this manual carefully before using this notebook. It is recommended to help users getting familiar with this notebook. It is recommended to using this notebook, the finely designed notebook. Beside, the steps of connecting the various external devices, ...

User Manual
Page 25
... Setup, provides information on BIOS Setup program and allows you need to configure the system for optimum use. The package should contain the following items: Notebook Quick Start Manual High-capacity Li-ion battery AC/DC adapter and AC power cord Carry bag (optional) All-in the future.
... Setup, provides information on BIOS Setup program and allows you need to configure the system for optimum use. The package should contain the following items: Notebook Quick Start Manual High-capacity Li-ion battery AC/DC adapter and AC power cord Carry bag (optional) All-in the future.

User Manual
Page 26
...MHz DDR3 SO-DIMM X 2 slots 8 GB (4 GB DDR3 SO-DIMM x 2) Core Chips Chipset Special Notification Intel® HM65 The actual core chip(s) preinstalled in the notebook depends on the model you purchased. Please contact the local dealer for detailed information. 2-4 Introductions Specification Physical Characteristic Dimension Weight 344.4 (W) x 221 (L) x 13.5~28 (H)... mm 2.2 kg with 6 cell battery CPU Support Processor Special Notification Intel® Sandy Bridge Dual Core The actual processor preinstalled in the notebook depends on the model you purchased.
...MHz DDR3 SO-DIMM X 2 slots 8 GB (4 GB DDR3 SO-DIMM x 2) Core Chips Chipset Special Notification Intel® HM65 The actual core chip(s) preinstalled in the notebook depends on the model you purchased. Please contact the local dealer for detailed information. 2-4 Introductions Specification Physical Characteristic Dimension Weight 344.4 (W) x 221 (L) x 13.5~28 (H)... mm 2.2 kg with 6 cell battery CPU Support Processor Special Notification Intel® Sandy Bridge Dual Core The actual processor preinstalled in the notebook depends on the model you purchased.

User Manual
Page 27
...: 100~240V~1.5A/ 2.0A 50~60Hz Output: 65W: 19V 3.42A (optional) 6-cell / 9-cell (optional) Yes The actual battery pack that comes with Line-in the notebook depends on the model you purchased. Please contact the local dealer for detailed information. Storage HDD form factor Optical Device Special Notification 2.5", 9.5 mm HD DVD...
...: 100~240V~1.5A/ 2.0A 50~60Hz Output: 65W: 19V 3.42A (optional) 6-cell / 9-cell (optional) Yes The actual battery pack that comes with Line-in the notebook depends on the model you purchased. Please contact the local dealer for detailed information. Storage HDD form factor Optical Device Special Notification 2.5", 9.5 mm HD DVD...
User Manual
Page 30
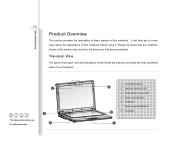
... using it. Introductions 2-8 Product Overview This section provides the description of basic aspects of your notebook. 1 The figures show here are for reference only. 3 4 1. Webcam / Webcam LED 3. Quick Launch Buttons 5. Touchpad 6 Top-open View The figure of top-open view and ... from the actual one that users purchased. Power Button / Power LED 4. Internal Microphone 2 2. It will lead you to browse the main operating area of the notebook. Keyboard / Quick Launch [Fn] Buttons 5 6.
... using it. Introductions 2-8 Product Overview This section provides the description of basic aspects of your notebook. 1 The figures show here are for reference only. 3 4 1. Webcam / Webcam LED 3. Quick Launch Buttons 5. Touchpad 6 Top-open View The figure of top-open view and ... from the actual one that users purchased. Power Button / Power LED 4. Internal Microphone 2 2. It will lead you to browse the main operating area of the notebook. Keyboard / Quick Launch [Fn] Buttons 5 6.

User Manual
Page 31
Optical Disk Drive Eject Button Š Please Note: The eject button is turned on. 4. Power LED: Glowing blue when the notebook power is functional under pure DOS system. With the help of these buttons, users will be functional. However, in an OS without SCM (System ... and select "Eject" to the webcam, glows amber when webcam function is activated; Quick Launch Buttons (optional) Press the quick launch buttons to turn the notebook power ON and OFF. Power Button / Power LED Power Button:Press the power button to activate the specific applications or tools. In such a case...
Optical Disk Drive Eject Button Š Please Note: The eject button is turned on. 4. Power LED: Glowing blue when the notebook power is functional under pure DOS system. With the help of these buttons, users will be functional. However, in an OS without SCM (System ... and select "Eject" to the webcam, glows amber when webcam function is activated; Quick Launch Buttons (optional) Press the quick launch buttons to turn the notebook power ON and OFF. Power Button / Power LED Power Button:Press the power button to activate the specific applications or tools. In such a case...

User Manual
Page 34
Introductions 2-12 6. Touchpad This is a pointing device of the notebook.
Introductions 2-12 6. Touchpad This is a pointing device of the notebook.

User Manual
Page 39
Introductions 2-17 4. Contact the local dealer for the notebook. 5. Power Connector To connect the AC/DC adapter and supply power for further and ... memory card, such as a heavy table or other similar equipment, thus securing the notebook in place with a key or some mechanical PIN device and attached through a rubberised metal cable. Kensington Lock Hole This... notebook provides a Kensington Lock hole, which allows users to be noted that the supported memory cards may ...
Introductions 2-17 4. Contact the local dealer for the notebook. 5. Power Connector To connect the AC/DC adapter and supply power for further and ... memory card, such as a heavy table or other similar equipment, thus securing the notebook in place with a key or some mechanical PIN device and attached through a rubberised metal cable. Kensington Lock Hole This... notebook provides a Kensington Lock hole, which allows users to be noted that the supported memory cards may ...

User Manual
Page 42
Battery Pack 2. RJ-45 Connector The Ethernet connector is disconnected. 2. RJ-45 Connector 1. 2-20 Rear Side View Introductions 1 23 1. VGA Port 3. VGA Port The 15-pin D-Sub VGA port allows you to connect a LAN cable for a great view of the computer display. 3. Battery Pack This notebook will be powered by the battery pack when the AC adapter is used to connect an external monitor or other standard VGA-compatible device (such as a projector) for network connection.
Battery Pack 2. RJ-45 Connector The Ethernet connector is disconnected. 2. RJ-45 Connector 1. 2-20 Rear Side View Introductions 1 23 1. VGA Port 3. VGA Port The 15-pin D-Sub VGA port allows you to connect a LAN cable for a great view of the computer display. 3. Battery Pack This notebook will be powered by the battery pack when the AC adapter is used to connect an external monitor or other standard VGA-compatible device (such as a projector) for network connection.

User Manual
Page 43
Battery Pack 3. Battery Lock/ Unlock Button Battery cannot be powered by the battery pack when the AC adapter is disconnected. Once the button is slid to unlock position, the battery is positioned on lock status. Battery Lock/ Unlock Button 4 2. Battery Release Button 4. Battery Pack This notebook will be moved when the button is removable. 2. Stereo Speaker 5 1. Ventilator 5. Introductions 2-21 Bottom Side View 3 2 1 1.
Battery Pack 3. Battery Lock/ Unlock Button Battery cannot be powered by the battery pack when the AC adapter is disconnected. Once the button is slid to unlock position, the battery is positioned on lock status. Battery Lock/ Unlock Button 4 2. Battery Release Button 4. Battery Pack This notebook will be moved when the button is removable. 2. Stereo Speaker 5 1. Ventilator 5. Introductions 2-21 Bottom Side View 3 2 1 1.

User Manual
Page 46
using this notebook for your notebook; Note that the AC/DC adapter included in the package is connected, recharging the battery will start immediately. Do not cover the AC/DC adapter ... time. Getting Started 3-2 Power Management Connecting the AC power It is strongly recommended to connect the AC/DC adapter to it may damage either the notebook or other devices attached to the notebook and use the AC power while using other adapter model may produce a certain heat while in use .
using this notebook for your notebook; Note that the AC/DC adapter included in the package is connected, recharging the battery will start immediately. Do not cover the AC/DC adapter ... time. Getting Started 3-2 Power Management Connecting the AC power It is strongly recommended to connect the AC/DC adapter to it may damage either the notebook or other devices attached to the notebook and use the AC power while using other adapter model may produce a certain heat while in use .

User Manual
Page 47
... connector part of AC/DC adapter. 7. Disconnecting the AC Power When you disconnect the AC/DC adapter, you should: 4. Unplug the power cord from the notebook. 6. Disconnect the power cord and the connector of the cord. Plug the DC end of the adapter to the... notebook, and the male end of the AC/DC adapter. 3. Never pull the cord directly! 6 2 4 3 6 3 Attach the power cord to the connector of the power cord ...
... connector part of AC/DC adapter. 7. Disconnecting the AC Power When you disconnect the AC/DC adapter, you should: 4. Unplug the power cord from the notebook. 6. Disconnect the power cord and the connector of the cord. Plug the DC end of the adapter to the... notebook, and the male end of the AC/DC adapter. 3. Never pull the cord directly! 6 2 4 3 6 3 Attach the power cord to the connector of the power cord ...

User Manual
Page 48
... pack is not in a safe place. Always keep the battery which is disassembled not by the manufacturer only. Getting Started 3-4 Using the Battery Power This notebook is an internal power source of the notebook. The rechargeable Li-ion battery pack is equipped with a high-capacity Li-ion battery pack.
... pack is not in a safe place. Always keep the battery which is disassembled not by the manufacturer only. Getting Started 3-4 Using the Battery Power This notebook is an internal power source of the notebook. The rechargeable Li-ion battery pack is equipped with a high-capacity Li-ion battery pack.

User Manual
Page 50
...to purchase a battery pack that is compliant to the unlocked position. 3. Locate the battery release button on the bottom side. 5. Make sure the notebook is turned 2 off, and the AC power is always recommended to the battery releasing direction as shown on the bottom side. 34 5 4. ...Getting Started 3-6 Releasing the Battery Pack It is disconnected. 2. Please contact your notebook. Push and hold the release button to have another battery pack in reserve for enough power supply. To remove the battery pack, following the...
...to purchase a battery pack that is compliant to the unlocked position. 3. Locate the battery release button on the bottom side. 5. Make sure the notebook is turned 2 off, and the AC power is always recommended to the battery releasing direction as shown on the bottom side. 34 5 4. ...Getting Started 3-6 Releasing the Battery Pack It is disconnected. 2. Please contact your notebook. Push and hold the release button to have another battery pack in reserve for enough power supply. To remove the battery pack, following the...

User Manual
Page 52
... can use the system, suspend system operation or shut down the system or Save-to-Disk. Š Plug in use. It is installed in the notebook. However, to optimize the life of battery, we suggest that consuming the battery power completely once a month is necessary. Š If you do not use... the notebook for a long time, it is not available, save your battery life. Š The actual charging time will be determined by the applications in an external...
... can use the system, suspend system operation or shut down the system or Save-to-Disk. Š Plug in use. It is installed in the notebook. However, to optimize the life of battery, we suggest that consuming the battery power completely once a month is necessary. Š If you do not use... the notebook for a long time, it is not available, save your battery life. Š The actual charging time will be determined by the applications in an external...

User Manual
Page 53
... applications Gaming mode, Movie mode, Presentation mode, Office mode, and Turbo Battery mode, to activate the ECO Engine power saving function: 1. Gaming Mode Select this notebook. Getting Started 3-9 ECO Power Saving Function (Optionally Supported) Enabling the ECO Engine ECO Engine, the outstanding and unique power saving function, provides various power saving...
... applications Gaming mode, Movie mode, Presentation mode, Office mode, and Turbo Battery mode, to activate the ECO Engine power saving function: 1. Gaming Mode Select this notebook. Getting Started 3-9 ECO Power Saving Function (Optionally Supported) Enabling the ECO Engine ECO Engine, the outstanding and unique power saving function, provides various power saving...

User Manual
Page 58
..., and make yourself comfortable during the operations. Getting Started 3-14 Basic Operations If you are a beginner to the notebook, please read the following instructions to assure your notebook in the space where may cause you discomfort (such as on the desk naturally to support your wrists. Š... Adjust the angle/position of the LCD panel to have to avoid personal injury Safety and Comfort Tips The notebook is an electrical device, please treat it with your notebook for a long period of time. Š Your work area should have enough illumination. Š Choose the proper...
..., and make yourself comfortable during the operations. Getting Started 3-14 Basic Operations If you are a beginner to the notebook, please read the following instructions to assure your notebook in the space where may cause you discomfort (such as on the desk naturally to support your wrists. Š... Adjust the angle/position of the LCD panel to have to avoid personal injury Safety and Comfort Tips The notebook is an electrical device, please treat it with your notebook for a long period of time. Š Your work area should have enough illumination. Š Choose the proper...
User Manual
Page 59
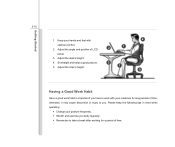
Getting Started 3-15 1. Sit straight and keep the following tips in mind when operating. Š Change your notebook for a period of time; Adjust the chair's height. 1 5 Having a Good Work Habit Have a good work with 4 optimal comfort. 2 1 2. Please keep a good posture. 3 5. Adjust the angle ...
Getting Started 3-15 1. Sit straight and keep the following tips in mind when operating. Š Change your notebook for a period of time; Adjust the chair's height. 1 5 Having a Good Work Habit Have a good work with 4 optimal comfort. 2 1 2. Please keep a good posture. 3 5. Adjust the angle ...

User Manual
Page 60
Typewriter keys Numeric keys Cursor keys / Function keys Getting Started 3-16 Knowing the Keyboard This notebook provides a full-functioned keyboard. This keyboard can be divided into four categories: Typewriter keys, Cursor keys, Numeric keys and Function keys.
Typewriter keys Numeric keys Cursor keys / Function keys Getting Started 3-16 Knowing the Keyboard This notebook provides a full-functioned keyboard. This keyboard can be divided into four categories: Typewriter keys, Cursor keys, Numeric keys and Function keys.
User Manual
Page 67
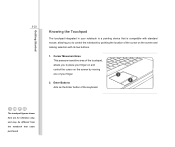
Getting Started 3-23 Knowing the Touchpad The touchpad integrated in your notebook is compatible with standard mouse, allowing you to control the notebook by pointing the location of the cursor on the screen by moving one of the touchpad, allows you to place your finger. 2. Cursor Movement Area .... 1. Enter Buttons Acts as the Enter button of the keyboard. 1 2 The touchpad figures shown here are for reference only, and may be different from the notebook that is a pointing device that users purchased
Getting Started 3-23 Knowing the Touchpad The touchpad integrated in your notebook is compatible with standard mouse, allowing you to control the notebook by pointing the location of the cursor on the screen by moving one of the touchpad, allows you to place your finger. 2. Cursor Movement Area .... 1. Enter Buttons Acts as the Enter button of the keyboard. 1 2 The touchpad figures shown here are for reference only, and may be different from the notebook that is a pointing device that users purchased


