

User Manual
Page 3
... Bottom Side View ...2-20 Getting Started Power Management ...3-2 Connecting the AC Power ...3-2 Using the Battery Power...3-4 ECO Engine -- Power Saving Function 3-10 Power Management in Windows OS 3-12 Energy Saving Tips...3-14 Basic Operations ...3-15 Safety and Comfort Tips...3-15 Having a Good Work Habit...3-16 Knowing the Keyboard ...3-17 Knowing the Touchpad ...3-24 About Hard Disk Drive...3-27 Using the Optical Storage Device 3-28 Connecting the External Devices 3-31 Connecting the Peripheral Devices 3-31 Connecting the Communication Devices 3-34
... Bottom Side View ...2-20 Getting Started Power Management ...3-2 Connecting the AC Power ...3-2 Using the Battery Power...3-4 ECO Engine -- Power Saving Function 3-10 Power Management in Windows OS 3-12 Energy Saving Tips...3-14 Basic Operations ...3-15 Safety and Comfort Tips...3-15 Having a Good Work Habit...3-16 Knowing the Keyboard ...3-17 Knowing the Touchpad ...3-24 About Hard Disk Drive...3-27 Using the Optical Storage Device 3-28 Connecting the External Devices 3-31 Connecting the Peripheral Devices 3-31 Connecting the Communication Devices 3-34

User Manual
Page 9
...installing the coaxial cable to the TV Tuner, it work according to protective earthing system of battery recommended by the manufacturer only. Š Always keep the battery in particular Section 820.93, Grounding of Outer Conductive Shield of a Coaxial Cable. Š To prevent explosion caused by a service personnel: Š The power cord or plug is reliable connected to User's Manual... has been exposed to moisture. Š The equipment has not worked well or you can not get the equipment checked by improper battery replacement, use the same or equivalent type of the building.
...installing the coaxial cable to the TV Tuner, it work according to protective earthing system of battery recommended by the manufacturer only. Š Always keep the battery in particular Section 820.93, Grounding of Outer Conductive Shield of a Coaxial Cable. Š To prevent explosion caused by a service personnel: Š The power cord or plug is reliable connected to User's Manual... has been exposed to moisture. Š The equipment has not worked well or you can not get the equipment checked by improper battery replacement, use the same or equivalent type of the building.

User Manual
Page 24
... users the basic safety information and caution that is recommended to using this notebook. It is interrelated to check out that this notebook. Introductions 2-2 Congratulations on using keyboard, touchpad, hard disk drive, and optical storage drive. Beside, the steps of this notebook, the finely designed notebook. Also, this chapter provides the specification of this notebook, and introduces the function buttons, quick launch buttons, connectors, LEDs and externals of installing and uninstalling the battery...
... users the basic safety information and caution that is recommended to using this notebook. It is interrelated to check out that this notebook. Introductions 2-2 Congratulations on using keyboard, touchpad, hard disk drive, and optical storage drive. Beside, the steps of this notebook, the finely designed notebook. Also, this chapter provides the specification of this notebook, and introduces the function buttons, quick launch buttons, connectors, LEDs and externals of installing and uninstalling the battery...

User Manual
Page 25
...: Notebook Quick Start Manual High-capacity Li-ion battery AC/DC adapter and AC power cord Carry bag (optional) All-in the future. 2-3 These accessories listed above may change without notice. Also, keep the box and packing materials in case you to ship the unit in -one application disk, containing the full version of user's manual, drivers, utilities, and optional recovery function, etc.. Introductions Chapter 4, BIOS Setup, provides information on BIOS Setup...
...: Notebook Quick Start Manual High-capacity Li-ion battery AC/DC adapter and AC power cord Carry bag (optional) All-in the future. 2-3 These accessories listed above may change without notice. Also, keep the box and packing materials in case you to ship the unit in -one application disk, containing the full version of user's manual, drivers, utilities, and optional recovery function, etc.. Introductions Chapter 4, BIOS Setup, provides information on BIOS Setup...

User Manual
Page 28
Communication Port (Items listed here may vary without notice) LAN 10/100/1000 Ethernet Wireless LAN Optional Supported Bluetooth Optional Supported Audio Sound Controller Internal Speaker Sound Volume Realtek® ALC888S 2 speakers with housing Adjust by volume button, K/B hot-key & SW Introductions 2-6 I/O Port Monitor (VGA) USB Line-in Mic-in RJ45 HDMI Internal Microphone Remote Controller Card Reader 15 pin D-Sub x 1 x 3 (USB version 2.0) x 1 x 1 x 1 x 1 (optional) x 1 x 1 (optional) x 1 (XD / SD/ MMC / MS/ MS Pro) The supported memory cards may vary without notice.
Communication Port (Items listed here may vary without notice) LAN 10/100/1000 Ethernet Wireless LAN Optional Supported Bluetooth Optional Supported Audio Sound Controller Internal Speaker Sound Volume Realtek® ALC888S 2 speakers with housing Adjust by volume button, K/B hot-key & SW Introductions 2-6 I/O Port Monitor (VGA) USB Line-in Mic-in RJ45 HDMI Internal Microphone Remote Controller Card Reader 15 pin D-Sub x 1 x 3 (USB version 2.0) x 1 x 1 x 1 x 1 (optional) x 1 x 1 (optional) x 1 (XD / SD/ MMC / MS/ MS Pro) The supported memory cards may vary without notice.

User Manual
Page 29
Yes x 1 WHQL Supported 17.3" LED Brightness controlled by K/B hot-keys Supported Yes, USB floppy boot up DOS only Fast Boot Support --- Introductions 2-7 Video (optional) Graphics VRAM Dual View Function External Display Output Display LCD Type Brightness WebCam CMOS (optional) Software & BIOS USB Flash Boot BIOS Others Kensington Lock Hole Compliance ATI Park XT S3/ ATI M92XTX S2 (on board) (optional) DDR3 512MB External display devices will be auto detected when connected.
Yes x 1 WHQL Supported 17.3" LED Brightness controlled by K/B hot-keys Supported Yes, USB floppy boot up DOS only Fast Boot Support --- Introductions 2-7 Video (optional) Graphics VRAM Dual View Function External Display Output Display LCD Type Brightness WebCam CMOS (optional) Software & BIOS USB Flash Boot BIOS Others Kensington Lock Hole Compliance ATI Park XT S3/ ATI M92XTX S2 (on board) (optional) DDR3 512MB External display devices will be auto detected when connected.
User Manual
Page 35
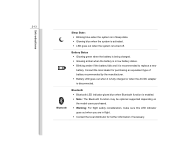
...; Glowing amber when the battery is in low battery status. Š Blinking amber if the battery fails and it is fully charged or when the AC/DC adapter is turned off. Bluetooth Bluetooth Š Bluetooth LED indicator glows blue when Bluetooth function is enabled. Š Note: The Bluetooth Function may be optional supported depending on the model users purchased. Š Warning: For flight safety consideration, make sure this LED indicator goes out when you...
...; Glowing amber when the battery is in low battery status. Š Blinking amber if the battery fails and it is fully charged or when the AC/DC adapter is turned off. Bluetooth Bluetooth Š Bluetooth LED indicator glows blue when Bluetooth function is enabled. Š Note: The Bluetooth Function may be optional supported depending on the model users purchased. Š Warning: For flight safety consideration, make sure this LED indicator goes out when you...
User Manual
Page 41
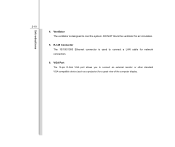
Ventilator The ventilator is used to connect a LAN cable for network connection. 6. DO NOT block the ventilator for a great view of the computer display. VGA Port The 15-pin D-Sub VGA port allows you to cool the system. Introductions 2-19 4. RJ-45 Connector The 10/100/1000 Ethernet connector is designed to connect an external monitor or other standard VGA-compatible device (such as a projector) for air circulation. 5.
Ventilator The ventilator is used to connect a LAN cable for network connection. 6. DO NOT block the ventilator for a great view of the computer display. VGA Port The 15-pin D-Sub VGA port allows you to cool the system. Introductions 2-19 4. RJ-45 Connector The 10/100/1000 Ethernet connector is designed to connect an external monitor or other standard VGA-compatible device (such as a projector) for air circulation. 5.
User Manual
Page 51
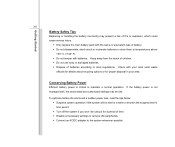
...: Š Suspend system operation if the system will be idle for a while or shorten the suspend timer's time period. Š Turn off the system if you won't be lost. Getting Started 3-8 Battery Safety Tips Replacing or handling the battery incorrectly may be using it for a period of time. Š Disable unnecessary settings or remove idle peripherals. Š Connect an AC/DC...
...: Š Suspend system operation if the system will be idle for a while or shorten the suspend timer's time period. Š Turn off the system if you won't be lost. Getting Started 3-8 Battery Safety Tips Replacing or handling the battery incorrectly may be using it for a period of time. Š Disable unnecessary settings or remove idle peripherals. Š Connect an AC/DC...
User Manual
Page 53
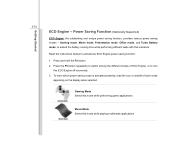
Press and hold the Fn button. 2. Power Saving Function (Optionally Supported) ECO Engine, the outstanding and unique power saving function, provides various power saving modes - Gaming mode, Movie mode, Presentation mode, Office mode, and Turbo Battery mode, to extend the battery running time while performing different tasks with this ECO Engine off recurrently. 3. Read the instructions bellow to turn this notebook. To learn which power saving mode is activated presently, read the icon...
Press and hold the Fn button. 2. Power Saving Function (Optionally Supported) ECO Engine, the outstanding and unique power saving function, provides various power saving modes - Gaming mode, Movie mode, Presentation mode, Office mode, and Turbo Battery mode, to extend the battery running time while performing different tasks with this ECO Engine off recurrently. 3. Read the instructions bellow to turn this notebook. To learn which power saving mode is activated presently, read the icon...

User Manual
Page 55
... Computer menu will present the options to Sleep (S3/S4), Shut Down (S5), or Restart your personal needs 4. Go to standby/hibernate mode after a period of following: Š the power button, Š the mouse, Š the keyboard. The computer should be energy efficient, turn off your display or set your display, hard drive, and battery. Getting Started 3-12 Power Management in response to a command from power saving mode in Windows OS Power management of...
... Computer menu will present the options to Sleep (S3/S4), Shut Down (S5), or Restart your personal needs 4. Go to standby/hibernate mode after a period of following: Š the power button, Š the mouse, Š the keyboard. The computer should be energy efficient, turn off your display or set your display, hard drive, and battery. Getting Started 3-12 Power Management in response to a command from power saving mode in Windows OS Power management of...

User Manual
Page 57
Getting Started 3-14 Energy Saving Tips Š Activate the ECO power saving function to manage the computer's energy consumption. Š Turn off the monitor after a period of user inactivity. Š Utilize the Fn and F12 sleep mode keys to turn into power saving mode. Š Tune the settings in Power Options under Windows OS to optimize the computer's power management. Š Always disconnect the AC power cord or uninstall the battery pack or switch off the wall socket if the computer would be left unused for a certain time to achieve zero energy consumption.
Getting Started 3-14 Energy Saving Tips Š Activate the ECO power saving function to manage the computer's energy consumption. Š Turn off the monitor after a period of user inactivity. Š Utilize the Fn and F12 sleep mode keys to turn into power saving mode. Š Tune the settings in Power Options under Windows OS to optimize the computer's power management. Š Always disconnect the AC power cord or uninstall the battery pack or switch off the wall socket if the computer would be left unused for a certain time to achieve zero energy consumption.
User Manual
Page 64
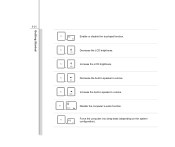
Getting Started 3-21 Enable or disable the touchpad function. + Decrease the LCD brightness. + Increase the LCD brightness. + Decrease the built-in speaker's volume. + Increase the built-in speaker's volume. + Disable the computer's audio function. + Force the computer into sleep state (depending on the system configuration). +
Getting Started 3-21 Enable or disable the touchpad function. + Decrease the LCD brightness. + Increase the LCD brightness. + Decrease the built-in speaker's volume. + Increase the built-in speaker's volume. + Disable the computer's audio function. + Force the computer into sleep state (depending on the system configuration). +

User Manual
Page 68
... change the size, shape, moving speed and other advanced features of your display. In addition, you to meet your finger on the touchpad (usually using the forefinger), and the rectangular pad will move your finger and place it on the screen. The Mouse Properties in Control Panel allows you can use the touchpad: „ Configuring the Touchpad You can act as a left -handed user...
... change the size, shape, moving speed and other advanced features of your display. In addition, you to meet your finger on the touchpad (usually using the forefinger), and the rectangular pad will move your finger and place it on the screen. The Mouse Properties in Control Panel allows you can use the touchpad: „ Configuring the Touchpad You can act as a left -handed user...

User Manual
Page 74
... then connect the device to the notebook. To connect these devices, install the drivers for reference only. Connecting the Peripheral Devices Connecting the USB devices This notebook provides USB ports for connecting various USB devices, such as mouse, keyboard, digital camera, webcam, printer, and external optical storage device, ete.. This notebook is capable to auto detect the USB devices installed, and if there is no detection of the devices, please manually enable the USB devices by going to Start Menu / Control Panel / Add Hardware to connect peripheral devices. The devices...
... then connect the device to the notebook. To connect these devices, install the drivers for reference only. Connecting the Peripheral Devices Connecting the USB devices This notebook provides USB ports for connecting various USB devices, such as mouse, keyboard, digital camera, webcam, printer, and external optical storage device, ete.. This notebook is capable to auto detect the USB devices installed, and if there is no detection of the devices, please manually enable the USB devices by going to Start Menu / Control Panel / Add Hardware to connect peripheral devices. The devices...

User Manual
Page 75
The 15-pin D-Sub VGA port allows users to connect an external monitor or other standard VGA-compatible device (such as a projector) for connecting a larger display with higher resolution. Getting Started 3-32 Connecting the External Display Devices This notebook provides a VGA port for a great view of the notebook display.
The 15-pin D-Sub VGA port allows users to connect an external monitor or other standard VGA-compatible device (such as a projector) for connecting a larger display with higher resolution. Getting Started 3-32 Connecting the External Display Devices This notebook provides a VGA port for a great view of the notebook display.
User Manual
Page 76
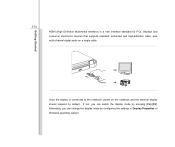
If not, you can switch the display mode by default. Alternately, you can change the display mode by configuring the settings in Display Properties of Windows operating system. Getting Started 3-33 HDMI (High Definition Multimedia Interface) is connected to the notebook, power on a single cable. Once the display is a new interface standard for PCs, displays and consumer electronics devices that supports standard, enhanced and high-definition video, plus multi-channel digital audio on the notebook and the external display should respond by pressing [Fn]+[F2].
If not, you can switch the display mode by default. Alternately, you can change the display mode by configuring the settings in Display Properties of Windows operating system. Getting Started 3-33 HDMI (High Definition Multimedia Interface) is connected to the notebook, power on a single cable. Once the display is a new interface standard for PCs, displays and consumer electronics devices that supports standard, enhanced and high-definition video, plus multi-channel digital audio on the notebook and the external display should respond by pressing [Fn]+[F2].

User Manual
Page 83
... notebook is equipped with a wireless LAN/ Bluetooth module, and the module may be upgradable and replaceable by the authorized dealer or service center. Additional memory module may be installed, by users. This notebook is equipped with a hard disk drive, and this notebook, depending on the specification limitation. To replace the battery pack, please refer to increase the performance of Using Battery power for details. Getting Started 3-40 1 2 3 4 This notebook is equipped with a high-capacity Li-ion battery...
... notebook is equipped with a wireless LAN/ Bluetooth module, and the module may be upgradable and replaceable by the authorized dealer or service center. Additional memory module may be installed, by users. This notebook is equipped with a hard disk drive, and this notebook, depending on the specification limitation. To replace the battery pack, please refer to increase the performance of Using Battery power for details. Getting Started 3-40 1 2 3 4 This notebook is equipped with a high-capacity Li-ion battery...
User Manual
Page 88
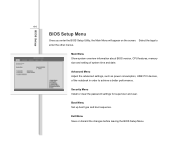
... Menu Install or clear the password settings for supervisor and user. Main Menu Show system overview information about BIOS version, CPU features, memory size and setting of the notebook in order to enter the other menus. Advanced Menu Adjust the advanced settings, such as power consumption, USB/ PCI devices, of system time and date. Boot Menu Set up boot type and boot sequence. Exit Menu Save or discard the changes before leaving the BIOS Setup Menu. BIOS Setup 4-4 BIOS Setup Menu Once you enter the BIOS Setup Utility, the Main Menu...
... Menu Install or clear the password settings for supervisor and user. Main Menu Show system overview information about BIOS version, CPU features, memory size and setting of the notebook in order to enter the other menus. Advanced Menu Adjust the advanced settings, such as power consumption, USB/ PCI devices, of system time and date. Boot Menu Set up boot type and boot sequence. Exit Menu Save or discard the changes before leaving the BIOS Setup Menu. BIOS Setup 4-4 BIOS Setup Menu Once you enter the BIOS Setup Utility, the Main Menu...
User Manual
Page 91
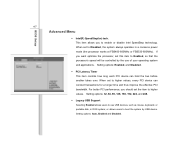
... the processor, set the item to boot the system by the use USB devices, such as mouse, keyboard, or portable disk, in a conserve power mode (the processor works at FSB400-600MHz or FSB533-800MHz). Setting options: 32, 64, 96, 128, 160, 192, 224, and 248. Š Legacy USB Support Selecting Enabled allows users to enable or disable Intel SpeedStep technology. BIOS Setup 4-7 Advanced Menu Š Intel(R) SpeedStep(tm) tech. Setting options: Enabled, and Disabled. Š PCI...
... the processor, set the item to boot the system by the use USB devices, such as mouse, keyboard, or portable disk, in a conserve power mode (the processor works at FSB400-600MHz or FSB533-800MHz). Setting options: 32, 64, 96, 128, 160, 192, 224, and 248. Š Legacy USB Support Selecting Enabled allows users to enable or disable Intel SpeedStep technology. BIOS Setup 4-7 Advanced Menu Š Intel(R) SpeedStep(tm) tech. Setting options: Enabled, and Disabled. Š PCI...

