User Manual
Page 2
Contents Getting Started...3 Package Contents...3 Installing the Monitor Stand 4 Adjusting the Monitor 7 Monitor Overview...9 Connecting the Monitor to PC 13 OSD Setup...15 Navi Key...15 Hot Key...16 OSD Menus...17 Gaming...17 Professional...19 Image...20 Input Source...21 Navi Key...21 Setting...22 Specifications...24 Preset Display Modes 26 Troubleshooting...27 Safety Instructions...28 TÜV Rheinland Certification 30 Regulatory Notices...31 Revision V1.1, 2023/05 2 Contents
Contents Getting Started...3 Package Contents...3 Installing the Monitor Stand 4 Adjusting the Monitor 7 Monitor Overview...9 Connecting the Monitor to PC 13 OSD Setup...15 Navi Key...15 Hot Key...16 OSD Menus...17 Gaming...17 Professional...19 Image...20 Input Source...21 Navi Key...21 Setting...22 Specifications...24 Preset Display Modes 26 Troubleshooting...27 Safety Instructions...28 TÜV Rheinland Certification 30 Regulatory Notices...31 Revision V1.1, 2023/05 2 Contents
User Manual
Page 3
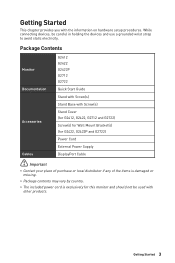
Getting Started 3 While connecting devices, be used with the information on hardware setup procedures. Package Contents Monitor G2412 G2422 G2422P G2712 G2722 Documentation Quick Start Guide Stand with Screw(s) Stand Base with Screw(s) Accessories Stand Cover (for G2412, G2422, G2712 and G2722) Screw(s) for Wall Mount Bracket(s) (for G2422, G2422P and G2722) Power Cord External Power Supply Cables DisplayPort Cable ⚠ Important ∙ Contact your place of purchase or local distributor if any of the items is...
Getting Started 3 While connecting devices, be used with the information on hardware setup procedures. Package Contents Monitor G2412 G2422 G2422P G2712 G2722 Documentation Quick Start Guide Stand with Screw(s) Stand Base with Screw(s) Accessories Stand Cover (for G2412, G2422, G2712 and G2722) Screw(s) for Wall Mount Bracket(s) (for G2422, G2422P and G2722) Power Cord External Power Supply Cables DisplayPort Cable ⚠ Important ∙ Contact your place of purchase or local distributor if any of the items is...
User Manual
Page 4
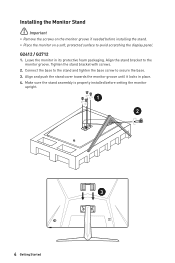
... foam packaging. Leave the monitor in place. 4. Connect the base to the stand and tighten the base screw to the monitor groove. Installing the Monitor Stand ⚠ Important ∙ Remove the screws on a soft, protected surface to avoid scratching the display panel. Tighten the stand bracket with screws. 2. Make sure the stand assembly is properly installed before installing the stand. ∙ Place the monitor on the monitor groove if needed before setting the monitor upright. 1 2 3 4 Getting Started G2412 / G2712 1.
... foam packaging. Leave the monitor in place. 4. Connect the base to the stand and tighten the base screw to the monitor groove. Installing the Monitor Stand ⚠ Important ∙ Remove the screws on a soft, protected surface to avoid scratching the display panel. Tighten the stand bracket with screws. 2. Make sure the stand assembly is properly installed before installing the stand. ∙ Place the monitor on the monitor groove if needed before setting the monitor upright. 1 2 3 4 Getting Started G2412 / G2712 1.
User Manual
Page 5
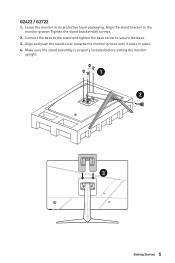
Align the stand bracket to secure the base. 3. Align and push the stand cover towards the monitor groove until it locks in its protective foam packaging. Make sure the stand assembly is properly installed before setting the monitor upright. 1 2 3 Getting Started 5 Tighten the stand bracket with screws. 2. G2422 / G2722 1. Connect the base to the stand and tighten the base screw to the monitor groove. Leave the monitor in place. 4.
Align the stand bracket to secure the base. 3. Align and push the stand cover towards the monitor groove until it locks in its protective foam packaging. Make sure the stand assembly is properly installed before setting the monitor upright. 1 2 3 Getting Started 5 Tighten the stand bracket with screws. 2. G2422 / G2722 1. Connect the base to the stand and tighten the base screw to the monitor groove. Leave the monitor in place. 4.
User Manual
Page 6
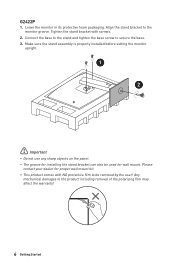
Connect the base to the stand and tighten the base screw to the monitor groove. Align the stand bracket to secure the base. 3. Make sure the stand assembly is properly installed before setting the monitor upright. 1 2 ⚠ Important ∙ Do not use any sharp objects on the panel. ∙ The groove for installing the stand bracket can also be removed by the user! Please contact your dealer for wall mount. G2422P 1. Leave the...
Connect the base to the stand and tighten the base screw to the monitor groove. Align the stand bracket to secure the base. 3. Make sure the stand assembly is properly installed before setting the monitor upright. 1 2 ⚠ Important ∙ Do not use any sharp objects on the panel. ∙ The groove for installing the stand bracket can also be removed by the user! Please contact your dealer for wall mount. G2422P 1. Leave the...
User Manual
Page 7
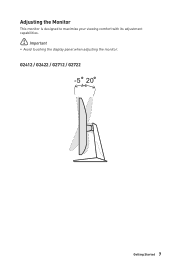
G2412 / G2422 / G2712 / G2722 -5 O 20O Getting Started 7 Adjusting the Monitor This monitor is designed to maximize your viewing comfort with its adjustment capabilities. ⚠ Important ∙ Avoid touching the display panel when adjusting the monitor.
G2412 / G2422 / G2712 / G2722 -5 O 20O Getting Started 7 Adjusting the Monitor This monitor is designed to maximize your viewing comfort with its adjustment capabilities. ⚠ Important ∙ Avoid touching the display panel when adjusting the monitor.
User Manual
Page 13
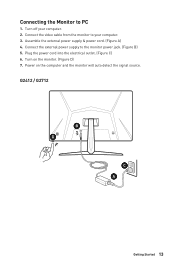
Turn on the computer and the monitor will auto detect the signal source. Assemble the external power supply & power cord. (Figure A) 4. Connect the external power supply to PC 1. G2412 / G2712 BA DA CA A Getting Started 13 Connecting the Monitor to the monitor power jack. (Figure B) 5. Plug the power cord into the electrical outlet. (Figure C) 6. Connect the video cable from the monitor to your computer. 2. Turn off your computer. 3. Power on the monitor. (Figure D) 7.
Turn on the computer and the monitor will auto detect the signal source. Assemble the external power supply & power cord. (Figure A) 4. Connect the external power supply to PC 1. G2412 / G2712 BA DA CA A Getting Started 13 Connecting the Monitor to the monitor power jack. (Figure B) 5. Plug the power cord into the electrical outlet. (Figure C) 6. Connect the video cable from the monitor to your computer. 2. Turn off your computer. 3. Power on the monitor. (Figure D) 7.
User Manual
Page 18
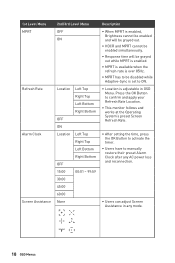
...Button to confirm and apply your Refresh Rate Location. ∙ This monitor follows and works at the Operating System's preset Screen Refresh Rate. ∙ After setting the time, press the OK Button to activate the timer. ∙ Users have to ON. ∙ Location is set to manually restore their preset Alarm Clock after any mode. 18 OSD Menus 1st Level Menu MPRT Refresh Rate Alarm Clock Screen... refresh rate is over 85Hz. ∙ MPRT has to be disabled while Adaptive-Sync is adjustable in any AC power loss and reconnection. ∙ Users can adjust Screen Assistance in OSD Menu.
...Button to confirm and apply your Refresh Rate Location. ∙ This monitor follows and works at the Operating System's preset Screen Refresh Rate. ∙ After setting the time, press the OK Button to activate the timer. ∙ Users have to ON. ∙ Location is set to manually restore their preset Alarm Clock after any mode. 18 OSD Menus 1st Level Menu MPRT Refresh Rate Alarm Clock Screen... refresh rate is over 85Hz. ∙ MPRT has to be disabled while Adaptive-Sync is adjustable in any AC power loss and reconnection. ∙ Users can adjust Screen Assistance in OSD Menu.
User Manual
Page 19
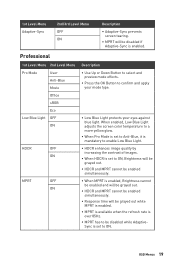
... enhances image quality by increasing the contrast of images. ∙ When HDCR is set to confirm and apply your mode type. ∙ Low Blue Light protects your eyes against blue light. 1st Level Menu Adaptive-Sync 2nd/3rd Level Menu OFF ON Description ∙ Adaptive-Sync prevents screen tearing. ∙ MPRT will be grayed out while MPRT is enabled. ∙ MPRT is available when the refresh rate is...
... enhances image quality by increasing the contrast of images. ∙ When HDCR is set to confirm and apply your mode type. ∙ Low Blue Light protects your eyes against blue light. 1st Level Menu Adaptive-Sync 2nd/3rd Level Menu OFF ON Description ∙ Adaptive-Sync prevents screen tearing. ∙ MPRT will be grayed out while MPRT is enabled. ∙ MPRT is available when the refresh rate is...
User Manual
Page 21
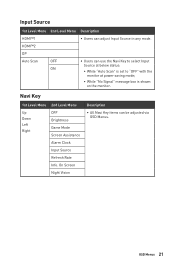
.... OSD Menus 21 HDMI™2 DP Auto Scan OFF ON ∙ Users can use the Navi Key to select Input Source at below status: • While "Auto Scan" is set to "OFF" with the monitor at power saving mode; • While "No Signal" message box is shown on the monitor. Navi Key 1st Level Menu 2nd Level Menu Up Down Left Right OFF Brightness Game Mode Screen Assistance Alarm Clock Input Source Refresh Rate...
.... OSD Menus 21 HDMI™2 DP Auto Scan OFF ON ∙ Users can use the Navi Key to select Input Source at below status: • While "Auto Scan" is set to "OFF" with the monitor at power saving mode; • While "No Signal" message box is shown on the monitor. Navi Key 1st Level Menu 2nd Level Menu Up Down Left Right OFF Brightness Game Mode Screen Assistance Alarm Clock Input Source Refresh Rate...

User Manual
Page 22
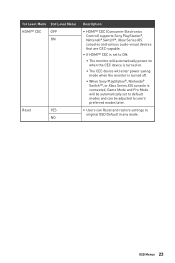
... mode. On Screen. When users set Reset to Yes, Language will override the factory default. Italiano Español 한국어 日本語 Português 简体中文 Bahasa Indonesia Türkçe (More languages coming soon) Transparency 0~5 ∙ Users can press the power button to turn off the panel and backlight. DP OFF OverClocking ON ∙ To achieve maximum resolution of the monitor...
... mode. On Screen. When users set Reset to Yes, Language will override the factory default. Italiano Español 한국어 日本語 Português 简体中文 Bahasa Indonesia Türkçe (More languages coming soon) Transparency 0~5 ∙ Users can press the power button to turn off the panel and backlight. DP OFF OverClocking ON ∙ To achieve maximum resolution of the monitor...
User Manual
Page 23
... monitor will automatically power on when the CEC device is turned on. • The CEC device will enter power saving mode when the monitor is turned off. • When Sony PlayStation®, Nintendo® Switch™, or Xbox Series X|S console is connected, Game Mode and Pro Mode will be automatically set to default modes and can be adjusted to users' preferred modes later. ∙ Users can Reset and restore settings to original OSD Default...
... monitor will automatically power on when the CEC device is turned on. • The CEC device will enter power saving mode when the monitor is turned off. • When Sony PlayStation®, Nintendo® Switch™, or Xbox Series X|S console is connected, Game Mode and Pro Mode will be automatically set to default modes and can be adjusted to users' preferred modes later. ∙ Users can Reset and restore settings to original OSD Default...
User Manual
Page 24
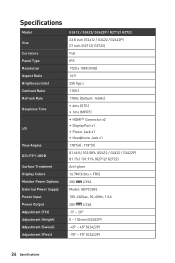
Specifications Model Size Curvature Panel Type Resolution Aspect Ratio Brightness (nits) Contrast Ratio Refresh Rate Response Time I/O View Angles DCI-P3*/ sRGB Surface Treatment Display Colors Monitor Power Options External Power Supply Power Input Power Output Adjustment (Tilt) Adjustment (Height) Adjustment (Swivel) Adjustment (Pivot) G2412 / G2422/ G2422P / G2712/ G2722 23.8 inch (G2412 / G2422 / G2422P) 27 inch (G2712/ G2722) Flat IPS 1920 x 1080 (FHD) 16:9 250 (typ.) 1100:1 170Hz (Default: 165Hz) ∙ 4ms (GTG) ∙ 1ms (MPRT) ∙ HDMI™ Connector x2 ∙ DisplayPort ...
Specifications Model Size Curvature Panel Type Resolution Aspect Ratio Brightness (nits) Contrast Ratio Refresh Rate Response Time I/O View Angles DCI-P3*/ sRGB Surface Treatment Display Colors Monitor Power Options External Power Supply Power Input Power Output Adjustment (Tilt) Adjustment (Height) Adjustment (Swivel) Adjustment (Pivot) G2412 / G2422/ G2422P / G2712/ G2722 23.8 inch (G2412 / G2422 / G2422P) 27 inch (G2712/ G2722) Flat IPS 1920 x 1080 (FHD) 16:9 250 (typ.) 1100:1 170Hz (Default: 165Hz) ∙ 4ms (GTG) ∙ 1ms (MPRT) ∙ HDMI™ Connector x2 ∙ DisplayPort ...
User Manual
Page 26
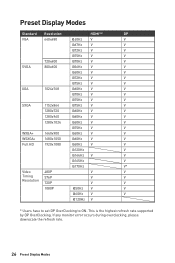
This is the highest refresh rate supported by DP OverClocking. If any monitor error occurs during overclocking, please downscale the refresh rate. 26 Preset Display Modes Preset Display Modes Standard Resolution HDMI™ DP VGA 640x480 @60Hz V V @67Hz V V @72Hz V V @75Hz V V 720x400 @70Hz V V SVGA 800x600 @56Hz V V @60Hz V... 1680x1050 @60Hz V V Full HD 1920x1080 @60Hz V V @120Hz V @144Hz V V @165Hz V @170Hz V* Video Timing Resolution 480P 576P 720P V V V V V V 1080P @50Hz V V @60Hz V V @120Hz V * Users have to set DP OverClocking to ON.
This is the highest refresh rate supported by DP OverClocking. If any monitor error occurs during overclocking, please downscale the refresh rate. 26 Preset Display Modes Preset Display Modes Standard Resolution HDMI™ DP VGA 640x480 @60Hz V V @67Hz V V @72Hz V V @75Hz V V 720x400 @70Hz V V SVGA 800x600 @56Hz V V @60Hz V... 1680x1050 @60Hz V V Full HD 1920x1080 @60Hz V V @120Hz V @144Hz V V @165Hz V @170Hz V* Video Timing Resolution 480P 576P 720P V V V V V V 1080P @50Hz V V @60Hz V V @120Hz V * Users have to set DP OverClocking to ON.

User Manual
Page 27
... connected. • Check if the computer and graphics card are turned on the signal cable connector. The monitor starts flickering or shows waves. • Change the refresh rate to match the capabilities of your monitor. • Update your graphics card drivers. • Keep the monitor away from electrical devices that may be in Standby mode. Press any video extension cables. • Adjust brightness and contrast. • Adjust RGB color or tune color temperature. • Check if the monitor signal cable is properly installed. • Check...
... connected. • Check if the computer and graphics card are turned on the signal cable connector. The monitor starts flickering or shows waves. • Change the refresh rate to match the capabilities of your monitor. • Update your graphics card drivers. • Keep the monitor away from electrical devices that may be in Standby mode. Press any video extension cables. • Adjust brightness and contrast. • Adjust RGB color or tune color temperature. • Check if the monitor signal cable is properly installed. • Check...

User Manual
Page 28
...connected to an earthed mains socket-outlet. ∙ Please confirm the power distribution system in the installation site shall provide the circuit breaker rated 120/240V, 20A (maximum). ∙ Always disconnect the power cord or switch the wall socket off if the device would be disposed of explosion if battery is incorrectly replaced. Replace.... Power ∙ Make sure that the power voltage is swallowed, it . If the coin/button cell battery is within its safety range and has been adjusted properly to qualified personnel only. Keep new and used batteries away from the plug.
...connected to an earthed mains socket-outlet. ∙ Please confirm the power distribution system in the installation site shall provide the circuit breaker rated 120/240V, 20A (maximum). ∙ Always disconnect the power cord or switch the wall socket off if the device would be disposed of explosion if battery is incorrectly replaced. Replace.... Power ∙ Make sure that the power voltage is swallowed, it . If the coin/button cell battery is within its safety range and has been adjusted properly to qualified personnel only. Keep new and used batteries away from the plug.
User Manual
Page 29
...; Use this device away from tipping over, secure the device to a desk, wall or fixed object with an anti-tip fastener that could damage the device or cause electric shock. ∙ Always keep it working according to remove the power plug. that helps to properly support the device and keep strong...been exposed to moisture. • The device does not work well or you can not get the device checked by service personnel: • The power cord or plug is around 40℃. ∙ When cleaning the device, be sure to the User Guide. • The device has dropped and damaged. &#...
...; Use this device away from tipping over, secure the device to a desk, wall or fixed object with an anti-tip fastener that could damage the device or cause electric shock. ∙ Always keep it working according to remove the power plug. that helps to properly support the device and keep strong...been exposed to moisture. • The device does not work well or you can not get the device checked by service personnel: • The power cord or plug is around 40℃. ∙ When cleaning the device, be sure to the User Guide. • The device has dropped and damaged. &#...
User Manual
Page 30
... within the range of 0 - 3000 Hz under various brightness settings. ∙ The display will help to the screen and blue light. ∙ Place the screen 20 - 28 inches (50 - 70 cm) away from the screen and gaze at a distant object for at various frequency ranges. MSI now offers monitors with TÜV Rheinland Low Blue Light certification to cause eye fatigue and discomfort. Please follow the instructions below to...
... within the range of 0 - 3000 Hz under various brightness settings. ∙ The display will help to the screen and blue light. ∙ Place the screen 20 - 28 inches (50 - 70 cm) away from the screen and gaze at a distant object for at various frequency ranges. MSI now offers monitors with TÜV Rheinland Low Blue Light certification to cause eye fatigue and discomfort. Please follow the instructions below to...
User Manual
Page 31
... used in a residential installation. This device must be determined by turning the equipment off and on, the user is no guarantee that interference will not occur in order to comply with the emission limits. This device complies with Part 15 of Industry, CA 91748, USA (626) 913-0828 www.msi.com Regulatory Notices 31 Operation is connected...
... used in a residential installation. This device must be determined by turning the equipment off and on, the user is no guarantee that interference will not occur in order to comply with the emission limits. This device complies with Part 15 of Industry, CA 91748, USA (626) 913-0828 www.msi.com Regulatory Notices 31 Operation is connected...
User Manual
Page 33
... make changes to accuracy or completeness is likely to affect eyesight. Technical Support If a problem arises with your place of purchase or local distributor. Overuse of screen time. 2. For children aged 2 years and over, screen time should be obtained from the user's manual, please contact your product and no screen time. Green Product Features ∙ Reduced energy consumption during use and stand...
... make changes to accuracy or completeness is likely to affect eyesight. Technical Support If a problem arises with your place of purchase or local distributor. Overuse of screen time. 2. For children aged 2 years and over, screen time should be obtained from the user's manual, please contact your product and no screen time. Green Product Features ∙ Reduced energy consumption during use and stand...