User Manual
Page 2
Contents Getting Started...3 Package Contents...3 Installing the Monitor Stand 4 Adjusting the Monitor 6 Monitor Overview...8 Connecting the Monitor to PC 11 OSD Setup...13 Navi Key...13 Hot Key...14 OSD Menus...15 Gaming...15 Professional...17 Image...18 Input Source...19 Navi Key...19 Setting...20 Specifications...22 Preset Display Modes 24 Troubleshooting...25 Safety Instructions...26 TÜV Rheinland Certification 28 Regulatory Notices...29 Revision V1.0, 2023/09 2
Contents Getting Started...3 Package Contents...3 Installing the Monitor Stand 4 Adjusting the Monitor 6 Monitor Overview...8 Connecting the Monitor to PC 11 OSD Setup...13 Navi Key...13 Hot Key...14 OSD Menus...15 Gaming...15 Professional...17 Image...18 Input Source...19 Navi Key...19 Setting...20 Specifications...22 Preset Display Modes 24 Troubleshooting...25 Safety Instructions...26 TÜV Rheinland Certification 28 Regulatory Notices...29 Revision V1.0, 2023/09 2
User Manual
Page 3
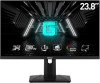
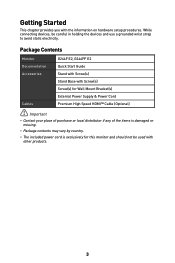
Package Contents Monitor G244F E2, G244PF E2 Documentation Quick Start Guide Accessories Stand with Screw(s) Stand Base with Screw(s) Screw(s) for Wall Mount Bracket(s) External Power Supply & Power Cord Cables Premium High Speed HDMI™ Cable (Optional) ⚠ Important ∙ Contact your place of purchase or local distributor if any of the items is damaged or missing. ∙ Package contents may vary by country. ∙ The included power cord is exclusively for this monitor and should...
Package Contents Monitor G244F E2, G244PF E2 Documentation Quick Start Guide Accessories Stand with Screw(s) Stand Base with Screw(s) Screw(s) for Wall Mount Bracket(s) External Power Supply & Power Cord Cables Premium High Speed HDMI™ Cable (Optional) ⚠ Important ∙ Contact your place of purchase or local distributor if any of the items is damaged or missing. ∙ Package contents may vary by country. ∙ The included power cord is exclusively for this monitor and should...

User Manual
Page 4
Leave the monitor in its protective packaging. Connect the base to the stand and tighten the base screw to the monitor groove. 2. G244F E2 2 1 3 4 Align the stand bracket to secure the base. 4. Tighten the stand bracket with screws. 3. Installing the Monitor Stand 1. Make sure the stand assembly is properly installed before setting the monitor upright.
Leave the monitor in its protective packaging. Connect the base to the stand and tighten the base screw to the monitor groove. 2. G244F E2 2 1 3 4 Align the stand bracket to secure the base. 4. Tighten the stand bracket with screws. 3. Installing the Monitor Stand 1. Make sure the stand assembly is properly installed before setting the monitor upright.
User Manual
Page 5
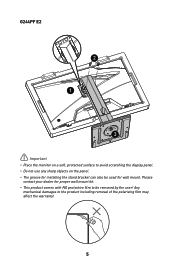
Please contact your dealer for wall mount. Any mechanical damages to be used for proper wall mount kit. ∙ This product comes with NO protective film to the product including removal of the polarizing film may affect the warranty! 5 G244PF E2 2 1 3 ⚠ Important ∙ Place the monitor on a soft, protected surface to avoid scratching the display panel. ∙ Do not use any sharp objects on the panel. ∙ The groove for installing the stand bracket can also be removed by the user!
Please contact your dealer for wall mount. Any mechanical damages to be used for proper wall mount kit. ∙ This product comes with NO protective film to the product including removal of the polarizing film may affect the warranty! 5 G244PF E2 2 1 3 ⚠ Important ∙ Place the monitor on a soft, protected surface to avoid scratching the display panel. ∙ Do not use any sharp objects on the panel. ∙ The groove for installing the stand bracket can also be removed by the user!

User Manual
Page 6
G244F E2 -5° 20° 6 Adjusting the Monitor This monitor is designed to maximize your viewing comfort with its adjustment capabilities. ⚠ Important Avoid touching the display panel when adjusting the monitor.
G244F E2 -5° 20° 6 Adjusting the Monitor This monitor is designed to maximize your viewing comfort with its adjustment capabilities. ⚠ Important Avoid touching the display panel when adjusting the monitor.
User Manual
Page 10
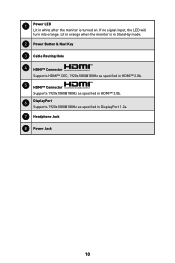
1 Power LED Lit in white after the monitor is in Stand-by mode. 2 Power Button & Navi Key 3 Cable Routing Hole 4 HDMI™ Connector Supports HDMI™ CEC, 1920x1080@180Hz as specified in HDMI™ 2.0b. 5 HDMI™ Connector Supports 1920x1080@180Hz as specified in HDMI™ 2.0b. 6 DisplayPort Supports 1920x1080@180Hz as specified in orange when the monitor is turned on. Lit in DisplayPort 1.2a. 7 Headphone Jack 8 Power Jack 10 If no signal input, the LED will turn into orange.
1 Power LED Lit in white after the monitor is in Stand-by mode. 2 Power Button & Navi Key 3 Cable Routing Hole 4 HDMI™ Connector Supports HDMI™ CEC, 1920x1080@180Hz as specified in HDMI™ 2.0b. 5 HDMI™ Connector Supports 1920x1080@180Hz as specified in HDMI™ 2.0b. 6 DisplayPort Supports 1920x1080@180Hz as specified in orange when the monitor is turned on. Lit in DisplayPort 1.2a. 7 Headphone Jack 8 Power Jack 10 If no signal input, the LED will turn into orange.
User Manual
Page 11
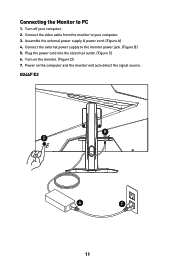
G244F E2 B D 比例25.400 A C 11 Assemble the external power supply & power cord. (Figure A) 4. Connect the external power supply to PC 1. Turn on the computer and the monitor will auto detect the signal source. Plug the power cord into the electrical outlet. (Figure C) 6. Power on the monitor. (Figure D) 7. Connecting the Monitor to the monitor power jack. (Figure B) 5. Turn off your computer. 3. Connect the video cable from the monitor to your computer. 2.
G244F E2 B D 比例25.400 A C 11 Assemble the external power supply & power cord. (Figure A) 4. Connect the external power supply to PC 1. Turn on the computer and the monitor will auto detect the signal source. Plug the power cord into the electrical outlet. (Figure C) 6. Power on the monitor. (Figure D) 7. Connecting the Monitor to the monitor power jack. (Figure B) 5. Turn off your computer. 3. Connect the video cable from the monitor to your computer. 2.
User Manual
Page 14
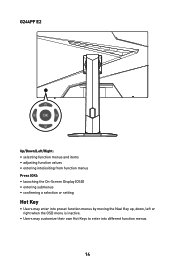
G244PF E2 Up/Down/Left/Right: ∙ selecting function menus and items ∙ adjusting function values ∙ entering into/exiting from function menus Press (OK): ∙ launching the On-Screen Display (OSD) ∙ entering submenus ∙ confirming a selection or setting Hot Key ∙ Users may enter into preset function menus by moving the Navi Key up, down, left or right when the OSD menu is inactive. ∙ Users may customize their own Hot Keys to enter into different function menus. 14
G244PF E2 Up/Down/Left/Right: ∙ selecting function menus and items ∙ adjusting function values ∙ entering into/exiting from function menus Press (OK): ∙ launching the On-Screen Display (OSD) ∙ entering submenus ∙ confirming a selection or setting Hot Key ∙ Users may enter into preset function menus by moving the Navi Key up, down, left or right when the OSD menu is inactive. ∙ Users may customize their own Hot Keys to enter into different function menus. 14

User Manual
Page 16
... is adjustable in OSD Menu. 1st Level Menu Response Time MPRT Refresh Rate Alarm Clock 2nd/3rd Level Menu Normal Fast Fastest OFF ON Description ∙ Setting to Fastest will reach the shortest response time and help improve blurred images when ...Brightness » Adaptive-Sync » HDCR Function Status Unable to select Set to manually restore their preset Alarm Clock after any AC power loss and reconnection. 00:01 ~ 99:59 16 Press the OK Button to confirm and apply your Refresh Rate Location. ∙ This monitor follows and works at the Operating System's preset Screen Refresh Rate...
... is adjustable in OSD Menu. 1st Level Menu Response Time MPRT Refresh Rate Alarm Clock 2nd/3rd Level Menu Normal Fast Fastest OFF ON Description ∙ Setting to Fastest will reach the shortest response time and help improve blurred images when ...Brightness » Adaptive-Sync » HDCR Function Status Unable to select Set to manually restore their preset Alarm Clock after any AC power loss and reconnection. 00:01 ~ 99:59 16 Press the OK Button to confirm and apply your Refresh Rate Location. ∙ This monitor follows and works at the Operating System's preset Screen Refresh Rate...

User Manual
Page 17
... Level Menu Pro Mode Low Blue Light 2nd Level Menu User Anti-Blue Movie Office sRGB Eco OFF ON ∙ Adaptive-Sync prevents screen tearing. ∙ Activating Adaptive-Sync will affect: Affected Function » MPRT Function Status Set to OFF Description ∙ Use Up or Down Button to select and preview mode effects. ∙ Press the OK Button to enable Low Blue Light. ∙ This monitor is a Low Blue Light backlight monitor, it is set...
... Level Menu Pro Mode Low Blue Light 2nd Level Menu User Anti-Blue Movie Office sRGB Eco OFF ON ∙ Adaptive-Sync prevents screen tearing. ∙ Activating Adaptive-Sync will affect: Affected Function » MPRT Function Status Set to OFF Description ∙ Use Up or Down Button to select and preview mode effects. ∙ Press the OK Button to enable Low Blue Light. ∙ This monitor is a Low Blue Light backlight monitor, it is set...

User Manual
Page 18
... by increasing the contrast of images. Color Temperature Cool Normal Warm Customization R (0-100) G (0-100) B (0-100) ∙ Use Up or Down Button to select and preview mode effects. ∙ Press the OK Button to improve their acutance. Image 1st Level Menu Brightness Contrast Sharpness 2nd/3rd Level Menu 0-100 0-100 0-5 Description ∙ Properly adjust Brightness according to the surrounding lighting. ∙ Properly adjust Contrast to relax your eyes...
... by increasing the contrast of images. Color Temperature Cool Normal Warm Customization R (0-100) G (0-100) B (0-100) ∙ Use Up or Down Button to select and preview mode effects. ∙ Press the OK Button to improve their acutance. Image 1st Level Menu Brightness Contrast Sharpness 2nd/3rd Level Menu 0-100 0-100 0-5 Description ∙ Properly adjust Brightness according to the surrounding lighting. ∙ Properly adjust Contrast to relax your eyes...
User Manual
Page 19
... 2nd Level Menu OFF Brightness Game Mode Screen Assistance Alarm Clock Input Source Refresh Rate Info. Input Source 1st Level Menu HDMI™ 1 HDMI™ 2 DP Auto Scan 2nd Level Menu OFF ON Description ∙ Users can adjust Input Source in any mode, any resolution and any mode. ∙ Users can use the Navi Key to select Input Source at below status: • While "Auto Scan" is set to "OFF" with the monitor at power saving mode; • While "No Signal" message box...
... 2nd Level Menu OFF Brightness Game Mode Screen Assistance Alarm Clock Input Source Refresh Rate Info. Input Source 1st Level Menu HDMI™ 1 HDMI™ 2 DP Auto Scan 2nd Level Menu OFF ON Description ∙ Users can adjust Input Source in any mode, any resolution and any mode. ∙ Users can use the Navi Key to select Input Source at below status: • While "Auto Scan" is set to "OFF" with the monitor at power saving mode; • While "No Signal" message box...
User Manual
Page 20
... adjust Transparency in any mode. 5~30s ∙ Users can press the power button to confirm and apply the Language setting. ∙ Language is an independent setting. On Screen 2nd Level Menu Description English Français Deutsch ∙ Users have to press the OK Button to turn off the panel and backlight. OFF ∙ The information of the screen. Standby ∙ When set Reset to turn off the monitor. Setting 1st Level Menu Language Transparency OSD...
... adjust Transparency in any mode. 5~30s ∙ Users can press the power button to confirm and apply the Language setting. ∙ Language is an independent setting. On Screen 2nd Level Menu Description English Français Deutsch ∙ Users have to press the OK Button to turn off the panel and backlight. OFF ∙ The information of the screen. Standby ∙ When set Reset to turn off the monitor. Setting 1st Level Menu Language Transparency OSD...
User Manual
Page 21
... the CEC device is turned on. • The CEC device will enter power saving mode when the monitor is turned off. • When Sony PlayStation®, Nintendo® Switch™, or Xbox Series X|S console is connected, Game Mode and Pro Mode will be automatically set to default Eco mode and can be adjusted to users' preferred modes later. ∙ Users can Reset and restore settings to original OSD Default in any mode. 21
... the CEC device is turned on. • The CEC device will enter power saving mode when the monitor is turned off. • When Sony PlayStation®, Nintendo® Switch™, or Xbox Series X|S console is connected, Game Mode and Pro Mode will be automatically set to default Eco mode and can be adjusted to users' preferred modes later. ∙ Users can Reset and restore settings to original OSD Default in any mode. 21

User Manual
Page 22
Specifications Monitor Size Curvature Panel Type Resolution Aspect Ratio Brightness Contrast Ratio Refresh Rate Response Time I/O View Angles DCI-P3*/ sRGB Surface Treatment Display Colors Monitor Power Options External Power Supply Power Input Power Output Adjustment (Tilt) Adjustment (Height) Adjustment (Swivel) Adjustment (Pivot) Kensington Lock G244F E2 G244PF E2 23.8 inch Flat Rapid IPS 1920 x 1080 (FHD) 16:9 300 nits (typ.) 1000:1 180Hz ∙ 1ms (MPRT) ∙ 1ms (GTG) ∙ 6ms (Tr + Tf) ∙ HDMI™ Connector x2 ∙ DisplayPort x1 ∙ Headphone Jack...
Specifications Monitor Size Curvature Panel Type Resolution Aspect Ratio Brightness Contrast Ratio Refresh Rate Response Time I/O View Angles DCI-P3*/ sRGB Surface Treatment Display Colors Monitor Power Options External Power Supply Power Input Power Output Adjustment (Tilt) Adjustment (Height) Adjustment (Swivel) Adjustment (Pivot) Kensington Lock G244F E2 G244PF E2 23.8 inch Flat Rapid IPS 1920 x 1080 (FHD) 16:9 300 nits (typ.) 1000:1 180Hz ∙ 1ms (MPRT) ∙ 1ms (GTG) ∙ 6ms (Tr + Tf) ∙ HDMI™ Connector x2 ∙ DisplayPort x1 ∙ Headphone Jack...

User Manual
Page 25
... turned on the signal cable connector. Press any video extension cables. • Adjust brightness and contrast. • Adjust RGB color or tune color temperature. • Check if the monitor signal cable is properly connected. • Check for bent pins on . • Check if the monitor signal cable is not properly sized or centered. • Refer to Preset Display Modes to set the computer to a setting suitable for the monitor to match the capabilities of your monitor. • Update your graphics card drivers. • Keep...
... turned on the signal cable connector. Press any video extension cables. • Adjust brightness and contrast. • Adjust RGB color or tune color temperature. • Check if the monitor signal cable is properly connected. • Check for bent pins on . • Check if the monitor signal cable is not properly sized or centered. • Refer to Preset Display Modes to set the computer to a setting suitable for the monitor to match the capabilities of your monitor. • Update your graphics card drivers. • Keep...
User Manual
Page 26
... that helps to remove the power plug. The device must be connected to an earthed mains socket-outlet. ∙ Please confirm the power distribution system in the installation site shall provide the circuit breaker rated 120/240V, 20A (maximum). ∙ Always disconnect the power cord or switch the wall socket off if the device would be noted. ∙ Refer servicing to clean the device...
... that helps to remove the power plug. The device must be connected to an earthed mains socket-outlet. ∙ Please confirm the power distribution system in the installation site shall provide the circuit breaker rated 120/240V, 20A (maximum). ∙ Always disconnect the power cord or switch the wall socket off if the device would be noted. ∙ Refer servicing to clean the device...

User Manual
Page 28
... standard within the range of 0 - 3000 Hz under various brightness settings. ∙ The display will help to reduce eye strain after extended screen time. ∙ Take breaks for 20 minutes every 2 hours. ∙ Look away from your eyes and a little below eye level. ∙ Consciously blinking the eyes every now and then will not support Flicker Free when Anti Motion...
... standard within the range of 0 - 3000 Hz under various brightness settings. ∙ The display will help to reduce eye strain after extended screen time. ∙ Take breaks for 20 minutes every 2 hours. ∙ Look away from your eyes and a little below eye level. ∙ Consciously blinking the eyes every now and then will not support Flicker Free when Anti Motion...

User Manual
Page 29
... a Class B digital device, pursuant to Part 15 of the FCC Rules. Notice 2 Shielded interface cables and AC power cord, if any interference received, including interference that to which can radiate radio frequency energy and, if not installed and used in a residential installation. Regulatory Notices CE Conformity This device complies with the requirements set out in accordance with the instruction manual, may cause...
... a Class B digital device, pursuant to Part 15 of the FCC Rules. Notice 2 Shielded interface cables and AC power cord, if any interference received, including interference that to which can radiate radio frequency energy and, if not installed and used in a residential installation. Regulatory Notices CE Conformity This device complies with the requirements set out in accordance with the instruction manual, may cause...

User Manual
Page 31
...been designed to less than one hour per day. MSI reserves the right to make changes to affect eyesight. Green Product Features ∙ Reduced energy consumption during use and stand-by ∙ Limited use of substances harmful to the environment and health ∙...use of natural resources by encouraging recycling ∙ Extended product lifetime through easy upgrades ∙ Reduced solid waste production through take -back, recycling, and disassembly of MSI products. Take a 10-minute break for further guidance. 31 Technical Support If a problem arises with your product and no screen...
...been designed to less than one hour per day. MSI reserves the right to make changes to affect eyesight. Green Product Features ∙ Reduced energy consumption during use and stand-by ∙ Limited use of substances harmful to the environment and health ∙...use of natural resources by encouraging recycling ∙ Extended product lifetime through easy upgrades ∙ Reduced solid waste production through take -back, recycling, and disassembly of MSI products. Take a 10-minute break for further guidance. 31 Technical Support If a problem arises with your product and no screen...
