
User Manual
Page 2
Contents Getting Started...3 Package Contents...3 Installing the Monitor Stand 4 Adjusting the Monitor 5 Monitor Overview...6 Connecting the Monitor to PC 7 OSD Setup...8 OSD Keys...8 OSD Menus...10 Gaming...10 Professional...12 Image...13 Input Source...13 Navi Key...14 Setting...14 Specifications...16 Preset Display Modes 18 Troubleshooting...19 Safety Instructions...20 TÜV Rheinland Certification 22 Regulatory Notices...23 Revision V1.0, 2023/08 2
Contents Getting Started...3 Package Contents...3 Installing the Monitor Stand 4 Adjusting the Monitor 5 Monitor Overview...6 Connecting the Monitor to PC 7 OSD Setup...8 OSD Keys...8 OSD Menus...10 Gaming...10 Professional...12 Image...13 Input Source...13 Navi Key...14 Setting...14 Specifications...16 Preset Display Modes 18 Troubleshooting...19 Safety Instructions...20 TÜV Rheinland Certification 22 Regulatory Notices...23 Revision V1.0, 2023/08 2
User Manual
Page 3
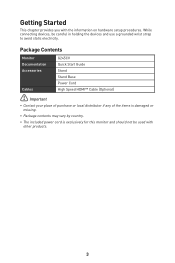
... Monitor G245CV Documentation Quick Start Guide Accessories Stand Stand Base Power Cord Cables High Speed HDMI™ Cable (Optional) ⚠ Important ∙ Contact your place of purchase or local distributor if any of the items is damaged or missing. ∙ Package contents may vary by country. ∙ The included power cord is exclusively for this monitor and should not be careful in holding the devices and use...
... Monitor G245CV Documentation Quick Start Guide Accessories Stand Stand Base Power Cord Cables High Speed HDMI™ Cable (Optional) ⚠ Important ∙ Contact your place of purchase or local distributor if any of the items is damaged or missing. ∙ Package contents may vary by country. ∙ The included power cord is exclusively for this monitor and should not be careful in holding the devices and use...

User Manual
Page 4
... stand bracket towards the stand until it locks in place. 4. In case of improper installation, push the release tab to the product including removal of the polarizing film may affect the warranty! 4 Make sure the stand assembly is properly installed before setting the monitor upright. 1 3 2 ⚠ Important ∙ Place the monitor on a soft, protected surface to avoid scratching the display panel. ∙ Do not use...
... stand bracket towards the stand until it locks in place. 4. In case of improper installation, push the release tab to the product including removal of the polarizing film may affect the warranty! 4 Make sure the stand assembly is properly installed before setting the monitor upright. 1 3 2 ⚠ Important ∙ Place the monitor on a soft, protected surface to avoid scratching the display panel. ∙ Do not use...

User Manual
Page 5
Adjusting the Monitor This monitor is designed to maximize your viewing comfort with its adjustment capabilities. ⚠ Important Avoid touching the display panel when adjusting the monitor. -3.5° +21.5° 5
Adjusting the Monitor This monitor is designed to maximize your viewing comfort with its adjustment capabilities. ⚠ Important Avoid touching the display panel when adjusting the monitor. -3.5° +21.5° 5

User Manual
Page 7
Connecting the Monitor to the monitor power jack. (Figure A) 4. Turn on the computer and the monitor will auto detect the signal source. Power on the monitor. (Figure C) 6. A C B 7 Connect the video cable from the monitor to your computer. 2. Plug the power cord into the electrical outlet. (Figure B) 5. Turn off your computer. 3. Connect the power cord to PC 1.
Connecting the Monitor to the monitor power jack. (Figure A) 4. Turn on the computer and the monitor will auto detect the signal source. Power on the monitor. (Figure C) 6. A C B 7 Connect the video cable from the monitor to your computer. 2. Plug the power cord into the electrical outlet. (Figure B) 5. Turn off your computer. 3. Connect the power cord to PC 1.

User Manual
Page 9
OSD Keys 1 INPUT / EXIT 2 UP / Game Mode / + 3 DOWN / Screen Assistance / - 4 MENU / ENTER Hot Key (When OSD is OFF) OSD Setup (When OSD is ON) ∙ Selecting the video input ∙ Returning to the previous from external sources menu ∙ Exiting from the OSD Main Menu ∙ Activating the Game Mode ∙ Adjusting function values ∙ Activating the Screen Assistance ∙ Activating the OSD Main ∙ Confirming the selection Menu 5 Power Button 9
OSD Keys 1 INPUT / EXIT 2 UP / Game Mode / + 3 DOWN / Screen Assistance / - 4 MENU / ENTER Hot Key (When OSD is OFF) OSD Setup (When OSD is ON) ∙ Selecting the video input ∙ Returning to the previous from external sources menu ∙ Exiting from the OSD Main Menu ∙ Activating the Game Mode ∙ Adjusting function values ∙ Activating the Screen Assistance ∙ Activating the OSD Main ∙ Confirming the selection Menu 5 Power Button 9

User Manual
Page 10
.... ∙ Press the MENU Button to confirm and apply your mode type. ∙ This function optimizes background brightness and is recommended for FPS games. ∙ Setting to Fastest will reach the shortest response time and help improve blurred images when playing very fast games. ∙ Activating MPRT will affect: Affected Function » Response Time » Brightness » Adaptive-Sync » HDCR...
.... ∙ Press the MENU Button to confirm and apply your mode type. ∙ This function optimizes background brightness and is recommended for FPS games. ∙ Setting to Fastest will reach the shortest response time and help improve blurred images when playing very fast games. ∙ Activating MPRT will affect: Affected Function » Response Time » Brightness » Adaptive-Sync » HDCR...
User Manual
Page 11
... Refresh Rate Location. ∙ This monitor follows and works at the Operating System's preset Screen Refresh Rate. ∙ After setting the time, press the MENU Button to activate the timer. ∙ Users have to OFF 11 Adaptive-Sync OFF ON ∙ Adaptive-Sync prevents screen tearing. ∙ Activating Adaptive-Sync will affect: Affected Function » MPRT Function Status Set to manually restore their preset Alarm Clock after any mode. 1st Level Menu Refresh Rate...
... Refresh Rate Location. ∙ This monitor follows and works at the Operating System's preset Screen Refresh Rate. ∙ After setting the time, press the MENU Button to activate the timer. ∙ Users have to OFF 11 Adaptive-Sync OFF ON ∙ Adaptive-Sync prevents screen tearing. ∙ Activating Adaptive-Sync will affect: Affected Function » MPRT Function Status Set to manually restore their preset Alarm Clock after any mode. 1st Level Menu Refresh Rate...
User Manual
Page 12
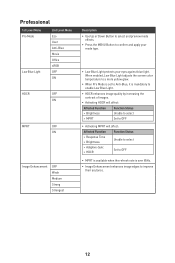
... » Response Time » Brightness Unable to select » Adaptive-Sync » HDCR Set to OFF ∙ MPRT is available when the refresh rate is over 85Hz. ∙ Image Enhancement enhances image edges to confirm and apply your mode type. ∙ Low Blue Light protects your eyes against blue light. Professional 1st Level Menu Pro Mode Low Blue Light 2nd Level Menu Eco User Anti-Blue Movie Office sRGB OFF...
... » Response Time » Brightness Unable to select » Adaptive-Sync » HDCR Set to OFF ∙ MPRT is available when the refresh rate is over 85Hz. ∙ Image Enhancement enhances image edges to confirm and apply your mode type. ∙ Low Blue Light protects your eyes against blue light. Professional 1st Level Menu Pro Mode Low Blue Light 2nd Level Menu Eco User Anti-Blue Movie Office sRGB OFF...
User Manual
Page 13
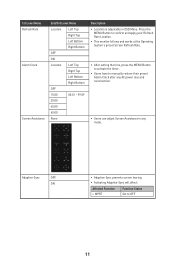
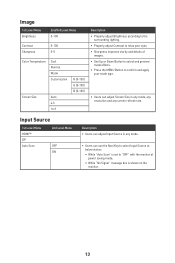
..." with the monitor at power saving mode; • While "No Signal" message box is shown on the monitor. 13 Image 1st Level Menu Brightness 2nd/3rd Level Menu 0-100 Contrast Sharpness 0-100 0-5 Color Temperature Cool Normal Warm Customization Screen Size Auto 4:3 16:9 R (0-100) G (0-100) B (0-100) Description ∙ Properly adjust Brightness according to the surrounding lighting. ∙ Properly adjust Contrast to relax your mode type. ∙ Users can adjust Screen Size in any mode, any resolution and any screen refresh rate.
..." with the monitor at power saving mode; • While "No Signal" message box is shown on the monitor. 13 Image 1st Level Menu Brightness 2nd/3rd Level Menu 0-100 Contrast Sharpness 0-100 0-5 Color Temperature Cool Normal Warm Customization Screen Size Auto 4:3 16:9 R (0-100) G (0-100) B (0-100) Description ∙ Properly adjust Brightness according to the surrounding lighting. ∙ Properly adjust Contrast to relax your mode type. ∙ Users can adjust Screen Size in any mode, any resolution and any screen refresh rate.
User Manual
Page 14
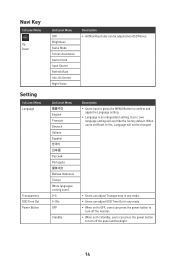
Users' own language setting will not be changed. ∙ Users can adjust Transparency in any mode. ∙ Users can adjust OSD Time Out in any mode. ∙ When set to OFF, users can press the power button to turn off the monitor. ∙ When set Reset to Yes, Language will override the factory default. When users set to Standby, users can be adjusted via OSD Menus. 2nd Level Menu English Français Deutsch Italiano Español Portuguê...
Users' own language setting will not be changed. ∙ Users can adjust Transparency in any mode. ∙ Users can adjust OSD Time Out in any mode. ∙ When set to OFF, users can press the power button to turn off the monitor. ∙ When set Reset to Yes, Language will override the factory default. When users set to Standby, users can be adjusted via OSD Menus. 2nd Level Menu English Français Deutsch Italiano Español Portuguê...
User Manual
Page 15
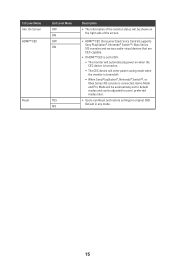
... device is turned on. • The CEC device will enter power saving mode when the monitor is turned off. • When Sony PlayStation®, Nintendo® Switch™, or Xbox Series X|S console is connected, Game Mode and Pro Mode will be automatically set to default modes and can be adjusted to users' preferred modes later. ∙ Users can Reset and restore settings to original OSD Default in any mode. 15 1st Level Menu Info.
... device is turned on. • The CEC device will enter power saving mode when the monitor is turned off. • When Sony PlayStation®, Nintendo® Switch™, or Xbox Series X|S console is connected, Game Mode and Pro Mode will be automatically set to default modes and can be adjusted to users' preferred modes later. ∙ Users can Reset and restore settings to original OSD Default in any mode. 15 1st Level Menu Info.

User Manual
Page 16
Specifications Monitor Size Curvature Panel Type Resolution Aspect Ratio Brightness (nits) Contrast Ratio Refresh Rate Response Time I/O View Angles DCI-P3*/ sRGB Surface Treatment Display Colors Monitor Power Options Power Consumption Adjustment (Tilt) Kensington Lock VESA Mounting G245CV 23.6 inch 1500R VA 1920 x 1080 (FHD) 16:9 250 (Typ.) 3000:1 100Hz ∙ 4ms (GTG) ∙ 1ms (MPRT) ∙ DisplayPort x 1 ∙ HDMI™ Connector x 1 ∙ Headphone Jack x 1 178° (H), 178° (V) 88% / 110% Anti-glare 16.7M...
Specifications Monitor Size Curvature Panel Type Resolution Aspect Ratio Brightness (nits) Contrast Ratio Refresh Rate Response Time I/O View Angles DCI-P3*/ sRGB Surface Treatment Display Colors Monitor Power Options Power Consumption Adjustment (Tilt) Kensington Lock VESA Mounting G245CV 23.6 inch 1500R VA 1920 x 1080 (FHD) 16:9 250 (Typ.) 3000:1 100Hz ∙ 4ms (GTG) ∙ 1ms (MPRT) ∙ DisplayPort x 1 ∙ HDMI™ Connector x 1 ∙ Headphone Jack x 1 178° (H), 178° (V) 88% / 110% Anti-glare 16.7M...
User Manual
Page 19
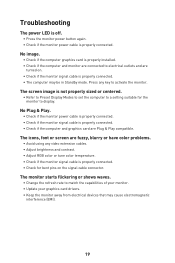
... any video extension cables. • Adjust brightness and contrast. • Adjust RGB color or tune color temperature. • Check if the monitor signal cable is properly connected. • The computer may cause electromagnetic interference (EMI). 19 The monitor starts flickering or shows waves. • Change the refresh rate to display. No Plug & Play. • Check if the monitor power cable is properly connected. • Check if the monitor signal cable is properly connected. Troubleshooting The power LED is off. • Press the monitor power button again. • Check if...
... any video extension cables. • Adjust brightness and contrast. • Adjust RGB color or tune color temperature. • Check if the monitor signal cable is properly connected. • The computer may cause electromagnetic interference (EMI). 19 The monitor starts flickering or shows waves. • Change the refresh rate to display. No Plug & Play. • Check if the monitor power cable is properly connected. • Check if the monitor signal cable is properly connected. Troubleshooting The power LED is off. • Press the monitor power button again. • Check if...
User Manual
Page 20
... to death. Power ∙ Make sure that people are unlikely to the power outlet. ∙ If the power cord comes with an adapter, use only the MSI provided AC adapter approved for recycling or special disposal. 20 Please use with this device comes with a 3-pin plug, do not disable the protective earth pin from children. The device must be connected to an earthed...
... to death. Power ∙ Make sure that people are unlikely to the power outlet. ∙ If the power cord comes with an adapter, use only the MSI provided AC adapter approved for recycling or special disposal. 20 Please use with this device comes with a 3-pin plug, do not disable the protective earth pin from children. The device must be connected to an earthed...
User Manual
Page 21
...Use a piece of soft cloth rather than industrial chemical to remove the power plug. Never pour any of the following situations arises, get it safe in place. ∙ To prevent fire or shock hazard, keep this device away from tipping over, secure the device to a desk, wall or fixed object with an anti-tip fastener that helps... The device does not work well or you can not get the device checked by service personnel: • The power cord or plug is around 40℃. ∙ When cleaning the device, be sure to clean the device. California, USA: The button cell battery may contain ...
...Use a piece of soft cloth rather than industrial chemical to remove the power plug. Never pour any of the following situations arises, get it safe in place. ∙ To prevent fire or shock hazard, keep this device away from tipping over, secure the device to a desk, wall or fixed object with an anti-tip fastener that helps... The device does not work well or you can not get the device checked by service personnel: • The power cord or plug is around 40℃. ∙ When cleaning the device, be sure to clean the device. California, USA: The button cell battery may contain ...
User Manual
Page 22
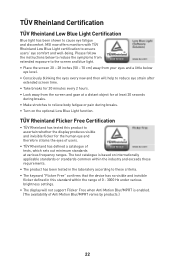
... "Flicker Free" confirms that the device has no visible and invisible flicker defined in this product to relieve body fatigue or pain during breaks. ∙ Turn on internationally applicable standards or standards common within the range of 0 - 3000 Hz under various brightness settings. ∙ The display will not support Flicker Free when Anti Motion Blur/MPRT is based on the optional Low Blue Light...
... "Flicker Free" confirms that the device has no visible and invisible flicker defined in this product to relieve body fatigue or pain during breaks. ∙ Turn on internationally applicable standards or standards common within the range of 0 - 3000 Hz under various brightness settings. ∙ The display will not support Flicker Free when Anti Motion Blur/MPRT is based on the optional Low Blue Light...
User Manual
Page 23
... turning the equipment off and on, the user is subject to Electromagnetic Compatibility (2014/30/EU), Low-voltage Directive (2014/35/EU), ErP Directive (2009/125/EC) and RoHS directive (2011/65/EU). Notice 2 Shielded interface cables and AC power cord, if any interference received, including interference that interference will not occur in a particular installation. FCC-B Radio Frequency...
... turning the equipment off and on, the user is subject to Electromagnetic Compatibility (2014/30/EU), Low-voltage Directive (2014/35/EU), ErP Directive (2009/125/EC) and RoHS directive (2011/65/EU). Notice 2 Shielded interface cables and AC power cord, if any interference received, including interference that interference will not occur in a particular installation. FCC-B Radio Frequency...
User Manual
Page 24
..., defined by MSI comply with the "India E-waste (Management and Handling) Rule 2016" and prohibits use of certain dangerous substances in electrical and electronic equipment. Vietnam RoHS As from December 1, 2012, all products manufactured by specification JIS C 0950...number of hazardous substances in electronic and electric products. 24 WEEE Statement Under the European Union ("EU") Directive on Waste Electrical and Electronic Equipment, Directive 2012/19/EU, products of "electrical and electronic equipment" cannot be discarded as municipal waste anymore and manufacturers of covered...
..., defined by MSI comply with the "India E-waste (Management and Handling) Rule 2016" and prohibits use of certain dangerous substances in electrical and electronic equipment. Vietnam RoHS As from December 1, 2012, all products manufactured by specification JIS C 0950...number of hazardous substances in electronic and electric products. 24 WEEE Statement Under the European Union ("EU") Directive on Waste Electrical and Electronic Equipment, Directive 2012/19/EU, products of "electrical and electronic equipment" cannot be discarded as municipal waste anymore and manufacturers of covered...
User Manual
Page 25
..., recycling, and disassembly of MSI products. Children under 2 years of purchase or local distributor. For children aged 2 years and over, screen time should have no solution can be limited to less than one hour per day. Warning! Technical Support If a problem arises with your place of age should be obtained from the user's manual, please contact your...
..., recycling, and disassembly of MSI products. Children under 2 years of purchase or local distributor. For children aged 2 years and over, screen time should have no solution can be limited to less than one hour per day. Warning! Technical Support If a problem arises with your place of age should be obtained from the user's manual, please contact your...