
User Manual
Page 2
Contents Getting Started...3 Package Contents...3 Installing the Monitor Stand 4 Adjusting the Monitor 6 Monitor Overview...8 Connecting the Monitor to PC 11 OSD Setup...13 Navi Key...13 Hot Key...14 OSD Menus...15 Gaming...16 Professional...18 Image...19 Input Source...20 PIP/PBP...21 Navi Key...22 Setting...23 Specifications...25 Preset Display Modes 27 Troubleshooting...28 Safety Instructions...29 TÜV Rheinland Certification 31 Regulatory Notices...32 Revision V1.1, 2023/07 2 Contents
Contents Getting Started...3 Package Contents...3 Installing the Monitor Stand 4 Adjusting the Monitor 6 Monitor Overview...8 Connecting the Monitor to PC 11 OSD Setup...13 Navi Key...13 Hot Key...14 OSD Menus...15 Gaming...16 Professional...18 Image...19 Input Source...20 PIP/PBP...21 Navi Key...22 Setting...23 Specifications...25 Preset Display Modes 27 Troubleshooting...28 Safety Instructions...29 TÜV Rheinland Certification 31 Regulatory Notices...32 Revision V1.1, 2023/07 2 Contents

User Manual
Page 3
Package Contents Monitor G273CQ MAG273CQR Documentation Quick Start Guide Stand Base with Quick Release Fastener Accessories Screw(s) for Wall Mount Bracket(s) Power Cord External Power Supply (Optional) Cables Premium High Speed HDMI™ Cable (Optional) DisplayPort Cable (Optional) ⚠ Important ∙ Contact your place of purchase or local distributor if any of the items is damaged or missing. ∙ Package contents may vary by country. ∙ The included power cord is exclusively...
Package Contents Monitor G273CQ MAG273CQR Documentation Quick Start Guide Stand Base with Quick Release Fastener Accessories Screw(s) for Wall Mount Bracket(s) Power Cord External Power Supply (Optional) Cables Premium High Speed HDMI™ Cable (Optional) DisplayPort Cable (Optional) ⚠ Important ∙ Contact your place of purchase or local distributor if any of the items is damaged or missing. ∙ Package contents may vary by country. ∙ The included power cord is exclusively...

User Manual
Page 4
Leave the monitor in its protective foam packaging. Connect the base to the stand and tighten the quick release fastener to the monitor groove. 2. Tighten the stand bracket with screws. 3. Make sure the stand assembly is properly installed before setting the monitor upright. Installing the Monitor Stand 1. Align the stand bracket to secure the base. 4. G273CQ 2 1 3 4 Getting Started
Leave the monitor in its protective foam packaging. Connect the base to the stand and tighten the quick release fastener to the monitor groove. 2. Tighten the stand bracket with screws. 3. Make sure the stand assembly is properly installed before setting the monitor upright. Installing the Monitor Stand 1. Align the stand bracket to secure the base. 4. G273CQ 2 1 3 4 Getting Started

User Manual
Page 5
... the warranty! Any mechanical damages to be used for wall mount. Getting Started 5 MAG273CQR 1 2 3 ⚠ Important ∙ Remove the screws on the monitor groove if needed before installing the stand. ∙ Place the monitor on a soft, protected surface to avoid scratching the display panel. ∙ Do not use any sharp objects on the panel. ∙ The groove for installing the stand bracket can also be removed by the user!
... the warranty! Any mechanical damages to be used for wall mount. Getting Started 5 MAG273CQR 1 2 3 ⚠ Important ∙ Remove the screws on the monitor groove if needed before installing the stand. ∙ Place the monitor on a soft, protected surface to avoid scratching the display panel. ∙ Do not use any sharp objects on the panel. ∙ The groove for installing the stand bracket can also be removed by the user!

User Manual
Page 6
G273CQ -5° 20° 6 Getting Started Adjusting the Monitor This monitor is designed to maximize your viewing comfort with its adjustment capabilities. ⚠ Important ∙ Avoid touching the display panel when adjusting the monitor.
G273CQ -5° 20° 6 Getting Started Adjusting the Monitor This monitor is designed to maximize your viewing comfort with its adjustment capabilities. ⚠ Important ∙ Avoid touching the display panel when adjusting the monitor.

User Manual
Page 10
... USB-C signal source and cable must support DisplayPort Alternate Mode to enable video output to the monitor. 9 USB 2.0 Type-B Upstream Port For USB Upstream Cable. ⚠ Important To Monitor Check the package for use. Lit in orange when the monitor is in Stand-by mode. 2 Power Button & Navi Key 3 Kensington Lock 4 Power Jack 5 HDMI™ Connector Supports 2560x1440@170Hz as specified in white after the monitor is connected, the USB Type-A Downstream Ports on . To PC 10 USB 2.0 Type-A Port 10 Getting Started...
... USB-C signal source and cable must support DisplayPort Alternate Mode to enable video output to the monitor. 9 USB 2.0 Type-B Upstream Port For USB Upstream Cable. ⚠ Important To Monitor Check the package for use. Lit in orange when the monitor is in Stand-by mode. 2 Power Button & Navi Key 3 Kensington Lock 4 Power Jack 5 HDMI™ Connector Supports 2560x1440@170Hz as specified in white after the monitor is connected, the USB Type-A Downstream Ports on . To PC 10 USB 2.0 Type-A Port 10 Getting Started...

User Manual
Page 11
Power on the monitor. (Figure D) 7. G273CQ D B C A Getting Started 11 Turn off your computer. 3. Connect the video cable from the monitor to your computer. 2. Assemble the external power supply & power cord. (Figure A) 4. Connect the external power supply to PC 1. Turn on the computer and the monitor will auto detect the signal source. Connecting the Monitor to the monitor power jack. (Figure B) 5. Plug the power cord into the electrical outlet. (Figure C) 6.
Power on the monitor. (Figure D) 7. G273CQ D B C A Getting Started 11 Turn off your computer. 3. Connect the video cable from the monitor to your computer. 2. Assemble the external power supply & power cord. (Figure A) 4. Connect the external power supply to PC 1. Turn on the computer and the monitor will auto detect the signal source. Connecting the Monitor to the monitor power jack. (Figure B) 5. Plug the power cord into the electrical outlet. (Figure C) 6.
User Manual
Page 17
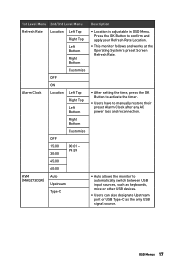
... Screen Refresh Rate. ∙ After setting the time, press the OK Button to activate the timer. ∙ Users have to manually restore their preset Alarm Clock after any AC power loss and reconnection. ∙ Auto allows the monitor to automatically switch between USB input sources, such as keyboards, mice or other USB devices. ∙ Users can also designate Upstream port or USB Type-C as the only USB signal source. 1st Level Menu...
... Screen Refresh Rate. ∙ After setting the time, press the OK Button to activate the timer. ∙ Users have to manually restore their preset Alarm Clock after any AC power loss and reconnection. ∙ Auto allows the monitor to automatically switch between USB input sources, such as keyboards, mice or other USB devices. ∙ Users can also designate Upstream port or USB Type-C as the only USB signal source. 1st Level Menu...
User Manual
Page 18
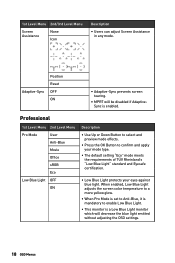
... default setting "Eco" mode meets the requirements of TÜV Rheinland's "Low Blue Light" standard and Eyesafe certification. Adaptive-Sync Position Reset OFF ON ∙ Adaptive-Sync prevents screen tearing. ∙ MPRT will be disabled if AdaptiveSync is a Low Blue Light monitor which will decrease the blue light emitted without adjusting the OSD settings. 18 OSD Menus Professional 1st Level Menu 2nd Level Menu Pro Mode User Anti-Blue Movie Office sRGB Eco Description ∙ Use Up or Down Button...
... default setting "Eco" mode meets the requirements of TÜV Rheinland's "Low Blue Light" standard and Eyesafe certification. Adaptive-Sync Position Reset OFF ON ∙ Adaptive-Sync prevents screen tearing. ∙ MPRT will be disabled if AdaptiveSync is a Low Blue Light monitor which will decrease the blue light emitted without adjusting the OSD settings. 18 OSD Menus Professional 1st Level Menu 2nd Level Menu Pro Mode User Anti-Blue Movie Office sRGB Eco Description ∙ Use Up or Down Button...

User Manual
Page 20
... your mode type. ∙ Users can adjust Color Temperature in Customization mode. ∙ Users can adjust Input Source in any mode, any resolution and any mode. Input Source 1st Level Menu 2nd Level Menu Description HDMI™1 ∙ Users can adjust Screen Size in any screen refresh rate. HDMI™2 DP Type-C (MAG273CQR) Auto Scan OFF ON ∙ Users can use the Navi Key to select Input Source at power saving mode; • While "No Signal" message box is shown on the monitor. 20 OSD Menus...
... your mode type. ∙ Users can adjust Color Temperature in Customization mode. ∙ Users can adjust Input Source in any mode, any resolution and any mode. Input Source 1st Level Menu 2nd Level Menu Description HDMI™1 ∙ Users can adjust Screen Size in any screen refresh rate. HDMI™2 DP Type-C (MAG273CQR) Auto Scan OFF ON ∙ Users can use the Navi Key to select Input Source at power saving mode; • While "No Signal" message box is shown on the monitor. 20 OSD Menus...
User Manual
Page 23
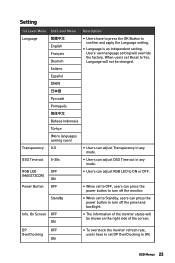
...;語 Português 简体中文 Bahasa Indonesia Türkçe (More languages coming soon) Transparency 0~5 ∙ Users can press the power button to turn off the monitor. Power Button OFF ∙ When set Reset to ON or OFF. RGB LED OFF (MAG273CQR) ON ∙ Users can press the power button to turn off the panel and backlight. When users set to OFF, users can adjust RGB LED to Yes, Language will override the factory.
...;語 Português 简体中文 Bahasa Indonesia Türkçe (More languages coming soon) Transparency 0~5 ∙ Users can press the power button to turn off the monitor. Power Button OFF ∙ When set Reset to ON or OFF. RGB LED OFF (MAG273CQR) ON ∙ Users can press the power button to turn off the panel and backlight. When users set to OFF, users can adjust RGB LED to Yes, Language will override the factory.
User Manual
Page 24
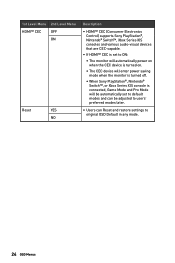
... the CEC device is turned on. • The CEC device will enter power saving mode when the monitor is turned off. • When Sony PlayStation®, Nintendo® Switch™, or Xbox Series X|S console is connected, Game Mode and Pro Mode will be automatically set to default modes and can be adjusted to users' preferred modes later. ∙ Users can Reset and restore settings to original OSD Default in any mode. 24 OSD Menus
... the CEC device is turned on. • The CEC device will enter power saving mode when the monitor is turned off. • When Sony PlayStation®, Nintendo® Switch™, or Xbox Series X|S console is connected, Game Mode and Pro Mode will be automatically set to default modes and can be adjusted to users' preferred modes later. ∙ Users can Reset and restore settings to original OSD Default in any mode. 24 OSD Menus
User Manual
Page 25
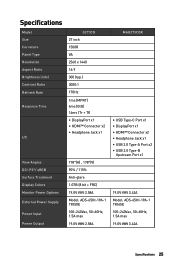
Specifications Model Size Curvature Panel Type Resolution Aspect Ratio Brightness (nits) Contrast Ratio Refresh Rate Response Time I/O View Angles DCI-P3*/ sRGB Surface Treatment Display Colors Monitor Power Options External Power Supply Power Input Power Output G273CQ 27 inch 1500R VA 2560 x 1440 16:9 300 (typ.) 3000:1 170Hz 1ms (MPRT) 4ms (GtG) 14ms (Tr + Tf) ∙ DisplayPort x1 ∙ HDMI™ Connector x2 ∙ Headphone Jack x1 178°(H) , 178°(V) 90% / 115% Anti...
Specifications Model Size Curvature Panel Type Resolution Aspect Ratio Brightness (nits) Contrast Ratio Refresh Rate Response Time I/O View Angles DCI-P3*/ sRGB Surface Treatment Display Colors Monitor Power Options External Power Supply Power Input Power Output G273CQ 27 inch 1500R VA 2560 x 1440 16:9 300 (typ.) 3000:1 170Hz 1ms (MPRT) 4ms (GtG) 14ms (Tr + Tf) ∙ DisplayPort x1 ∙ HDMI™ Connector x2 ∙ Headphone Jack x1 178°(H) , 178°(V) 90% / 115% Anti...
User Manual
Page 27
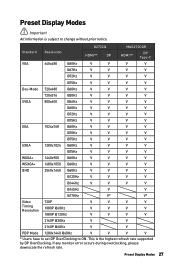
... @60Hz V V V V @120Hz V V V V @144Hz V V V V @165Hz V V @170Hz V* V* Video Timing Resolution 720P 1080P @60Hz 1080P @120Hz V V V V V V V V V V V V 2160P @30Hz V V 2160P @60Hz V V PBP Mode 1280x1440 @60Hz V V V V * Users have to set DP OverClocking to change without prior notice. Preset Display Modes ⚠ Important All information is the highest refresh rate supported by DP OverClocking. If any monitor error occurs during overclocking, please downscale the refresh rate. This is subject to ON.
... @60Hz V V V V @120Hz V V V V @144Hz V V V V @165Hz V V @170Hz V* V* Video Timing Resolution 720P 1080P @60Hz 1080P @120Hz V V V V V V V V V V V V 2160P @30Hz V V 2160P @60Hz V V PBP Mode 1280x1440 @60Hz V V V V * Users have to set DP OverClocking to change without prior notice. Preset Display Modes ⚠ Important All information is the highest refresh rate supported by DP OverClocking. If any monitor error occurs during overclocking, please downscale the refresh rate. This is subject to ON.
User Manual
Page 28
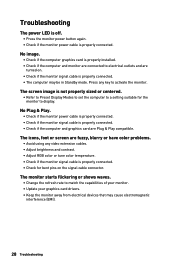
... any video extension cables. • Adjust brightness and contrast. • Adjust RGB color or tune color temperature. • Check if the monitor signal cable is properly connected. • Check for the monitor to display. The icons, font or screen are turned on the signal cable connector. The monitor starts flickering or shows waves. • Change the refresh rate to electrical outlets and are fuzzy, blurry or have color problems. • Avoid using any key to activate the monitor. The screen image is properly connected. Troubleshooting The power LED...
... any video extension cables. • Adjust brightness and contrast. • Adjust RGB color or tune color temperature. • Check if the monitor signal cable is properly connected. • Check for the monitor to display. The icons, font or screen are turned on the signal cable connector. The monitor starts flickering or shows waves. • Change the refresh rate to electrical outlets and are fuzzy, blurry or have color problems. • Avoid using any key to activate the monitor. The screen image is properly connected. Troubleshooting The power LED...

User Manual
Page 29
... coin/button cell battery is incorrectly replaced. The device must be connected to an earthed mains socket-outlet. ∙ Please confirm the power distribution system in the installation site shall provide the circuit breaker rated 120/240V, 20A (maximum). ∙ Always disconnect the power cord or switch the wall socket off if the device would be noted. ∙ Refer servicing to...
... coin/button cell battery is incorrectly replaced. The device must be connected to an earthed mains socket-outlet. ∙ Please confirm the power distribution system in the installation site shall provide the circuit breaker rated 120/240V, 20A (maximum). ∙ Always disconnect the power cord or switch the wall socket off if the device would be noted. ∙ Refer servicing to...
User Manual
Page 30
...checked by service personnel: • The power cord or plug is around 40℃. ∙ When cleaning the device, be sure to remove the power plug. Never pour any of the following situations arises, get it safe in an unconditioned environment with an anti-tip fastener that helps to properly support the device and keep this device only on a hard, flat...device on a soft, unsteady surface or obstruct its air ventilators. ∙ Use this device away from tipping over, secure the device to a desk, wall or fixed object with a storage temperature above 60℃ or below -20℃, ...
...checked by service personnel: • The power cord or plug is around 40℃. ∙ When cleaning the device, be sure to remove the power plug. Never pour any of the following situations arises, get it safe in an unconditioned environment with an anti-tip fastener that helps to properly support the device and keep this device only on a hard, flat...device on a soft, unsteady surface or obstruct its air ventilators. ∙ Use this device away from tipping over, secure the device to a desk, wall or fixed object with a storage temperature above 60℃ or below -20℃, ...

User Manual
Page 31
...;V Rheinland Low Blue Light Certification Blue light has been shown to ensure users' eye comfort and well-being. MSI now offers monitors with TÜV Rheinland Low Blue Light certification to cause eye fatigue and discomfort. The test catalogue is enabled. (The availability of 0 - 3000 Hz under various brightness settings. ∙ The display will help to the screen and blue light. ∙ Place the screen 20 - 28 inches (50...
...;V Rheinland Low Blue Light Certification Blue light has been shown to ensure users' eye comfort and well-being. MSI now offers monitors with TÜV Rheinland Low Blue Light certification to cause eye fatigue and discomfort. The test catalogue is enabled. (The availability of 0 - 3000 Hz under various brightness settings. ∙ The display will help to the screen and blue light. ∙ Place the screen 20 - 28 inches (50...
User Manual
Page 32
... equipment generates, uses and can be used in accordance with the requirements set out in order to comply with the harmonized standards for a Class B digital device, pursuant to Part 15 of the FCC Rules. Notice 2 Shielded interface cables and AC power cord, if any interference received, including interference that interference will not occur in a residential installation. This product has...
... equipment generates, uses and can be used in accordance with the requirements set out in order to comply with the harmonized standards for a Class B digital device, pursuant to Part 15 of the FCC Rules. Notice 2 Shielded interface cables and AC power cord, if any interference received, including interference that interference will not occur in a residential installation. This product has...
User Manual
Page 34
.... MSI reserves the right to make changes to affect eyesight. Technical Support If a problem arises with your place of purchase or local distributor. Copyright and Trademarks Notice Copyright © Micro-Star Int'l Co., Ltd. The terms HDMI™, HDMI™ High-Definition Multimedia Interface, HDMI™ Trade dress and the HDMI™ Logos are trademarks or registered trademarks of screens...
.... MSI reserves the right to make changes to affect eyesight. Technical Support If a problem arises with your place of purchase or local distributor. Copyright and Trademarks Notice Copyright © Micro-Star Int'l Co., Ltd. The terms HDMI™, HDMI™ High-Definition Multimedia Interface, HDMI™ Trade dress and the HDMI™ Logos are trademarks or registered trademarks of screens...
