
User Manual
Page 2
Contents Getting Started...3 Package Contents...3 Installing the Monitor Stand 4 Adjusting the Monitor 6 Monitor Overview...7 Connecting the Monitor to PC 8 OSD Setup...9 Navi Key...9 Hot Key...9 OSD Menus...10 Gaming...10 Professional...12 Image...13 Input Source...13 Navi Key...14 Setting...14 Specifications...16 Preset Display Modes 18 Troubleshooting...19 Safety Instructions...20 TÜV Rheinland Certification 22 Regulatory Notices...23 Revision V1.0, 2023/09 2
Contents Getting Started...3 Package Contents...3 Installing the Monitor Stand 4 Adjusting the Monitor 6 Monitor Overview...7 Connecting the Monitor to PC 8 OSD Setup...9 Navi Key...9 Hot Key...9 OSD Menus...10 Gaming...10 Professional...12 Image...13 Input Source...13 Navi Key...14 Setting...14 Specifications...16 Preset Display Modes 18 Troubleshooting...19 Safety Instructions...20 TÜV Rheinland Certification 22 Regulatory Notices...23 Revision V1.0, 2023/09 2

User Manual
Page 3
... connecting devices, be used with the information on hardware setup procedures. Package Contents Monitor G27C4 E3 Documentation Quick Start Guide Accessories Stand with Screw(s) Stand Base with Screw(s) Stand Cover External Power Supply Power Cord Cables Premium High Speed HDMI™ Cable (Optional) ⚠ Important ∙ Contact your place of purchase or local distributor if any of the items is damaged or missing. ∙ Package contents may vary by country. ∙ The included power cord...
... connecting devices, be used with the information on hardware setup procedures. Package Contents Monitor G27C4 E3 Documentation Quick Start Guide Accessories Stand with Screw(s) Stand Base with Screw(s) Stand Cover External Power Supply Power Cord Cables Premium High Speed HDMI™ Cable (Optional) ⚠ Important ∙ Contact your place of purchase or local distributor if any of the items is damaged or missing. ∙ Package contents may vary by country. ∙ The included power cord...
User Manual
Page 4
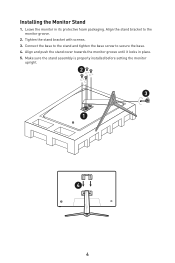
Align and push the stand cover towards the monitor groove until it locks in its protective foam packaging. Connect the base to the stand and tighten the base screw to the monitor groove. 2. Installing the Monitor Stand 1. Align the stand bracket to secure the base. 4. Tighten the stand bracket with screws. 3. Leave the monitor in place. 5. Make sure the stand assembly is properly installed before setting the monitor upright. 2 3 1 4 4
Align and push the stand cover towards the monitor groove until it locks in its protective foam packaging. Connect the base to the stand and tighten the base screw to the monitor groove. 2. Installing the Monitor Stand 1. Align the stand bracket to secure the base. 4. Tighten the stand bracket with screws. 3. Leave the monitor in place. 5. Make sure the stand assembly is properly installed before setting the monitor upright. 2 3 1 4 4
User Manual
Page 6
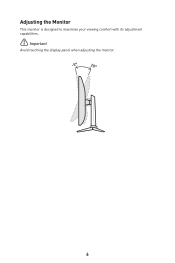
Adjusting the Monitor This monitor is designed to maximize your viewing comfort with its adjustment capabilities. ⚠ Important Avoid touching the display panel when adjusting the monitor. -5° 20° 6
Adjusting the Monitor This monitor is designed to maximize your viewing comfort with its adjustment capabilities. ⚠ Important Avoid touching the display panel when adjusting the monitor. -5° 20° 6
User Manual
Page 7
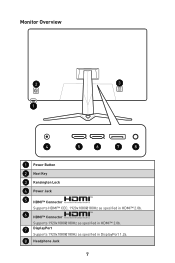
Monitor Overview 2 3 1 4 5 6 7 8 1 Power Button 2 Navi Key 3 Kensington Lock 4 Power Jack 5 HDMI™ Connector Supports HDMI™ CEC, 1920x1080@180Hz as specified in HDMI™ 2.0b. 6 HDMI™ Connector Supports 1920x1080@180Hz as specified in HDMI™ 2.0b. 7 DisplayPort Supports 1920x1080@180Hz as specified in DisplayPort 1.2a. 8 Headphone Jack 7
Monitor Overview 2 3 1 4 5 6 7 8 1 Power Button 2 Navi Key 3 Kensington Lock 4 Power Jack 5 HDMI™ Connector Supports HDMI™ CEC, 1920x1080@180Hz as specified in HDMI™ 2.0b. 6 HDMI™ Connector Supports 1920x1080@180Hz as specified in HDMI™ 2.0b. 7 DisplayPort Supports 1920x1080@180Hz as specified in DisplayPort 1.2a. 8 Headphone Jack 7
User Manual
Page 8
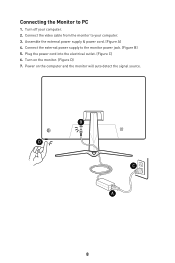
Power on the monitor. (Figure D) 7. Connecting the Monitor to the monitor power jack. (Figure B) 5. Turn on the computer and the monitor will auto detect the signal source. Assemble the external power supply & power cord. (Figure A) 4. Connect the external power supply to PC 1. Plug the power cord into the electrical outlet. (Figure C) 6. Connect the video cable from the monitor to your computer. 2. Turn off your computer. 3. B D C A 8
Power on the monitor. (Figure D) 7. Connecting the Monitor to the monitor power jack. (Figure B) 5. Turn on the computer and the monitor will auto detect the signal source. Assemble the external power supply & power cord. (Figure A) 4. Connect the external power supply to PC 1. Plug the power cord into the electrical outlet. (Figure C) 6. Connect the video cable from the monitor to your computer. 2. Turn off your computer. 3. B D C A 8

User Manual
Page 9
...): ∙ launching the On-Screen Display (OSD) ∙ entering submenus ∙ confirming a selection or setting Hot Key ∙ Users may customize their own Hot Keys to change without prior notice. OSD Setup This chapter provides you with a Navi Key, a multi-directional control that helps navigate the On-Screen Display (OSD) menu. Navi Key The monitor comes with essential information on OSD Setup. ⚠ Important All information is...
...): ∙ launching the On-Screen Display (OSD) ∙ entering submenus ∙ confirming a selection or setting Hot Key ∙ Users may customize their own Hot Keys to change without prior notice. OSD Setup This chapter provides you with a Navi Key, a multi-directional control that helps navigate the On-Screen Display (OSD) menu. Navi Key The monitor comes with essential information on OSD Setup. ⚠ Important All information is...
User Manual
Page 10
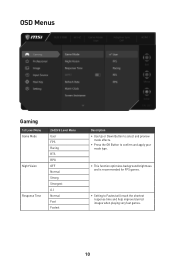
OSD Menus Gaming 1st Level Menu Game Mode Night Vision Response Time 2nd/3rd Level Menu User FPS Racing RTS RPG OFF Normal Strong Strongest A.I. Normal Fast Fastest Description ∙ Use Up or Down Button to select and preview mode effects. ∙ Press the OK Button to confirm and apply your mode type. ∙ This function optimizes background brightness and is recommended for FPS games. ∙ Setting to Fastest will reach the shortest response time and help improve blurred images when playing very fast games. 10
OSD Menus Gaming 1st Level Menu Game Mode Night Vision Response Time 2nd/3rd Level Menu User FPS Racing RTS RPG OFF Normal Strong Strongest A.I. Normal Fast Fastest Description ∙ Use Up or Down Button to select and preview mode effects. ∙ Press the OK Button to confirm and apply your mode type. ∙ This function optimizes background brightness and is recommended for FPS games. ∙ Setting to Fastest will reach the shortest response time and help improve blurred images when playing very fast games. 10
User Manual
Page 11
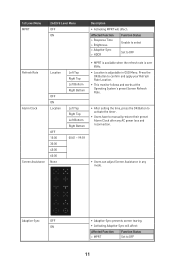
... OK Button to activate the timer. ∙ Users have to confirm and apply your Refresh Rate Location. ∙ This monitor follows and works at the Operating System's preset Screen Refresh Rate. Adaptive-Sync OFF ON ∙ Adaptive-Sync prevents screen tearing. ∙ Activating Adaptive-Sync will affect: Affected Function » Response Time » Brightness » Adaptive-Sync » HDCR Function Status Unable to select Set to OFF 11 1st Level Menu...
... OK Button to activate the timer. ∙ Users have to confirm and apply your Refresh Rate Location. ∙ This monitor follows and works at the Operating System's preset Screen Refresh Rate. Adaptive-Sync OFF ON ∙ Adaptive-Sync prevents screen tearing. ∙ Activating Adaptive-Sync will affect: Affected Function » Response Time » Brightness » Adaptive-Sync » HDCR Function Status Unable to select Set to OFF 11 1st Level Menu...
User Manual
Page 12
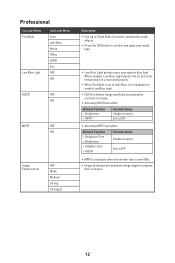
...; Response Time » Brightness » Adaptive-Sync » HDCR Function Status Unable to select Set to OFF ∙ MPRT is available when the refresh rate is over 85Hz. ∙ Image Enhancement enhances image edges to confirm and apply your mode type. ∙ Low Blue Light protects your eyes against blue light. Professional 1st Level Menu Pro Mode Low Blue Light 2nd Level Menu User Anti-Blue Movie Office sRGB Eco...
...; Response Time » Brightness » Adaptive-Sync » HDCR Function Status Unable to select Set to OFF ∙ MPRT is available when the refresh rate is over 85Hz. ∙ Image Enhancement enhances image edges to confirm and apply your mode type. ∙ Low Blue Light protects your eyes against blue light. Professional 1st Level Menu Pro Mode Low Blue Light 2nd Level Menu User Anti-Blue Movie Office sRGB Eco...
User Manual
Page 13
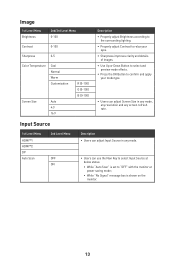
... adjust Screen Size in any mode. ∙ Users can adjust Input Source in any mode, any resolution and any screen refresh rate. Image 1st Level Menu Brightness 2nd/3rd Level Menu 0-100 Contrast 0-100 Sharpness 0-5 Color Temperature Cool Normal Warm Customization Screen Size Auto 4:3 16:9 R (0-100) G (0-100) B (0-100) Description ∙ Properly adjust Brightness according to the surrounding lighting. ∙ Properly adjust Contrast to relax your eyes. ∙ Sharpness improves clarity and details of images. ∙ Use Up or Down Button...
... adjust Screen Size in any mode. ∙ Users can adjust Input Source in any mode, any resolution and any screen refresh rate. Image 1st Level Menu Brightness 2nd/3rd Level Menu 0-100 Contrast 0-100 Sharpness 0-5 Color Temperature Cool Normal Warm Customization Screen Size Auto 4:3 16:9 R (0-100) G (0-100) B (0-100) Description ∙ Properly adjust Brightness according to the surrounding lighting. ∙ Properly adjust Contrast to relax your eyes. ∙ Sharpness improves clarity and details of images. ∙ Use Up or Down Button...

User Manual
Page 14
On Screen 2nd Level Menu OFF Brightness Game Mode Screen Assistance Alarm Clock Input Source Refresh Rate Info. Description ∙ Users have to press the OK Button to turn off the panel and backlight. ∙ The information of the screen. 14 Navi Key 1st Level Menu Up Down Left Right Setting 1st Level Menu Language Transparency OSD Time Out Power Button Info. On Screen Night Vision 2nd Level Menu English Français Deutsch Italiano Espa...
On Screen 2nd Level Menu OFF Brightness Game Mode Screen Assistance Alarm Clock Input Source Refresh Rate Info. Description ∙ Users have to press the OK Button to turn off the panel and backlight. ∙ The information of the screen. 14 Navi Key 1st Level Menu Up Down Left Right Setting 1st Level Menu Language Transparency OSD Time Out Power Button Info. On Screen Night Vision 2nd Level Menu English Français Deutsch Italiano Espa...
User Manual
Page 15
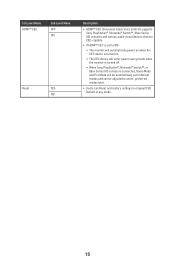
... monitor will automatically power on when the CEC device is turned on. • The CEC device will enter power saving mode when the monitor is turned off. • When Sony PlayStation®, Nintendo® Switch™, or Xbox Series X|S console is connected, Game Mode and Pro Mode will be automatically set to default modes and can be adjusted to users' preferred modes later. ∙ Users can Reset and restore settings to original OSD Default...
... monitor will automatically power on when the CEC device is turned on. • The CEC device will enter power saving mode when the monitor is turned off. • When Sony PlayStation®, Nintendo® Switch™, or Xbox Series X|S console is connected, Game Mode and Pro Mode will be automatically set to default modes and can be adjusted to users' preferred modes later. ∙ Users can Reset and restore settings to original OSD Default...

User Manual
Page 16
Specifications Monitor Size Curvature Panel Type Resolution Aspect Ratio Brightness (nits) Contrast Ratio Refresh Rate Response Time I/O View Angles DCI-P3*/ sRGB Surface Treatment Display Colors Monitor Power Options External Power Supply** Power Input Power Output Adjustment (Tilt) Kensington Lock VESA Mounting Dimension (W x H x D) Weight Net Gross G27C4 E3 27 inch 1500R Rapid VA 1920 x 1080 16:9 250 nits (Typ.) 3000:1 180Hz ∙ 1ms (GTG) ∙ 1ms (MPRT) ∙ DisplayPort x1 ∙ HDMI™ Connector x2 ∙ Headphone Jack x1 178...
Specifications Monitor Size Curvature Panel Type Resolution Aspect Ratio Brightness (nits) Contrast Ratio Refresh Rate Response Time I/O View Angles DCI-P3*/ sRGB Surface Treatment Display Colors Monitor Power Options External Power Supply** Power Input Power Output Adjustment (Tilt) Kensington Lock VESA Mounting Dimension (W x H x D) Weight Net Gross G27C4 E3 27 inch 1500R Rapid VA 1920 x 1080 16:9 250 nits (Typ.) 3000:1 180Hz ∙ 1ms (GTG) ∙ 1ms (MPRT) ∙ DisplayPort x1 ∙ HDMI™ Connector x2 ∙ Headphone Jack x1 178...

User Manual
Page 19
...; Change the refresh rate to display. Press any video extension cables. • Adjust brightness and contrast. • Adjust RGB color or tune color temperature. • Check if the monitor signal cable is properly installed. • Check if the computer and monitor are connected to activate the monitor. The icons, font or screen are fuzzy, blurry or have color problems. • Avoid using any key to electrical outlets and are turned on the signal cable connector. No Plug & Play. • Check if the monitor power cable...
...; Change the refresh rate to display. Press any video extension cables. • Adjust brightness and contrast. • Adjust RGB color or tune color temperature. • Check if the monitor signal cable is properly installed. • Check if the computer and monitor are connected to activate the monitor. The icons, font or screen are fuzzy, blurry or have color problems. • Avoid using any key to electrical outlets and are turned on the signal cable connector. No Plug & Play. • Check if the monitor power cable...
User Manual
Page 20
...; Read the safety instructions carefully and thoroughly. ∙ All cautions and warnings on the device or User Guide should be noted. ∙ Refer servicing to remove the power plug. Never pour any liquid into the opening; The device must be connected to clean the device. Environment ∙ To reduce the... its safety range and has been adjusted properly to the value of 100~240V before connecting the device to step on it safe in the installation site shall provide the circuit breaker rated 120/240V, 20A (maximum). ∙ Always disconnect the power cord or switch the wall socket off...
...; Read the safety instructions carefully and thoroughly. ∙ All cautions and warnings on the device or User Guide should be noted. ∙ Refer servicing to remove the power plug. Never pour any liquid into the opening; The device must be connected to clean the device. Environment ∙ To reduce the... its safety range and has been adjusted properly to the value of 100~240V before connecting the device to step on it safe in the installation site shall provide the circuit breaker rated 120/240V, 20A (maximum). ∙ Always disconnect the power cord or switch the wall socket off...

User Manual
Page 22
... pain during breaks. ∙ Turn on internationally applicable standards or standards common within the range of 0 - 3000 Hz under various brightness settings. ∙ The display will help to reduce eye strain after extended screen time. ∙ Take breaks for 20 minutes every 2 hours. ∙ Look away from the screen and gaze at various frequency ranges. TÜV Rheinland Flicker Free Certification ∙ TÜ...
... pain during breaks. ∙ Turn on internationally applicable standards or standards common within the range of 0 - 3000 Hz under various brightness settings. ∙ The display will help to reduce eye strain after extended screen time. ∙ Take breaks for 20 minutes every 2 hours. ∙ Look away from the screen and gaze at various frequency ranges. TÜV Rheinland Flicker Free Certification ∙ TÜ...

User Manual
Page 23
...help. Regulatory Notices CE Conformity This device complies with the requirements set out in the Council Directive on a circuit different from that to which can radiate radio frequency energy and, if not installed and used in order to comply with the emission limits. Notice 2 Shielded interface cables and AC power cord... installation. However, there is subject to operate the equipment. This device complies with Part 15 of Industry, CA 91748, USA (626) 913-0828 www.msi.com 23 This device must accept any , must be determined by turning the equipment off and on, the user ...
...help. Regulatory Notices CE Conformity This device complies with the requirements set out in the Council Directive on a circuit different from that to which can radiate radio frequency energy and, if not installed and used in order to comply with the emission limits. Notice 2 Shielded interface cables and AC power cord... installation. However, there is subject to operate the equipment. This device complies with Part 15 of Industry, CA 91748, USA (626) 913-0828 www.msi.com 23 This device must accept any , must be determined by turning the equipment off and on, the user ...

User Manual
Page 24
... the use of lead, mercury, hexavalent chromium, polybrominated biphenyls or polybrominated diphenyl ethers in concentrations exceeding 0.1 weight % and 0.01 weight % for cadmium, except for the exemptions set in Schedule 2 of the Rule. Vietnam RoHS As from December 1, 2012, all products manufactured by MSI comply with requirements of the Technical Regulation, approved by specification JIS...
... the use of lead, mercury, hexavalent chromium, polybrominated biphenyls or polybrominated diphenyl ethers in concentrations exceeding 0.1 weight % and 0.01 weight % for cadmium, except for the exemptions set in Schedule 2 of the Rule. Vietnam RoHS As from December 1, 2012, all products manufactured by MSI comply with requirements of the Technical Regulation, approved by specification JIS...
User Manual
Page 25
... and disposing of their respective owners. No warranty as to this document without prior notice. MSI reserves the right to make changes to accuracy or completeness is expressed or implied. Warning! Children under 2 years of age should be obtained from the user's manual, please contact your product and no screen time. The MSI logo used is likely to less...
... and disposing of their respective owners. No warranty as to this document without prior notice. MSI reserves the right to make changes to accuracy or completeness is expressed or implied. Warning! Children under 2 years of age should be obtained from the user's manual, please contact your product and no screen time. The MSI logo used is likely to less...
