User Manual
Page 2
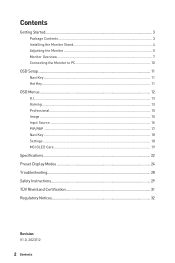
Contents Getting Started...3 Package Contents...3 Installing the Monitor Stand 4 Adjusting the Monitor 5 Monitor Overview...7 Connecting the Monitor to PC 10 OSD Setup...11 Navi Key...11 Hot Key...11 OSD Menus...12 G.I...13 Gaming...13 Professional...15 Image...15 Input Source...16 PIP/PBP...17 Navi Key...18 Settings...18 MSI OLED Care...19 Specifications...22 Preset Display Modes 24 Troubleshooting...28 Safety Instructions...29 TÜV Rheinland Certification 31 Regulatory Notices...32 Revision V1.0, 2023/12 2 Contents
Contents Getting Started...3 Package Contents...3 Installing the Monitor Stand 4 Adjusting the Monitor 5 Monitor Overview...7 Connecting the Monitor to PC 10 OSD Setup...11 Navi Key...11 Hot Key...11 OSD Menus...12 G.I...13 Gaming...13 Professional...15 Image...15 Input Source...16 PIP/PBP...17 Navi Key...18 Settings...18 MSI OLED Care...19 Specifications...22 Preset Display Modes 24 Troubleshooting...28 Safety Instructions...29 TÜV Rheinland Certification 31 Regulatory Notices...32 Revision V1.0, 2023/12 2 Contents
User Manual
Page 3
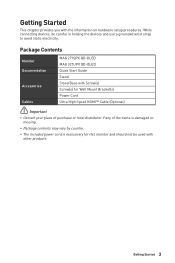
Package Contents Monitor MAG 271QPX QD-OLED MAG 321UPX QD-OLED Documentation Quick Start Guide Stand Accessories Stand Base with Screw(s) Screw(s) for Wall Mount Bracket(s) Power Cord Cables Ultra High Speed HDMI™ Cable (Optional) ⚠ Important ∙ Contact your place of purchase or local distributor if any of the items is damaged or missing. ∙ Package contents may vary by country. ∙ The included power cord is exclusively for this monitor and should not be...
Package Contents Monitor MAG 271QPX QD-OLED MAG 321UPX QD-OLED Documentation Quick Start Guide Stand Accessories Stand Base with Screw(s) Screw(s) for Wall Mount Bracket(s) Power Cord Cables Ultra High Speed HDMI™ Cable (Optional) ⚠ Important ∙ Contact your place of purchase or local distributor if any of the items is damaged or missing. ∙ Package contents may vary by country. ∙ The included power cord is exclusively for this monitor and should not be...

User Manual
Page 4
... base. 4. Connect the base to the stand and tighten the base screws to the product including removal of the polarizing film may affect the warranty! 4 Getting Started Please contact your dealer for wall mount. Align the stand to be removed by the user! Make sure the stand assembly is properly installed before setting the monitor upright. 3 1 2 ⚠ Important ∙ Place the monitor on a soft, protected surface to avoid scratching the display panel...
... base. 4. Connect the base to the stand and tighten the base screws to the product including removal of the polarizing film may affect the warranty! 4 Getting Started Please contact your dealer for wall mount. Align the stand to be removed by the user! Make sure the stand assembly is properly installed before setting the monitor upright. 3 1 2 ⚠ Important ∙ Place the monitor on a soft, protected surface to avoid scratching the display panel...
User Manual
Page 5
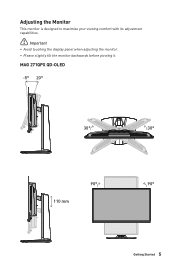
MAG 271QPX QD-OLED -5° 20° 30° 30° 90° 90° 110 mm Getting Started 5 Adjusting the Monitor This monitor is designed to maximize your viewing comfort with its adjustment capabilities. ⚠ Important ∙ Avoid touching the display panel when adjusting the monitor. ∙ Please slightly tilt the monitor backwards before pivoting it.
MAG 271QPX QD-OLED -5° 20° 30° 30° 90° 90° 110 mm Getting Started 5 Adjusting the Monitor This monitor is designed to maximize your viewing comfort with its adjustment capabilities. ⚠ Important ∙ Avoid touching the display panel when adjusting the monitor. ∙ Please slightly tilt the monitor backwards before pivoting it.
User Manual
Page 8
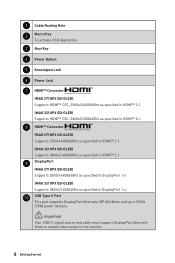
... specified in HDMI™ 2.1. (MAG 321UPX QD-OLED) Supports 3840x2160@240Hz as specified in HDMI™ 2.1. 9 DisplayPort (MAG 271QPX QD-OLED) Supports 2560x1440@360Hz as specified in DisplayPort 1.4. (MAG 321UPX QD-OLED) Supports 3840x2160@240Hz as specified in DisplayPort 1.4. 10 USB Type-C Port This port supports DisplayPort Alternate (DP Alt) Mode and up to 5V/3A (15W) power delivery. ⚠ Important Your USB-C signal source and cable must support DisplayPort Alternate Mode to enable video output to the monitor. 8 Getting Started
... specified in HDMI™ 2.1. (MAG 321UPX QD-OLED) Supports 3840x2160@240Hz as specified in HDMI™ 2.1. 9 DisplayPort (MAG 271QPX QD-OLED) Supports 2560x1440@360Hz as specified in DisplayPort 1.4. (MAG 321UPX QD-OLED) Supports 3840x2160@240Hz as specified in DisplayPort 1.4. 10 USB Type-C Port This port supports DisplayPort Alternate (DP Alt) Mode and up to 5V/3A (15W) power delivery. ⚠ Important Your USB-C signal source and cable must support DisplayPort Alternate Mode to enable video output to the monitor. 8 Getting Started
User Manual
Page 12
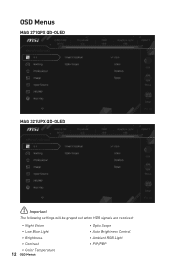
OSD Menus MAG 271QPX QD-OLED MAG 321UPX QD-OLED ⚠ Important The following settings will be grayed out when HDR signals are received: ∙ Night Vision ∙ Low Blue Light ∙ Brightness ∙ Contrast ∙ Color Temperature 12 OSD Menus ∙ Optix Scope ∙ Auto Brightness Control ∙ Ambient RGB Light ∙ PIP/PBP
OSD Menus MAG 271QPX QD-OLED MAG 321UPX QD-OLED ⚠ Important The following settings will be grayed out when HDR signals are received: ∙ Night Vision ∙ Low Blue Light ∙ Brightness ∙ Contrast ∙ Color Temperature 12 OSD Menus ∙ Optix Scope ∙ Auto Brightness Control ∙ Ambient RGB Light ∙ PIP/PBP
User Manual
Page 13
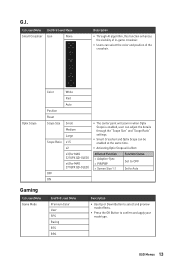
... Color Position Reset Scope Size Scope Ratio OFF ON White Red Auto Small Medium Large x1.5 x2 x3 (for MAG 321UPX QD-OLED) x4 (for MAG 271QPX QD-OLED) ∙ The center point will affect: Affected Function » Adaptive-Sync » PIP/PBP » Screen Size 1:1 Function Status Set to OFF Set to Auto Gaming 1st Level Menu Game Mode 2nd/3rd Level Menu Premium Color User FPS Racing RTS RPG Description ∙ Use Up or Down Button...
... Color Position Reset Scope Size Scope Ratio OFF ON White Red Auto Small Medium Large x1.5 x2 x3 (for MAG 321UPX QD-OLED) x4 (for MAG 271QPX QD-OLED) ∙ The center point will affect: Affected Function » Adaptive-Sync » PIP/PBP » Screen Size 1:1 Function Status Set to OFF Set to Auto Gaming 1st Level Menu Game Mode 2nd/3rd Level Menu Premium Color User FPS Racing RTS RPG Description ∙ Use Up or Down Button...

User Manual
Page 14
...; Users have to manually restore their preset Alarm Clock after any AC power loss and reconnection. ∙ Adaptive-Sync prevents screen tearing. ∙ Activating Adaptive-Sync will affect: Affected Function » Night Vision Function Status Unable to OFF 14 OSD Menus Vision Refresh Rate Alarm Clock Adaptive-Sync 2nd/3rd Level Menu OFF Normal Strong Strongest A.I . Vision enhances image quality by optimizing the contrast of images and background brightness...
...; Users have to manually restore their preset Alarm Clock after any AC power loss and reconnection. ∙ Adaptive-Sync prevents screen tearing. ∙ Activating Adaptive-Sync will affect: Affected Function » Night Vision Function Status Unable to OFF 14 OSD Menus Vision Refresh Rate Alarm Clock Adaptive-Sync 2nd/3rd Level Menu OFF Normal Strong Strongest A.I . Vision enhances image quality by optimizing the contrast of images and background brightness...

User Manual
Page 15
... Blue Light" standard. ∙ Activating sRGB, Adobe RGB, and Display P3 will decrease the blue light emitted without adjusting the OSD settings. ∙ Image Enhancement enhances image edges to improve their acutance. OSD Menus 15 Professional 1st Level Menu Pro Mode 2nd Level Menu Eco User Anti-Blue Movie Office sRGB Adobe RGB Display P3 Low Blue Light OFF ON Image Enhancement OFF Weak Medium Strong Strongest Description ∙ Use Up or Down Button...
... Blue Light" standard. ∙ Activating sRGB, Adobe RGB, and Display P3 will decrease the blue light emitted without adjusting the OSD settings. ∙ Image Enhancement enhances image edges to improve their acutance. OSD Menus 15 Professional 1st Level Menu Pro Mode 2nd Level Menu Eco User Anti-Blue Movie Office sRGB Adobe RGB Display P3 Low Blue Light OFF ON Image Enhancement OFF Weak Medium Strong Strongest Description ∙ Use Up or Down Button...

User Manual
Page 16
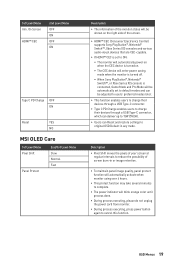
... status: • While "Auto Scan" is set the DisplayHDR to select Input Source at power saving mode; • While "No Signal" message box is shown on the monitor. 16 OSD Menus 1st Level Menu Screen Size 2nd/3rd Level Menu Auto 4:3 16:9 16:10 1:1 DisplayHDR True Black 400 Peak 1000 nits Description ∙ Users can adjust Screen Size in any screen refresh rate. ∙ Activating Screen Size 1:1 will affect: Affected Function » Adaptive-Sync » Optix Scope...
... status: • While "Auto Scan" is set the DisplayHDR to select Input Source at power saving mode; • While "No Signal" message box is shown on the monitor. 16 OSD Menus 1st Level Menu Screen Size 2nd/3rd Level Menu Auto 4:3 16:9 16:10 1:1 DisplayHDR True Black 400 Peak 1000 nits Description ∙ Users can adjust Screen Size in any screen refresh rate. ∙ Activating Screen Size 1:1 will affect: Affected Function » Adaptive-Sync » Optix Scope...

User Manual
Page 17
...; Screen Size » HDMI™ CEC » DisplayHDR Function Status Set to OFF Set to Auto & unable to select Set to OFF & unable to select Unable to switch between primary and secondary input sources. ∙ If there is a similar feature that displays two input sources side-by-side on one signal input, the Display Switch and Audio Switch will be grayed out. ∙ Users can adjust the ratio of window division by Picture...
...; Screen Size » HDMI™ CEC » DisplayHDR Function Status Set to OFF Set to Auto & unable to select Set to OFF & unable to select Unable to switch between primary and secondary input sources. ∙ If there is a similar feature that displays two input sources side-by-side on one signal input, the Display Switch and Audio Switch will be grayed out. ∙ Users can adjust the ratio of window division by Picture...
User Manual
Page 19
...; Switch™, or Xbox Series X|S console is connected, Game Mode and Pro Mode will be automatically set to default modes and can Reset and restore settings to original OSD Default in or image retention. ∙ To maintain panel image quality, panel protect function will automatically activate when monitor using over 4 hours. ∙ This protect function may take several minutes to complete. ∙ The power indicator will be adjusted to users' preferred modes...
...; Switch™, or Xbox Series X|S console is connected, Game Mode and Pro Mode will be automatically set to default modes and can Reset and restore settings to original OSD Default in or image retention. ∙ To maintain panel image quality, panel protect function will automatically activate when monitor using over 4 hours. ∙ This protect function may take several minutes to complete. ∙ The power indicator will be adjusted to users' preferred modes...

User Manual
Page 21
... ON Reducing 1-3 Level OLED Panel Info. When set to ON, brightness reduction of MSI OLED Care. * HDMI™ VRR (Variable Refresh Rate) synchronizes with Adaptive-Sync (ON/ OFF). For VRR ON/OFF status, please check Adaptive-Sync. ** When VRR is set to ON, the monitor scaler will kick in if boundaries, such as letters, pillars and vertical lines, are detected. ∙ Users can select a level for brightness reduction. •...
... ON Reducing 1-3 Level OLED Panel Info. When set to ON, brightness reduction of MSI OLED Care. * HDMI™ VRR (Variable Refresh Rate) synchronizes with Adaptive-Sync (ON/ OFF). For VRR ON/OFF status, please check Adaptive-Sync. ** When VRR is set to ON, the monitor scaler will kick in if boundaries, such as letters, pillars and vertical lines, are detected. ∙ Users can select a level for brightness reduction. •...
User Manual
Page 22
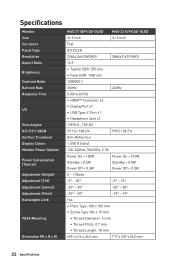
Specifications Monitor Size Curvature Panel Type Resolution Aspect Ratio Brightness Contrast Ratio Refresh Rate Response Time I/O View Angles DCI-P3*/ sRGB Surface Treatment Display Colors Monitor Power Options Power Consumption (Typical) Adjustment (Height) Adjustment (Tilt) Adjustment (Swivel) Adjustment (Pivot) Kensington Lock VESA Mounting Dimension (W x H x D) MAG 271QPX QD-OLED MAG 321UPX QD-OLED 26.5 inch 31.5 inch Flat QD-OLED 2560x1440 (WQHD) 3840x2160 (UHD) 16:9 ∙ Typical SDR: 250 nits ∙ Peak HDR: 1000 nits 1500000:1 360Hz 240Hz 0.03ms (GTG) ∙ HDMI&#...
Specifications Monitor Size Curvature Panel Type Resolution Aspect Ratio Brightness Contrast Ratio Refresh Rate Response Time I/O View Angles DCI-P3*/ sRGB Surface Treatment Display Colors Monitor Power Options Power Consumption (Typical) Adjustment (Height) Adjustment (Tilt) Adjustment (Swivel) Adjustment (Pivot) Kensington Lock VESA Mounting Dimension (W x H x D) MAG 271QPX QD-OLED MAG 321UPX QD-OLED 26.5 inch 31.5 inch Flat QD-OLED 2560x1440 (WQHD) 3840x2160 (UHD) 16:9 ∙ Typical SDR: 250 nits ∙ Peak HDR: 1000 nits 1500000:1 360Hz 240Hz 0.03ms (GTG) ∙ HDMI&#...
User Manual
Page 26
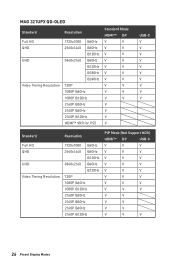
MAG 321UPX QD-OLED Standard Resolution Full HD QHD UHD Video Timing Resolution 1920x1080 @60Hz 2560x1440 @60Hz @120Hz 3840x2160 @60Hz @120Hz @180Hz @240Hz 720P 1080P @60Hz 1080P @120Hz 2160P @30Hz 2160P @60Hz 2160P @120Hz HDMI™ VRR for PS5 Standard Mode HDMI™ DP V V V V V V V V V V V V V V V V V V V V V V V V USB-C V V V V V V V V V V Standard Full HD QHD UHD Video Timing Resolution Resolution 1920x1080 @60Hz 2560x1440 @60Hz @120Hz 3840x2160 @60Hz @120Hz 720P 1080P @60Hz...
MAG 321UPX QD-OLED Standard Resolution Full HD QHD UHD Video Timing Resolution 1920x1080 @60Hz 2560x1440 @60Hz @120Hz 3840x2160 @60Hz @120Hz @180Hz @240Hz 720P 1080P @60Hz 1080P @120Hz 2160P @30Hz 2160P @60Hz 2160P @120Hz HDMI™ VRR for PS5 Standard Mode HDMI™ DP V V V V V V V V V V V V V V V V V V V V V V V V USB-C V V V V V V V V V V Standard Full HD QHD UHD Video Timing Resolution Resolution 1920x1080 @60Hz 2560x1440 @60Hz @120Hz 3840x2160 @60Hz @120Hz 720P 1080P @60Hz...

User Manual
Page 28
... monitor. The monitor starts flickering or shows waves. • Change the refresh rate to match the capabilities of your monitor. • Update your graphics card drivers. • Keep the monitor away from electrical devices that may be in Standby mode. Troubleshooting The power LED is off. • Press the monitor power button again. • Check if the monitor power cable is properly connected. • Check for the monitor to display. Press any video extension cables. • Adjust brightness and contrast. • Adjust RGB color or tune color...
... monitor. The monitor starts flickering or shows waves. • Change the refresh rate to match the capabilities of your monitor. • Update your graphics card drivers. • Keep the monitor away from electrical devices that may be in Standby mode. Troubleshooting The power LED is off. • Press the monitor power button again. • Check if the monitor power cable is properly connected. • Check for the monitor to display. Press any video extension cables. • Adjust brightness and contrast. • Adjust RGB color or tune color...
User Manual
Page 29
... not disable the protective earth pin from the plug. Never pour any liquid into the opening; that the power voltage is around 40℃. ∙ When cleaning the device, be left unused for use only the MSI provided AC adapter approved for a certain time to achieve zero energy consumption. ∙ Place the power cord in a way that helps to properly support the...
... not disable the protective earth pin from the plug. Never pour any liquid into the opening; that the power voltage is around 40℃. ∙ When cleaning the device, be left unused for use only the MSI provided AC adapter approved for a certain time to achieve zero energy consumption. ∙ Place the power cord in a way that helps to properly support the...

User Manual
Page 31
... body fatigue or pain during breaks. The test catalogue is based on internationally applicable standards or standards common within the range of 0 - 3000 Hz under various brightness settings. ∙ The display will help to ascertain whether the display produces visible and invisible flicker for at various frequency ranges. TÜV Rheinland Flicker Free Certification ∙ TÜV Rheinland has tested this standard within the...
... body fatigue or pain during breaks. The test catalogue is based on internationally applicable standards or standards common within the range of 0 - 3000 Hz under various brightness settings. ∙ The display will help to ascertain whether the display produces visible and invisible flicker for at various frequency ranges. TÜV Rheinland Flicker Free Certification ∙ TÜV Rheinland has tested this standard within the...

User Manual
Page 32
... compliance could void the user's authority to comply with the requirements set out in accordance with Part 15 of the FCC Rules. Notice 2 Shielded interface cables and AC power cord, if any, must accept any interference received, including interference that to which the receiver is subject to comply with the limits for help. If this equipment does...
... compliance could void the user's authority to comply with the requirements set out in accordance with Part 15 of the FCC Rules. Notice 2 Shielded interface cables and AC power cord, if any, must accept any interference received, including interference that to which the receiver is subject to comply with the limits for help. If this equipment does...
User Manual
Page 34
... terms HDMI™, HDMI™ High-Definition Multimedia Interface, HDMI™ Trade dress and the HDMI™ Logos are trademarks or registered trademarks of screen time. 2. Alternatively, please visit https://www.msi.com/support/ for further recycling information. ∙ Users may be obtained from the user's manual, please contact your product and no screen time. MSI reserves the right to make changes to affect...
... terms HDMI™, HDMI™ High-Definition Multimedia Interface, HDMI™ Trade dress and the HDMI™ Logos are trademarks or registered trademarks of screen time. 2. Alternatively, please visit https://www.msi.com/support/ for further recycling information. ∙ Users may be obtained from the user's manual, please contact your product and no screen time. MSI reserves the right to make changes to affect...