

User Manual
Page 2
Contents Getting Started...3 Package Contents...3 Installing the Monitor Stand 4 Adjusting the Monitor 5 Monitor Overview...6 Connecting the Monitor to PC 9 OSD Setup...10 Navi Key...10 Hot Key...10 OSD Menus...11 G.I. (MPG ARTYMIS 273CQR 12 Gaming...13 Professional...15 Image...16 Input Source...17 Navi Key...18 Setting...18 Specifications...20 Preset Display Modes 22 Troubleshooting...24 Safety Instructions...25 TÜV Rheinland Certification 27 Regulatory Notices...28 Revision V1.0, 2021/08 2 Contents
Contents Getting Started...3 Package Contents...3 Installing the Monitor Stand 4 Adjusting the Monitor 5 Monitor Overview...6 Connecting the Monitor to PC 9 OSD Setup...10 Navi Key...10 Hot Key...10 OSD Menus...11 G.I. (MPG ARTYMIS 273CQR 12 Gaming...13 Professional...15 Image...16 Input Source...17 Navi Key...18 Setting...18 Specifications...20 Preset Display Modes 22 Troubleshooting...24 Safety Instructions...25 TÜV Rheinland Certification 27 Regulatory Notices...28 Revision V1.0, 2021/08 2 Contents
User Manual
Page 3
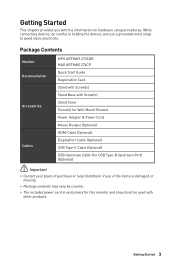
Getting Started 3 While connecting devices, be used with the information on hardware setup procedures. Package Contents Monitor MPG ARTYMIS 273CQR MAG ARTYMIS 274CP Documentation Quick Start Guide Registration Card Stand with Screw(s) Stand Base with Screw(s) Accessories Stand Cover Screw(s) for Wall Mount Bracket Power Adapter & Power Cord Mouse Bungee (Optional) HDMI Cable (Optional) Cables DisplayPort Cable (Optional) USB Type-C Cable (Optional) USB Upstream Cable (for USB Type-B Upstream Port) (Optional) ⚠⚠Important ∙∙Contact your place of ...
Getting Started 3 While connecting devices, be used with the information on hardware setup procedures. Package Contents Monitor MPG ARTYMIS 273CQR MAG ARTYMIS 274CP Documentation Quick Start Guide Registration Card Stand with Screw(s) Stand Base with Screw(s) Accessories Stand Cover Screw(s) for Wall Mount Bracket Power Adapter & Power Cord Mouse Bungee (Optional) HDMI Cable (Optional) Cables DisplayPort Cable (Optional) USB Type-C Cable (Optional) USB Upstream Cable (for USB Type-B Upstream Port) (Optional) ⚠⚠Important ∙∙Contact your place of ...
User Manual
Page 4
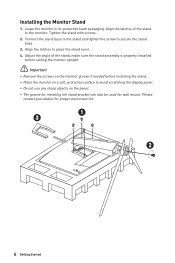
... ∙∙Remove the screws on the monitor groove if needed before installing the stand. ∙∙Place the monitor on a soft, protected surface to place the stand cover. 4. Align the latches to avoid scratching the display panel. ∙∙Do not use any sharp objects on the panel. ∙∙The groove for installing the stand bracket can also be used for proper wall mount kit. 1 3 2 4 Getting Started
... ∙∙Remove the screws on the monitor groove if needed before installing the stand. ∙∙Place the monitor on a soft, protected surface to place the stand cover. 4. Align the latches to avoid scratching the display panel. ∙∙Do not use any sharp objects on the panel. ∙∙The groove for installing the stand bracket can also be used for proper wall mount kit. 1 3 2 4 Getting Started
User Manual
Page 5
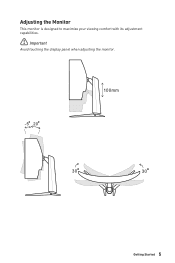
Adjusting the Monitor This monitor is designed to maximize your viewing comfort with its adjustment capabilities. ⚠⚠Important Avoid touching the display panel when adjusting the monitor. -5O 20O 100mm 30O 30O Getting Started 5
Adjusting the Monitor This monitor is designed to maximize your viewing comfort with its adjustment capabilities. ⚠⚠Important Avoid touching the display panel when adjusting the monitor. -5O 20O 100mm 30O 30O Getting Started 5
User Manual
Page 8
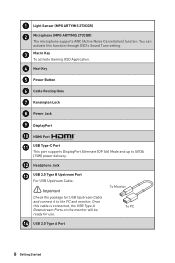
... connect it to the PC and monitor. 1 Light Sensor (MPG ARTYMIS 273CQR) 2 Microphone (MPG ARTYMIS 273CQR) The microphone supports ANC (Active Noise Cancellation) function. To Monitor To PC 14 USB 2.0 Type A Port 8 Getting Started Once this function through OSD's Sound Tune setting. 3 Macro Key To activate Gaming OSD Application. 4 Navi Key 5 Power Button 6 Cable Routing Hole 7 Kensington Lock 8 Power Jack 9 DisplayPort 10 HDMI Port 11 USB Type-C Port This port supports DisplayPort Alternate (DP Alt) Mode...
... connect it to the PC and monitor. 1 Light Sensor (MPG ARTYMIS 273CQR) 2 Microphone (MPG ARTYMIS 273CQR) The microphone supports ANC (Active Noise Cancellation) function. To Monitor To PC 14 USB 2.0 Type A Port 8 Getting Started Once this function through OSD's Sound Tune setting. 3 Macro Key To activate Gaming OSD Application. 4 Navi Key 5 Power Button 6 Cable Routing Hole 7 Kensington Lock 8 Power Jack 9 DisplayPort 10 HDMI Port 11 USB Type-C Port This port supports DisplayPort Alternate (DP Alt) Mode...
User Manual
Page 9
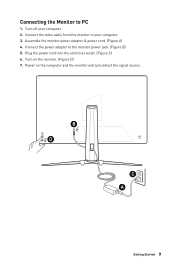
Connecting the Monitor to the monitor power jack. (Figure B) 5. Plug the power cord into the electrical outlet. (Figure C) 6. Power on the monitor. (Figure D) 7. Turn off your computer. 3. Assemble the monitor power adapter & power cord. (Figure A) 4. Turn on the computer and the monitor will auto detect the signal source. Connect the power adapter to PC 1. Connect the video cable from the monitor to your computer. 2. B D C A Getting Started 9
Connecting the Monitor to the monitor power jack. (Figure B) 5. Plug the power cord into the electrical outlet. (Figure C) 6. Power on the monitor. (Figure D) 7. Turn off your computer. 3. Assemble the monitor power adapter & power cord. (Figure A) 4. Turn on the computer and the monitor will auto detect the signal source. Connect the power adapter to PC 1. Connect the video cable from the monitor to your computer. 2. B D C A Getting Started 9
User Manual
Page 12
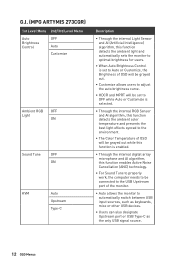
G.I. (MPG ARTYMIS 273CQR) 1st Level Menu 2nd/3rd Level Menu Auto Brightness Control OFF Auto Customize Ambient RGB OFF Light ON Sound Tune OFF ON KVM Auto Upstream Type-C Description ∙∙Through the internal Light Sensor and AI (Artificial Intelligence) algorithm, this function detects the ambient light and automatically sets the monitor to optimal brightness for users. ∙∙When Auto Brightness Control is set to Auto or Customize, the Brightness of OSD will be...
G.I. (MPG ARTYMIS 273CQR) 1st Level Menu 2nd/3rd Level Menu Auto Brightness Control OFF Auto Customize Ambient RGB OFF Light ON Sound Tune OFF ON KVM Auto Upstream Type-C Description ∙∙Through the internal Light Sensor and AI (Artificial Intelligence) algorithm, this function detects the ambient light and automatically sets the monitor to optimal brightness for users. ∙∙When Auto Brightness Control is set to Auto or Customize, the Brightness of OSD will be...

User Manual
Page 14
...;∙Users have to manually restore their preset Alarm Clock after any AC power loss and reconnection. ∙∙ Auto allows the monitor to automatically switch between USB input sources, such as keyboards, mice or other USB devices. ∙∙Users can also designate Upstream port or USB Type-C as the only USB signal source. 14 OSD Menus 1st Level Menu 2nd/3rd Level Menu MPRT OFF ON Refresh Rate Location...
...;∙Users have to manually restore their preset Alarm Clock after any AC power loss and reconnection. ∙∙ Auto allows the monitor to automatically switch between USB input sources, such as keyboards, mice or other USB devices. ∙∙Users can also designate Upstream port or USB Type-C as the only USB signal source. 14 OSD Menus 1st Level Menu 2nd/3rd Level Menu MPRT OFF ON Refresh Rate Location...
User Manual
Page 15
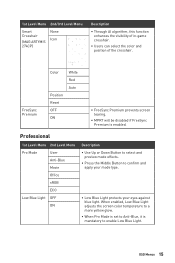
... preview mode effects. ∙∙Press the Middle Button to enable Low Blue Light. OSD Menus 15 1st Level Menu 2nd/3rd Level Menu Smart Crosshair (MAG ARTYMIS 274CP) None Icon Description ∙∙Through AI algorithm, this function enhances the visibility of in-game crosshair. ∙∙Users can select the color and position of the crosshair. FreeSync Premium Color Position Reset OFF ON White Red Auto ∙...
... preview mode effects. ∙∙Press the Middle Button to enable Low Blue Light. OSD Menus 15 1st Level Menu 2nd/3rd Level Menu Smart Crosshair (MAG ARTYMIS 274CP) None Icon Description ∙∙Through AI algorithm, this function enhances the visibility of in-game crosshair. ∙∙Users can select the color and position of the crosshair. FreeSync Premium Color Position Reset OFF ON White Red Auto ∙...
User Manual
Page 17
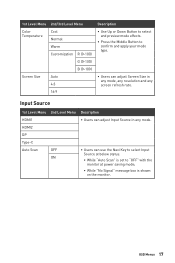
... "Auto Scan" is set to confirm and apply your mode type. ∙∙Users can adjust Screen Size in any screen refresh rate. OSD Menus 17 1st Level Menu 2nd/3rd Level Menu Color Temperature Cool Normal Warm Customization R (0-100) G (0-100) B (0-100) Screen Size Auto 4:3 16:9 Description ∙∙Use Up or Down Button to select and preview mode effects. ∙∙Press the Middle Button to "OFF" with the monitor at power saving mode...
... "Auto Scan" is set to confirm and apply your mode type. ∙∙Users can adjust Screen Size in any screen refresh rate. OSD Menus 17 1st Level Menu 2nd/3rd Level Menu Color Temperature Cool Normal Warm Customization R (0-100) G (0-100) B (0-100) Screen Size Auto 4:3 16:9 Description ∙∙Use Up or Down Button to select and preview mode effects. ∙∙Press the Middle Button to "OFF" with the monitor at power saving mode...
User Manual
Page 18
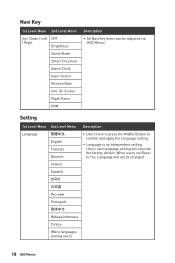
Setting 1st Level Menu 2nd Level Menu Description Language English Français Deutsch ∙∙Users have to press the Middle Button to Yes, Language will override the factory default. Users' own language setting will not be adjusted via OSD Menus. Navi Key 1st Level Menu 2nd Level Menu Up / Down / Left OFF / Right Brightness Game Mode Smart Crosshair Alarm Clock Input Source Refresh Rate Info. When users set Reset to confirm and apply the Language setting. ∙...
Setting 1st Level Menu 2nd Level Menu Description Language English Français Deutsch ∙∙Users have to press the Middle Button to Yes, Language will override the factory default. Users' own language setting will not be adjusted via OSD Menus. Navi Key 1st Level Menu 2nd Level Menu Up / Down / Left OFF / Right Brightness Game Mode Smart Crosshair Alarm Clock Input Source Refresh Rate Info. When users set Reset to confirm and apply the Language setting. ∙...

User Manual
Page 19
... power saving mode when the monitor is turned off. • When Sony PlayStation®, Nintendo® Switch™, or Xbox Series X|S console is connected, Game and Pro Mode will be automatically set to User mode (Default) and can be adjusted to users' preferred modes later. ∙∙Users can Reset and restore settings to original OSD Default in any mode. 1st Level Menu 2nd Level Menu Transparency 0~5 OSD Time Out 5~30s RGB LED OFF (MPG ARTYMIS ON 273CQR) Power Button...
... power saving mode when the monitor is turned off. • When Sony PlayStation®, Nintendo® Switch™, or Xbox Series X|S console is connected, Game and Pro Mode will be automatically set to User mode (Default) and can be adjusted to users' preferred modes later. ∙∙Users can Reset and restore settings to original OSD Default in any mode. 1st Level Menu 2nd Level Menu Transparency 0~5 OSD Time Out 5~30s RGB LED OFF (MPG ARTYMIS ON 273CQR) Power Button...
User Manual
Page 20
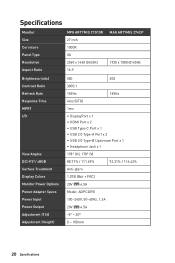
Specifications Monitor Size Curvature Panel Type Resolution Aspect Ratio MPG ARTYMIS 273CQR 27 inch 1000R VA 2560 x 1440 @165Hz 16:9 MAG ARTYMIS 274CP 1920 x 1080 @165Hz Brightness (nits) Contrast Ratio Refresh Rate Response Time MPRT I/O View Angles DCI-P3*/ sRGB Surface Treatment Display Colors Monitor Power Options Power Adapter Specs Power Input Power Output Adjustment (Tilt) Adjustment (Height) 550 300 3000:1 165Hz 165Hz 4ms (GTG) 1ms ∙∙DisplayPort x 1 ∙∙HDMI Port x 2 ∙∙USB Type-C Port x 1 ∙∙USB 2.0 Type-A Port x 2 ∙∙...
Specifications Monitor Size Curvature Panel Type Resolution Aspect Ratio MPG ARTYMIS 273CQR 27 inch 1000R VA 2560 x 1440 @165Hz 16:9 MAG ARTYMIS 274CP 1920 x 1080 @165Hz Brightness (nits) Contrast Ratio Refresh Rate Response Time MPRT I/O View Angles DCI-P3*/ sRGB Surface Treatment Display Colors Monitor Power Options Power Adapter Specs Power Input Power Output Adjustment (Tilt) Adjustment (Height) 550 300 3000:1 165Hz 165Hz 4ms (GTG) 1ms ∙∙DisplayPort x 1 ∙∙HDMI Port x 2 ∙∙USB Type-C Port x 1 ∙∙USB 2.0 Type-A Port x 2 ∙∙...
User Manual
Page 21
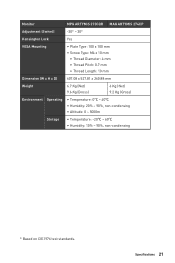
Specifications 21 Monitor MPG ARTYMIS 273CQR MAG ARTYMIS 274CP Adjustment (Swivel) -30° ~ 30° Kensington Lock Yes VESA Mounting ∙∙Plate Type: 100 x 100 mm ∙∙Screw Type: M4 x 10 mm • Thread Diameter: 4 mm • Thread Pitch: 0.7 mm • Thread Length: 10 mm Dimension (W x H x D) 607.08 x 527.81 x 260.88 mm ...;∙Humidity: 20% ~ 90%, non-condensing ∙∙Altitude: 0 ~ 5000m Storage ∙∙Temperature: -20℃ ~ 60℃ ∙∙Humidity: 10% ~ 90%, non-condensing * Based on CIE1976 test standards.
Specifications 21 Monitor MPG ARTYMIS 273CQR MAG ARTYMIS 274CP Adjustment (Swivel) -30° ~ 30° Kensington Lock Yes VESA Mounting ∙∙Plate Type: 100 x 100 mm ∙∙Screw Type: M4 x 10 mm • Thread Diameter: 4 mm • Thread Pitch: 0.7 mm • Thread Length: 10 mm Dimension (W x H x D) 607.08 x 527.81 x 260.88 mm ...;∙Humidity: 20% ~ 90%, non-condensing ∙∙Altitude: 0 ~ 5000m Storage ∙∙Temperature: -20℃ ~ 60℃ ∙∙Humidity: 10% ~ 90%, non-condensing * Based on CIE1976 test standards.

User Manual
Page 23
MAG ARTYMIS 274CP Standard VGA Resolution 640x480 @60Hz @67Hz @72Hz Dos-Mode SVGA XGA SXGA WXGA+ WSXGA+ Full HD Video Timing Resolution @75Hz 720x480 @60Hz 720x576 @50Hz 800x600 @56Hz @60Hz @72Hz @75Hz 1024x768 @60Hz @70Hz @75Hz 1280x1024 @60Hz @75Hz 1440x900 @60Hz 1680x1050 @60Hz 1920x1080 @60Hz @120Hz @144Hz @165Hz 480P 576P 720P 1080P 1080P @120Hz HDMI V V V V V V V V V V V V V V V V V V V V V V V V V V DP/ Type-C V V V V V V V V V V V V V V V V V V V V V V V V V V Preset Display Modes 23
MAG ARTYMIS 274CP Standard VGA Resolution 640x480 @60Hz @67Hz @72Hz Dos-Mode SVGA XGA SXGA WXGA+ WSXGA+ Full HD Video Timing Resolution @75Hz 720x480 @60Hz 720x576 @50Hz 800x600 @56Hz @60Hz @72Hz @75Hz 1024x768 @60Hz @70Hz @75Hz 1280x1024 @60Hz @75Hz 1440x900 @60Hz 1680x1050 @60Hz 1920x1080 @60Hz @120Hz @144Hz @165Hz 480P 576P 720P 1080P 1080P @120Hz HDMI V V V V V V V V V V V V V V V V V V V V V V V V V V DP/ Type-C V V V V V V V V V V V V V V V V V V V V V V V V V V Preset Display Modes 23
User Manual
Page 24
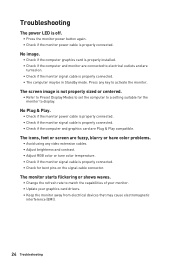
... and are turned on the signal cable connector. The icons, font or screen are Plug & Play compatible. No Plug & Play. • Check if the monitor power cable is properly connected. • Check if the monitor signal cable is properly connected. • Check if the computer and graphics card are fuzzy, blurry or have color problems. • Avoid using any key to match the capabilities of your monitor. • Update your graphics card drivers. • Keep the monitor away from...
... and are turned on the signal cable connector. The icons, font or screen are Plug & Play compatible. No Plug & Play. • Check if the monitor power cable is properly connected. • Check if the monitor signal cable is properly connected. • Check if the computer and graphics card are fuzzy, blurry or have color problems. • Avoid using any key to match the capabilities of your monitor. • Update your graphics card drivers. • Keep the monitor away from...
User Manual
Page 25
... power cord or switch the wall socket off if the device would be connected to qualified personnel only. Power ∙∙Make sure that can lead to the value of as unsorted household waste. Replace only with a battery. ∙∙Danger of explosion if battery is within its safety range and has been adjusted properly to death. Safety Instructions 25 Safety Instructions...
... power cord or switch the wall socket off if the device would be connected to qualified personnel only. Power ∙∙Make sure that can lead to the value of as unsorted household waste. Replace only with a battery. ∙∙Danger of explosion if battery is within its safety range and has been adjusted properly to death. Safety Instructions 25 Safety Instructions...

User Manual
Page 26
...helps to properly support the device and keep it working according to clean the device. California, USA: The button cell battery may contain perchlorate material and requires special handling when recycled or disposed of in an unconditioned environment with an anti-tip fastener that could damage the device or cause electric shock. ∙∙Always keep...The device does not work well or you can not get the device checked by service personnel: • The power cord or plug is around 40℃. ∙∙When cleaning the device, be sure to a desk, wall or fixed object with a ...
...helps to properly support the device and keep it working according to clean the device. California, USA: The button cell battery may contain perchlorate material and requires special handling when recycled or disposed of in an unconditioned environment with an anti-tip fastener that could damage the device or cause electric shock. ∙∙Always keep...The device does not work well or you can not get the device checked by service personnel: • The power cord or plug is around 40℃. ∙∙When cleaning the device, be sure to a desk, wall or fixed object with a ...

User Manual
Page 27
.../Anti-Blue mode or turn on internationally applicable standards or standards common within the range of 0 - 3000 Hz under various brightness settings. ∙∙The display will not support Flicker Free when Anti Motion Blur/MPRT is based on the optional Low Blue Light function. MSI now offers monitors with TÜV Rheinland Low Blue Light certification to ascertain whether the display produces visible and invisible flicker for at various frequency ranges...
.../Anti-Blue mode or turn on internationally applicable standards or standards common within the range of 0 - 3000 Hz under various brightness settings. ∙∙The display will not support Flicker Free when Anti Motion Blur/MPRT is based on the optional Low Blue Light function. MSI now offers monitors with TÜV Rheinland Low Blue Light certification to ascertain whether the display produces visible and invisible flicker for at various frequency ranges...

User Manual
Page 28
...turning the equipment off and on, the user is no guarantee that interference will not occur in accordance with the instruction manual, may cause harmful interference to comply with the harmonized standards for help. This equipment generates, uses and can be used in a particular installation. Operation is connected... and 2. This device complies with the emission limits. Notice 2 Shielded interface cables and AC power cord, if any interference received, including interference that to Electromagnetic Compatibility (2014/30/EU), Low-voltage Directive (2014/35/EU), ErP Directive (...
...turning the equipment off and on, the user is no guarantee that interference will not occur in accordance with the instruction manual, may cause harmful interference to comply with the harmonized standards for help. This equipment generates, uses and can be used in a particular installation. Operation is connected... and 2. This device complies with the emission limits. Notice 2 Shielded interface cables and AC power cord, if any interference received, including interference that to Electromagnetic Compatibility (2014/30/EU), Low-voltage Directive (2014/35/EU), ErP Directive (...