
User Manual
Page 18
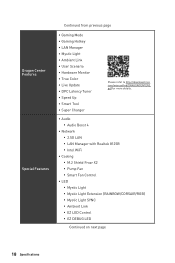
...;▪Mystic Light SYNC ▪▪Ambient Link ▪▪EZ LED Control ▪▪EZ DEBUG LED Continued on next page 18 Specifications com/manual/mb/DRAGONCENTER2. Dragon Center Features Special Features Continued from previous page ∙∙Gaming Mode ∙∙Gaming Hotkey ∙∙LAN Manager ∙∙...;∙Live Update ∙∙DPC Latency Tuner ∙∙Speed Up ∙∙Smart Tool ∙∙Super Charger Please refer to http://download.msi.
...;▪Mystic Light SYNC ▪▪Ambient Link ▪▪EZ LED Control ▪▪EZ DEBUG LED Continued on next page 18 Specifications com/manual/mb/DRAGONCENTER2. Dragon Center Features Special Features Continued from previous page ∙∙Gaming Mode ∙∙Gaming Hotkey ∙∙LAN Manager ∙∙...;∙Live Update ∙∙DPC Latency Tuner ∙∙Speed Up ∙∙Smart Tool ∙∙Super Charger Please refer to http://download.msi.
User Manual
Page 20
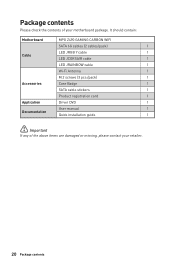
Package contents Please check the contents of the above items are damaged or missing, please contact your motherboard package. It should contain: Motherboard MPG Z490 GAMING CARBON WIFI SATA 6G cables (2 cables/pack) 1 LED JRGB Y cable 1 Cable LED JCORSAIR cable 1 LED JRAINBOW cable 1 Wi-Fi Antenna 1 M.2 screws (3 pcs./pack) 1 Accessories Case Badge 1 SATA cable stickers 1 Product registration card 1 Application Driver DVD 1 User manual 1 Documentation Quick installation guide 1 ⚠⚠Important If any of your retailer. 20 Package contents
Package contents Please check the contents of the above items are damaged or missing, please contact your motherboard package. It should contain: Motherboard MPG Z490 GAMING CARBON WIFI SATA 6G cables (2 cables/pack) 1 LED JRGB Y cable 1 Cable LED JCORSAIR cable 1 LED JRAINBOW cable 1 Wi-Fi Antenna 1 M.2 screws (3 pcs./pack) 1 Accessories Case Badge 1 SATA cable stickers 1 Product registration card 1 Application Driver DVD 1 User manual 1 Documentation Quick installation guide 1 ⚠⚠Important If any of your retailer. 20 Package contents
User Manual
Page 37
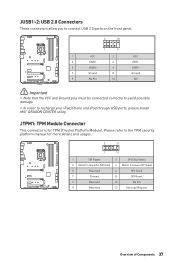
Please refer to recharge your iPad,iPhone and iPod through USB ports, please install MSI® DRAGON CENTER utility. JUSB1~2: USB 2.0 Connectors These connectors allow you to connect USB 2.0 ports on the front panel. 2 10 1 9 1 VCC 2 3 USB0- 4 5 USB0+ 6 7 Ground 8...;∙Note that the VCC and Ground pins must be connected correctly to avoid possible damage. ∙∙In order to the TPM security platform manual for TPM (Trusted Platform Module). JTPM1: TPM Module Connector This connector is for more details and usages. 2 12 1 11 1 SPI Power 2 SPI Chip ...
Please refer to recharge your iPad,iPhone and iPod through USB ports, please install MSI® DRAGON CENTER utility. JUSB1~2: USB 2.0 Connectors These connectors allow you to connect USB 2.0 ports on the front panel. 2 10 1 9 1 VCC 2 3 USB0- 4 5 USB0+ 6 7 Ground 8...;∙Note that the VCC and Ground pins must be connected correctly to avoid possible damage. ∙∙In order to the TPM security platform manual for TPM (Trusted Platform Module). JTPM1: TPM Module Connector This connector is for more details and usages. 2 12 1 11 1 SPI Power 2 SPI Chip ...
User Manual
Page 38
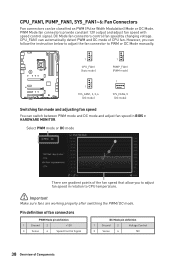
... speed in BIOS > HARDWARE MONITOR. CPU_FAN1 can switch between PWM mode and DC mode and adjust fan speed in relation to PWM or DC Mode manually. 1 CPU_FAN1 (Auto mode) 1 PUMP_FAN1 (PWM mode) 1 SYS_FAN1, 2, 3, 6 (DC mode) 1 SYS_FAN4, 5 (DC mode) Switching fan mode and adjusting fan speed You can automatically detect PWM and...
... speed in BIOS > HARDWARE MONITOR. CPU_FAN1 can switch between PWM mode and DC mode and adjust fan speed in relation to PWM or DC Mode manually. 1 CPU_FAN1 (Auto mode) 1 PUMP_FAN1 (PWM mode) 1 SYS_FAN1, 2, 3, 6 (DC mode) 1 SYS_FAN4, 5 (DC mode) Switching fan mode and adjusting fan speed You can automatically detect PWM and...
User Manual
Page 45
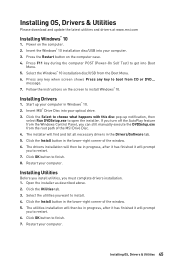
... drivers installation. 1. Follow the instructions on the computer case. 4. Restart your computer. message. 7. The installer will prompt you can still manually execute the DVDSetup.exe from the Boot Menu. 6. Click the Install button in progress, after it has finished it will find and list... all necessary drivers in the lower-right corner of the window. 6. Restart your computer. Power on the computer. 2. Insert MSI® Drive Disc into your computer. 3. Installing OS, Drivers & Utilities 45 Press any key when screen shows Press any key to install....
... drivers installation. 1. Follow the instructions on the computer case. 4. Restart your computer. message. 7. The installer will prompt you can still manually execute the DVDSetup.exe from the Boot Menu. 6. Click the Install button in progress, after it has finished it will find and list... all necessary drivers in the lower-right corner of the window. 6. Restart your computer. Power on the computer. 2. Insert MSI® Drive Disc into your computer. 3. Installing OS, Drivers & Utilities 45 Press any key when screen shows Press any key to install....
User Manual
Page 51
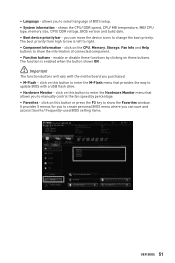
... BIOS menu where you can save and access favorite/ frequently-used BIOS setting items. UEFI BIOS 51 ∙∙ Language - The function is left to manually control the fan speed by clicking on this button or press the F3 key to show the information of BIOS setup. ∙∙ System information...
... BIOS menu where you can save and access favorite/ frequently-used BIOS setting items. UEFI BIOS 51 ∙∙ Language - The function is left to manually control the fan speed by clicking on this button or press the F3 key to show the information of BIOS setup. ∙∙ System information...
User Manual
Page 56
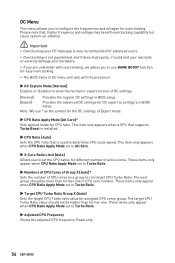
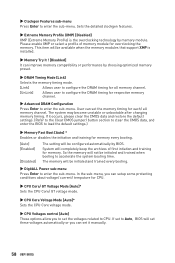
... the CPU ratio that , higher frequency and voltage may benefit overclocking capability but cause system un-stability. ⚠⚠Important ∙∙Overclocking your PC manually is only recommended for advanced users. ∙∙Overclocking is used to determine CPU clock speed. OC Menu This menu allows you to set the...
... the CPU ratio that , higher frequency and voltage may benefit overclocking capability but cause system un-stability. ⚠⚠Important ∙∙Overclocking your PC manually is only recommended for advanced users. ∙∙Overclocking is used to determine CPU clock speed. OC Menu This menu allows you to set the...
User Manual
Page 57
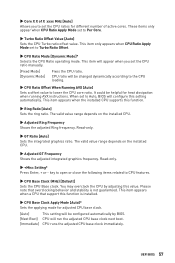
... to Auto, BIOS will appear when you to set the CPU ratios for different number of X xxxx MHz [Auto] Allows you set the CPU ratio manually. [Fixed Mode] [Dynamic Mode] Fixes the CPU ratio. This item appears when the installed CPU supports this function is not guaranteed. You may overclock the...
... to Auto, BIOS will appear when you to set the CPU ratios for different number of X xxxx MHz [Auto] Allows you set the CPU ratio manually. [Fixed Mode] [Dynamic Mode] Fixes the CPU ratio. This item appears when the installed CPU supports this function is not guaranteed. You may overclock the...
User Manual
Page 58
... set the voltages related to Auto, BIOS will be available when the memory modules that support XMP is the overclocking technology by BIOS. If it manually. 58 UEFI BIOS So the memory will completely keep the archives of memory module for CPU. ▶▶CPU Core/ GT Voltage Mode [Auto]* Sets...
... set the voltages related to Auto, BIOS will be available when the memory modules that support XMP is the overclocking technology by BIOS. If it manually. 58 UEFI BIOS So the memory will completely keep the archives of memory module for CPU. ▶▶CPU Core/ GT Voltage Mode [Auto]* Sets...
User Manual
Page 59
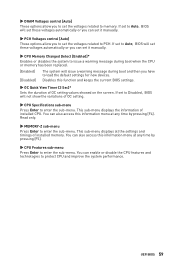
...disable the CPU features and technologies to protect CPU and improve the system performance. If set the voltages related to memory. You can set it manually. ▶▶PCH Voltages control [Auto] These options allow you to set to Disabled, BIOS will not show the variations of OC setting. ...;CPU Specifications sub-menu Press Enter to enter the sub-menu. ▶▶DRAM Voltages control [Auto] These options allow you to set it manually. ▶▶CPU Memory Changed Detect [Enabled]* Enables or disables the system to issue a warning message during boot when the CPU or memory ...
...disable the CPU features and technologies to protect CPU and improve the system performance. If set the voltages related to memory. You can set it manually. ▶▶PCH Voltages control [Auto] These options allow you to set to Disabled, BIOS will not show the variations of OC setting. ...;CPU Specifications sub-menu Press Enter to enter the sub-menu. ▶▶DRAM Voltages control [Auto] These options allow you to set it manually. ▶▶CPU Memory Changed Detect [Enabled]* Enables or disables the system to issue a warning message during boot when the CPU or memory ...
User Manual
Page 62
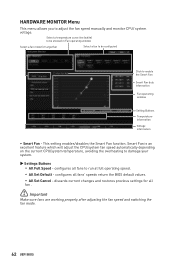
... speed and switching the fan mode. 62 UEFI BIOS This setting enables/disables the Smart Fan function. configures all fans to adjust the fan speed manually and monitor CPU/ system voltage. Select a temperature curve line (white) to be configured Click to damage your system. ▶▶Settings Buttons ▪▪All...
... speed and switching the fan mode. 62 UEFI BIOS This setting enables/disables the Smart Fan function. configures all fans to adjust the fan speed manually and monitor CPU/ system voltage. Select a temperature curve line (white) to be configured Click to damage your system. ▶▶Settings Buttons ▪▪All...

User Manual
Page 69
...) driver, click Next. 5. As previously mentioned, enable Intel(R) Rapid Storage Technology in the computer until the system reboots itself. Insert the MSI Drive Disk into the optical drive. Under the Drivers/Software tab, check the Intel RAID Drivers check-box. 5. When prompted, insert the ...Control Panel, you to restart, click OK button to open the Intel® Rapid Storage Technology software. When prompt you can still manually execute the DVDSetup. Double-click the Intel® Rapid Storage Technology icon to the directory containing the saved Intel RAID drivers, then ...
...) driver, click Next. 5. As previously mentioned, enable Intel(R) Rapid Storage Technology in the computer until the system reboots itself. Insert the MSI Drive Disk into the optical drive. Under the Drivers/Software tab, check the Intel RAID Drivers check-box. 5. When prompted, insert the ...Control Panel, you to restart, click OK button to open the Intel® Rapid Storage Technology software. When prompt you can still manually execute the DVDSetup. Double-click the Intel® Rapid Storage Technology icon to the directory containing the saved Intel RAID drivers, then ...
User Manual
Page 70
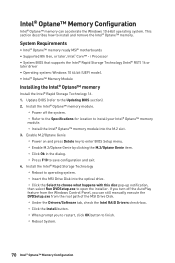
...the Updating BIOS section). 2. Intel® Optane™ Memory Configuration Intel® Optane™ memory can still manually execute the DVDSetup.exe from the root path of the MSI Drive Disk. ▫▫Under the Drivers/Software tab, check the Intel RAID Drivers check-box. ▫&#...;When prompt you to restart, click OK button to save configuration and exit. 4. System Requirements ∙∙Intel® Optane™ memory ready MSI® motherboards ∙∙Supported 8th Gen, or later, Intel® Core™ - Update BIOS (refer to install and remove the Intel&#...
...the Updating BIOS section). 2. Intel® Optane™ Memory Configuration Intel® Optane™ memory can still manually execute the DVDSetup.exe from the root path of the MSI Drive Disk. ▫▫Under the Drivers/Software tab, check the Intel RAID Drivers check-box. ▫&#...;When prompt you to restart, click OK button to save configuration and exit. 4. System Requirements ∙∙Intel® Optane™ memory ready MSI® motherboards ∙∙Supported 8th Gen, or later, Intel® Core™ - Update BIOS (refer to install and remove the Intel&#...


