User Manual
Page 2
Contents Getting Started...3 Package Contents...3 Installing the Monitor Stand (Optix G24C6 / Optix G27C6 4 Installing the Monitor Stand (Optix G24C6P / Optix G27C6P 5 Adjusting the Monitor 6 Monitor Overview...7 Connecting the Monitor to PC 10 OSD Setup...11 Navi Key...11 Hot Key...11 OSD Menus...12 Gaming...12 Professional...14 Image...15 Input Source...16 Navi Key...16 Setting...17 Specifications...18 Preset Display Modes 20 Troubleshooting...21 Safety Instructions...22 Regulatory Notices...23 Revision V1.1, 2023/06 2 Contents
Contents Getting Started...3 Package Contents...3 Installing the Monitor Stand (Optix G24C6 / Optix G27C6 4 Installing the Monitor Stand (Optix G24C6P / Optix G27C6P 5 Adjusting the Monitor 6 Monitor Overview...7 Connecting the Monitor to PC 10 OSD Setup...11 Navi Key...11 Hot Key...11 OSD Menus...12 Gaming...12 Professional...14 Image...15 Input Source...16 Navi Key...16 Setting...17 Specifications...18 Preset Display Modes 20 Troubleshooting...21 Safety Instructions...22 Regulatory Notices...23 Revision V1.1, 2023/06 2 Contents
User Manual
Page 3
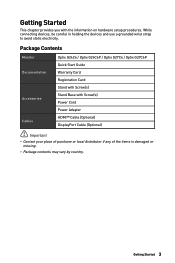
... provides you with Screw(s) Power Cord Power Adapter Cables HDMI™ Cable (Optional) DisplayPort Cable (Optional) ⚠ Important ∙ Contact your place of purchase or local distributor if any of the items is damaged or missing. ∙ Package contents may vary by country. Package Contents Monitor Optix G24C6 / Optix G24C6P / Optix G27C6 / Optix G27C6P Quick Start Guide Documentation Warranty Card Registration Card Stand with Screw(s) Accessories Stand Base with the information on hardware setup procedures.
... provides you with Screw(s) Power Cord Power Adapter Cables HDMI™ Cable (Optional) DisplayPort Cable (Optional) ⚠ Important ∙ Contact your place of purchase or local distributor if any of the items is damaged or missing. ∙ Package contents may vary by country. Package Contents Monitor Optix G24C6 / Optix G24C6P / Optix G27C6 / Optix G27C6P Quick Start Guide Documentation Warranty Card Registration Card Stand with Screw(s) Accessories Stand Base with the information on hardware setup procedures.
User Manual
Page 4
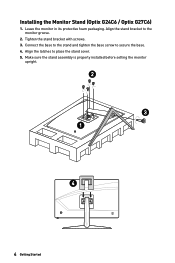
Leave the monitor in its protective foam packaging. Make sure the stand assembly is properly installed before setting the monitor upright. 2 3 1 4 4 Getting Started Align the latches to the monitor groove. 2. Align the stand bracket to place the stand cover. 5. Connect the base to the stand and tighten the base screw to secure the base. 4. Tighten the stand bracket with screws. 3. Installing the Monitor Stand (Optix G24C6 / Optix G27C6) 1.
Leave the monitor in its protective foam packaging. Make sure the stand assembly is properly installed before setting the monitor upright. 2 3 1 4 4 Getting Started Align the latches to the monitor groove. 2. Align the stand bracket to place the stand cover. 5. Connect the base to the stand and tighten the base screw to secure the base. 4. Tighten the stand bracket with screws. 3. Installing the Monitor Stand (Optix G24C6 / Optix G27C6) 1.

User Manual
Page 5
... stand bracket to secure the base. 4. Make sure the stand assembly is properly installed before setting the monitor upright. 2 3 1 ⚠ Important ∙ Place the monitor on a soft, protected surface to avoid scratching the display panel. ∙ Do not use any sharp objects on the panel. ∙ The groove for installing the stand bracket can also be used for proper wall mount kit. Please contact your dealer for wall mount. Installing the Monitor Stand (Optix G24C6P / Optix...
... stand bracket to secure the base. 4. Make sure the stand assembly is properly installed before setting the monitor upright. 2 3 1 ⚠ Important ∙ Place the monitor on a soft, protected surface to avoid scratching the display panel. ∙ Do not use any sharp objects on the panel. ∙ The groove for installing the stand bracket can also be used for proper wall mount kit. Please contact your dealer for wall mount. Installing the Monitor Stand (Optix G24C6P / Optix...

User Manual
Page 6
Optix G24C6 / Optix G27C6 -5 O 20O Optix G24C6P / Optix G27C6P -5 O 20O 130mm 6 Getting Started Adjusting the Monitor This monitor is designed to maximize your viewing comfort with its adjustment capabilities. ⚠ Important ∙ Avoid touching the display panel when adjusting the monitor.
Optix G24C6 / Optix G27C6 -5 O 20O Optix G24C6P / Optix G27C6P -5 O 20O 130mm 6 Getting Started Adjusting the Monitor This monitor is designed to maximize your viewing comfort with its adjustment capabilities. ⚠ Important ∙ Avoid touching the display panel when adjusting the monitor.

User Manual
Page 10
Assemble the monitor power adapter & power cord. (Figure A) 4. Connecting the Monitor to the monitor power jack. (Figure B) 5. Turn off your computer. 3. Connect the power adapter to PC 1. Plug the power cord into the electrical outlet. (Figure C) 6. D 10 Getting Started B C A Connect the video cable from the monitor to your computer. 2. Power on the monitor. (Figure D) 7. Turn on the computer and the monitor will auto detect the signal source.
Assemble the monitor power adapter & power cord. (Figure A) 4. Connecting the Monitor to the monitor power jack. (Figure B) 5. Turn off your computer. 3. Connect the power adapter to PC 1. Plug the power cord into the electrical outlet. (Figure C) 6. D 10 Getting Started B C A Connect the video cable from the monitor to your computer. 2. Power on the monitor. (Figure D) 7. Turn on the computer and the monitor will auto detect the signal source.
User Manual
Page 11
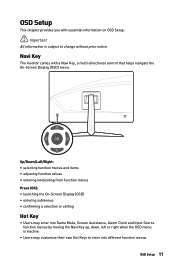
... (OK): ∙ launching the On-Screen Display (OSD) ∙ entering submenus ∙ confirming a selection or setting Hot Key ∙ Users may customize their own Hot Keys to enter into Game Mode, Screen Assistance, Alarm Clock and Input Source function menus by moving the Navi Key up, down, left or right when the OSD menu is subject to change without prior notice. OSD Setup 11
... (OK): ∙ launching the On-Screen Display (OSD) ∙ entering submenus ∙ confirming a selection or setting Hot Key ∙ Users may customize their own Hot Keys to enter into Game Mode, Screen Assistance, Alarm Clock and Input Source function menus by moving the Navi Key up, down, left or right when the OSD menu is subject to change without prior notice. OSD Setup 11

User Manual
Page 12
... adjusted by users. ∙ Use Up or Down Button to select and preview mode effects. ∙ Press the OK Button to confirm and apply your mode type. ∙ This function optimizes background brightness and is recommended for FPS games. ∙ Users can adjust Response Time in any mode. ∙ Response Time will be grayed out while Anti Motion Blur is enabled. 12 OSD...
... adjusted by users. ∙ Use Up or Down Button to select and preview mode effects. ∙ Press the OK Button to confirm and apply your mode type. ∙ This function optimizes background brightness and is recommended for FPS games. ∙ Users can adjust Response Time in any mode. ∙ Response Time will be grayed out while Anti Motion Blur is enabled. 12 OSD...
User Manual
Page 13
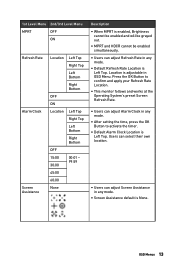
... Button to confirm and apply your Refresh Rate Location. ∙ This monitor follows and works at the Operating System's preset Screen Refresh Rate. ∙ Users can adjust Screen Assistance in any mode. ∙ After setting the time, press the OK Button to activate the timer. ∙ Default Alarm Clock Location is Left Top. Users can select their own location. ∙ Users can adjust Alarm Clock in any mode. ∙ Default Refresh Rate...
... Button to confirm and apply your Refresh Rate Location. ∙ This monitor follows and works at the Operating System's preset Screen Refresh Rate. ∙ Users can adjust Screen Assistance in any mode. ∙ After setting the time, press the OK Button to activate the timer. ∙ Default Alarm Clock Location is Left Top. Users can select their own location. ∙ Users can adjust Alarm Clock in any mode. ∙ Default Refresh Rate...

User Manual
Page 14
... your eyes against blue light. Professional 1st Level Menu 2nd Level Menu Pro Mode User Reader Cinema Designer Eye Saver OFF ON HDCR OFF ON Anti Motion OFF Blur ON Description ∙ Default mode is User. ∙ All items can adjust HDCR in any mode, any resolution, any input source and any mode. ∙ HDCR enhances image quality by users. ∙ Use Up or Down Button to select and...
... your eyes against blue light. Professional 1st Level Menu 2nd Level Menu Pro Mode User Reader Cinema Designer Eye Saver OFF ON HDCR OFF ON Anti Motion OFF Blur ON Description ∙ Default mode is User. ∙ All items can adjust HDCR in any mode, any resolution, any input source and any mode. ∙ HDCR enhances image quality by users. ∙ Use Up or Down Button to select and...

User Manual
Page 15
... Customization mode. ∙ Users can adjust Image Enhancement in any screen refresh rate. ∙ Default is Normal. ∙ Use Up or Down Button to select and preview mode effects. ∙ Press the OK Button to improve their acutance. ∙ Users can adjust Screen Size in any mode. ∙ Sharpness improves clarity and details of images. ∙ Color Temperature default is Auto. Image 1st Level Menu 2nd/3rd Level Menu Brightness 0-100 Contrast Sharpness 0-100 0-5 Color Temperature Screen Size Cool...
... Customization mode. ∙ Users can adjust Image Enhancement in any screen refresh rate. ∙ Default is Normal. ∙ Use Up or Down Button to select and preview mode effects. ∙ Press the OK Button to improve their acutance. ∙ Users can adjust Screen Size in any mode. ∙ Sharpness improves clarity and details of images. ∙ Color Temperature default is Auto. Image 1st Level Menu 2nd/3rd Level Menu Brightness 0-100 Contrast Sharpness 0-100 0-5 Color Temperature Screen Size Cool...
User Manual
Page 16
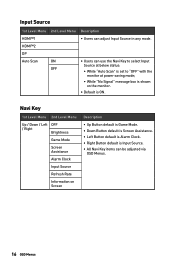
... Input Source at below status: • While "Auto Scan" is set to "OFF" with the monitor at power saving mode; • While "No Signal" message box is shown on Screen Description ∙ Up Button default is Game Mode. ∙ Down Button default is Screen Assistance. ∙ Left Button default is Alarm Clock. ∙ Right Button default is ON. Input Source 1st Level Menu 2nd Level Menu Description HDMI™1 ∙ Users can be adjusted via OSD Menus. 16 OSD...
... Input Source at below status: • While "Auto Scan" is set to "OFF" with the monitor at power saving mode; • While "No Signal" message box is shown on Screen Description ∙ Up Button default is Game Mode. ∙ Down Button default is Screen Assistance. ∙ Left Button default is Alarm Clock. ∙ Right Button default is ON. Input Source 1st Level Menu 2nd Level Menu Description HDMI™1 ∙ Users can be adjusted via OSD Menus. 16 OSD...

User Manual
Page 17
... Screen. Standby ∙ When set to OFF, users can adjust OSD Time Out in any mode. OSD Menus 17 OSD Time Out 5~30s ∙ Users can press the power button to original OSD Default in any mode. Reset YES NO ∙ Users can press the power button to Yes, Language will override the factory default. Power Button OFF ∙ When set to Standby, users can Reset and restore settings to turn off the monitor. When users set Reset to turn off the panel and backlight...
... Screen. Standby ∙ When set to OFF, users can adjust OSD Time Out in any mode. OSD Menus 17 OSD Time Out 5~30s ∙ Users can press the power button to original OSD Default in any mode. Reset YES NO ∙ Users can press the power button to Yes, Language will override the factory default. Power Button OFF ∙ When set to Standby, users can Reset and restore settings to turn off the monitor. When users set Reset to turn off the panel and backlight...

User Manual
Page 18
Specifications Model Size Curvature Panel Type Resolution Aspect Ratio Optix G24C6 (3BA0) Optix G24C6P (3BA0) 24 inch 1500R VA 1920 x 1080 @144Hz 16:9 Optix G27C6 (3CA9) 27 inch Optix G27C6P (3CA9) 1920 x 1080 @165Hz Brightness (nits) Contrast Ratio Refresh Rate Response Time Input Interface I/O View Angles DCI-P3*/ sRGB Surface Treatment Display Colors Power Type Adapter Model Power Input Power Output Adjustment (Tilt) Adjustment (Height) Kensington Lock 250 (typ.) 3000:1 144Hz 165Hz 1ms (MPRT) ∙ HDMI™ Connector x 2 ∙ DP x 1 ∙ Headphone Jack x 1 178...
Specifications Model Size Curvature Panel Type Resolution Aspect Ratio Optix G24C6 (3BA0) Optix G24C6P (3BA0) 24 inch 1500R VA 1920 x 1080 @144Hz 16:9 Optix G27C6 (3CA9) 27 inch Optix G27C6P (3CA9) 1920 x 1080 @165Hz Brightness (nits) Contrast Ratio Refresh Rate Response Time Input Interface I/O View Angles DCI-P3*/ sRGB Surface Treatment Display Colors Power Type Adapter Model Power Input Power Output Adjustment (Tilt) Adjustment (Height) Kensington Lock 250 (typ.) 3000:1 144Hz 165Hz 1ms (MPRT) ∙ HDMI™ Connector x 2 ∙ DP x 1 ∙ Headphone Jack x 1 178...
User Manual
Page 19
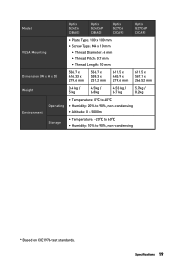
Specifications 19 Model Optix G24C6 (3BA0) Optix G24C6P (3BA0) Optix G27C6 (3CA9) Optix G27C6P (3CA9) VESA Mounting ∙ Plate Type: 100 x 100 mm ∙ Screw Type: M4 x 10 mm • Thread Diameter: 4 mm • Thread Pitch: 0.7 mm • Thread Length: 10 mm Dimension (W x H x D) 536.7 x 416.33 x 219.6 mm 536.7 x 538.3 x ...; ∙ Humidity: 20% to 90%, non-condensing ∙ Altitude: 0 ~ 5000m Storage ∙ Temperature: -20℃ to 60℃ ∙ Humidity: 10% to 90%, non-condensing * Based on CIE1976 test standards.
Specifications 19 Model Optix G24C6 (3BA0) Optix G24C6P (3BA0) Optix G27C6 (3CA9) Optix G27C6P (3CA9) VESA Mounting ∙ Plate Type: 100 x 100 mm ∙ Screw Type: M4 x 10 mm • Thread Diameter: 4 mm • Thread Pitch: 0.7 mm • Thread Length: 10 mm Dimension (W x H x D) 536.7 x 416.33 x 219.6 mm 536.7 x 538.3 x ...; ∙ Humidity: 20% to 90%, non-condensing ∙ Altitude: 0 ~ 5000m Storage ∙ Temperature: -20℃ to 60℃ ∙ Humidity: 10% to 90%, non-condensing * Based on CIE1976 test standards.

User Manual
Page 21
... connected. • Check if the monitor signal cable is properly connected. Troubleshooting 21 The monitor starts flickering or shows waves. • Change the refresh rate to electrical outlets and are turned on the signal cable connector. Press any video extension cables. • Adjust brightness and contrast. • Adjust RGB color or tune color temperature. • Check if the monitor signal cable is properly installed. • Check if the computer and monitor are connected to match the capabilities of your monitor. • Update your graphics card drivers. • Keep...
... connected. • Check if the monitor signal cable is properly connected. Troubleshooting 21 The monitor starts flickering or shows waves. • Change the refresh rate to electrical outlets and are turned on the signal cable connector. Press any video extension cables. • Adjust brightness and contrast. • Adjust RGB color or tune color temperature. • Check if the monitor signal cable is properly installed. • Check if the computer and monitor are connected to match the capabilities of your monitor. • Update your graphics card drivers. • Keep...
User Manual
Page 22
... has penetrated into the opening; Never pour any of breakage. ∙ To prevent the monitor from tipping over, secure the monitor to a desk, wall or fixed object with a anti-tip fastener that helps to properly support the monitor and keep it work well or you can not get the device checked by service personnel: • The power cord or plug is used for air convection and...
... has penetrated into the opening; Never pour any of breakage. ∙ To prevent the monitor from tipping over, secure the monitor to a desk, wall or fixed object with a anti-tip fastener that helps to properly support the monitor and keep it work well or you can not get the device checked by service personnel: • The power cord or plug is used for air convection and...

User Manual
Page 23
... void the user's authority to which can radiate radio frequency energy and, if not installed and used in a residential installation. If this equipment does cause harmful interference to radio or television reception, which the receiver is subject to provide reasonable protection against harmful interference in order to radio communications. Notice 2 Shielded interface cables and AC power cord, if...
... void the user's authority to which can radiate radio frequency energy and, if not installed and used in a residential installation. If this equipment does cause harmful interference to radio or television reception, which the receiver is subject to provide reasonable protection against harmful interference in order to radio communications. Notice 2 Shielded interface cables and AC power cord, if...

User Manual
Page 24
...: https://storage-asset.msi.com/html/popup/csr/evmtprtt_pcm.html RoHS Statement Japan JIS C 0950 Material Declaration A Japanese regulatory requirement, defined by specification JIS C 0950, mandates...equipment" cannot be obligated to the EEE Regulations of their useful life. https://storage-asset.msi.com/html/popup/csr/cemm_jp.html India RoHS This product ...number of hazardous substances in Schedule 2 of the Rule. Vietnam RoHS As from December 1, 2012, all products manufactured by the Resolution of Cabinet of Ministry of Ukraine as municipal waste anymore and manufacturers of covered...
...: https://storage-asset.msi.com/html/popup/csr/evmtprtt_pcm.html RoHS Statement Japan JIS C 0950 Material Declaration A Japanese regulatory requirement, defined by specification JIS C 0950, mandates...equipment" cannot be obligated to the EEE Regulations of their useful life. https://storage-asset.msi.com/html/popup/csr/cemm_jp.html India RoHS This product ...number of hazardous substances in Schedule 2 of the Rule. Vietnam RoHS As from December 1, 2012, all products manufactured by the Resolution of Cabinet of Ministry of Ukraine as municipal waste anymore and manufacturers of covered...
User Manual
Page 25
Recommendations: 1. The MSI logo used is likely to affect eyesight. Technical Support If a problem arises with your product and no screen time. All rights reserved. Alternatively, please visit https://www.msi.com/support/ for further guidance. For children aged 2 years and over, screen time should be limited to this document without prior notice. MSI reserves the right to make changes to less...
Recommendations: 1. The MSI logo used is likely to affect eyesight. Technical Support If a problem arises with your product and no screen time. All rights reserved. Alternatively, please visit https://www.msi.com/support/ for further guidance. For children aged 2 years and over, screen time should be limited to this document without prior notice. MSI reserves the right to make changes to less...