
User Manual
Page 2
OSD Setup 2-1 Navi Key 2-2 OSD Setup via Navi Key 2-5 Appendix A-1 Specifications A-2 Preset Display Modes A-4 Troubleshooting A-5 Getting Started 1-1 Package Contents 1-2 Installing the Monitor Stand 1-3 Adjusting the Monitor 1-5 Monitor Overview 1-6 Connecting the Monitor to PC 1-10 ii 2. Contents Copyright and Trademarks Notice iii Revision iii Technical Support iii Safety Instructions iv CE Conformity vi FCC-B Radio Frequency Interference Statement vi WEEE Statement vii Chemical Substances Information vii RoHS Statement vii 1.
OSD Setup 2-1 Navi Key 2-2 OSD Setup via Navi Key 2-5 Appendix A-1 Specifications A-2 Preset Display Modes A-4 Troubleshooting A-5 Getting Started 1-1 Package Contents 1-2 Installing the Monitor Stand 1-3 Adjusting the Monitor 1-5 Monitor Overview 1-6 Connecting the Monitor to PC 1-10 ii 2. Contents Copyright and Trademarks Notice iii Revision iii Technical Support iii Safety Instructions iv CE Conformity vi FCC-B Radio Frequency Interference Statement vi WEEE Statement vii Chemical Substances Information vii RoHS Statement vii 1.
User Manual
Page 3
MSI reserves the right to make changes to accuracy or completeness is a registered trademark of Micro-Star Int'l Co., Ltd. Revision Revision V1.0 Date 2020/06 Technical Support If a problem arises with your product and no ...solution can be trademarks of purchase or local distributor. Preface Copyright and Trademarks Notice Copyright © Micro-Star Int'l Co., Ltd. All other marks and names mentioned may be obtained from the user's manual, please contact your place of their respective owners. The MSI logo used...
MSI reserves the right to make changes to accuracy or completeness is a registered trademark of Micro-Star Int'l Co., Ltd. Revision Revision V1.0 Date 2020/06 Technical Support If a problem arises with your product and no ...solution can be trademarks of purchase or local distributor. Preface Copyright and Trademarks Notice Copyright © Micro-Star Int'l Co., Ltd. All other marks and names mentioned may be obtained from the user's manual, please contact your place of their respective owners. The MSI logo used...
User Manual
Page 4
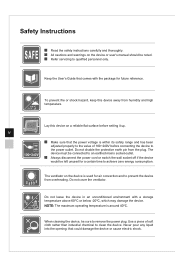
...; Always disconnect the power cord or switch the wall socket off if the device would be sure to achieve zero energy consumption. When cleaning the device, be left unused for future reference. Never pour any liquid into the opening; Do not cover the ventilator. iv ◙◙ Make sure that the power voltage is around 40OC. Use a piece of 100...
...; Always disconnect the power cord or switch the wall socket off if the device would be sure to achieve zero energy consumption. When cleaning the device, be left unused for future reference. Never pour any liquid into the opening; Do not cover the ventilator. iv ◙◙ Make sure that the power voltage is around 40OC. Use a piece of 100...
User Manual
Page 5
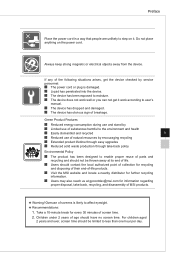
... . Children under 2 years of breakage. Green Product Features ◙◙ Reduced energy consumption during use and stand-by ◙◙ Limited use of substances harmful to the environment and health ◙◙ Easily dismantled and recycled v ◙◙ Reduced use of natural resources by service personnel: ◙◙ The power cord or plug is likely to affect eyesight. ★...
... . Children under 2 years of breakage. Green Product Features ◙◙ Reduced energy consumption during use and stand-by ◙◙ Limited use of substances harmful to the environment and health ◙◙ Easily dismantled and recycled v ◙◙ Reduced use of natural resources by service personnel: ◙◙ The power cord or plug is likely to affect eyesight. ★...

User Manual
Page 6
...Part 15 of the European Union. However, there is subject to comply with the emission limits. Notice 2 Shielded interface cables and AC power cord, if any, must accept any interference received, including interference that to which can radiate radio frequency energy and, if not installed and used in a residential installation. MSI...Industry, CA 91748, USA (626)913-0828 www.msi.com this device must be determined by the party responsible for help. Notice 1 The changes or modifications not expressly approved by turning the equipment off and on a circuit different from ...
...Part 15 of the European Union. However, there is subject to comply with the emission limits. Notice 2 Shielded interface cables and AC power cord, if any, must accept any interference received, including interference that to which can radiate radio frequency energy and, if not installed and used in a residential installation. MSI...Industry, CA 91748, USA (626)913-0828 www.msi.com this device must be determined by the party responsible for help. Notice 1 The changes or modifications not expressly approved by turning the equipment off and on a circuit different from ...

User Manual
Page 7
...msi.com/html/popup/csr/evmtprtt_pcm.html RoHS Statement Japan JIS C 0950 Material Declaration A Japanese regulatory requirement, defined by specification...for a number of the Rule. Vietnam RoHS As from December 1, 2012, all products manufactured by MSI comply with... chemical substances regulations, such as of December 3, 2008 № 1057, in terms of restrictions for the use of lead, mercury, hexavalent chromium, polybrominated biphenyls or polybrominated diphenyl ethers in concentrations exceeding 0.1 weight % and 0.01 weight % for cadmium, except for the exemptions set...
...msi.com/html/popup/csr/evmtprtt_pcm.html RoHS Statement Japan JIS C 0950 Material Declaration A Japanese regulatory requirement, defined by specification...for a number of the Rule. Vietnam RoHS As from December 1, 2012, all products manufactured by MSI comply with... chemical substances regulations, such as of December 3, 2008 № 1057, in terms of restrictions for the use of lead, mercury, hexavalent chromium, polybrominated biphenyls or polybrominated diphenyl ethers in concentrations exceeding 0.1 weight % and 0.01 weight % for cadmium, except for the exemptions set...
User Manual
Page 10
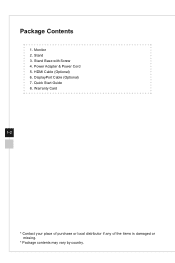
Monitor 2. Power Adapter & Power Cord 5. HDMI Cable (Optional) 6. DisplayPort Cable (Optional) 7. Warranty Card 1-2 * Contact your place of purchase or local distributor if any of the items is damaged or missing. * Package contents may vary by country. Stand Base with Screw 4. Quick Start Guide 8. Package Contents 1. Stand 3.
Monitor 2. Power Adapter & Power Cord 5. HDMI Cable (Optional) 6. DisplayPort Cable (Optional) 7. Warranty Card 1-2 * Contact your place of purchase or local distributor if any of the items is damaged or missing. * Package contents may vary by country. Stand Base with Screw 4. Quick Start Guide 8. Package Contents 1. Stand 3.
User Manual
Page 11
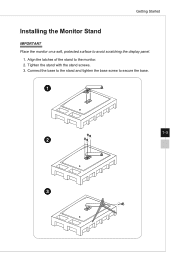
Tighten the stand with the stand screws. 3. Connect the base to the stand and tighten the base screw to avoid scratching the display panel. 1. Getting Started Installing the Monitor Stand IMPORTANT Place the monitor on a soft, protected surface to secure the base. 1 1-3 2 3 Align the latches of the stand to the monitor. 2.
Tighten the stand with the stand screws. 3. Connect the base to the stand and tighten the base screw to avoid scratching the display panel. 1. Getting Started Installing the Monitor Stand IMPORTANT Place the monitor on a soft, protected surface to secure the base. 1 1-3 2 3 Align the latches of the stand to the monitor. 2.
User Manual
Page 13
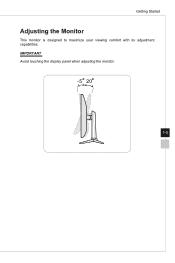
Getting Started Adjusting the Monitor This monitor is designed to maximize your viewing comfort with its adjustment capabilities. IMPORTANT Avoid touching the display panel when adjusting the monitor. -5 O 20O 1-5
Getting Started Adjusting the Monitor This monitor is designed to maximize your viewing comfort with its adjustment capabilities. IMPORTANT Avoid touching the display panel when adjusting the monitor. -5 O 20O 1-5
User Manual
Page 18
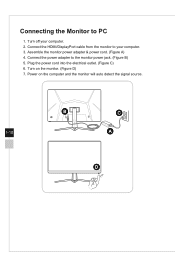
Turn off your computer. 3. Connect the power adapter to PC 1. Power on the monitor. (Figure D) 7. Connecting the Monitor to the monitor power jack. (Figure B) 5. Plug the power cord into the electrical outlet. (Figure C) 6. Turn on the computer and the monitor will auto detect the signal source. Connect the HDMI/DisplayPort cable from the monitor to your computer. 2. B C 1-10 A D Assemble the monitor power adapter & power cord. (Figure A) 4.
Turn off your computer. 3. Connect the power adapter to PC 1. Power on the monitor. (Figure D) 7. Connecting the Monitor to the monitor power jack. (Figure B) 5. Plug the power cord into the electrical outlet. (Figure C) 6. Turn on the computer and the monitor will auto detect the signal source. Connect the HDMI/DisplayPort cable from the monitor to your computer. 2. B C 1-10 A D Assemble the monitor power adapter & power cord. (Figure A) 4.

User Manual
Page 20
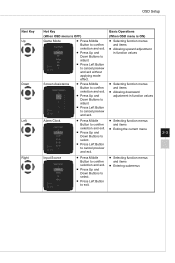
Navi Key 2-2 The Navi Key default settings are as follows. Navi Key The monitor comes with a Navi Key, a multi-directional control that helps navigate the On-Screen Display (OSD) menu. Navi Key Middle Button Hot Key (When OSD menu is OFF) OSD Main Menu Basic Operations (When OSD menu is ON) ■■ Entering submenus ■■ Confirming a selection or setting
Navi Key 2-2 The Navi Key default settings are as follows. Navi Key The monitor comes with a Navi Key, a multi-directional control that helps navigate the On-Screen Display (OSD) menu. Navi Key Middle Button Hot Key (When OSD menu is OFF) OSD Main Menu Basic Operations (When OSD menu is ON) ■■ Entering submenus ■■ Confirming a selection or setting
User Manual
Page 21
Right Input Source ■■ Press Middle Button to confirm selection and exit. ■■ Press Up and Down Buttons to select. ■■ Press Left Button to cancel preview and exit. Screen Assistance ■■ Press Middle Button to confirm selection and exit. ■■ Press Up and Down Buttons to adjust. ■■ Press Left Button to exit. ■...
Right Input Source ■■ Press Middle Button to confirm selection and exit. ■■ Press Up and Down Buttons to select. ■■ Press Left Button to cancel preview and exit. Screen Assistance ■■ Press Middle Button to confirm selection and exit. ■■ Press Up and Down Buttons to adjust. ■■ Press Left Button to exit. ■...
User Manual
Page 22
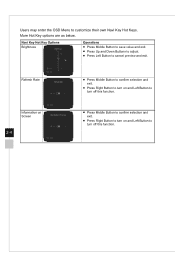
... and exit. ■■ Press Right Button to turn off this function. More Hot Key options are as below. Refresh Rate Information on Screen 2-4 ■■ Press Middle Button to confirm selection and exit. ■■ Press Right Button to turn on and Left Button to cancel preview and exit. Users may enter the OSD Menu to customize their own Navi Key...
... and exit. ■■ Press Right Button to turn off this function. More Hot Key options are as below. Refresh Rate Information on Screen 2-4 ■■ Press Middle Button to confirm selection and exit. ■■ Press Right Button to turn on and Left Button to cancel preview and exit. Users may enter the OSD Menu to customize their own Navi Key...
User Manual
Page 23
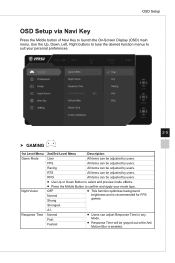
...;■ This function optimizes background brightness and is enabled. Normal Fast Fastest ■■ Users can be adjusted by users. RTS All items can adjust Response Time in any Mode. ■■ Response Time will be adjusted by users. Strongest A.I. Use the Up, Down, Left, Right buttons to tune the desired function menus to launch the On-Screen Display (OSD) main menu. FPS All items...
...;■ This function optimizes background brightness and is enabled. Normal Fast Fastest ■■ Users can be adjusted by users. RTS All items can adjust Response Time in any Mode. ■■ Response Time will be adjusted by users. Strongest A.I. Use the Up, Down, Left, Right buttons to tune the desired function menus to launch the On-Screen Display (OSD) main menu. FPS All items...
User Manual
Page 24
... Mode. ■■ Screen Assistance default is None. Position Reset FreeSync (OFF) (ON) ■■ FreeSync prevents screen tearing ■■ DisplayPort or HDMI default is ON and can adjust Screen Assistance in any Mode. Alarm Clock Location OFF Left Top ■■ Users can adjust Refresh Rate in OSD Menu. Refresh Rate Location OFF ON Left Top ■■ Users can adjust Alarm Clock in any mode, any resolution, any input source and any Mode...
... Mode. ■■ Screen Assistance default is None. Position Reset FreeSync (OFF) (ON) ■■ FreeSync prevents screen tearing ■■ DisplayPort or HDMI default is ON and can adjust Screen Assistance in any Mode. Alarm Clock Location OFF Left Top ■■ Users can adjust Refresh Rate in OSD Menu. Refresh Rate Location OFF ON Left Top ■■ Users can adjust Alarm Clock in any mode, any resolution, any input source and any Mode...

User Manual
Page 25
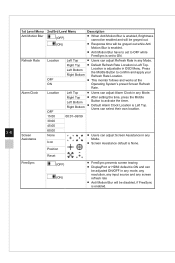
... Saver adjusts the screen color temperature to ON. Image Enhancement OFF Weak Medium Strong Strongest ■■ Image Enhancement enhances image edges to improve their acutance. ■■ Users can adjust Eye Saver in any Mode. ■■ When Pro Mode is set to a more yellow glow. ■■ Users can adjust Image Enhancement in any Mode. OSD Setup hh Professional 1st Level Menu 2nd Level Menu Description Pro Mode User Default mode...
... Saver adjusts the screen color temperature to ON. Image Enhancement OFF Weak Medium Strong Strongest ■■ Image Enhancement enhances image edges to improve their acutance. ■■ Users can adjust Eye Saver in any Mode. ■■ When Pro Mode is set to a more yellow glow. ■■ Users can adjust Image Enhancement in any Mode. OSD Setup hh Professional 1st Level Menu 2nd Level Menu Description Pro Mode User Default mode...
User Manual
Page 26
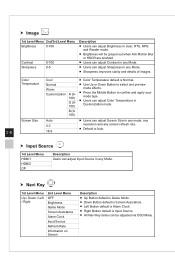
... adjust Screen Size in any mode, any resolution and any screen refresh rate. ■■ Default is Normal. ■■ Use Up or Down Button to select and preview mode effects. ■■ Press the Middle Button to confirm and apply your mode type. ■■ Users can adjust Input Source in any Mode. ■■ Sharpness improves clarity and details of images. hh Image 1st Level Menu 2nd/3rd Level Menu Brightness 0-100 Contrast...
... adjust Screen Size in any mode, any resolution and any screen refresh rate. ■■ Default is Normal. ■■ Use Up or Down Button to select and preview mode effects. ■■ Press the Middle Button to confirm and apply your mode type. ■■ Users can adjust Input Source in any Mode. ■■ Sharpness improves clarity and details of images. hh Image 1st Level Menu 2nd/3rd Level Menu Brightness 0-100 Contrast...

User Manual
Page 27
Standby When set to Standby, users can press power button to confirm and apply the Language setting. ■■ Language is an independent setting. Default is English. OSD Time Out Power Button 5~30s OFF Users can adjust Transparency in any Mode. 2-9 When set Reset to close monitor. When users set to OFF, users can press power button to Yes, Language will be changed. 한국어 日本語 Português 简体中文 ไท...
Standby When set to Standby, users can press power button to confirm and apply the Language setting. ■■ Language is an independent setting. Default is English. OSD Time Out Power Button 5~30s OFF Users can adjust Transparency in any Mode. 2-9 When set Reset to close monitor. When users set to OFF, users can press power button to Yes, Language will be changed. 한국어 日本語 Português 简体中文 ไท...

User Manual
Page 30
Specifications Model Size Curvature Panel Type Resolution A-2 Aspect Ratio Brightness (nits) Contrast Ratio Refresh Rate Response Time Input Interface I/O View Angles DCI-P3/ sRGB Surface Treatment Display Colors Power Type Adapter Model Power Input Power Output Adjustment (Tilt) Kensington Lock VESA Mounting Dimension (W x H x D) Optix G24C4 (3BA0) Optix G27C4 G27C5 (3CA9) Optix G32C4 (3DA6) Optix G27CQ4 (3CB0) Optix G32CQ4 (3DB5) 24 inch 27 inch 32 inch 27 inch 32 inch 1500R VA 1920 x 1080 @144Hz 1920 x 1080 @165Hz 2560 x 1440 @165Hz 16:9 250 (max) 3000:1 144Hz 165Hz...
Specifications Model Size Curvature Panel Type Resolution A-2 Aspect Ratio Brightness (nits) Contrast Ratio Refresh Rate Response Time Input Interface I/O View Angles DCI-P3/ sRGB Surface Treatment Display Colors Power Type Adapter Model Power Input Power Output Adjustment (Tilt) Kensington Lock VESA Mounting Dimension (W x H x D) Optix G24C4 (3BA0) Optix G27C4 G27C5 (3CA9) Optix G32C4 (3DA6) Optix G27CQ4 (3CB0) Optix G32CQ4 (3DB5) 24 inch 27 inch 32 inch 27 inch 32 inch 1500R VA 1920 x 1080 @144Hz 1920 x 1080 @165Hz 2560 x 1440 @165Hz 16:9 250 (max) 3000:1 144Hz 165Hz...

User Manual
Page 33
... screen are Plug & Play compatible. No image. ■■ Check if the computer graphics card is properly installed. ■■ Check if the computer and monitor are turned on the signal cable connector. The monitor starts flickering or shows waves. ■■ Change the refresh rate to display. The screen image is properly connected. ■■ The computer may cause electromagnetic interference (EMI). Press any video extension cables. ■■ Adjust brightness and contrast. ■■ Adjust RGB color or tune color...
... screen are Plug & Play compatible. No image. ■■ Check if the computer graphics card is properly installed. ■■ Check if the computer and monitor are turned on the signal cable connector. The monitor starts flickering or shows waves. ■■ Change the refresh rate to display. The screen image is properly connected. ■■ The computer may cause electromagnetic interference (EMI). Press any video extension cables. ■■ Adjust brightness and contrast. ■■ Adjust RGB color or tune color...
