User Manual
Page 2
Contents Copyright and Trademarks Notice iii Revision iii Technical Support iii Safety Instructions iv CE Conformity vi FCC-B Radio Frequency Interference Statement vi WEEE Statement vii Chemical Substances Information vii RoHS Statement vii Getting Started 1-1 Package Contents 1-2 Installing the Monitor Stand 1-3 Adjusting the Monitor 1-4 Monitor Overview 1-5 Connecting the Monitor to PC 1-8 OSD Setup 2-1 ii Navi Key 2-2 OSD Setup via Navi Key 2-5 Appendix A-1 Specifications A-2 Preset Display Modes A-3 Troubleshooting A-4
Contents Copyright and Trademarks Notice iii Revision iii Technical Support iii Safety Instructions iv CE Conformity vi FCC-B Radio Frequency Interference Statement vi WEEE Statement vii Chemical Substances Information vii RoHS Statement vii Getting Started 1-1 Package Contents 1-2 Installing the Monitor Stand 1-3 Adjusting the Monitor 1-4 Monitor Overview 1-5 Connecting the Monitor to PC 1-8 OSD Setup 2-1 ii Navi Key 2-2 OSD Setup via Navi Key 2-5 Appendix A-1 Specifications A-2 Preset Display Modes A-3 Troubleshooting A-4
User Manual
Page 3
... may be obtained from the user's manual, please contact your place of purchase or local distributor. Alternatively, please visit https://www.msi.com/support/ for further guidance. No warranty as to this document without prior notice. MSI reserves the right to make changes to accuracy or completeness is a registered trademark of their respective owners. Revision Revision V1.1 Date...
... may be obtained from the user's manual, please contact your place of purchase or local distributor. Alternatively, please visit https://www.msi.com/support/ for further guidance. No warranty as to this document without prior notice. MSI reserves the right to make changes to accuracy or completeness is a registered trademark of their respective owners. Revision Revision V1.1 Date...
User Manual
Page 4
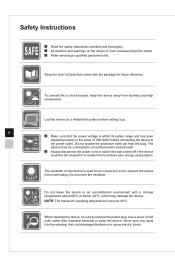
...clean the device. Keep the User's Guide that could damage the device or cause electric shock. To prevent fire or shock hazard, keep this device on a reliable flat surface before connecting the device to the power outlet. Do not cover the ventilator. Use a piece of 100~240V before setting it up. Lay this device away from the plug. iv ◙◙ Make... cleaning the device, be noted. ◙◙ Refer servicing to qualified personnel only. The device must be connected to an earthed mains socket-outlet. ◙◙ Always disconnect the power cord or switch the wall socket...
...clean the device. Keep the User's Guide that could damage the device or cause electric shock. To prevent fire or shock hazard, keep this device on a reliable flat surface before connecting the device to the power outlet. Do not cover the ventilator. Use a piece of 100~240V before setting it up. Lay this device away from the plug. iv ◙◙ Make... cleaning the device, be noted. ◙◙ Refer servicing to qualified personnel only. The device must be connected to an earthed mains socket-outlet. ◙◙ Always disconnect the power cord or switch the wall socket...

User Manual
Page 5
... dismantled and recycled ◙◙ Reduced use of natural resources by encouraging recycling v ◙◙ Extended product lifetime through easy upgrades ◙◙ Reduced solid waste production through take -back, recycling, and disassembly of the following situations arises, get the device checked by service personnel: ◙◙ The power cord or plug is likely to affect eyesight. ★...
... dismantled and recycled ◙◙ Reduced use of natural resources by encouraging recycling v ◙◙ Extended product lifetime through easy upgrades ◙◙ Reduced solid waste production through take -back, recycling, and disassembly of the following situations arises, get the device checked by service personnel: ◙◙ The power cord or plug is likely to affect eyesight. ★...
User Manual
Page 6
... relating to Part 15 of the European Union. This equipment generates, uses and can be used in accordance with the instruction manual, may not cause harmful interference, and 2. CE Conformity This device complies with the requirements set out in the Council Directive on , the user is encouraged ...frequency energy and, if not installed and used in order to comply with Part 15 of Industry, CA 91748, USA (626)913-0828 www.msi.com this device may cause harmful interference to radio communications. MSI Computer Corp. 901 Canada Court, City of the FCC Rules. Notice 1 The changes...
... relating to Part 15 of the European Union. This equipment generates, uses and can be used in accordance with the instruction manual, may not cause harmful interference, and 2. CE Conformity This device complies with the requirements set out in the Council Directive on , the user is encouraged ...frequency energy and, if not installed and used in order to comply with Part 15 of Industry, CA 91748, USA (626)913-0828 www.msi.com this device may cause harmful interference to radio communications. MSI Computer Corp. 901 Canada Court, City of the FCC Rules. Notice 1 The changes...

User Manual
Page 7
...://tw.msi.com/html/popup/csr_tw/cemm_jp.html vii India RoHS This product complies with Circular 30/2011/TT-BCT temporarily regulating the permitted limits for certain categories of their useful life. Vietnam RoHS As from December 1, 2012, all products manufactured by specification JIS C 0950, mandates that manufacturers provide material declarations for a number of...
...://tw.msi.com/html/popup/csr_tw/cemm_jp.html vii India RoHS This product complies with Circular 30/2011/TT-BCT temporarily regulating the permitted limits for certain categories of their useful life. Vietnam RoHS As from December 1, 2012, all products manufactured by specification JIS C 0950, mandates that manufacturers provide material declarations for a number of...

User Manual
Page 10
Stand Base with Screw 4. Monitor 2. Package Contents 1. Stand 3. Cord Sleeve 5. HDMI Cable (Optional) 7. USB Upstream Cable (For Optix MAG271VCR only) * Contact your place of purchase or local distributor if any of the items is damaged or missing. * Package contents may vary by country. 1-2 DisplayPort Cable (Optional) 8. Power Adapter & Power Cord 6.
Stand Base with Screw 4. Monitor 2. Package Contents 1. Stand 3. Cord Sleeve 5. HDMI Cable (Optional) 7. USB Upstream Cable (For Optix MAG271VCR only) * Contact your place of purchase or local distributor if any of the items is damaged or missing. * Package contents may vary by country. 1-2 DisplayPort Cable (Optional) 8. Power Adapter & Power Cord 6.

User Manual
Page 11
Align the latches of the stand to the monitor, a click sound will be also used for proper wall mount kit. When the stand is secured to the monitor. Place the cord sleeve to avoid scratching the display panel. 1. IMPORTANT The holes for installing the stand can be heard. 2. Please contact your dealer for wall mount. Getting Started Installing the Monitor Stand IMPORTANT Place the monitor on a soft, protected surface to the stand. 1 1-3 2 3 4. Connect the base to the stand and tighten the base screw to secure the base. 3.
Align the latches of the stand to the monitor, a click sound will be also used for proper wall mount kit. When the stand is secured to the monitor. Place the cord sleeve to avoid scratching the display panel. 1. IMPORTANT The holes for installing the stand can be heard. 2. Please contact your dealer for wall mount. Getting Started Installing the Monitor Stand IMPORTANT Place the monitor on a soft, protected surface to the stand. 1 1-3 2 3 4. Connect the base to the stand and tighten the base screw to secure the base. 3.

User Manual
Page 12
Adjusting the Monitor This monitor is designed to maximize your viewing comfort with its adjustment capabilities. -5 O 18O 62mm O O -30~30 1-4 IMPORTANT Avoid touching the display panel when adjusting the monitor.
Adjusting the Monitor This monitor is designed to maximize your viewing comfort with its adjustment capabilities. -5 O 18O 62mm O O -30~30 1-4 IMPORTANT Avoid touching the display panel when adjusting the monitor.
User Manual
Page 15
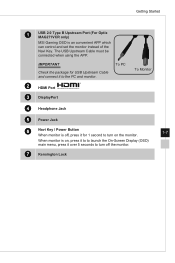
...-Screen Display (OSD) main menu, press it to turn off , press it for USB Upstream Cable and connect it over 5 seconds to the PC and monitor. The USB Upstream Cable must be connected when using the APP. To PC To Monitor 2 HDMI Port 3 DisplayPort 4 Headphone Jack 5 Power Jack 6 Navi Key / Power Button When monitor is an convenient APP which can control and set the monitor instead of the Navi Key. Getting Started 1 USB 2.0 Type B Upstream Port...
...-Screen Display (OSD) main menu, press it to turn off , press it for USB Upstream Cable and connect it over 5 seconds to the PC and monitor. The USB Upstream Cable must be connected when using the APP. To PC To Monitor 2 HDMI Port 3 DisplayPort 4 Headphone Jack 5 Power Jack 6 Navi Key / Power Button When monitor is an convenient APP which can control and set the monitor instead of the Navi Key. Getting Started 1 USB 2.0 Type B Upstream Port...

User Manual
Page 16
Connect the power adapter to your computer. 2. Connect the HDMI/DisplayPort cable from the monitor to the monitor power jack.(Figure B) 5. D C 1-8 B A Connecting the Monitor to PC 1. Turn on the computer then monitor will auto detect signal source. Plug the power cord into the electrical outlet.(Figure C) 6. Power on the monitor.(Figure D) 7. Assemble the monitor power adapter & power cord.(Figure A) 4. Turn off your computer. 3.
Connect the power adapter to your computer. 2. Connect the HDMI/DisplayPort cable from the monitor to the monitor power jack.(Figure B) 5. D C 1-8 B A Connecting the Monitor to PC 1. Turn on the computer then monitor will auto detect signal source. Plug the power cord into the electrical outlet.(Figure C) 6. Power on the monitor.(Figure D) 7. Assemble the monitor power adapter & power cord.(Figure A) 4. Turn off your computer. 3.

User Manual
Page 20
Refresh Rate Information on Screen 2-4 ■■ Press Middle Button to confirm selection and exit. ■■ Press Right Button to turn on and Left Button to turn off this function. Navi Key Hot Key Options Brightness Operations ■■ Press Middle Button to save value and exit. ■■ Press Up and Down Buttons to adjust. ■■ Press Left Button to turn off this...
Refresh Rate Information on Screen 2-4 ■■ Press Middle Button to confirm selection and exit. ■■ Press Right Button to turn on and Left Button to turn off this function. Navi Key Hot Key Options Brightness Operations ■■ Press Middle Button to save value and exit. ■■ Press Up and Down Buttons to adjust. ■■ Press Left Button to turn off this...
User Manual
Page 21
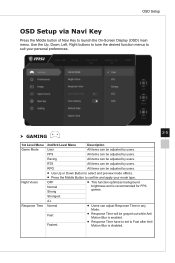
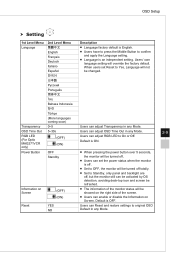
...;■ Response Time have to set to suit your mode type. RTS All items can be adjusted by users. Normal ■■ Users can be adjusted by users. Racing All items can adjust Response Time in any Mode. OFF Normal Strong ■■ This function optimizes background brightness and is disabled. OSD Setup OSD Setup via Navi Key Press the Middle button of Navi Key to confirm...
...;■ Response Time have to set to suit your mode type. RTS All items can be adjusted by users. Normal ■■ Users can be adjusted by users. Racing All items can adjust Response Time in any Mode. OFF Normal Strong ■■ This function optimizes background brightness and is disabled. OSD Setup OSD Setup via Navi Key Press the Middle button of Navi Key to confirm...

User Manual
Page 22
... Middle Button to ON. Position Reset Adaptive Sync (OFF) (ON) ■■ Adaptive Sync prevents screen tearing ■■ DisplayPort or HDMI default is ON and can adjust this item in any mode, any resolution, any input source and any Mode. ■■ Screen Assistance default is None. Zero Latency (OFF) (ON) ■■ Users can be adjusted ON/OFF in any mode , any input source , any resolution and any screen refresh rate. ■■ While Adaptive Sync is...
... Middle Button to ON. Position Reset Adaptive Sync (OFF) (ON) ■■ Adaptive Sync prevents screen tearing ■■ DisplayPort or HDMI default is ON and can adjust this item in any mode, any resolution, any input source and any Mode. ■■ Screen Assistance default is None. Zero Latency (OFF) (ON) ■■ Users can be adjusted ON/OFF in any mode , any input source , any resolution and any screen refresh rate. ■■ While Adaptive Sync is...
User Manual
Page 23
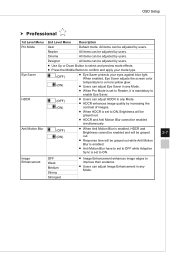
... All items can be adjusted by increasing the contrast of images. ■■ When HDCR is set to ON, Brightness will be grayed out while Anti Motion Blur is enabled. ■■ Anti Motion Blur have to set to confirm and apply your eyes against blue light. OSD Setup hh Professional 1st Level Menu 2nd Level Menu Pro Mode User Description Default mode. Reader All items...
... All items can be adjusted by increasing the contrast of images. ■■ When HDCR is set to ON, Brightness will be grayed out while Anti Motion Blur is enabled. ■■ Anti Motion Blur have to set to confirm and apply your eyes against blue light. OSD Setup hh Professional 1st Level Menu 2nd Level Menu Pro Mode User Description Default mode. Reader All items...

User Manual
Page 24
...; Color Temperature default is Auto. 1st Level Menu HDMI1 HDMI2 DP 2nd/3rd Level Menu Description Users can adjust Input Source in Customization mode. hh Image 1st Level Menu 2nd/3rd Level Menu Brightness 0-100 Contrast Sharpness 0-100 0-5 Description ■■ Users can adjust Brightness in User, RTS, RPG and Reader mode. ■■ Brightness will be adjusted via OSD Menu. Screen Size Auto 4:3 16:9 2-8 hh Input Source ■■ Users can adjust Screen Size in any mode, any resolution and any screen refresh rate. ■■ Default is...
...; Color Temperature default is Auto. 1st Level Menu HDMI1 HDMI2 DP 2nd/3rd Level Menu Description Users can adjust Input Source in Customization mode. hh Image 1st Level Menu 2nd/3rd Level Menu Brightness 0-100 Contrast Sharpness 0-100 0-5 Description ■■ Users can adjust Brightness in User, RTS, RPG and Reader mode. ■■ Brightness will be adjusted via OSD Menu. Screen Size Auto 4:3 16:9 2-8 hh Input Source ■■ Users can adjust Screen Size in any mode, any resolution and any screen refresh rate. ■■ Default is...
User Manual
Page 25
... of the monitor status will override the factory default. Users' own language setting will be turned off totally. ■■ Set to Standby, only panel and backlight are off, but the monitor still can adjust Transparency in any Mode. Reset YES NO Users can adjust RGB LED to original OSD Default in any Mode. OSD Time Out 5~30s Users can adjust OSD Time Out in any Mode. 2-9 RGB LED (For Optix MAG271VCR (OFF) (ON) Users can Reset and restore settings to On...
... of the monitor status will override the factory default. Users' own language setting will be turned off totally. ■■ Set to Standby, only panel and backlight are off, but the monitor still can adjust Transparency in any Mode. Reset YES NO Users can adjust RGB LED to original OSD Default in any Mode. OSD Time Out 5~30s Users can adjust OSD Time Out in any Mode. 2-9 RGB LED (For Optix MAG271VCR (OFF) (ON) Users can Reset and restore settings to On...
User Manual
Page 28
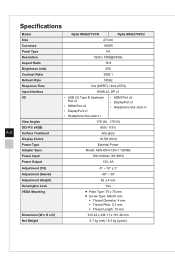
... x 75 mm ■■ Screw Type: M4x10 mm ▶▶ Thread Diameter: 4 mm ▶▶ Thread Pitch: 0.7 mm ▶▶ Thread Length: 10 mm 612.24 x 434.11 x 181.40 mm 5.7 kg (net) / 8.3 kg (gross) A-2 Specifications Model Size Curvature Panel Type Resolution Aspect Ratio Brightness (nits) Contrast Ratio Refresh Rate Response Time Input Interface I/O View Angles DCI-P3/ sRGB Surface Treatment Display Colors Power Type Adapter Spec.
... x 75 mm ■■ Screw Type: M4x10 mm ▶▶ Thread Diameter: 4 mm ▶▶ Thread Pitch: 0.7 mm ▶▶ Thread Length: 10 mm 612.24 x 434.11 x 181.40 mm 5.7 kg (net) / 8.3 kg (gross) A-2 Specifications Model Size Curvature Panel Type Resolution Aspect Ratio Brightness (nits) Contrast Ratio Refresh Rate Response Time Input Interface I/O View Angles DCI-P3/ sRGB Surface Treatment Display Colors Power Type Adapter Spec.

User Manual
Page 29
Appendix Model Environment Operating Storage Optix MAG271VCR Optix MAG270VC2 Temperature: 0°C to 40°C Humidity: 20% to 80%, non-condensing Altitude: 0 ~ 2000m Temperature: -20°C to 50°C Humidity: 10% to 90%, non-condensing Altitude: 0 ~ 5000m Preset Display Modes Standard Resolution VGA Dos-Mode SVGA XGA SXGA WXGA+ WSXGA+ Full HD Video Timing Resolution 640x480 @60Hz 640x480 @72Hz 640x480 @75Hz 720x480 @60Hz...
Appendix Model Environment Operating Storage Optix MAG271VCR Optix MAG270VC2 Temperature: 0°C to 40°C Humidity: 20% to 80%, non-condensing Altitude: 0 ~ 2000m Temperature: -20°C to 50°C Humidity: 10% to 90%, non-condensing Altitude: 0 ~ 5000m Preset Display Modes Standard Resolution VGA Dos-Mode SVGA XGA SXGA WXGA+ WSXGA+ Full HD Video Timing Resolution 640x480 @60Hz 640x480 @72Hz 640x480 @75Hz 720x480 @60Hz...
User Manual
Page 30
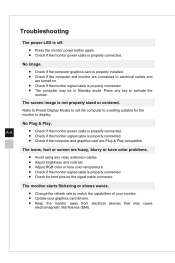
... monitor to electrical outlets and are turned on the signal cable connector. Refer to Preset Display Modes to set the computer to a setting suitable for bent pins on . ■■ Check if the monitor signal cable is not properly sized or centered. The monitor starts flickering or shows waves. ■■ Change the refresh rate to activate the monitor. The icons, font or screen are fuzzy, blurry or have color problems. ■■ Avoid using...
... monitor to electrical outlets and are turned on the signal cable connector. Refer to Preset Display Modes to set the computer to a setting suitable for bent pins on . ■■ Check if the monitor signal cable is not properly sized or centered. The monitor starts flickering or shows waves. ■■ Change the refresh rate to activate the monitor. The icons, font or screen are fuzzy, blurry or have color problems. ■■ Avoid using...
