User Manual
Page 2
Contents Getting Started...3 Package Contents...3 Installing the Monitor Stand 4 Adjusting the Monitor 6 Monitor Overview...7 Connecting the Monitor to PC 9 OSD Setup...10 Navi Key...10 Hot Key...10 OSD Menus...11 Gaming...11 Professional...13 Image...14 Input Source...15 Navi Key...15 Setting...16 Specifications...17 Preset Display Modes 19 Troubleshooting...20 Safety Instructions...21 TÜV Rheinland Certification 22 Regulatory Notices...23 Revision V1.0, 2020/12 2 Contents
Contents Getting Started...3 Package Contents...3 Installing the Monitor Stand 4 Adjusting the Monitor 6 Monitor Overview...7 Connecting the Monitor to PC 9 OSD Setup...10 Navi Key...10 Hot Key...10 OSD Menus...11 Gaming...11 Professional...13 Image...14 Input Source...15 Navi Key...15 Setting...16 Specifications...17 Preset Display Modes 19 Troubleshooting...20 Safety Instructions...21 TÜV Rheinland Certification 22 Regulatory Notices...23 Revision V1.0, 2020/12 2 Contents
User Manual
Page 3
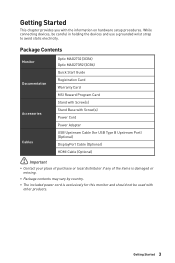
... by country. ∙∙The included power cord is exclusively for this monitor and should not be careful in holding the devices and use a grounded wrist strap to avoid static electricity. Package Contents Monitor Optix MAG2732(3CB6) Optix MAG273R2(3CB6) Quick Start Guide Documentation Registration Card Warranty Card MSI Reward Program Card Stand with Screw(s) Accessories Stand Base with the information on hardware setup procedures. Getting...
... by country. ∙∙The included power cord is exclusively for this monitor and should not be careful in holding the devices and use a grounded wrist strap to avoid static electricity. Package Contents Monitor Optix MAG2732(3CB6) Optix MAG273R2(3CB6) Quick Start Guide Documentation Registration Card Warranty Card MSI Reward Program Card Stand with Screw(s) Accessories Stand Base with the information on hardware setup procedures. Getting...
User Manual
Page 4
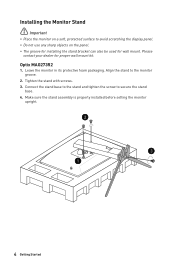
... dealer for wall mount. Tighten the stand with screws. 3. Make sure the stand assembly is properly installed before setting the monitor upright. 2 3 1 4 Getting Started Optix MAG273R2 1. Connect the stand base to the stand and tighten the screw to avoid scratching the display panel. ∙∙Do not use any sharp objects on a soft, protected surface to secure the stand base. 4. Installing the Monitor Stand ⚠⚠Important ∙∙Place the monitor on the panel. ∙∙...
... dealer for wall mount. Tighten the stand with screws. 3. Make sure the stand assembly is properly installed before setting the monitor upright. 2 3 1 4 Getting Started Optix MAG273R2 1. Connect the stand base to the stand and tighten the screw to avoid scratching the display panel. ∙∙Do not use any sharp objects on a soft, protected surface to secure the stand base. 4. Installing the Monitor Stand ⚠⚠Important ∙∙Place the monitor on the panel. ∙∙...

User Manual
Page 5
Tighten the stand with screws. 3. Align the stand to secure the stand base. 4. Leave the monitor in place. 2 3 1 4 Getting Started 5 Optix MAG2732 1. Connect the stand base to the stand and tighten the screw to the monitor groove. 2. Align and push the stand cover towards the monitor groove until it locks in its protective foam packaging.
Tighten the stand with screws. 3. Align the stand to secure the stand base. 4. Leave the monitor in place. 2 3 1 4 Getting Started 5 Optix MAG2732 1. Connect the stand base to the stand and tighten the screw to the monitor groove. 2. Align and push the stand cover towards the monitor groove until it locks in its protective foam packaging.

User Manual
Page 6
Adjusting the Monitor This monitor is designed to maximize your viewing comfort with its adjustment capabilities. ⚠⚠Important ∙∙Avoid touching the display panel when adjusting the monitor. Optix MAG2732 -5 O 20O Optix MAG273R2 -5 O 20O 130mm 6 Getting Started
Adjusting the Monitor This monitor is designed to maximize your viewing comfort with its adjustment capabilities. ⚠⚠Important ∙∙Avoid touching the display panel when adjusting the monitor. Optix MAG2732 -5 O 20O Optix MAG273R2 -5 O 20O 130mm 6 Getting Started

User Manual
Page 8
Once this cable is connected, the USB Type A Downstream Ports on the monitor will be ready for USB Upstream Cable and connect it to the PC and monitor. 1 Power Button 2 Navi Key 3 Cable Routing Hole 4 Macro Key To activate OSD Application. 5 Kensington Lock 6 Power Jack 7 USB 2.0 Type-B Upstream Port For USB Upstream Cable. ⚠⚠Important Check the package for use. 8 USB 2.0 Type A Port 9 DisplayPort 10 HDMI 2.0 Port 11 Headphone Jack To Monitor To PC 8 Getting Started
Once this cable is connected, the USB Type A Downstream Ports on the monitor will be ready for USB Upstream Cable and connect it to the PC and monitor. 1 Power Button 2 Navi Key 3 Cable Routing Hole 4 Macro Key To activate OSD Application. 5 Kensington Lock 6 Power Jack 7 USB 2.0 Type-B Upstream Port For USB Upstream Cable. ⚠⚠Important Check the package for use. 8 USB 2.0 Type A Port 9 DisplayPort 10 HDMI 2.0 Port 11 Headphone Jack To Monitor To PC 8 Getting Started

User Manual
Page 9
Turn off your computer. 3. Plug the power cord into the electrical outlet. (Figure C) 6. Power on the monitor. (Figure D) 7. Connect the video cable from the monitor to the monitor power jack. (Figure B) 5. Connect the power adapter to your computer. 2. Assemble the monitor power adapter & power cord. (Figure A) 4. Turn on the computer and the monitor will auto detect the signal source. B D C A Getting Started 9 Connecting the Monitor to PC 1.
Turn off your computer. 3. Plug the power cord into the electrical outlet. (Figure C) 6. Power on the monitor. (Figure D) 7. Connect the video cable from the monitor to the monitor power jack. (Figure B) 5. Connect the power adapter to your computer. 2. Assemble the monitor power adapter & power cord. (Figure A) 4. Turn on the computer and the monitor will auto detect the signal source. B D C A Getting Started 9 Connecting the Monitor to PC 1.
User Manual
Page 10
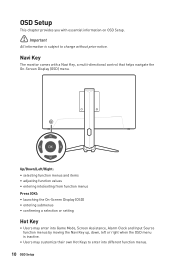
...-Screen Display (OSD) ∙∙entering submenus ∙∙confirming a selection or setting Hot Key ∙∙Users may customize their own Hot Keys to enter into Game Mode, Screen Assistance, Alarm Clock and Input Source function menus by moving the Navi Key up, down, left or right when the OSD menu is subject to change without prior notice. Navi Key The monitor...
...-Screen Display (OSD) ∙∙entering submenus ∙∙confirming a selection or setting Hot Key ∙∙Users may customize their own Hot Keys to enter into Game Mode, Screen Assistance, Alarm Clock and Input Source function menus by moving the Navi Key up, down, left or right when the OSD menu is subject to change without prior notice. Navi Key The monitor...

User Manual
Page 11
... OFF Normal Strong Strongest A.I. OSD Menus 11 Response Time Normal Fast Fastest Description ∙∙All items can be adjusted by users. ∙∙Use Up or Down Button to select and preview mode effects. ∙∙Press the OK Button to confirm and apply your mode type. ∙∙This function optimizes background brightness and is recommended for FPS...
... OFF Normal Strong Strongest A.I. OSD Menus 11 Response Time Normal Fast Fastest Description ∙∙All items can be adjusted by users. ∙∙Use Up or Down Button to select and preview mode effects. ∙∙Press the OK Button to confirm and apply your mode type. ∙∙This function optimizes background brightness and is recommended for FPS...
User Manual
Page 12
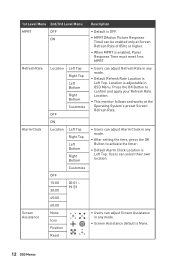
... None Icon Position Reset Description ∙∙Default is OFF. ∙∙MPRT (Motion Picture Response Time) can be enabled only at the Operating System's preset Screen Refresh Rate. ∙∙Users can adjust Alarm Clock in any mode. ∙∙After setting the time, press the OK Button to confirm and apply your Refresh Rate Location. ∙∙This monitor follows and works at Screen Refresh Rate of...
... None Icon Position Reset Description ∙∙Default is OFF. ∙∙MPRT (Motion Picture Response Time) can be enabled only at the Operating System's preset Screen Refresh Rate. ∙∙Users can adjust Alarm Clock in any mode. ∙∙After setting the time, press the OK Button to confirm and apply your Refresh Rate Location. ∙∙This monitor follows and works at Screen Refresh Rate of...

User Manual
Page 13
...;Default is OFF. ∙∙MPRT (Motion Picture Response Time) can be enabled only at Screen Refresh Rate of 85Hz or higher. ∙∙When MPRT is User. ∙∙All items can adjust HDCR in any mode, any resolution, any input source and any mode. ∙∙HDCR enhances image quality by increasing the contrast of images. ∙∙When HDCR is set to Anti-Blue...
...;Default is OFF. ∙∙MPRT (Motion Picture Response Time) can be enabled only at Screen Refresh Rate of 85Hz or higher. ∙∙When MPRT is User. ∙∙All items can adjust HDCR in any mode, any resolution, any input source and any mode. ∙∙HDCR enhances image quality by increasing the contrast of images. ∙∙When HDCR is set to Anti-Blue...

User Manual
Page 14
... OK Button to improve their acutance. ∙∙Users can adjust Screen Size in any screen refresh rate. ∙∙Default is Auto. 14 OSD Menus 1st Level Menu 2nd Level Menu Image Enhancement OFF Weak Medium Strong Strongest Description ∙∙Image Enhancement enhances image edges to confirm and apply your mode type. ∙∙Users can adjust Color Temperature in Customization mode. ∙∙Users can adjust Image Enhancement in any mode, any resolution...
... OK Button to improve their acutance. ∙∙Users can adjust Screen Size in any screen refresh rate. ∙∙Default is Auto. 14 OSD Menus 1st Level Menu 2nd Level Menu Image Enhancement OFF Weak Medium Strong Strongest Description ∙∙Image Enhancement enhances image edges to confirm and apply your mode type. ∙∙Users can adjust Color Temperature in Customization mode. ∙∙Users can adjust Image Enhancement in any mode, any resolution...
User Manual
Page 15
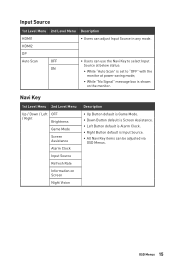
...;Right Button default is shown on the monitor. OSD Menus 15 Input Source 1st Level Menu 2nd Level Menu Description HDMI1 ∙∙Users can be adjusted via OSD Menus. HDMI2 DP Auto Scan OFF ON ∙∙Users can use the Navi Key to select Input Source at below status: • While "Auto Scan" is set to "OFF" with the monitor at power saving mode; • While "No Signal" message box is Input Source...
...;Right Button default is shown on the monitor. OSD Menus 15 Input Source 1st Level Menu 2nd Level Menu Description HDMI1 ∙∙Users can be adjusted via OSD Menus. HDMI2 DP Auto Scan OFF ON ∙∙Users can use the Navi Key to select Input Source at below status: • While "Auto Scan" is set to "OFF" with the monitor at power saving mode; • While "No Signal" message box is Input Source...
User Manual
Page 16
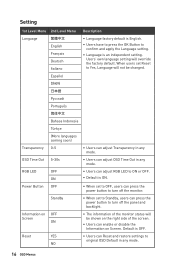
...;Users can press the power button to turn off the monitor. When users set Reset to confirm and apply the Language setting. ∙∙Language is an independent setting. Power Button OFF ∙∙When set to turn off the panel and backlight. OSD Time Out 5~30s ∙∙Users can adjust OSD Time Out in any mode. Setting 1st Level Menu 2nd Level Menu Description Language English Français Deutsch Italiano ∙∙Language factory default is English. ∙∙Users...
...;Users can press the power button to turn off the monitor. When users set Reset to confirm and apply the Language setting. ∙∙Language is an independent setting. Power Button OFF ∙∙When set to turn off the panel and backlight. OSD Time Out 5~30s ∙∙Users can adjust OSD Time Out in any mode. Setting 1st Level Menu 2nd Level Menu Description Language English Français Deutsch Italiano ∙∙Language factory default is English. ∙∙Users...
User Manual
Page 17
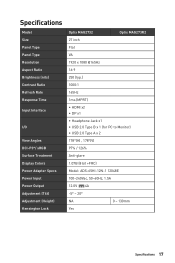
Specifications Model Size Panel Type Panel Type Resolution Aspect Ratio Brightness (nits) Contrast Ratio Refresh Rate Response Time Input Interface I/O View Angles DCI-P3*/ sRGB Surface Treatment Display Colors Power Adapter Specs Power Input Power Output Adjustment (Tilt) Adjustment (Height) Kensington Lock Optix MAG2732 Optix MAG273R2 27 inch Flat VA 1920 x 1080 @165Hz 16:9 250 (typ.) 1000:1 165Hz 1ms (MPRT) ∙∙HDMI x2 ∙∙DP x1 ∙∙Headphone Jack x1 ∙∙USB 2.0 Type B x 1 (for PC to Monitor) ∙∙USB 2.0 Type...
Specifications Model Size Panel Type Panel Type Resolution Aspect Ratio Brightness (nits) Contrast Ratio Refresh Rate Response Time Input Interface I/O View Angles DCI-P3*/ sRGB Surface Treatment Display Colors Power Adapter Specs Power Input Power Output Adjustment (Tilt) Adjustment (Height) Kensington Lock Optix MAG2732 Optix MAG273R2 27 inch Flat VA 1920 x 1080 @165Hz 16:9 250 (typ.) 1000:1 165Hz 1ms (MPRT) ∙∙HDMI x2 ∙∙DP x1 ∙∙Headphone Jack x1 ∙∙USB 2.0 Type B x 1 (for PC to Monitor) ∙∙USB 2.0 Type...
User Manual
Page 20
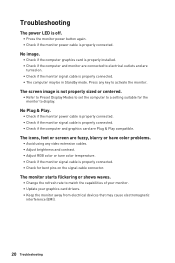
... Display Modes to set the computer to a setting suitable for bent pins on . • Check if the monitor signal cable is properly connected. • The computer may cause electromagnetic interference (EMI). 20 Troubleshooting No Plug & Play. • Check if the monitor power cable is properly connected. • Check if the monitor signal cable is properly connected. • Check if the computer and graphics card are turned on the signal cable connector. Press any video extension cables. • Adjust brightness and contrast. • Adjust RGB color...
... Display Modes to set the computer to a setting suitable for bent pins on . • Check if the monitor signal cable is properly connected. • The computer may cause electromagnetic interference (EMI). 20 Troubleshooting No Plug & Play. • Check if the monitor power cable is properly connected. • Check if the monitor signal cable is properly connected. • Check if the computer and graphics card are turned on the signal cable connector. Press any video extension cables. • Adjust brightness and contrast. • Adjust RGB color...
User Manual
Page 21
... hazard, keep this device away from humidity and high temperature. ∙∙Lay this device on a reliable flat surface before setting it up. ∙∙Make sure that the power voltage is within its safety range and has been adjusted properly to the value of 100~240V before connecting the device to remove the power plug. Safety Instructions 21 Do not cover the...
... hazard, keep this device away from humidity and high temperature. ∙∙Lay this device on a reliable flat surface before setting it up. ∙∙Make sure that the power voltage is within its safety range and has been adjusted properly to the value of 100~240V before connecting the device to remove the power plug. Safety Instructions 21 Do not cover the...
User Manual
Page 22
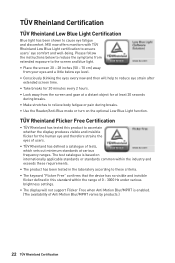
... not support Flicker Free when Anti Motion Blur/MPRT is enabled. (The availability of 0 - 3000 Hz under various brightness settings. ∙∙The display will help to ascertain whether the display produces visible and invisible flicker for at various frequency ranges. TÜV Rheinland Certification TÜV Rheinland Low Blue Light Certification Blue light has been shown to ensure users' eye comfort and well-being. Please follow the instructions...
... not support Flicker Free when Anti Motion Blur/MPRT is enabled. (The availability of 0 - 3000 Hz under various brightness settings. ∙∙The display will help to ascertain whether the display produces visible and invisible flicker for at various frequency ranges. TÜV Rheinland Certification TÜV Rheinland Low Blue Light Certification Blue light has been shown to ensure users' eye comfort and well-being. Please follow the instructions...
User Manual
Page 23
... user is encouraged to try to correct the interference by the party responsible for a Class B digital device, pursuant to comply with the instruction manual, may not cause harmful interference, and 2. If this equipment does cause harmful interference to radio or television reception, which can radiate radio frequency energy and, if not installed and used in a particular installation. FCC...
... user is encouraged to try to correct the interference by the party responsible for a Class B digital device, pursuant to comply with the instruction manual, may not cause harmful interference, and 2. If this equipment does cause harmful interference to radio or television reception, which can radiate radio frequency energy and, if not installed and used in a particular installation. FCC...
User Manual
Page 25
... rights reserved. The MSI logo used is likely to this document without prior notice. Recommendations: 1. No warranty as to less than one hour per day. Regulatory Notices 25 MSI reserves the right to make changes to affect eyesight. Alternatively, please visit https://www.msi.com/support/ for every 30 minutes of screen time. 2. Overuse of screens is a registered trademark...
... rights reserved. The MSI logo used is likely to this document without prior notice. Recommendations: 1. No warranty as to less than one hour per day. Regulatory Notices 25 MSI reserves the right to make changes to affect eyesight. Alternatively, please visit https://www.msi.com/support/ for every 30 minutes of screen time. 2. Overuse of screens is a registered trademark...