
User Manual
Page 2
Contents Copyright and Trademarks Notice iii Revision iii Technical Support iii Safety Instructions iv CE Conformity vi FCC-B Radio Frequency Interference Statement vi WEEE Statement vii Chemical Substances Information vii RoHS Statement vii Getting Started 1-1 Package Contents 1-2 Installing the Monitor Stand 1-3 Adjusting the Monitor 1-4 Monitor Overview 1-5 Connecting the Monitor to PC 1-7 OSD Setup 2-1 ii Navi Key 2-2 OSD Setup via Navi Key 2-5 Appendix A-1 Specifications A-2 Preset Display Modes A-4 Troubleshooting A-5
Contents Copyright and Trademarks Notice iii Revision iii Technical Support iii Safety Instructions iv CE Conformity vi FCC-B Radio Frequency Interference Statement vi WEEE Statement vii Chemical Substances Information vii RoHS Statement vii Getting Started 1-1 Package Contents 1-2 Installing the Monitor Stand 1-3 Adjusting the Monitor 1-4 Monitor Overview 1-5 Connecting the Monitor to PC 1-7 OSD Setup 2-1 ii Navi Key 2-2 OSD Setup via Navi Key 2-5 Appendix A-1 Specifications A-2 Preset Display Modes A-4 Troubleshooting A-5
User Manual
Page 3
...user's manual, please contact your product and no solution can be trademarks of purchase or local distributor. MSI reserves the right to make changes to accuracy or completeness is a registered trademark of Micro-Star Int'l Co., Ltd. Alternatively, please visit https://www.msi.com/support.../ for further guidance. All rights reserved. Revision Revision V1.0 Date 2020/07 Technical Support If a problem arises with your place of their respective owners. No warranty as to this document without prior notice. The MSI logo used is expressed or...
...user's manual, please contact your product and no solution can be trademarks of purchase or local distributor. MSI reserves the right to make changes to accuracy or completeness is a registered trademark of Micro-Star Int'l Co., Ltd. Alternatively, please visit https://www.msi.com/support.../ for further guidance. All rights reserved. Revision Revision V1.0 Date 2020/07 Technical Support If a problem arises with your place of their respective owners. No warranty as to this document without prior notice. The MSI logo used is expressed or...
User Manual
Page 4
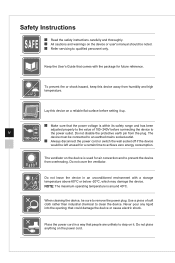
... up. ◙◙ Make sure that the power voltage is within its safety range and has been adjusted properly to the value of soft cloth rather than industrial chemical to iv the power outlet. To prevent fire or shock hazard, keep this device on a reliable flat surface before connecting the device to clean the device. The ventilator on the power cord.
... up. ◙◙ Make sure that the power voltage is within its safety range and has been adjusted properly to the value of soft cloth rather than industrial chemical to iv the power outlet. To prevent fire or shock hazard, keep this device on a reliable flat surface before connecting the device to clean the device. The ventilator on the power cord.
User Manual
Page 5
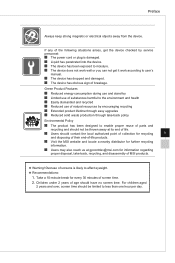
... it work according to less than one hour per day. Green Product Features ◙◙ Reduced energy consumption during use and stand-by ◙◙ Limited use of substances harmful to the environment and health ◙◙ Easily dismantled and recycled ◙◙ Reduced use of natural resources by service personnel: ◙◙ The power cord or plug is likely...
... it work according to less than one hour per day. Green Product Features ◙◙ Reduced energy consumption during use and stand-by ◙◙ Limited use of substances harmful to the environment and health ◙◙ Easily dismantled and recycled ◙◙ Reduced use of natural resources by service personnel: ◙◙ The power cord or plug is likely...
User Manual
Page 6
... cables and AC power cord, if any, must accept any interference received, including interference that interference will not occur in a particular installation. vi ■■ Increase the separation between the equipment and receiver. ■■ Connect ...used in accordance with the instruction manual, may not cause harmful interference, and 2. this device must be determined by the party responsible for a Class B digital device, pursuant to Part 15 of the European Union. This product has been tested and found to comply with the limits for compliance could void the user...
... cables and AC power cord, if any, must accept any interference received, including interference that interference will not occur in a particular installation. vi ■■ Increase the separation between the equipment and receiver. ■■ Connect ...used in accordance with the instruction manual, may not cause harmful interference, and 2. this device must be determined by the party responsible for a Class B digital device, pursuant to Part 15 of the European Union. This product has been tested and found to comply with the limits for compliance could void the user...

User Manual
Page 7
...; 1057, in terms of restrictions for the use of lead, mercury, hexavalent chromium, polybrominated biphenyls or polybrominated diphenyl ethers in concentrations exceeding 0.1 weight % and 0.01 weight % for cadmium, except for the exemptions set in Schedule 2 of the Rule. Preface WEEE...https://www.msi.com/html/popup/csr/evmtprtt_pcm.html RoHS Statement Japan JIS C 0950 Material Declaration A Japanese regulatory requirement, defined by specification JIS C 0950, mandates that manufacturers provide material declarations for certain categories of electronic products offered for a number of ...
...; 1057, in terms of restrictions for the use of lead, mercury, hexavalent chromium, polybrominated biphenyls or polybrominated diphenyl ethers in concentrations exceeding 0.1 weight % and 0.01 weight % for cadmium, except for the exemptions set in Schedule 2 of the Rule. Preface WEEE...https://www.msi.com/html/popup/csr/evmtprtt_pcm.html RoHS Statement Japan JIS C 0950 Material Declaration A Japanese regulatory requirement, defined by specification JIS C 0950, mandates that manufacturers provide material declarations for certain categories of electronic products offered for a number of ...

User Manual
Page 10
DisplayPort Cable (Optional) 8. Quick Start Guide 10. Stand 3. Power Adapter 5. VESA Cover Screws * Contact your place of purchase or local distributor if any of the items is damaged or missing. * Package contents may vary by country. 1-2 Package Contents 1. Power Cord 6. USB Upstream Cable (Optional) 9. HDMI Cable (Optional) 7. Warranty Card 11. Monitor 2. Stand Base with Screw 4.
DisplayPort Cable (Optional) 8. Quick Start Guide 10. Stand 3. Power Adapter 5. VESA Cover Screws * Contact your place of purchase or local distributor if any of the items is damaged or missing. * Package contents may vary by country. 1-2 Package Contents 1. Power Cord 6. USB Upstream Cable (Optional) 9. HDMI Cable (Optional) 7. Warranty Card 11. Monitor 2. Stand Base with Screw 4.

User Manual
Page 11
When the stand is secured to avoid scratching the display panel. • The holes for proper wall mount kit. 1 1-3 2 3 IMPORTANT • Place the monitor on a soft, protected surface to the monitor, a click sound will be also used for wall mount. Connect the base to the stand and tighten the base screw to the monitor and push it. 2. Please contact your dealer for installing the stand can be heard. 3. Getting Started Installing the Monitor Stand 1. Align the latch of the stand to secure the base.
When the stand is secured to avoid scratching the display panel. • The holes for proper wall mount kit. 1 1-3 2 3 IMPORTANT • Place the monitor on a soft, protected surface to the monitor, a click sound will be also used for wall mount. Connect the base to the stand and tighten the base screw to the monitor and push it. 2. Please contact your dealer for installing the stand can be heard. 3. Getting Started Installing the Monitor Stand 1. Align the latch of the stand to secure the base.

User Manual
Page 12
IMPORTANT • Avoid touching the display panel when adjusting the monitor. • Avoid scratching the monitor, please lift the monitor to the highest and tilt the monitor backward to maximize your viewing comfort with its adjustment capabilities. Adjusting the Monitor This monitor is designed to the maximum before pivoting. -5 O 20O 110mm 1-4 -30O~30O 90O 90O
IMPORTANT • Avoid touching the display panel when adjusting the monitor. • Avoid scratching the monitor, please lift the monitor to the highest and tilt the monitor backward to maximize your viewing comfort with its adjustment capabilities. Adjusting the Monitor This monitor is designed to the maximum before pivoting. -5 O 20O 110mm 1-4 -30O~30O 90O 90O
User Manual
Page 14
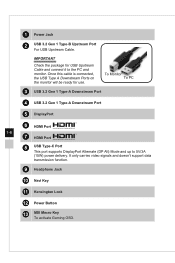
... video signals and doesn't support data transmission function. 9 Headphone Jack 10 Navi Key 11 Kensington Lock 12 Power Button 13 MSI Macro Key To activate Gaming OSD. 1 Power Jack 2 USB 3.2 Gen 1 Type-B Upstream Port For USB Upstream Cable. To Monitor To PC 3 USB 3.2 Gen 1 Type-A Downstream Port 4 USB 3.2 Gen 1 Type-A Downstream Port 5 DisplayPort 6 HDMI Port 1-6 7 HDMI Port 8 USB Type-C Port This port supports DisplayPort Alternate (DP Alt) Mode and up to the PC and monitor. Once this cable is connected...
... video signals and doesn't support data transmission function. 9 Headphone Jack 10 Navi Key 11 Kensington Lock 12 Power Button 13 MSI Macro Key To activate Gaming OSD. 1 Power Jack 2 USB 3.2 Gen 1 Type-B Upstream Port For USB Upstream Cable. To Monitor To PC 3 USB 3.2 Gen 1 Type-A Downstream Port 4 USB 3.2 Gen 1 Type-A Downstream Port 5 DisplayPort 6 HDMI Port 1-6 7 HDMI Port 8 USB Type-C Port This port supports DisplayPort Alternate (DP Alt) Mode and up to the PC and monitor. Once this cable is connected...

User Manual
Page 15
Connect the HDMI/ DisplayPort/ USB Type-C cable from the monitor to your computer. 2. B C 1-7 A D Getting Started Connecting the Monitor to the monitor power jack. (Figure B) 5. Power on the monitor. (Figure D) 7. Assemble the monitor power adapter & power cord. (Figure A) 4. Turn on the computer then monitor will auto detect signal source. Connect the power adapter to PC 1. Plug the power cord into the electrical outlet. (Figure C) 6. Turn off your computer. 3.
Connect the HDMI/ DisplayPort/ USB Type-C cable from the monitor to your computer. 2. B C 1-7 A D Getting Started Connecting the Monitor to the monitor power jack. (Figure B) 5. Power on the monitor. (Figure D) 7. Assemble the monitor power adapter & power cord. (Figure A) 4. Turn on the computer then monitor will auto detect signal source. Connect the power adapter to PC 1. Plug the power cord into the electrical outlet. (Figure C) 6. Turn off your computer. 3.
User Manual
Page 18
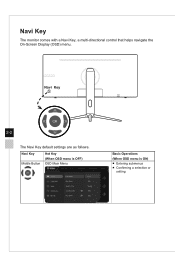
Navi Key 2-2 The Navi Key default settings are as follows. Navi Key Middle Button Hot Key (When OSD menu is OFF) OSD Main Menu Basic Operations (When OSD menu is ON) ■■ Entering submenus ■■ Confirming a selection or setting Navi Key The monitor comes with a Navi Key, a multi-directional control that helps navigate the On-Screen Display (OSD) menu.
Navi Key 2-2 The Navi Key default settings are as follows. Navi Key Middle Button Hot Key (When OSD menu is OFF) OSD Main Menu Basic Operations (When OSD menu is ON) ■■ Entering submenus ■■ Confirming a selection or setting Navi Key The monitor comes with a Navi Key, a multi-directional control that helps navigate the On-Screen Display (OSD) menu.

User Manual
Page 20
Users may enter the OSD Menu to turn off the Refresh Rate. Information on Screen 2-4 ■■ Press Middle Button to confirm selection and exit. ■■ Press Right Button to turn on and Left Button to cancel preview and exit. More Hot Key options are as below. Refresh Rate ■■ Press Middle Button to confirm selection and exit. ■■ Press Right Button to...
Users may enter the OSD Menu to turn off the Refresh Rate. Information on Screen 2-4 ■■ Press Middle Button to confirm selection and exit. ■■ Press Right Button to turn on and Left Button to cancel preview and exit. More Hot Key options are as below. Refresh Rate ■■ Press Middle Button to confirm selection and exit. ■■ Press Right Button to...
User Manual
Page 21
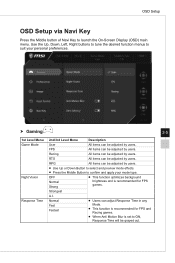
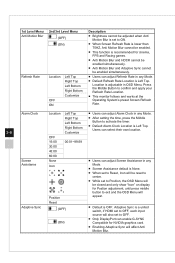
... preferences. OSD Setup OSD Setup via Navi Key Press the Middle button of Navi Key to ON, Response Time will be adjusted by users. OFF Normal Strong ■■ This function optimizes background brightness and is recommended for FPS and Racing games. ■■ When Anti Motion Blur is recommended for FPS games. hh Gaming 2-5 1st Level Menu Game Mode Night...
... preferences. OSD Setup OSD Setup via Navi Key Press the Middle button of Navi Key to ON, Response Time will be adjusted by users. OFF Normal Strong ■■ This function optimizes background brightness and is recommended for FPS and Racing games. ■■ When Anti Motion Blur is recommended for FPS games. hh Gaming 2-5 1st Level Menu Game Mode Night...
User Manual
Page 22
... your Refresh Rate Location. ■■ This monitor follows and works at the Operating System's preset Screen Refresh Rate. Reset Adaptive Sync (OFF) ■■ Default is Left Top. Adaptive Sync is a united switch, if HDMI set to OFF, each input source will also set to exit and the OSD Menu will appear. Position ■■ While set to Position, the OSD Menu will be closed and only show "Icon" on display for Postion adjustment, until press middle button...
... your Refresh Rate Location. ■■ This monitor follows and works at the Operating System's preset Screen Refresh Rate. Reset Adaptive Sync (OFF) ■■ Default is Left Top. Adaptive Sync is a united switch, if HDMI set to OFF, each input source will also set to exit and the OSD Menu will appear. Position ■■ While set to Position, the OSD Menu will be closed and only show "Icon" on display for Postion adjustment, until press middle button...
User Manual
Page 23
...;■ Anti Motion Blur and Adaptive Sync cannot be adjusted by users. ■■ Use Up or Down Button to select and preview mode effects. ■■ Press the Middle Button to enable Eye Saver. All items can be adjusted by increasing the contrast of images. ■■ When HDCR is set to ON. 2-7 ■■ When Screen Refresh Rate is lower than 75HZ, Anti...
...;■ Anti Motion Blur and Adaptive Sync cannot be adjusted by users. ■■ Use Up or Down Button to select and preview mode effects. ■■ Press the Middle Button to enable Eye Saver. All items can be adjusted by increasing the contrast of images. ■■ When HDCR is set to ON. 2-7 ■■ When Screen Refresh Rate is lower than 75HZ, Anti...
User Manual
Page 24
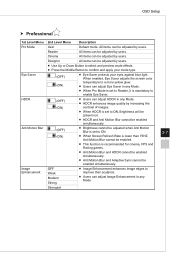
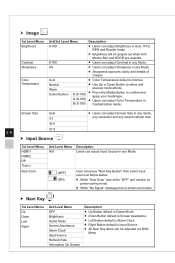
...) (ON) User can press "Navi Key Button" then select input source at below status: ■■ While "Auto Scan" was set to "OFF" and monitor at power saving mode. ■■ While "No Signal" message box is Normal. hh Image 1st Level Menu Brightness Contrast Sharpness Color Temperature 2nd/3rd Level Menu Description 0-100 ■■ Users can adjust Brightness in User, RTS, RPG and Reader mode. ■■ Brightness will be adjusted via OSD Menu.
...) (ON) User can press "Navi Key Button" then select input source at below status: ■■ While "Auto Scan" was set to "OFF" and monitor at power saving mode. ■■ While "No Signal" message box is Normal. hh Image 1st Level Menu Brightness Contrast Sharpness Color Temperature 2nd/3rd Level Menu Description 0-100 ■■ Users can adjust Brightness in User, RTS, RPG and Reader mode. ■■ Brightness will be adjusted via OSD Menu.
User Manual
Page 25
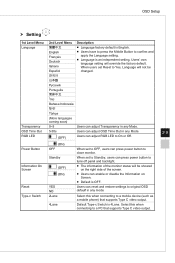
... power button to close monitor. Users can press power button to tune off panel and backlight. ■■ The information of the screen. ■■ Users can enable or disable the Information on Screen. ■■ Default is an independent setting. OSD Setup hh Setting 1st Level Menu 2nd Level Menu Description Language 繁體中文 ■■ Language factory default is 4Lane. OSD Time Out 5-30s Users can adjust OSD Time Out in any Mode. 2-9 RGB LED (OFF) Users...
... power button to close monitor. Users can press power button to tune off panel and backlight. ■■ The information of the screen. ■■ Users can enable or disable the Information on Screen. ■■ Default is an independent setting. OSD Setup hh Setting 1st Level Menu 2nd Level Menu Description Language 繁體中文 ■■ Language factory default is 4Lane. OSD Time Out 5-30s Users can adjust OSD Time Out in any Mode. 2-9 RGB LED (OFF) Users...
User Manual
Page 28
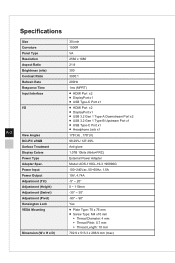
... ■■ Plate Type: 75 x 75 mm ■■ Screw Type: M4 x10 mm ▶▶ Thread Diameter: 4 mm ▶▶ Thread Pitch: 0.7 mm ▶▶ Thread Length: 10 mm 702.9 x 513.3 x 286.9 mm (max) A-2 Specifications Size Curvature Panel Type Resolution Aspect Ratio Brightness (nits) Contrast Ratio Refresh Rate Response Time Input Interface I/O View Angles DCI-P3/ sRGB Surface Treatment Display Colors Power Type Adapter Spec.
... ■■ Plate Type: 75 x 75 mm ■■ Screw Type: M4 x10 mm ▶▶ Thread Diameter: 4 mm ▶▶ Thread Pitch: 0.7 mm ▶▶ Thread Length: 10 mm 702.9 x 513.3 x 286.9 mm (max) A-2 Specifications Size Curvature Panel Type Resolution Aspect Ratio Brightness (nits) Contrast Ratio Refresh Rate Response Time Input Interface I/O View Angles DCI-P3/ sRGB Surface Treatment Display Colors Power Type Adapter Spec.
User Manual
Page 31
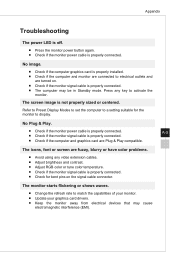
...; Change the refresh rate to electrical outlets and are connected to match the capabilities of your monitor. ■■ Update your graphics card drivers. ■■ Keep the monitor away from electrical devices that may be in Standby mode. The icons, font or screen are Plug & Play compatible. Appendix Troubleshooting The power LED is off. ■■ Press the monitor power button again. ■■ Check if the monitor power cable is not properly sized...
...; Change the refresh rate to electrical outlets and are connected to match the capabilities of your monitor. ■■ Update your graphics card drivers. ■■ Keep the monitor away from electrical devices that may be in Standby mode. The icons, font or screen are Plug & Play compatible. Appendix Troubleshooting The power LED is off. ■■ Press the monitor power button again. ■■ Check if the monitor power cable is not properly sized...