User Manual
Page 2
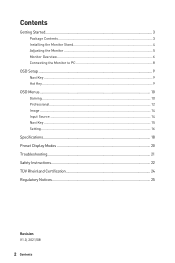
Contents Getting Started...3 Package Contents...3 Installing the Monitor Stand 4 Adjusting the Monitor 5 Monitor Overview...6 Connecting the Monitor to PC 8 OSD Setup...9 Navi Key...9 Hot Key...9 OSD Menus...10 Gaming...10 Professional...12 Image...14 Input Source...14 Navi Key...15 Setting...16 Specifications...18 Preset Display Modes 20 Troubleshooting...21 Safety Instructions...22 TÜV Rheinland Certification 24 Regulatory Notices...25 Revision V1.0, 2021/08 2 Contents
Contents Getting Started...3 Package Contents...3 Installing the Monitor Stand 4 Adjusting the Monitor 5 Monitor Overview...6 Connecting the Monitor to PC 8 OSD Setup...9 Navi Key...9 Hot Key...9 OSD Menus...10 Gaming...10 Professional...12 Image...14 Input Source...14 Navi Key...15 Setting...16 Specifications...18 Preset Display Modes 20 Troubleshooting...21 Safety Instructions...22 TÜV Rheinland Certification 24 Regulatory Notices...25 Revision V1.0, 2021/08 2 Contents

User Manual
Page 3
... Contents Monitor Optix MAG321QR Documentation Quick Start Guide Registration Card Stand with Screw(s) Accessories Stand Base with Screw(s) Power Cord Power Adapter HDMI Cable (Optional) Cables DisplayPort Cable (Optional) USB Upstream Cable (for USB Type-B Upstream Port) (Optional) USB Type-C Cable (Optional) ⚠⚠Important ∙∙Contact your place of purchase or local distributor if any of the items is damaged or missing. ∙∙Package contents may vary by country. ∙∙The included power cord...
... Contents Monitor Optix MAG321QR Documentation Quick Start Guide Registration Card Stand with Screw(s) Accessories Stand Base with Screw(s) Power Cord Power Adapter HDMI Cable (Optional) Cables DisplayPort Cable (Optional) USB Upstream Cable (for USB Type-B Upstream Port) (Optional) USB Type-C Cable (Optional) ⚠⚠Important ∙∙Contact your place of purchase or local distributor if any of the items is damaged or missing. ∙∙Package contents may vary by country. ∙∙The included power cord...

User Manual
Page 4
Make sure the stand assembly is properly installed before setting the monitor upright. ⚠⚠Important ∙∙Place the monitor on the panel. ∙∙The groove for installing the stand bracket can also be used for proper wall mount kit. 2 1 3 4 Getting Started Leave the monitor in its protective foam packaging. Connect the base to the stand and tighten the base screw to avoid scratching the display panel. ∙∙Do not...
Make sure the stand assembly is properly installed before setting the monitor upright. ⚠⚠Important ∙∙Place the monitor on the panel. ∙∙The groove for installing the stand bracket can also be used for proper wall mount kit. 2 1 3 4 Getting Started Leave the monitor in its protective foam packaging. Connect the base to the stand and tighten the base screw to avoid scratching the display panel. ∙∙Do not...

User Manual
Page 5
Adjusting the Monitor This monitor is designed to maximize your viewing comfort with its adjustment capabilities. ⚠⚠Important ∙∙Avoid touching the display panel when adjusting the monitor. ∙∙Please slightly tilt the monitor backwards before pivoting it. -5 O 20O 130mm 45O 45O Getting Started 5
Adjusting the Monitor This monitor is designed to maximize your viewing comfort with its adjustment capabilities. ⚠⚠Important ∙∙Avoid touching the display panel when adjusting the monitor. ∙∙Please slightly tilt the monitor backwards before pivoting it. -5 O 20O 130mm 45O 45O Getting Started 5
User Manual
Page 7
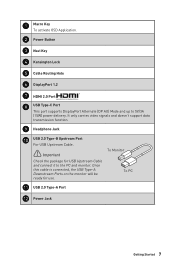
... video signals and doesn't support data transmission function. 9 Headphone Jack 10 USB 2.0 Type-B Upstream Port For USB Upstream Cable. ⚠⚠Important To Monitor Check the package for use. Once this cable is connected, the USB Type-A Downstream Ports on the monitor will be ready for USB Upstream Cable and connect it to 5V/3A (15W) power delivery. 1 Macro Key To activate OSD Application. 2 Power Button 3 Navi Key 4 Kensington Lock 5 Cable Routing Hole 6 DisplayPort 1.2 7 HDMI 2.0 Port 8 USB...
... video signals and doesn't support data transmission function. 9 Headphone Jack 10 USB 2.0 Type-B Upstream Port For USB Upstream Cable. ⚠⚠Important To Monitor Check the package for use. Once this cable is connected, the USB Type-A Downstream Ports on the monitor will be ready for USB Upstream Cable and connect it to 5V/3A (15W) power delivery. 1 Macro Key To activate OSD Application. 2 Power Button 3 Navi Key 4 Kensington Lock 5 Cable Routing Hole 6 DisplayPort 1.2 7 HDMI 2.0 Port 8 USB...

User Manual
Page 8
Connecting the Monitor to the monitor power jack. (Figure B) 5. Turn off your computer. 3. Connect the power adapter to PC 1. Turn on the computer and the monitor will auto detect the signal source. Power on the monitor. (Figure D) 7. Connect the video cable from the monitor to your computer. 2. D 8 Getting Started B C A Plug the power cord into the electrical outlet. (Figure C) 6. Assemble the monitor power adapter & power cord. (Figure A) 4.
Connecting the Monitor to the monitor power jack. (Figure B) 5. Turn off your computer. 3. Connect the power adapter to PC 1. Turn on the computer and the monitor will auto detect the signal source. Power on the monitor. (Figure D) 7. Connect the video cable from the monitor to your computer. 2. D 8 Getting Started B C A Plug the power cord into the electrical outlet. (Figure C) 6. Assemble the monitor power adapter & power cord. (Figure A) 4.
User Manual
Page 9
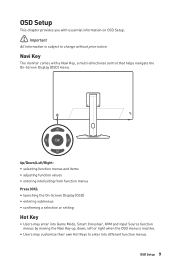
... the On-Screen Display (OSD) ∙∙entering submenus ∙∙confirming a selection or setting Hot Key ∙∙Users may customize their own Hot Keys to change without prior notice. OSD Setup 9 Navi Key The monitor comes with essential information on OSD Setup. ⚠⚠Important All information is subject to enter into Game Mode, Smart Crosshair, KVM and Input Source function menus...
... the On-Screen Display (OSD) ∙∙entering submenus ∙∙confirming a selection or setting Hot Key ∙∙Users may customize their own Hot Keys to change without prior notice. OSD Setup 9 Navi Key The monitor comes with essential information on OSD Setup. ⚠⚠Important All information is subject to enter into Game Mode, Smart Crosshair, KVM and Input Source function menus...

User Manual
Page 11
... disabled while Adaptive-Sync is set to ON. ∙∙MPRT is available when the refresh rate is over 85Hz. ∙∙Users can adjust Refresh Rate in OSD Menu. Location is Left Top. Press the OK Button to activate the timer. ∙∙Default Alarm Clock Location is Left Top. OSD Menus 11 Users can adjust Alarm Clock in any mode. ∙∙Default Refresh Rate Location is adjustable in any mode...
... disabled while Adaptive-Sync is set to ON. ∙∙MPRT is available when the refresh rate is over 85Hz. ∙∙Users can adjust Refresh Rate in OSD Menu. Location is Left Top. Press the OK Button to activate the timer. ∙∙Default Alarm Clock Location is Left Top. OSD Menus 11 Users can adjust Alarm Clock in any mode. ∙∙Default Refresh Rate Location is adjustable in any mode...

User Manual
Page 12
Adaptive-Sync Color Position Reset OFF ON White Red Auto ∙∙Adaptive-Sync prevents screen tearing. ∙∙MPRT will be adjusted by users. ∙∙Use Up or Down Button to select and preview mode effects. ∙∙Press the OK Button to automatically switch between USB input sources, such as keyboards, mice or other USB devices. ∙∙Users can also designate Upstream port or USB Type-C as the only USB signal source. ∙∙Through...
Adaptive-Sync Color Position Reset OFF ON White Red Auto ∙∙Adaptive-Sync prevents screen tearing. ∙∙MPRT will be adjusted by users. ∙∙Use Up or Down Button to select and preview mode effects. ∙∙Press the OK Button to automatically switch between USB input sources, such as keyboards, mice or other USB devices. ∙∙Users can also designate Upstream port or USB Type-C as the only USB signal source. ∙∙Through...

User Manual
Page 13
..., Low Blue Light adjusts the screen color temperature to a more yellow glow. ∙∙Users can adjust Low Blue Light in any mode. ∙∙When Pro Mode is set to Anti-Blue, it is mandatory to enable Low Blue Light. ∙∙Users can adjust HDCR in any mode. ∙∙HDCR enhances image quality by increasing the contrast of images. ∙∙When HDCR is set to ON, Brightness will be...
..., Low Blue Light adjusts the screen color temperature to a more yellow glow. ∙∙Users can adjust Low Blue Light in any mode. ∙∙When Pro Mode is set to Anti-Blue, it is mandatory to enable Low Blue Light. ∙∙Users can adjust HDCR in any mode. ∙∙HDCR enhances image quality by increasing the contrast of images. ∙∙When HDCR is set to ON, Brightness will be...

User Manual
Page 14
... clarity and details of images. ∙∙Use Up or Down Button to select and preview mode effects. ∙∙Press the OK Button to confirm and apply your mode type. ∙∙Users can adjust Color Temperature in Customization mode. ∙∙Users can adjust Input Source in any mode, any resolution and any mode. Input Source 1st Level Menu 2nd Level Menu Description HDMI1 ∙∙Users can adjust Screen Size in any screen refresh rate.
... clarity and details of images. ∙∙Use Up or Down Button to select and preview mode effects. ∙∙Press the OK Button to confirm and apply your mode type. ∙∙Users can adjust Color Temperature in Customization mode. ∙∙Users can adjust Input Source in any mode, any resolution and any mode. Input Source 1st Level Menu 2nd Level Menu Description HDMI1 ∙∙Users can adjust Screen Size in any screen refresh rate.
User Manual
Page 15
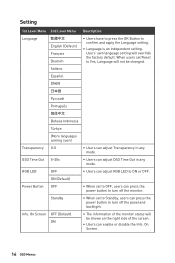
... Button default is Input Source. ∙∙All Navi Key items can use the Navi Key to select Input Source at below status: • While "Auto Scan" is set to "OFF" with the monitor at power saving mode; • While "No Signal" message box is shown on the monitor. Navi Key 1st Level Menu 2nd Level Menu Up / Down / Left OFF / Right Brightness Game Mode Alarm Clock Smart Crosshair Input Source Refresh Rate...
... Button default is Input Source. ∙∙All Navi Key items can use the Navi Key to select Input Source at below status: • While "Auto Scan" is set to "OFF" with the monitor at power saving mode; • While "No Signal" message box is shown on the monitor. Navi Key 1st Level Menu 2nd Level Menu Up / Down / Left OFF / Right Brightness Game Mode Alarm Clock Smart Crosshair Input Source Refresh Rate...
User Manual
Page 16
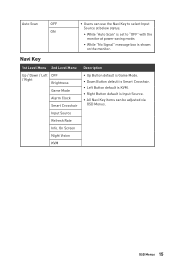
...;Users can adjust OSD Time Out in any mode. ON (Default) Power Button OFF ∙∙When set to Yes, Language will not be shown on the right side of the monitor status will override the factory default. On Screen. 16 OSD Menus RGB LED OFF ∙∙Users can press the power button to confirm and apply the Language setting. ∙∙Language is an independent setting. Setting 1st Level Menu 2nd Level Menu Description Language English (Default...
...;Users can adjust OSD Time Out in any mode. ON (Default) Power Button OFF ∙∙When set to Yes, Language will not be shown on the right side of the monitor status will override the factory default. On Screen. 16 OSD Menus RGB LED OFF ∙∙Users can press the power button to confirm and apply the Language setting. ∙∙Language is an independent setting. Setting 1st Level Menu 2nd Level Menu Description Language English (Default...
User Manual
Page 17
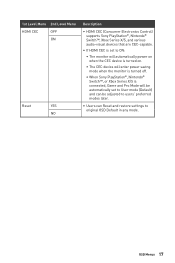
... power on when the CEC device is turned on. • The CEC device will enter power saving mode when the monitor is turned off. • When Sony PlayStation®, Nintendo® Switch™, or Xbox Series X/S is connected, Game and Pro Mode will be automatically set to User mode (Default) and can be adjusted to users' preferred modes later. ∙∙Users can Reset and restore settings to original OSD Default in any mode. OSD...
... power on when the CEC device is turned on. • The CEC device will enter power saving mode when the monitor is turned off. • When Sony PlayStation®, Nintendo® Switch™, or Xbox Series X/S is connected, Game and Pro Mode will be automatically set to User mode (Default) and can be adjusted to users' preferred modes later. ∙∙Users can Reset and restore settings to original OSD Default in any mode. OSD...
User Manual
Page 18
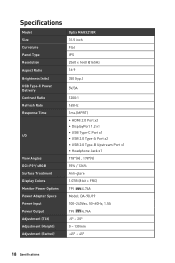
Specifications Model Size Curvature Panel Type Resolution Aspect Ratio Optix MAG321QR 31.5 inch Flat IPS 2560 x 1440 @165Hz 16:9 Brightness (nits) USB Type-C Power Delivery Contrast Ratio Refresh Rate Response Time I/O View Angles DCI-P3*/ sRGB Surface Treatment Display Colors Monitor Power Options Power Adapter Specs Power Input Power Output Adjustment (Tilt) Adjustment (Height) Adjustment (Swivel) 350 (typ.) 5V/3A 1200:1 165Hz 1ms (MPRT) ∙∙HDMI 2.0 Port x2 ∙∙DisplayPort 1.2 x1 ∙∙USB Type-C Port x1 ∙∙USB 2.0 Type-A Port x2 ∙∙USB ...
Specifications Model Size Curvature Panel Type Resolution Aspect Ratio Optix MAG321QR 31.5 inch Flat IPS 2560 x 1440 @165Hz 16:9 Brightness (nits) USB Type-C Power Delivery Contrast Ratio Refresh Rate Response Time I/O View Angles DCI-P3*/ sRGB Surface Treatment Display Colors Monitor Power Options Power Adapter Specs Power Input Power Output Adjustment (Tilt) Adjustment (Height) Adjustment (Swivel) 350 (typ.) 5V/3A 1200:1 165Hz 1ms (MPRT) ∙∙HDMI 2.0 Port x2 ∙∙DisplayPort 1.2 x1 ∙∙USB Type-C Port x1 ∙∙USB 2.0 Type-A Port x2 ∙∙USB ...
User Manual
Page 21
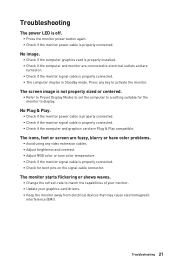
... color problems. • Avoid using any key to electrical outlets and are turned on the signal cable connector. The monitor starts flickering or shows waves. • Change the refresh rate to display. Troubleshooting 21 The screen image is not properly sized or centered. • Refer to Preset Display Modes to set the computer to a setting suitable for bent pins on . • Check if the monitor signal cable is properly installed. • Check if the computer and monitor are Plug & Play compatible...
... color problems. • Avoid using any key to electrical outlets and are turned on the signal cable connector. The monitor starts flickering or shows waves. • Change the refresh rate to display. Troubleshooting 21 The screen image is not properly sized or centered. • Refer to Preset Display Modes to set the computer to a setting suitable for bent pins on . • Check if the monitor signal cable is properly installed. • Check if the computer and monitor are Plug & Play compatible...
User Manual
Page 22
... rated 120/240V, 20A (maximum). ∙∙Always disconnect the power cord or switch the wall socket off if the device would be noted. ∙∙Refer servicing to qualified personnel only. Please use with this device comes with a 3-pin plug, do not disable the protective earth pin from children. Battery Please take special precautions if this device. Safety Instructions...
... rated 120/240V, 20A (maximum). ∙∙Always disconnect the power cord or switch the wall socket off if the device would be noted. ∙∙Refer servicing to qualified personnel only. Please use with this device comes with a 3-pin plug, do not disable the protective earth pin from children. Battery Please take special precautions if this device. Safety Instructions...
User Manual
Page 23
... power cord or plug is around 40℃. ∙∙When cleaning the device, be sure to remove the power plug. that helps to properly support the device and keep it working according to the User Guide. • The device has dropped and damaged. • The device has obvious sign of breakage. Use a piece of soft cloth rather than industrial chemical to a desk, wall or fixed...
... power cord or plug is around 40℃. ∙∙When cleaning the device, be sure to remove the power plug. that helps to properly support the device and keep it working according to the User Guide. • The device has dropped and damaged. • The device has obvious sign of breakage. Use a piece of soft cloth rather than industrial chemical to a desk, wall or fixed...

User Manual
Page 24
... not support Flicker Free when Anti Motion Blur/MPRT is based on the optional Low Blue Light function. MSI now offers monitors with TÜV Rheinland Low Blue Light certification to cause eye fatigue and discomfort. Please follow the instructions below to reduce the symptoms from extended exposure to reduce eye strain after extended screen time. ∙∙Take breaks for at various frequency ranges...
... not support Flicker Free when Anti Motion Blur/MPRT is based on the optional Low Blue Light function. MSI now offers monitors with TÜV Rheinland Low Blue Light certification to cause eye fatigue and discomfort. Please follow the instructions below to reduce the symptoms from extended exposure to reduce eye strain after extended screen time. ∙∙Take breaks for at various frequency ranges...
User Manual
Page 25
... the following two conditions: 1. MSI Computer Corp. 901 Canada Court, City of the European Union. Notice 2 Shielded interface cables and AC power cord, if any, must accept any interference received, including interference that may cause undesired operation. FCC-B Radio Frequency Interference Statement This equipment has been tested and found to Part 15 of the FCC Rules...
... the following two conditions: 1. MSI Computer Corp. 901 Canada Court, City of the European Union. Notice 2 Shielded interface cables and AC power cord, if any, must accept any interference received, including interference that may cause undesired operation. FCC-B Radio Frequency Interference Statement This equipment has been tested and found to Part 15 of the FCC Rules...