
User Manual
Page 13
... memory 5 Connecting the Front Panel Header 6 Installing the Motherboard 7 Installing SATA Drives 8 Installing a Graphics Card 9 Connecting Peripheral Devices 10 Connecting the Power Connectors 11 Power On...12 Specifications...15 Block Diagram ...19 Rear I/O Panel...20 LAN Port LED Status Table 20 Audio Ports Configuration 20 Realtek HD Audio Manager 21 Overview of Components...
... memory 5 Connecting the Front Panel Header 6 Installing the Motherboard 7 Installing SATA Drives 8 Installing a Graphics Card 9 Connecting Peripheral Devices 10 Connecting the Power Connectors 11 Power On...12 Specifications...15 Block Diagram ...19 Rear I/O Panel...20 LAN Port LED Status Table 20 Audio Ports Configuration 20 Realtek HD Audio Manager 21 Overview of Components...

User Manual
Page 15
...@60Hz ●● Supports 2-Way AMD® CrossFire™ Technology Intel® Z170 Chipset ●● 6x SATA 6Gb/s ports* ●● Supports RAID 0, RAID 1, RAID 5 and RAID 10 for SATA storage devices ●● 1x M.2 slot ▶▶Supports PCIe 3.0 x4 and SATA 6Gb/s standards, 4.2cm/ 6cm/ 8cm length M.2 SSD cards ▶▶Supports...
...@60Hz ●● Supports 2-Way AMD® CrossFire™ Technology Intel® Z170 Chipset ●● 6x SATA 6Gb/s ports* ●● Supports RAID 0, RAID 1, RAID 5 and RAID 10 for SATA storage devices ●● 1x M.2 slot ▶▶Supports PCIe 3.0 x4 and SATA 6Gb/s standards, 4.2cm/ 6cm/ 8cm length M.2 SSD cards ▶▶Supports...

User Manual
Page 16
...;● Intel® Z170 Chipset ▶▶8x USB 3.1 Gen1 (SuperSpeed USB) ports (4 ports on the back panel, 4 ports available through the internal USB 3.1 Gen 1 connectors) ▶▶6x USB 2.0 (High-speed USB) ports (2 ports on the back panel, 4 ports available through the internal USB...pin ATX 12V power connector ●● 6x SATA 6Gb/s connectors ●● 2x SATAe connectors ●● 2x USB 2.0 connector (supports additional 4 USB 2.0 ports) ●● 2x USB 3.1 Gen1 connectors (supports additional 4 USB 3.1 Gen1 ports) ●● 2x 4-pin CPU fan ...
...;● Intel® Z170 Chipset ▶▶8x USB 3.1 Gen1 (SuperSpeed USB) ports (4 ports on the back panel, 4 ports available through the internal USB 3.1 Gen 1 connectors) ▶▶6x USB 2.0 (High-speed USB) ports (2 ports on the back panel, 4 ports available through the internal USB...pin ATX 12V power connector ●● 6x SATA 6Gb/s connectors ●● 2x SATAe connectors ●● 2x USB 2.0 connector (supports additional 4 USB 2.0 ports) ●● 2x USB 3.1 Gen1 connectors (supports additional 4 USB 3.1 Gen1 ports) ●● 2x 4-pin CPU fan ...
User Manual
Page 24
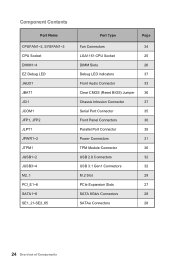
...Socket DIMM1~4 EZ Debug LED JAUD1 JBAT1 JCI1 JCOM1 JFP1, JFP2 JLPT1 JPWR1~2 JTPM1 JUSB1~2 JUSB3~4 M2_1 PCI_E1~6 SATA1~6 SE1_21-SE2_65 Port Type Page Fan Connectors 34 LGA1151 CPU Socket 25 DIMM Slots 26 Debug LED indicators 37 Front Audio Connector 33 Clear CMOS (Reset ...BIOS) Jumper 36 Chassis Intrusion Connector 37 Serial Port Connector 35 Front Panel Connectors 30 Parallel Port Connector 35 Power Connectors 31 TPM Module Connector 36 USB 2.0 Connectors 32 USB 3.1 Gen1 Connectors 32 M.2 Slot...
...Socket DIMM1~4 EZ Debug LED JAUD1 JBAT1 JCI1 JCOM1 JFP1, JFP2 JLPT1 JPWR1~2 JTPM1 JUSB1~2 JUSB3~4 M2_1 PCI_E1~6 SATA1~6 SE1_21-SE2_65 Port Type Page Fan Connectors 34 LGA1151 CPU Socket 25 DIMM Slots 26 Debug LED indicators 37 Front Audio Connector 33 Clear CMOS (Reset ...BIOS) Jumper 36 Chassis Intrusion Connector 37 Serial Port Connector 35 Front Panel Connectors 30 Parallel Port Connector 35 Power Connectors 31 TPM Module Connector 36 USB 2.0 Connectors 32 USB 3.1 Gen1 Connectors 32 M.2 Slot...
User Manual
Page 28
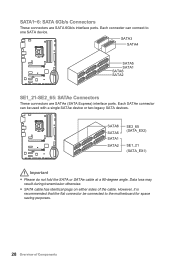
... has identical plugs on either sides of Components SATA1~6: SATA 6Gb/s Connectors These connectors are SATAe (SATA Express) interface ports. SATA6 SATA5 SATA1 SATA2 SE2_65 (SATA_EX2) SE1_21 (SATA_EX1) Important ●● Please do not fold the SATA or SATAe cable at a 90-degree angle. Each SATAe connector can connect to the motherboard for space saving purposes. 28...
... has identical plugs on either sides of Components SATA1~6: SATA 6Gb/s Connectors These connectors are SATAe (SATA Express) interface ports. SATA6 SATA5 SATA1 SATA2 SE2_65 (SATA_EX2) SE1_21 (SATA_EX1) Important ●● Please do not fold the SATA or SATAe cable at a 90-degree angle. Each SATAe connector can connect to the motherboard for space saving purposes. 28...
User Manual
Page 30
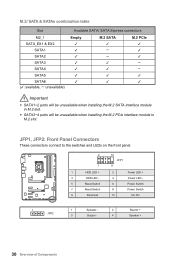
... - 4 Buzzer + Speaker + 30 Overview of Components M.2/ SATA & SATAe combination table Slot M2_1 SATA_EX1 & EX2 SATA1 SATA2 SATA3 SATA4 SATA5 SATA6 (✓: available, ─: unavailable) Available SATA/ SATA Express connectors Empty M.2 SATA M.2 PCIe Important ●● SATA1~2 ports will be unavailable when installing the M.2 SATA interface module in M.2 slot. ●● SATA3~4 ports will be unavailable when installing the...
... - 4 Buzzer + Speaker + 30 Overview of Components M.2/ SATA & SATAe combination table Slot M2_1 SATA_EX1 & EX2 SATA1 SATA2 SATA3 SATA4 SATA5 SATA6 (✓: available, ─: unavailable) Available SATA/ SATA Express connectors Empty M.2 SATA M.2 PCIe Important ●● SATA1~2 ports will be unavailable when installing the M.2 SATA interface module in M.2 slot. ●● SATA3~4 ports will be unavailable when installing the...

User Manual
Page 45
... function support. [Auto] The system will be unavailable under legacy mode. Press to enable or disable the SATA hot plug support. [Enabled] Enables hot plug support for the SATA ports. [Disabled] Disables hot plug support for the SATA ports. ▶▶HD Audio Controller [Enabled] Enables or disables the onboard High Definition Audio controller. ▶...
... function support. [Auto] The system will be unavailable under legacy mode. Press to enable or disable the SATA hot plug support. [Enabled] Enables hot plug support for the SATA ports. [Disabled] Disables hot plug support for the SATA ports. ▶▶HD Audio Controller [Enabled] Enables or disables the onboard High Definition Audio controller. ▶...
User Manual
Page 75
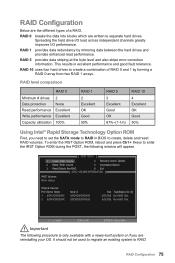
... 2. Exit [ENTER] - This results in BIOS to RAID in excellent performance and good fault tolerance. Exit [ DISK / VOLUME INFORMATION ] RAID Volumes : None defined. Physical Devices : Port Device Model 1 XXXX-XXXXXXXX 2 XXXX-XXXXXXXX Serial # XXXXXXXXXXXXXX XXXXXXXXXXXXXX Size Type/Status (Vol ID) XXX.XGB Non-RAID Disk XXX.XGB Non-RAID Disk [ ↑... enter the IRST Option ROM during the POST, the following procedure is only available with a newly-built system or if you need to set the SATA mode to create, delete and reset RAID volumes.
... 2. Exit [ENTER] - This results in BIOS to RAID in excellent performance and good fault tolerance. Exit [ DISK / VOLUME INFORMATION ] RAID Volumes : None defined. Physical Devices : Port Device Model 1 XXXX-XXXXXXXX 2 XXXX-XXXXXXXX Serial # XXXXXXXXXXXXXX XXXXXXXXXXXXXX Size Type/Status (Vol ID) XXX.XGB Non-RAID Disk XXX.XGB Non-RAID Disk [ ↑... enter the IRST Option ROM during the POST, the following procedure is only available with a newly-built system or if you need to set the SATA mode to create, delete and reset RAID volumes.

