User Manual (English)
Page 2
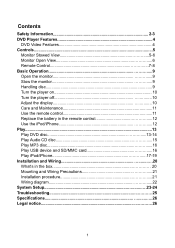
... 10 Turn the player off 10 Adjust the display 10 Care and Maintenance 11 Use the remote control 11 Replace the battery in the remote control 12 Use the iPod/iPhone 12 Play...13 Play DVD disc 13-14 Play Audio CD disc 15 Play MP3 disc 16 Play USB device and SD/MMC card 16 Play iPod/iPhone 17-19 Installation and Wiring 20 What's in the box 20 Mounting and Wiring Precautions 21 Installation procedure 21 Wiring diagram 22 System Setup 23-24 Troubleshooting 25 Specifications...
... 10 Turn the player off 10 Adjust the display 10 Care and Maintenance 11 Use the remote control 11 Replace the battery in the remote control 12 Use the iPod/iPhone 12 Play...13 Play DVD disc 13-14 Play Audio CD disc 15 Play MP3 disc 16 Play USB device and SD/MMC card 16 Play iPod/iPhone 17-19 Installation and Wiring 20 What's in the box 20 Mounting and Wiring Precautions 21 Installation procedure 21 Wiring diagram 22 System Setup 23-24 Troubleshooting 25 Specifications...

User Manual (English)
Page 3
... used soon after switching on the screen during sudden braking or other hazards. ™ Be careful not to ensure you are firmly secured by yourself. Keep this manual in any way. Turn off the unit immediately! If you do not accidentally hit your warranty. ™ SAFETY FIRST! Installation or servicing of all the features and functions. ™ Do not operate the unit...
... used soon after switching on the screen during sudden braking or other hazards. ™ Be careful not to ensure you are firmly secured by yourself. Keep this manual in any way. Turn off the unit immediately! If you do not accidentally hit your warranty. ™ SAFETY FIRST! Installation or servicing of all the features and functions. ™ Do not operate the unit...

User Manual (English)
Page 5
DVD Player Features This player is a Roof Mount 10.2" TFT-LCD Color Display with DVD player that can be used as a stand-alone display, or can be integrated into a mobile multimedia system. This player has the following features: — 10.2" TFT-LCD color monitor(16:9) — Roof Mounting Application — Pixel(dots):1152 x 234 — Wide Viewing angle(up/down/left/right):45/65/65/65 — NTSC and PAL Compatible — Adjustable Contrast / Brightness / Color / Tint — Manual Viewing Angle Adjustment — Vertical Angle Adjustable: up/down
DVD Player Features This player is a Roof Mount 10.2" TFT-LCD Color Display with DVD player that can be used as a stand-alone display, or can be integrated into a mobile multimedia system. This player has the following features: — 10.2" TFT-LCD color monitor(16:9) — Roof Mounting Application — Pixel(dots):1152 x 234 — Wide Viewing angle(up/down/left/right):45/65/65/65 — NTSC and PAL Compatible — Adjustable Contrast / Brightness / Color / Tint — Manual Viewing Angle Adjustment — Vertical Angle Adjustable: up/down
User Manual (English)
Page 6
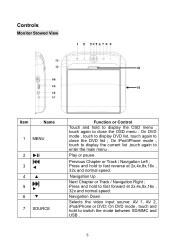
... close the DVD list ; On DVD mode , touch to display DVD list, touch again to fast forward at 2x,4x,8x,16x , 32x and normal speed. Navigation Down . Next Chapter or Track / Navigation Right ; On iPod/iPhone mode , touch to display the current list ,touch again to switch the mode between SD/MMC and USB . 5 Press and hold to close the OSD menu . Selects the video input source: AV 1, AV 2, iPod/iPhone or DVD; Play or...
... close the DVD list ; On DVD mode , touch to display DVD list, touch again to fast forward at 2x,4x,8x,16x , 32x and normal speed. Navigation Down . Next Chapter or Track / Navigation Right ; On iPod/iPhone mode , touch to display the current list ,touch again to switch the mode between SD/MMC and USB . 5 Press and hold to close the OSD menu . Selects the video input source: AV 1, AV 2, iPod/iPhone or DVD; Play or...
User Manual (English)
Page 7
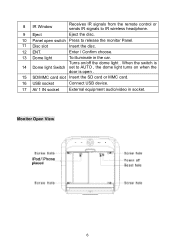
... Receives IR signals from the remote control or sends IR signals to IR wireless headphone. 9 Eject Eject the disc. 10 Panel open . 15 SD/MMC card slot Insert the SD card or MMC card. 16 USB socket Connect USB device. 17 AV 1 IN socket External equipment audio/video in the car. Enter / Confirm choose. 13 Dome light To illuminate in socket. Turns on when the door is 14 Dome light Switch set...
... Receives IR signals from the remote control or sends IR signals to IR wireless headphone. 9 Eject Eject the disc. 10 Panel open . 15 SD/MMC card slot Insert the SD card or MMC card. 16 USB socket Connect USB device. 17 AV 1 IN socket External equipment audio/video in the car. Enter / Confirm choose. 13 Dome light To illuminate in socket. Turns on when the door is 14 Dome light Switch set...

User Manual (English)
Page 8
Remote Control Item Name 1 POWER 2 SETUP 3 MUTE 4 EJECT 5 0-9 Number key 6 SRC 7 MENU 8 Function or control Turn on or off the player. Selects the video input source: AV 1 , AV 2, iPod/iPhone or DVD ; Press to enter the main menu . On iPod/iPhone mode, press to display the current list , press again to enter numbers directly, such as for settings or track numbers. Press to go to modify the DVD player settings. Press and hold to switch between SD/MMC and USB mode . Turn the sound on...
Remote Control Item Name 1 POWER 2 SETUP 3 MUTE 4 EJECT 5 0-9 Number key 6 SRC 7 MENU 8 Function or control Turn on or off the player. Selects the video input source: AV 1 , AV 2, iPod/iPhone or DVD ; Press to enter the main menu . On iPod/iPhone mode, press to display the current list , press again to enter numbers directly, such as for settings or track numbers. Press to go to modify the DVD player settings. Press and hold to switch between SD/MMC and USB mode . Turn the sound on...

User Manual (English)
Page 9
...or ENTER button to return the last position of DVD. Play or pause . Press to point B. Press to decrease / increase the volume. Press to stop playback, press►II or ENTER button to display the playback information (such as title, chapter, track and time). Press ... DISPLAY 26 GOTO Navigation Up/Left/Right/Down and confirm choose . This feature only works if the DVD is recorded with multiple angles. Press to fast reverse playback at the last position; Press to view the DVD disc's title menu. Press to repeats the track or the entire disc. Press to start playing...
...or ENTER button to return the last position of DVD. Play or pause . Press to point B. Press to decrease / increase the volume. Press to stop playback, press►II or ENTER button to display the playback information (such as title, chapter, track and time). Press ... DISPLAY 26 GOTO Navigation Up/Left/Right/Down and confirm choose . This feature only works if the DVD is recorded with multiple angles. Press to fast reverse playback at the last position; Press to view the DVD disc's title menu. Press to repeats the track or the entire disc. Press to start playing...
User Manual (English)
Page 10
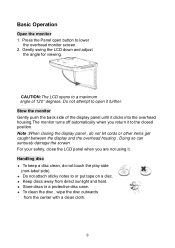
... attempt to open button to the closed position. Handling disc z To keep a disc clean, do not let cords or other items get caught between the display and the overhead housing . z Store discs in a protective disc case. For your safety, close the LCD panel when you return it to lower the overhead monitor screen. 2. Gently swing the LCD down and adjust the angle for viewing.
... attempt to open button to the closed position. Handling disc z To keep a disc clean, do not let cords or other items get caught between the display and the overhead housing . z Store discs in a protective disc case. For your safety, close the LCD panel when you return it to lower the overhead monitor screen. 2. Gently swing the LCD down and adjust the angle for viewing.
User Manual (English)
Page 11
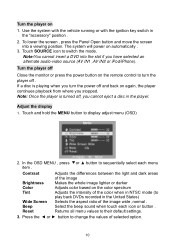
... of the image Makes the whole image lighter or darker Adjusts color based on 1. To lower the screen , press the Panel Open button and move the screen into the slot if you cannot eject a disc in the "accessory" position . 2. Turn the player off Close the monitor or press the power button on the remote control to turn the power off , you have selected an alternate audio-video source (AV IN1 ,AV IN2 or iPod/iPhone).
... of the image Makes the whole image lighter or darker Adjusts color based on 1. To lower the screen , press the Panel Open button and move the screen into the slot if you cannot eject a disc in the "accessory" position . 2. Turn the player off Close the monitor or press the power button on the remote control to turn the power off , you have selected an alternate audio-video source (AV IN1 ,AV IN2 or iPod/iPhone).

User Manual (English)
Page 12
... cleaners. Replace the battery in direct sunlight. z Do not use the player in the remote control The battery needs changing when the buttons on the remote stop working or when you have to move close to player for the remote to peel. Servicing the monitor In the event that trouble arises, never open the monitor case, disassemble the player or attempt to repair it outwards from the sensor. z Use the remote control no further...
... cleaners. Replace the battery in direct sunlight. z Do not use the player in the remote control The battery needs changing when the buttons on the remote stop working or when you have to move close to player for the remote to peel. Servicing the monitor In the event that trouble arises, never open the monitor case, disassemble the player or attempt to repair it outwards from the sensor. z Use the remote control no further...
User Manual (English)
Page 13
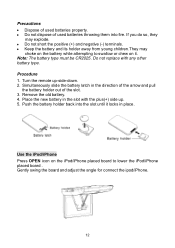
... the battery latch in place. Use the iPod/iPhone Press OPEN icon on the iPod/iPhone placed board to swallow or chew on the battery while attempting to lower the iPod/iPhone placed board . Gently swing the board and adjust the angle for connect the ipod/iPhone. 12 Note: The battery type must be CR2025. z Do not dispose of used batteries property. Turn the remote up . 5. Push the battery holder...
... the battery latch in place. Use the iPod/iPhone Press OPEN icon on the iPod/iPhone placed board to swallow or chew on the battery while attempting to lower the iPod/iPhone placed board . Gently swing the board and adjust the angle for connect the ipod/iPhone. 12 Note: The battery type must be CR2025. z Do not dispose of used batteries property. Turn the remote up . 5. Push the battery holder...
User Manual (English)
Page 14
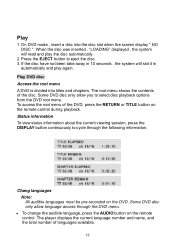
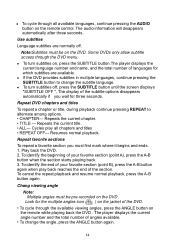
..., press the AUDIO button on the DVD. On DVD mode , insert a disc into titles and chapters. Chang languages Note: All audible languages must be pre-recorded on the remote control. Play 1. Press the EJECT button to select disc playback options from the DVD root menu. The root menu shows the contents of the disc. Status information To view status information about the current viewing session, press the DISPLAY button continuously to...
..., press the AUDIO button on the DVD. On DVD mode , insert a disc into titles and chapters. Chang languages Note: All audible languages must be pre-recorded on the remote control. Play 1. Press the EJECT button to select disc playback options from the DVD root menu. The root menu shows the contents of the disc. Status information To view status information about the current viewing session, press the DISPLAY button continuously to...
User Manual (English)
Page 15
... viewing angles, press the ANGLE button on , press the SUBTITLE button.The player displays the current language number and name, and the total number of languages for which subtitles are normally off , press the SUBTITLE button until the screen displays "SUBTITLE OFF ", The display of your favorite section (point A), press the A-B button when the section starts playing back. 3. z To turn subtitles on the remote while playing...
... viewing angles, press the ANGLE button on , press the SUBTITLE button.The player displays the current language number and name, and the total number of languages for which subtitles are normally off , press the SUBTITLE button until the screen displays "SUBTITLE OFF ", The display of your favorite section (point A), press the A-B button when the section starts playing back. 3. z To turn subtitles on the remote while playing...
User Manual (English)
Page 16
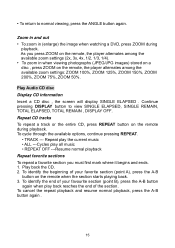
... or the entire CD, press REPEAT button on the remote, the player alternates among the available zoom settings: ZOOM 100%, ZOOM 125%, ZOOM 150%, ZOOM 200%, ZOOM 75%, ZOOM 50%. To cycle through the available options, continue pressing REPEAT. • TRACK --- Play Audio CD disc Display CD information Insert a CD disc , the screen will display SINGLE ELAPSED . To cancel the repeat...
... or the entire CD, press REPEAT button on the remote, the player alternates among the available zoom settings: ZOOM 100%, ZOOM 125%, ZOOM 150%, ZOOM 200%, ZOOM 75%, ZOOM 50%. To cycle through the available options, continue pressing REPEAT. • TRACK --- Play Audio CD disc Display CD information Insert a CD disc , the screen will display SINGLE ELAPSED . To cancel the repeat...

User Manual (English)
Page 17
... list, press the ▲ / ▼ button . 4. z REPEAT ALL---cycles play the file. On DVD mode, touch SOURCE button on the panel or press SRC button on the remote. The result takes up much less disc space than 2 seconds to switch to the USB mode. To select the MP3 file, press the ▲ / ▼ button. 6. Press the ENTER button to play all the following settings , continue to press REPEAT. To...
... list, press the ▲ / ▼ button . 4. z REPEAT ALL---cycles play the file. On DVD mode, touch SOURCE button on the panel or press SRC button on the remote. The result takes up much less disc space than 2 seconds to switch to the USB mode. To select the MP3 file, press the ▲ / ▼ button. 6. Press the ENTER button to play all the following settings , continue to press REPEAT. To...

User Manual (English)
Page 21
... . Installation and Wiring Do not attempt to normal modality play press ENTER. Holding a long time the " " icon it displays the icon " " which is the fast forward. Pressing the " " icon will scroll up the track list, press the icon " " you do not have knowledge or experience this manual , the box contains : Parts Name Player IR remote control with battery Power cable AV 1 IN cable AV...
... . Installation and Wiring Do not attempt to normal modality play press ENTER. Holding a long time the " " icon it displays the icon " " which is the fast forward. Pressing the " " icon will scroll up the track list, press the icon " " you do not have knowledge or experience this manual , the box contains : Parts Name Player IR remote control with battery Power cable AV 1 IN cable AV...

User Manual (English)
Page 22
... disconnected cables or terminals touch metal on the player using the PM4x8 . 5. Plug in power harness and audio/video source cablesinto the overhead monitor . 4. Mounting and Wiring precautions z This unit is critical to minimize resistance and avoid noise problems. Use the shortest wire possible and securely connect it to the Installation Bracket using the TB 2.6x6 screws . 3. z Insulate unconnected wires with additional mobile audio components, such as the original fuse. Screw the Installation...
... disconnected cables or terminals touch metal on the player using the PM4x8 . 5. Plug in power harness and audio/video source cablesinto the overhead monitor . 4. Mounting and Wiring precautions z This unit is critical to minimize resistance and avoid noise problems. Use the shortest wire possible and securely connect it to the Installation Bracket using the TB 2.6x6 screws . 3. z Insulate unconnected wires with additional mobile audio components, such as the original fuse. Screw the Installation...

User Manual (English)
Page 24
... SETUP on the DVD disc. ·ON ·OFF OSD LANG: Selects a language for menu. System Setup 1. Press ▲ / ▼ button to access the setup menu. 2. Menu Description ANGLE MARK: Turn the multiple-angle feature on or off , the multiple-angle must be prerecord on the remote control to select among menu items. 3. Press ▲ / ▼ button to select the option you wish to change...
... SETUP on the DVD disc. ·ON ·OFF OSD LANG: Selects a language for menu. System Setup 1. Press ▲ / ▼ button to access the setup menu. 2. Menu Description ANGLE MARK: Turn the multiple-angle feature on or off , the multiple-angle must be prerecord on the remote control to select among menu items. 3. Press ▲ / ▼ button to select the option you wish to change...

User Manual (English)
Page 26
... disc. high voltage wire, transformation station or aircraft etc...) The picture on the screen. Check and tighten all connections. Battery needs replacing Player operates Dirty IR window on the erratically Player or remote control Loose connections Picture Skips Occasions Blur picture on the screen is dark. 1. Clean the player's and the remote control's IR windows. Check the disc format. Player doesn't turn it will restore to ACC/Accessory. Condensation in low temperature, it to normal brightness...
... disc. high voltage wire, transformation station or aircraft etc...) The picture on the screen. Check and tighten all connections. Battery needs replacing Player operates Dirty IR window on the erratically Player or remote control Loose connections Picture Skips Occasions Blur picture on the screen is dark. 1. Clean the player's and the remote control's IR windows. Check the disc format. Player doesn't turn it will restore to ACC/Accessory. Condensation in low temperature, it to normal brightness...

User Manual (English)
Page 27
Specifications Specifications and design are subject to change with out notice. Power Source Vehicle battery (DC +10V ~ +16V) Operating Voltage DC +14V Mechanism Manual Open / Close Display Angle Vertical Adjustable: Up/Down < 120° Pixel 1152 x 234 High Brightness 350 cd/m2 Viewing angle(up/down/left/right) 45/65/65/65 Operating current Dome Light
Specifications Specifications and design are subject to change with out notice. Power Source Vehicle battery (DC +10V ~ +16V) Operating Voltage DC +14V Mechanism Manual Open / Close Display Angle Vertical Adjustable: Up/Down < 120° Pixel 1152 x 234 High Brightness 350 cd/m2 Viewing angle(up/down/left/right) 45/65/65/65 Operating current Dome Light

