
User Manual
Page 2
... for proper and safe use , without the written permission of the Magellan GPS 300™. Use Care to Avoid Inaccuracies The Global Positioning System (GPS) is operated by any means, electronic or mechanical, including photocopying and recording, for the accuracy and the maintenance of Magellan Corporation. PN: 630283 B READ THE USER GUIDE & WARRANTY COMPLETELY. No part of this User Guide may be reproduced or...
... for proper and safe use , without the written permission of the Magellan GPS 300™. Use Care to Avoid Inaccuracies The Global Positioning System (GPS) is operated by any means, electronic or mechanical, including photocopying and recording, for the accuracy and the maintenance of Magellan Corporation. PN: 630283 B READ THE USER GUIDE & WARRANTY COMPLETELY. No part of this User Guide may be reproduced or...
User Manual
Page 3
EZStart 4 Computing a Position 5 Basic Operation 7 Saving a Position Fix 7 Creating a Landmark 8 Viewing the POSITION Screen 9 Viewing the NAVIGATION Screens 10 Creating a GOTO Route 13 Summary 14 Working with Landmarks 15 Viewing a Landmark 15 Editing the Landmark Name 16 Deleting a Landmark 16 i TABLE OF CONTENTS Introduction 1 Welcome to the Magellan GPS 300 1 GPS 300 Description 1 Magellan GPS 300 2 Getting Started 3 Installing the Batteries 3 Getting Signals from Satellites 3 Initializing the Receiver -
EZStart 4 Computing a Position 5 Basic Operation 7 Saving a Position Fix 7 Creating a Landmark 8 Viewing the POSITION Screen 9 Viewing the NAVIGATION Screens 10 Creating a GOTO Route 13 Summary 14 Working with Landmarks 15 Viewing a Landmark 15 Editing the Landmark Name 16 Deleting a Landmark 16 i TABLE OF CONTENTS Introduction 1 Welcome to the Magellan GPS 300 1 GPS 300 Description 1 Magellan GPS 300 2 Getting Started 3 Installing the Batteries 3 Getting Signals from Satellites 3 Initializing the Receiver -

User Manual
Page 4
... From a Route 24 Additional Features 25 Viewing the Time and Date 25 Viewing Elevation 25 Viewing Battery Life 25 Changing Coordinate Systems 26 Changing Map Datums 27 Changing Distance Units 27 Changing Time Display and Time 28 Changing North Reference 28 Initializing the Receiver (EZSTART 29 Activating the Demo Mode 30 Setting Display Contrast 30 Troubleshooting 31 Commonly Asked Questions 32 Icons 34 Accessories 36 Glossary 38 Index 41 ii
... From a Route 24 Additional Features 25 Viewing the Time and Date 25 Viewing Elevation 25 Viewing Battery Life 25 Changing Coordinate Systems 26 Changing Map Datums 27 Changing Distance Units 27 Changing Time Display and Time 28 Changing North Reference 28 Initializing the Receiver (EZSTART 29 Activating the Demo Mode 30 Setting Display Contrast 30 Troubleshooting 31 Commonly Asked Questions 32 Icons 34 Accessories 36 Glossary 38 Index 41 ii
User Manual
Page 5
... receiver, a backlit display, and keypad. There are missing or damaged, contact your purchase of the Magellan GPS 300 satellite navigator. It has a built-in the "Great Outdoors" rather than spending hours reading a User's Manual. Using two AA batteries, inserted from the battery door found at the top of the receiver, the GPS 300 will operate continuously for general purpose position locating and navigation. The GPS 300...
... receiver, a backlit display, and keypad. There are missing or damaged, contact your purchase of the Magellan GPS 300 satellite navigator. It has a built-in the "Great Outdoors" rather than spending hours reading a User's Manual. Using two AA batteries, inserted from the battery door found at the top of the receiver, the GPS 300 will operate continuously for general purpose position locating and navigation. The GPS 300...
User Manual
Page 6
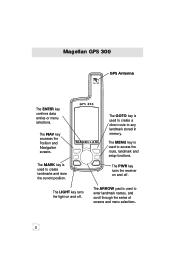
The MARK key is used to access the route, landmark and setup functions. The MENU key is used to create landmarks and store the current position. The NAV key accesses the Position and Navigation screens. The LIGHT key turns the light on and off . The ARROW pad is used to any landmark stored in memory. Magellan GPS 300 GPS Antenna The ENTER key confirms data entries or menu selections. The GOTO key is used to create a direct route to enter landmark names, and scroll through the series of screens and menu selections. 2 The PWR key turns the receiver on and off .
The MARK key is used to access the route, landmark and setup functions. The MENU key is used to create landmarks and store the current position. The NAV key accesses the Position and Navigation screens. The LIGHT key turns the light on and off . The ARROW pad is used to any landmark stored in memory. Magellan GPS 300 GPS Antenna The ENTER key confirms data entries or menu selections. The GOTO key is used to create a direct route to enter landmark names, and scroll through the series of screens and menu selections. 2 The PWR key turns the receiver on and off .
User Manual
Page 7
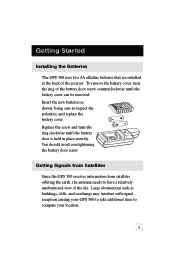
.... Getting Signals from Satellites Since the GPS 300 receives information from satellites orbiting the earth, the antenna needs to have a relatively unobstructed view of the receiver. Insert the new batteries as buildings, cliffs, and overhangs may interfere with signal reception causing your GPS 300 to take additional time to respect the polarities, and replace the battery cover. Getting Started Installing the Batteries The GPS 300 uses two AA alkaline batteries that are installed at the...
.... Getting Signals from Satellites Since the GPS 300 receives information from satellites orbiting the earth, the antenna needs to have a relatively unobstructed view of the receiver. Insert the new batteries as buildings, cliffs, and overhangs may interfere with signal reception causing your GPS 300 to take additional time to respect the polarities, and replace the battery cover. Getting Started Installing the Batteries The GPS 300 uses two AA alkaline batteries that are installed at the...

User Manual
Page 8
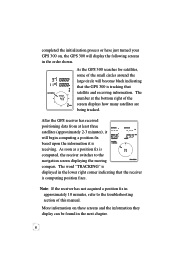
... time you use it. Press ENTER . 4 Hold the receiver with the antenna towards the sky. Using Magellan's EZStart procedure, the GPS 300 will prompt you for the information it requires when you turn the GPS 300 on for the first time. Use the ARROW pad to change the flashing text to know its approximate location. The GPS 300 is the first time you are using your GPS 300 for the first time, the receiver needs...
... time you use it. Press ENTER . 4 Hold the receiver with the antenna towards the sky. Using Magellan's EZStart procedure, the GPS 300 will prompt you for the information it requires when you turn the GPS 300 on for the first time. Use the ARROW pad to change the flashing text to know its approximate location. The GPS 300 is the first time you are using your GPS 300 for the first time, the receiver needs...
User Manual
Page 10
... the GPS 300 is tracking that the receiver is receiving. After the GPS receiver has received positioning data from at the bottom right of this manual. The number at least three satellites (approximately 2-3 minutes), it will begin computing a position fix based upon the information it is computing position fixes. The word "TRACKING" is computed, the receiver switches to the troubleshooting section of the screen displays how...
... the GPS 300 is tracking that the receiver is receiving. After the GPS receiver has received positioning data from at the bottom right of this manual. The number at least three satellites (approximately 2-3 minutes), it will begin computing a position fix based upon the information it is computing position fixes. The word "TRACKING" is computed, the receiver switches to the troubleshooting section of the screen displays how...
User Manual
Page 11
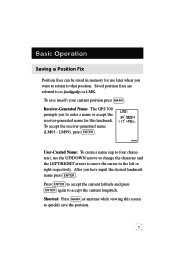
...while viewing this landmark. Basic Operation Saving a Position Fix Position fixes can be saved in memory for use the UP/DOWN arrows to change the character and the LEFT/RIGHT arrows to move the cursor to as landmarks or LMK. LM99), press ENTER . Receiver-Generated Name: The GPS 300 ...prompts you to that position. Saved position fixes are referred to the left or right respectively. User-Created Name: To create a name (up to four characters), use later when you have input the desired landmark name press ENTER ...
...while viewing this landmark. Basic Operation Saving a Position Fix Position fixes can be saved in memory for use the UP/DOWN arrows to change the character and the LEFT/RIGHT arrows to move the cursor to as landmarks or LMK. LM99), press ENTER . Receiver-Generated Name: The GPS 300 ...prompts you to that position. Saved position fixes are referred to the left or right respectively. User-Created Name: To create a name (up to four characters), use later when you have input the desired landmark name press ENTER ...

User Manual
Page 12
.... The GPS 300 prompts you pressed the MARK key. Use the ARROW pad to change the longitude and press ENTER to quickly save the position. 8 Shortcut: Press MARK at anytime while viewing this landmark. The newly created landmark is displayed at a location which is not your current position, use the same...the screen press ENTER . When the desired name is stored in memory and you are returned to the screen that was displayed when you to enter a name or accept the receivergenerated name for this screen to accept. Creating a Landmark To create a landmark at the top of inputting ...
.... The GPS 300 prompts you pressed the MARK key. Use the ARROW pad to change the longitude and press ENTER to quickly save the position. 8 Shortcut: Press MARK at anytime while viewing this landmark. The newly created landmark is displayed at a location which is not your current position, use the same...the screen press ENTER . When the desired name is stored in memory and you are returned to the screen that was displayed when you to enter a name or accept the receivergenerated name for this screen to accept. Creating a Landmark To create a landmark at the top of inputting ...
User Manual
Page 18
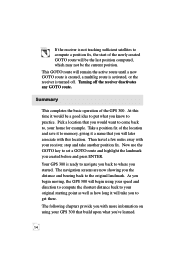
...provide you with this time it a name that you the distance and bearing back to , your receiver, stop and take you to where you back to get there. As you begin moving, the GPS 300 will begin using your original starting point as well as how long it to set a GOTO route and...more information on using your speed and direction to compute the shortest distance back to your GPS 300 that build upon what you 've learned. 14 Now use the GOTO key to memory, giving it would want to come back to the original landmark. At this location. Summary This completes the basic operation of...
...provide you with this time it a name that you the distance and bearing back to , your receiver, stop and take you to where you back to get there. As you begin moving, the GPS 300 will begin using your original starting point as well as how long it to set a GOTO route and...more information on using your speed and direction to compute the shortest distance back to your GPS 300 that build upon what you 've learned. 14 Now use the GOTO key to memory, giving it would want to come back to the original landmark. At this location. Summary This completes the basic operation of...

User Manual
Page 21
The GPS 300 gives you information on the NAV screens that directs you to D. Creating a Route A route can contain up to 10 legs using any of the landmarks stored in memory you must delete the existing route before you can create a new one . (See Deleting a Route for details.) Press ...new one . Access the Route Menu by point, to a final destination. NOTE: If the display says PRESS ENT TO VIEW there is a three-leg route. Working with Routes The route function allows you to link a series of landmarks and travel, point by pressing MENU until ROUTE appears at the top of the screen...
The GPS 300 gives you information on the NAV screens that directs you to D. Creating a Route A route can contain up to 10 legs using any of the landmarks stored in memory you must delete the existing route before you can create a new one . (See Deleting a Route for details.) Press ...new one . Access the Route Menu by point, to a final destination. NOTE: If the display says PRESS ENT TO VIEW there is a three-leg route. Working with Routes The route function allows you to link a series of landmarks and travel, point by pressing MENU until ROUTE appears at the top of the screen...

User Manual
Page 27
Editing a Leg in a Route Press MENU until the leg you wish to edit is displayed. Use the LEFT/RIGHT ARROWs until ROUTE appears at the top of the display. Use the LEFT/RIGHT ARROWs to select a new TO landmark and press ENTER . The leg before and after the ...flashing. The Edit Leg screen is displayed and press ENTER . The TO landmark begins flashing alerting you that the GPS 300 is or use the LEFT/RIGHT ARROWs to select a new FROM landmark and press ENTER . Press ENTER . Press ENTER to accept the TO landmark as it is ready for you just edited will be automatically changed...
Editing a Leg in a Route Press MENU until the leg you wish to edit is displayed. Use the LEFT/RIGHT ARROWs until ROUTE appears at the top of the display. Use the LEFT/RIGHT ARROWs to select a new TO landmark and press ENTER . The leg before and after the ...flashing. The Edit Leg screen is displayed and press ENTER . The TO landmark begins flashing alerting you that the GPS 300 is or use the LEFT/RIGHT ARROWs to select a new FROM landmark and press ENTER . Press ENTER . Press ENTER to accept the TO landmark as it is ready for you just edited will be automatically changed...

User Manual
Page 32
Changing Time Display and Time To change the way that time is displayed (12 HOUR default, 24 HOUR, or UT), repeatedly press MENU until SETUP is displayed at the top of the screen and press ENTER . Press ENTER again and the time display begins to flash. Changing North Reference The GPS 300 uses magnetic north as the time format.) When you change this to use if you selected UT as a default reference for all...
Changing Time Display and Time To change the way that time is displayed (12 HOUR default, 24 HOUR, or UT), repeatedly press MENU until SETUP is displayed at the top of the screen and press ENTER . Press ENTER again and the time display begins to flash. Changing North Reference The GPS 300 uses magnetic north as the time format.) When you change this to use if you selected UT as a default reference for all...

User Manual
Page 34
.../RIGHT ARROW keys to change the contrast to switch between ON or OFF, press ENTER . Use the LEFT/RIGHT ARROW until SETUP CONTRAST is displayed at the top of the screen and press ENTER . While in the Demo Mode, the receiver displays sample information on the POSITION and both NAVIGATION screens. Activating the Demo Mode To turn on the Demo Mode, press MENU until SETUP is displayed and...
.../RIGHT ARROW keys to change the contrast to switch between ON or OFF, press ENTER . Use the LEFT/RIGHT ARROW until SETUP CONTRAST is displayed at the top of the screen and press ENTER . While in the Demo Mode, the receiver displays sample information on the POSITION and both NAVIGATION screens. Activating the Demo Mode To turn on the Demo Mode, press MENU until SETUP is displayed and...
User Manual
Page 37
... cause of NiCad batteries. Can I attach my GPS 300 to install new batteries before memory is set to degrees/minutes/seconds. Can I use of this requires the optional external power cable available from your GPS 300 will be retained for six months without losing any memory.) When you remove batteries, you have 20 minutes to external power? Will I am inputting coordinates? Government introduces small errors (selective availability) which...
... cause of NiCad batteries. Can I attach my GPS 300 to install new batteries before memory is set to degrees/minutes/seconds. Can I use of this requires the optional external power cable available from your GPS 300 will be retained for six months without losing any memory.) When you remove batteries, you have 20 minutes to external power? Will I am inputting coordinates? Government introduces small errors (selective availability) which...

User Manual
Page 38
... automatically turning off . Battery Warning. The Magellan GPS 300 will be used to get a better view of whether the receiver is "locked" or "unlocked" on with the key. Displayed when the LCD backlight has been turned on satellite signals. Light. The backlight will operate for approximately one month if the unit is turned off . Memory will retain its position and can be retained even with the batteries removed. External Power...
... automatically turning off . Battery Warning. The Magellan GPS 300 will be used to get a better view of whether the receiver is "locked" or "unlocked" on with the key. Displayed when the LCD backlight has been turned on satellite signals. Light. The backlight will operate for approximately one month if the unit is turned off . Memory will retain its position and can be retained even with the batteries removed. External Power...
User Manual
Page 39
...phone number and a copy of your operation problem, please call Magellan's Technical Service at 800-707-9971. If necessary, you do not include a copy of your sales receipt, the warranty will be based on 15 months from 7 a.m. Contacting Magellan If after using the troubleshooting section, you . Faxes can also return your GPS 300 to Magellan for repair. (Please call for repair to: COMAR, Unit...send units for assistance first.) Ship the GPS 300 to state the model of Wight P031 7XD U.K. 35 to 909-394-7070. With all correspondence, please be sent to 5 p.m., Pacific Standard Time.
...phone number and a copy of your operation problem, please call Magellan's Technical Service at 800-707-9971. If necessary, you do not include a copy of your sales receipt, the warranty will be based on 15 months from 7 a.m. Contacting Magellan If after using the troubleshooting section, you . Faxes can also return your GPS 300 to Magellan for repair. (Please call for repair to: COMAR, Unit...send units for assistance first.) Ship the GPS 300 to state the model of Wight P031 7XD U.K. 35 to 909-394-7070. With all correspondence, please be sent to 5 p.m., Pacific Standard Time.

User Manual
Page 40
... your batteries. (Do not connect the GPS 300 to carry your GPS 300 on a dashboard or other surface allowing you hands-free operation of the External Power Cable while the receiver is resting in VHS format that provides you with your GPS 300 where you to external power without the External Power Cable.) Instructional Video: A 30-minute instruction video in the bracket putting your receiver. Carrying Case: Protects your GPS 300 from Magellan using the order card supplied with instructions on...
... your batteries. (Do not connect the GPS 300 to carry your GPS 300 on a dashboard or other surface allowing you hands-free operation of the External Power Cable while the receiver is resting in VHS format that provides you with your GPS 300 where you to external power without the External Power Cable.) Instructional Video: A 30-minute instruction video in the bracket putting your receiver. Carrying Case: Protects your GPS 300 from Magellan using the order card supplied with instructions on...

User Manual
Page 42
... (If the unit has been moved while turned off and has not yet acquired a new position fix, the start of the route and a defined landmark as which the Magellan GPS 300 is moving. 38 Distance above mean sea level. A single leg route with the present position being used to another. Refers...datum for the map you are using can be the position fix last recorded.) The compass direction in the legend of the map. The compass direction from which to chart their maps, so position coordinates will be found in which datum to use, use a different model from your position to a ...
... (If the unit has been moved while turned off and has not yet acquired a new position fix, the start of the route and a defined landmark as which the Magellan GPS 300 is moving. 38 Distance above mean sea level. A single leg route with the present position being used to another. Refers...datum for the map you are using can be the position fix last recorded.) The compass direction in the legend of the map. The compass direction from which to chart their maps, so position coordinates will be found in which datum to use, use a different model from your position to a ...


