
Getting Started Guide
Page 2
... receiver is operated by poor satellite geometry and obstructions, like buildings and large trees. The Magellan MobileMapper 6 must not be determined by the periodic adjustments to operate this document is solely responsible for product updates and additional information. This Class B digital apparatus meets all requirements of the GPS hardware and GPS operating software. Trademarks All product and brand names mentioned in a residential installation. The accuracy...
... receiver is operated by poor satellite geometry and obstructions, like buildings and large trees. The Magellan MobileMapper 6 must not be determined by the periodic adjustments to operate this document is solely responsible for product updates and additional information. This Class B digital apparatus meets all requirements of the GPS hardware and GPS operating software. Trademarks All product and brand names mentioned in a residential installation. The accuracy...

Getting Started Guide
Page 3
... State of California, without reference to changes in the GPS. (Note: Magellan Navigation GPS receivers use ; (ii) disasters such as UPS or FedEx when returning a product for repair. In the event of Goods, and shall benefit Magellan Navigation, its conflict of a satellite or modifications to the receiver that it is incomplete or illegible or if the serial number is being shipped for service. Inaccurate transmissions can...
... State of California, without reference to changes in the GPS. (Note: Magellan Navigation GPS receivers use ; (ii) disasters such as UPS or FedEx when returning a product for repair. In the event of Goods, and shall benefit Magellan Navigation, its conflict of a satellite or modifications to the receiver that it is incomplete or illegible or if the serial number is being shipped for service. Inaccurate transmissions can...

Getting Started Guide
Page 4
... shipment, or for repair. Opening, dismantling or repairing of a satellite or modifications to the receiver that may not apply to obtain position, velocity and time information. Purchaser is operated by Magellan Navigation, (8) that software products or software included in the GPS. (Note: Magellan Navigation GPS receivers use GPS or GPS+GLONASS to you purchased the product. The repaired or replaced product will be warranted for 90 days from the date of any patent, trademark...
... shipment, or for repair. Opening, dismantling or repairing of a satellite or modifications to the receiver that may not apply to obtain position, velocity and time information. Purchaser is operated by Magellan Navigation, (8) that software products or software included in the GPS. (Note: Magellan Navigation GPS receivers use GPS or GPS+GLONASS to you purchased the product. The repaired or replaced product will be warranted for 90 days from the date of any patent, trademark...

Getting Started Guide
Page 7
...Package Content & Product Specifications 2 Package Content 2 Optional Accessories 2 Operating System 2 GPS Characteristics 2 User Interface 2 Software Provided as Standard 3 Physical Characteristics 3 Memory Characteristics 3 Power Requirements 3 Other Features 3 Description 4 Front View 4 Rear View 5 Side View (Left 5 Side View (Right 6 Top View 6 Rubber Flaps 6 First-Time Use 7 Inserting Fresh Batteries 7 Turning the Receiver On 7 Adjusting the Backlight 8 Other Preliminary Settings 8 How to Hold the Receiver 9 Installing New Software 10 From an SD Card 10 From your...
...Package Content & Product Specifications 2 Package Content 2 Optional Accessories 2 Operating System 2 GPS Characteristics 2 User Interface 2 Software Provided as Standard 3 Physical Characteristics 3 Memory Characteristics 3 Power Requirements 3 Other Features 3 Description 4 Front View 4 Rear View 5 Side View (Left 5 Side View (Right 6 Top View 6 Rubber Flaps 6 First-Time Use 7 Inserting Fresh Batteries 7 Turning the Receiver On 7 Adjusting the Backlight 8 Other Preliminary Settings 8 How to Hold the Receiver 9 Installing New Software 10 From an SD Card 10 From your...
Getting Started Guide
Page 9
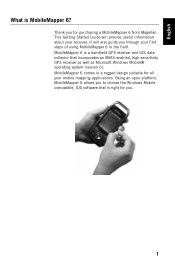
... Microsoft Windows Mobile® operating system (version 6). Being an open platform, MobileMapper 6 allows you through your first steps of using MobileMapper 6 in a rugged design suitable for you for purchasing a MobileMapper 6 from Magellan. MobileMapper 6 is a handheld GPS receiver and GIS data collector that is MobileMapper 6? MobileMapper 6 comes in the field. It will provide useful information about your receiver. Thank you . 1 English What is right for all your mobile mapping applications.
... Microsoft Windows Mobile® operating system (version 6). Being an open platform, MobileMapper 6 allows you through your first steps of using MobileMapper 6 in a rugged design suitable for you for purchasing a MobileMapper 6 from Magellan. MobileMapper 6 is a handheld GPS receiver and GIS data collector that is MobileMapper 6? MobileMapper 6 comes in the field. It will provide useful information about your receiver. Thank you . 1 English What is right for all your mobile mapping applications.

Getting Started Guide
Page 10
... Specifications Package Content • MobileMapper 6 GPS receiver • USB data cable • 2 x AA batteries • Spare stylus (5) • Getting Started CD Optional Accessories • External GPS antenna • Windshield mount • Cigarette lighter power adapter • AC power adapter • Carrying case Operating System • Microsoft Windows Mobile version 6 • Processor: 400 MHz • Bluetooth wireless technology, Object Push Profile (OPP) • USB interface (device only) GPS Characteristics...
... Specifications Package Content • MobileMapper 6 GPS receiver • USB data cable • 2 x AA batteries • Spare stylus (5) • Getting Started CD Optional Accessories • External GPS antenna • Windshield mount • Cigarette lighter power adapter • AC power adapter • Carrying case Operating System • Microsoft Windows Mobile version 6 • Processor: 400 MHz • Bluetooth wireless technology, Object Push Profile (OPP) • USB interface (device only) GPS Characteristics...
Getting Started Guide
Page 12
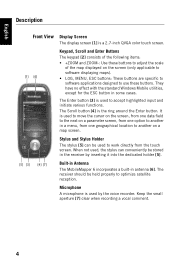
... the voice recorder. Stylus and Stylus Holder [2] The stylus [5] can conveniently be used by inserting it into the dedicated holder [5]. [5] [3] [4] [7] Built-in Antenna The MobileMapper 6 incorporates a built-in some cases. English Description Front View Display Screen The display screen [1] is a 2.7-inch QVGA color touch screen. [1] [6] Keypad, Scroll and Enter Buttons The keypad [2] consists of the map displayed on a map screen. It is used to work directly from one...
... the voice recorder. Stylus and Stylus Holder [2] The stylus [5] can conveniently be used by inserting it into the dedicated holder [5]. [5] [3] [4] [7] Built-in Antenna The MobileMapper 6 incorporates a built-in some cases. English Description Front View Display Screen The display screen [1] is a 2.7-inch QVGA color touch screen. [1] [6] Keypad, Scroll and Enter Buttons The keypad [2] consists of the map displayed on a map screen. It is used to work directly from one...

Getting Started Guide
Page 13
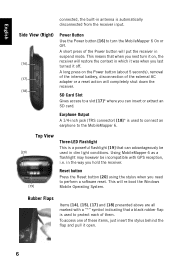
... a connection to select the next backlight level. • Flashlight: A long press on the flashlight. When an external antenna is used , the MobileMapper 6 is powered from the computer and the receiver batteries are five different backlight levels (off , hold the button pressed until the light goes out. The MobileMapper 6 USB port is 5 Hold Slide Switch Setting the Hold slide switch [14]* to secure the Magellan USB Data cable onto the receiver. English Rear View...
... a connection to select the next backlight level. • Flashlight: A long press on the flashlight. When an external antenna is used , the MobileMapper 6 is powered from the computer and the receiver batteries are five different backlight levels (off , hold the button pressed until the light goes out. The MobileMapper 6 USB port is 5 Hold Slide Switch Setting the Hold slide switch [14]* to secure the Magellan USB Data cable onto the receiver. English Rear View...
Getting Started Guide
Page 14
... Operating System. This will put the receiver in suspend mode. Rubber Flaps Items [14], [15], [17] and [18] presented above are all marked with GPS reception, i.e. A short press of them. Using MobileMapper 6 as a flashlight may however be [20] used in dim light conditions. Side View (Right) [16] [17] [18] Power Button Use the Power button [16] to turn it on the Power button (about 5 seconds), removal of the internal battery...
... Operating System. This will put the receiver in suspend mode. Rubber Flaps Items [14], [15], [17] and [18] presented above are all marked with GPS reception, i.e. A short press of them. Using MobileMapper 6 as a flashlight may however be [20] used in dim light conditions. Side View (Right) [16] [17] [18] Power Button Use the Power button [16] to turn it on the Power button (about 5 seconds), removal of the internal battery...
Getting Started Guide
Page 15
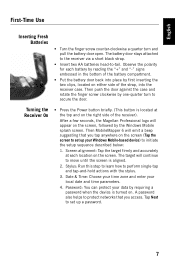
... screen. English First-Time Use Inserting Fresh Batteries • Turn the finger screw counter-clockwise a quarter turn to set up a password. 7 Turning the Receiver On • Press the Power button briefly. (This button is turned on either side of the battery compartment. • Put the battery door back into the receiver case. Observe the polarity for each location on the screen (Tap the screen to set up your local date and time parameters. 4. Password...
... screen. English First-Time Use Inserting Fresh Batteries • Turn the finger screw counter-clockwise a quarter turn to set up a password. 7 Turning the Receiver On • Press the Power button briefly. (This button is turned on either side of the battery compartment. • Put the battery door back into the receiver case. Observe the polarity for each location on the screen (Tap the screen to set up your local date and time parameters. 4. Password...

Getting Started Guide
Page 16
... Mobile Start screen. Adjusting the Backlight • Press the Flashlight button briefly and repeatedly until you choose. Settings are the other settings you to validate all your email address, name, account display name, user name, password and automatic send/receive time interval. The Battery tab shows the energy left side of time you get the desired level of backlight. (This button is powered from an external power source. • Tap on the Power icon...
... Mobile Start screen. Adjusting the Backlight • Press the Flashlight button briefly and repeatedly until you choose. Settings are the other settings you to validate all your email address, name, account display name, user name, password and automatic send/receive time interval. The Battery tab shows the energy left side of time you get the desired level of backlight. (This button is powered from an external power source. • Tap on the Power icon...

Getting Started Guide
Page 17
... - Time and date formats • Tap ok to set local settings: - How to Hold the Receiver Use of 45 degrees from horizontal and not too close to your changes and close the Regional Settings window. The receiver will have the best view of the sky when you hold it at an angle of the MobileMapper 6 while receiving satellites requires that you hold the receiver properly. Number format...
... - Time and date formats • Tap ok to set local settings: - How to Hold the Receiver Use of 45 degrees from horizontal and not too close to your changes and close the Regional Settings window. The receiver will have the best view of the sky when you hold it at an angle of the MobileMapper 6 while receiving satellites requires that you hold the receiver properly. Number format...
Getting Started Guide
Page 18
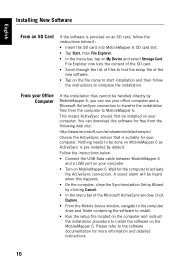
... MobileMapper 6 SD card slot. • Tap Start, then File Explorer. • In the menu bar, tap on My Device and select Storage Card. A sound alarm will be installed on your office computer and a Microsoft ActiveSync connection to transfer the installation files from the following web site: http://www.microsoft.com/windowsmobile/activesync/ Choose the ActiveSync version that is suitable for more information and detailed instructions. 10 English Installing New Software...
... MobileMapper 6 SD card slot. • Tap Start, then File Explorer. • In the menu bar, tap on My Device and select Storage Card. A sound alarm will be installed on your office computer and a Microsoft ActiveSync connection to transfer the installation files from the following web site: http://www.microsoft.com/windowsmobile/activesync/ Choose the ActiveSync version that is suitable for more information and detailed instructions. 10 English Installing New Software...
Getting Started Guide
Page 19
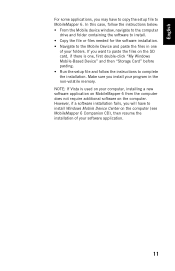
... applications, you install your program in one , first double-click "My Windows Mobile-Based Device" and then "Storage Card" before pasting. • Run the setup file and follow the instructions below: • From the Mobile device window, navigate to the computer drive and folder containing the software to install. • Copy the file or files needed for the software installation. • Navigate to install Windows Mobile Device Center on...
... applications, you install your program in one , first double-click "My Windows Mobile-Based Device" and then "Storage Card" before pasting. • Run the setup file and follow the instructions below: • From the Mobile device window, navigate to the computer drive and folder containing the software to install. • Copy the file or files needed for the software installation. • Navigate to install Windows Mobile Device Center on...

Getting Started Guide
Page 20
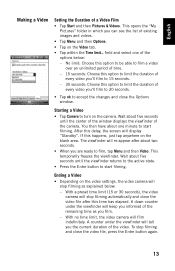
...; Tap Start, Programs and Pictures & Videos. This opens the "My Pictures" folder in the "My Pictures" folder. If this delay, the screen will re-appear after about two seconds. • Now use the MobileMapper 6 as possible and press the Enter button to take pictures. The light-blue background means the camera is currently selected. • Tap Camera, or press the Enter button, to...
...; Tap Start, Programs and Pictures & Videos. This opens the "My Pictures" folder in the "My Pictures" folder. If this delay, the screen will re-appear after about two seconds. • Now use the MobileMapper 6 as possible and press the Enter button to take pictures. The light-blue background means the camera is currently selected. • Tap Camera, or press the Enter button, to...
Getting Started Guide
Page 21
... the viewfinder. English Making a Video Setting the Duration of the camera. This opens the "My Pictures" folder in which you can see the list of the options below : - field and select one minute to accept the changes and close the video file, press the Enter button again. 13 Starting a Video • Tap Camera to start filming. Wait about five seconds...
... the viewfinder. English Making a Video Setting the Duration of the camera. This opens the "My Pictures" folder in which you can see the list of the options below : - field and select one minute to accept the changes and close the video file, press the Enter button again. 13 Starting a Video • Tap Camera to start filming. Wait about five seconds...

Getting Started Guide
Page 22
.... Changing Picture Settings • Tap Start, Programs and Pictures & Videos. Choose between x1 (zoom1:1), x2 (zoom2:1) and x3 (zoom 3:1). Playing Back a Video • With the "My Pictures" folder open , select the desired video file using the Scroll button. • Tap Menu and then Delete. • Tap Yes to the "My Pictures" folder. The video file you take . • Tap Menu, then Mode. The zoom setting...
.... Changing Picture Settings • Tap Start, Programs and Pictures & Videos. Choose between x1 (zoom1:1), x2 (zoom2:1) and x3 (zoom 3:1). Playing Back a Video • With the "My Pictures" folder open , select the desired video file using the Scroll button. • Tap Menu and then Delete. • Tap Yes to the "My Pictures" folder. The video file you take . • Tap Menu, then Mode. The zoom setting...

Getting Started Guide
Page 23
... MobileMapper 6, tap Start, then Settings. • Tap on the Connections tab. • Tap on the Bluetooth icon. • Tap on the name of your mobile phone and then tap Next (bottom right). • Using the virtual keyboard, enter a passcode of your mobile phone and make sure its web pages. Creating a Bluetooth Connection with a Mobile Phone • Turn on after the receiver...
... MobileMapper 6, tap Start, then Settings. • Tap on the Connections tab. • Tap on the Bluetooth icon. • Tap on the name of your mobile phone and then tap Next (bottom right). • Using the virtual keyboard, enter a passcode of your mobile phone and make sure its web pages. Creating a Bluetooth Connection with a Mobile Phone • Turn on after the receiver...

Getting Started Guide
Page 24
.... • Tap Finish to confirm the connection request. Creating a GPRS Connection Via a Mobile Phone • In the Settings window, tap on the Connections icon. • Tap on the upper Add a new modem connection hyperlink displayed on the screen. • Name your phone as the modem used , the phone may now ask you back to the Bluetooth Settings window on the connection name and then select Connect.
.... • Tap Finish to confirm the connection request. Creating a GPRS Connection Via a Mobile Phone • In the Settings window, tap on the Connections icon. • Tap on the upper Add a new modem connection hyperlink displayed on the screen. • Name your phone as the modem used , the phone may now ask you back to the Bluetooth Settings window on the connection name and then select Connect.

Getting Started Guide
Page 27
... L Languages 3 LOG button 4 Loudspeaker 5 M Manage existing connections 16 MENU button 4 Microphone 4 Mobile phone 15 Modem connection 15 O Opening battery door 7 Operating system 3, 18 OPP (Object Push Profile) 2 P Password 7 Play back video 14 Power button 6 Power management 8 Q QVGA 4 R Regional settings 9 Rename picture 12 Rename video file 14 Reset button 6 Resolution 14 S Screen alignment 7 Scroll button 4 SD Card 6, 10 Standby 13 Start shooting video 13 Stop shooting video 13 Storage Card 11 Stylus 4, 7 T Time limit (video) 13 Timer 14 U Update Rate 2 USB Data Cable 5 USB data cable...
... L Languages 3 LOG button 4 Loudspeaker 5 M Manage existing connections 16 MENU button 4 Microphone 4 Mobile phone 15 Modem connection 15 O Opening battery door 7 Operating system 3, 18 OPP (Object Push Profile) 2 P Password 7 Play back video 14 Power button 6 Power management 8 Q QVGA 4 R Regional settings 9 Rename picture 12 Rename video file 14 Reset button 6 Resolution 14 S Screen alignment 7 Scroll button 4 SD Card 6, 10 Standby 13 Start shooting video 13 Stop shooting video 13 Storage Card 11 Stylus 4, 7 T Time limit (video) 13 Timer 14 U Update Rate 2 USB Data Cable 5 USB data cable...


