
Manual - English
Page 3
Table of Contents i eXplorist 500 GPS Receiver 1 Features of the Magellan eXplorist GPS Receiver 1 Button Descriptions 2 Installing and Charging the Battery 4 Installing an Optional SD Card 5 Connecting to a Personal Computer 5 Using the eXplorist 500 6 Going to a Destination 6 Saving Your Position 7 Tracing Your Steps 8 Additional Features 9 Summary 9 Starting Up 10 Turning the eXplorist On 10 Turning the eXplorist Off 10 Changing the Display Backlight Intensity...
Table of Contents i eXplorist 500 GPS Receiver 1 Features of the Magellan eXplorist GPS Receiver 1 Button Descriptions 2 Installing and Charging the Battery 4 Installing an Optional SD Card 5 Connecting to a Personal Computer 5 Using the eXplorist 500 6 Going to a Destination 6 Saving Your Position 7 Tracing Your Steps 8 Additional Features 9 Summary 9 Starting Up 10 Turning the eXplorist On 10 Turning the eXplorist Off 10 Changing the Display Backlight Intensity...
Manual - English
Page 8
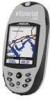
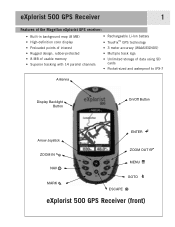
eXplorist 500 GPS Receiver 1 Features of the Magellan eXplorist GPS receiver: • Built-in background map (8 MB) • High-definition color display • Preloaded points of interest • Rugged design, rubber-protected • 8 MB of usable memory • Superior tracking with 14 parallel channels • Rechargeable Li-Ion battery • TrueFix™ GPS technology • 3 meter accuracy (WAAS/EGNOS) • Multiple...
eXplorist 500 GPS Receiver 1 Features of the Magellan eXplorist GPS receiver: • Built-in background map (8 MB) • High-definition color display • Preloaded points of interest • Rugged design, rubber-protected • 8 MB of usable memory • Superior tracking with 14 parallel channels • Rechargeable Li-Ion battery • TrueFix™ GPS technology • 3 meter accuracy (WAAS/EGNOS) • Multiple...

Manual - English
Page 10
eXplorist 500 GPS Receiver Wrist Lanyard Strap Mounting Hole Battery Door 3 Connector for external power and connection to install batteries.) eXplorist 500 GPS Receiver (back) Battery Door Fastener (Unscrew to open battery door to a personal computer.
eXplorist 500 GPS Receiver Wrist Lanyard Strap Mounting Hole Battery Door 3 Connector for external power and connection to install batteries.) eXplorist 500 GPS Receiver (back) Battery Door Fastener (Unscrew to open battery door to a personal computer.

Manual - English
Page 11
...; Turn the eXplorist off . Charging the Battery: Important: Charge the battery completely before first using power at the same rate. Tips on the batteries is constantly calculating position fixes and using your eXplorist. Insert the battery as shown and replace the battery door. eXplorist 500 GPS Receiver 4 Installing and Charging the Battery Installing the Battery: Remove the battery door by unscrewing the battery door fastener...
...; Turn the eXplorist off . Charging the Battery: Important: Charge the battery completely before first using power at the same rate. Tips on the batteries is constantly calculating position fixes and using your eXplorist. Insert the battery as shown and replace the battery door. eXplorist 500 GPS Receiver 4 Installing and Charging the Battery Installing the Battery: Remove the battery door by unscrewing the battery door fastener...

Manual - English
Page 12
...Card Cradle. On your personal computer USB ports (normally found a new USB hardware device. eXplorist 500 GPS Receiver Installing an Optional SD Card Open the battery door and remove the LI-ION battery, exposing the SD Card Cradle. Gently push the SD card cradle back down until it... named "Removable Disk". Connecting to a Personal Computer Turn your eXplorist off and connect the round connector of the eXplorist data cable to your eXplorist, a screen is installed properly. Put the LI-ION battery back in the battery compartment as damage will see a message on the back of ...
...Card Cradle. On your personal computer USB ports (normally found a new USB hardware device. eXplorist 500 GPS Receiver Installing an Optional SD Card Open the battery door and remove the LI-ION battery, exposing the SD Card Cradle. Gently push the SD card cradle back down until it... named "Removable Disk". Connecting to a Personal Computer Turn your eXplorist off and connect the round connector of the eXplorist data cable to your eXplorist, a screen is installed properly. Put the LI-ION battery back in the battery compartment as damage will see a message on the back of ...

Manual - English
Page 17
... 30 seconds between pressing the POWER button and pressing the ENTER button, otherwise the eXplorist will immediately turn the eXplorist off . If you need to leave the eXplorist on the batteries. To turn the eXplorist on, press the POWER button on the top right side. To prevent the... eXplorist from being turned on accidentally, draining the batteries, you press the POWER button during this countdown period, the eXplorist will automatically turn itself off. 10 Turning the eXplorist Off To turn off , press the POWER button on...
... 30 seconds between pressing the POWER button and pressing the ENTER button, otherwise the eXplorist will immediately turn the eXplorist off . If you need to leave the eXplorist on the batteries. To turn the eXplorist on, press the POWER button on the top right side. To prevent the... eXplorist from being turned on accidentally, draining the batteries, you press the POWER button during this countdown period, the eXplorist will automatically turn itself off. 10 Turning the eXplorist Off To turn off , press the POWER button on...

Manual - English
Page 32
...Position Screen The Position screen provides detailed position information in the GPS satellites. • A resettable trip odometer to keeps track of the distance you've travelled. • A graphical battery indicator provides you have the eXplorist connected to seasoned navigators. It also displays a 'charging'... text format that is also displayed in the eXplorist. Position Screen Overview Coordinates of present position Elevation of present position Trip Odometer Accuracy of the LI-Ion battery in the Accuracy field when the eXplorist is using the coordinate system selected. (See ...
...Position Screen The Position screen provides detailed position information in the GPS satellites. • A resettable trip odometer to keeps track of the distance you've travelled. • A graphical battery indicator provides you have the eXplorist connected to seasoned navigators. It also displays a 'charging'... text format that is also displayed in the eXplorist. Position Screen Overview Coordinates of present position Elevation of present position Trip Odometer Accuracy of the LI-Ion battery in the Accuracy field when the eXplorist is using the coordinate system selected. (See ...

Manual - English
Page 95
Features found in Preferences: • Restarting the GPS (Initializing) to give the eXplorist its approximate location if it has been moved a large distance while turned off. • A way of setting default folders for saving POI's, routes, etc. • ... the need arise. There are tools that will provide you full flexibility over the built-in power-management tools to assist in prolonging battery life. • Personalize your eXplorist. • Choose from ten different languages that can be used to display information. • Access to tools that are getting near your destination...
Features found in Preferences: • Restarting the GPS (Initializing) to give the eXplorist its approximate location if it has been moved a large distance while turned off. • A way of setting default folders for saving POI's, routes, etc. • ... the need arise. There are tools that will provide you full flexibility over the built-in power-management tools to assist in prolonging battery life. • Personalize your eXplorist. • Choose from ten different languages that can be used to display information. • Access to tools that are getting near your destination...

Manual - English
Page 104
Two areas that you can control to extend the battery life are turning the eXplorist off when not in your eXplorist should note that if the eXplorist turns off , you might want to set to Off. Press ENTER. 6....moving. This does not apply to highlight Preferences. 3. Setting the Power-Off Timer The eXplorist has a power-off timer that will turn the eXplorist off after a defined time period if no buttons have a GOTO route activated and .... 9. Press ENTER. 4. Press ENTER. 8. Press ENTER. This will prevent the batteries from running out if you accidentally leave the eXplorist on. 1.
Two areas that you can control to extend the battery life are turning the eXplorist off when not in your eXplorist should note that if the eXplorist turns off , you might want to set to Off. Press ENTER. 6....moving. This does not apply to highlight Preferences. 3. Setting the Power-Off Timer The eXplorist has a power-off timer that will turn the eXplorist off after a defined time period if no buttons have a GOTO route activated and .... 9. Press ENTER. 4. Press ENTER. 8. Press ENTER. This will prevent the batteries from running out if you accidentally leave the eXplorist on. 1.

Manual - English
Page 105
... the Arrow joystick to highlight Pwr Management. 5. Press ENTER. 4. Use the Arrow joystick to highlight the desired time interval or set to remain on the batteries. Press MENU. 2. The Light Timer function provides you with the selection of how long you want the backlight to Timer Off. 9.
... the Arrow joystick to highlight Pwr Management. 5. Press ENTER. 4. Use the Arrow joystick to highlight the desired time interval or set to remain on the batteries. Press MENU. 2. The Light Timer function provides you with the selection of how long you want the backlight to Timer Off. 9.

Manual - English
Page 115
Antenna Patch Acquisition Times (optimal conditions) Warm less than 1 minute Cold less than 2 minutes Update Rate 1 second continuous Accuracy Position Specifications 108 Performance Receiver 14 parallel-channel technology, tracks up to 14 satellites to compute and update information.
Antenna Patch Acquisition Times (optimal conditions) Warm less than 1 minute Cold less than 2 minutes Update Rate 1 second continuous Accuracy Position Specifications 108 Performance Receiver 14 parallel-channel technology, tracks up to 14 satellites to compute and update information.

Manual - English
Page 116
... Position Includes background map and 2 data fields (customizable) Includes graphical compass and 2 data fields (customizable) Includes position, elevation, accuracy, date and time, trip odometer, and battery life Alarms Anchor Alarm Off Course Alarm Arrival Alarm Proximity Alarm Alerts when moved a user-defined distance Alerts when more than a user-defined distance, left...
... Position Includes background map and 2 data fields (customizable) Includes graphical compass and 2 data fields (customizable) Includes position, elevation, accuracy, date and time, trip odometer, and battery life Alarms Anchor Alarm Off Course Alarm Arrival Alarm Proximity Alarm Alerts when moved a user-defined distance Alerts when more than a user-defined distance, left...

Manual - English
Page 117
... car, truck, boat, or virtually any additional accessories that are available for carrying extra batteries. This easy-to-install mounting bracket securely holds your receiver for your Magellan eXplorist, this rugged black canvas carrying case attaches conveniently to the Magellan Online Store at just the right angle while on your bicycle, snowmobile, or motorcycle for...
... car, truck, boat, or virtually any additional accessories that are available for carrying extra batteries. This easy-to-install mounting bracket securely holds your receiver for your Magellan eXplorist, this rugged black canvas carrying case attaches conveniently to the Magellan Online Store at just the right angle while on your bicycle, snowmobile, or motorcycle for...

Manual - English (for the UK)
Page 3
Table of Contents i eXplorist 500 GPS Receiver 1 Features of the Magellan eXplorist GPS Receiver 1 Button Descriptions 2 Installing and Charging the Battery 4 Installing an Optional SD Card 5 Connecting to a Personal Computer 5 Using the eXplorist 500 6 Going to a Destination 6 Saving Your Position 7 Tracing Your Steps 8 Additional Features 9 Summary 9 Starting Up 10 Turning the eXplorist On 10 Turning the eXplorist Off 10 Changing the Display Backlight Intensity...
Table of Contents i eXplorist 500 GPS Receiver 1 Features of the Magellan eXplorist GPS Receiver 1 Button Descriptions 2 Installing and Charging the Battery 4 Installing an Optional SD Card 5 Connecting to a Personal Computer 5 Using the eXplorist 500 6 Going to a Destination 6 Saving Your Position 7 Tracing Your Steps 8 Additional Features 9 Summary 9 Starting Up 10 Turning the eXplorist On 10 Turning the eXplorist Off 10 Changing the Display Backlight Intensity...

Manual - English (for the UK)
Page 8
eXplorist 500 GPS Receiver 1 Features of the Magellan eXplorist GPS receiver: • Built-in background map (8 MB) • High-definition color display • Preloaded points of interest • Rugged design, rubber-protected • 8 MB of usable memory • Superior tracking with 14 parallel channels • Rechargeable Li-Ion battery • TrueFix™ GPS technology • 3 meter accuracy (WAAS/EGNOS) • Multiple...
eXplorist 500 GPS Receiver 1 Features of the Magellan eXplorist GPS receiver: • Built-in background map (8 MB) • High-definition color display • Preloaded points of interest • Rugged design, rubber-protected • 8 MB of usable memory • Superior tracking with 14 parallel channels • Rechargeable Li-Ion battery • TrueFix™ GPS technology • 3 meter accuracy (WAAS/EGNOS) • Multiple...

Manual - English (for the UK)
Page 10
eXplorist 500 GPS Receiver Wrist Lanyard Strap Mounting Hole Battery Door 3 Connector for external power and connection to install batteries.) eXplorist 500 GPS Receiver (back) Battery Door Fastener (Unscrew to open battery door to a personal computer.
eXplorist 500 GPS Receiver Wrist Lanyard Strap Mounting Hole Battery Door 3 Connector for external power and connection to install batteries.) eXplorist 500 GPS Receiver (back) Battery Door Fastener (Unscrew to open battery door to a personal computer.

Manual - English (for the UK)
Page 11
...PC cable to the last viewed navigation screen. The battery will notice a drastic drop in use of time, turn the eXplorist off. • Use the Power Timer to ...Battery: Important: Charge the battery completely before first using power at the same position for a selected time. Use the arrow joystick to the lowest setting when none of the eXplorist. The most severe drain on high. eXplorist 500 GPS Receiver 4 Installing and Charging the Battery Installing the Battery: Remove the battery door by unscrewing the battery door fastener and lifting the battery...
...PC cable to the last viewed navigation screen. The battery will notice a drastic drop in use of time, turn the eXplorist off. • Use the Power Timer to ...Battery: Important: Charge the battery completely before first using power at the same position for a selected time. Use the arrow joystick to the lowest setting when none of the eXplorist. The most severe drain on high. eXplorist 500 GPS Receiver 4 Installing and Charging the Battery Installing the Battery: Remove the battery door by unscrewing the battery door fastener and lifting the battery...

Manual - English (for the UK)
Page 12
...occur when closing the SD Card Cradle. Put the LI-ION battery back in the battery compartment as damage will spring open. 5 SD Card Cradle Release With the cradle open, slide the SD card in the cradle (shown in your eXplorist and tighten the locking screw. Connecting to a Personal Computer ...may see a new device named "Removable Disk". From here you have an SD card installed in gray). eXplorist 500 GPS Receiver Installing an Optional SD Card Open the battery door and remove the LI-ION battery, exposing the SD Card Cradle. There are able to copy files to and from the installed SD card ...
...occur when closing the SD Card Cradle. Put the LI-ION battery back in the battery compartment as damage will spring open. 5 SD Card Cradle Release With the cradle open, slide the SD card in the cradle (shown in your eXplorist and tighten the locking screw. Connecting to a Personal Computer ...may see a new device named "Removable Disk". From here you have an SD card installed in gray). eXplorist 500 GPS Receiver Installing an Optional SD Card Open the battery door and remove the LI-ION battery, exposing the SD Card Cradle. There are able to copy files to and from the installed SD card ...

Manual - English (for the UK)
Page 17
... time you change your mind and decide to leave the eXplorist on , the display backlight is displayed. REMEMBER: Using the display backlight on high causes severe drain on medium. To turn the eXplorist on, press the POWER button on accidentally, draining the batteries, you press the POWER button. Changing the Display Backlight Intensity...
... time you change your mind and decide to leave the eXplorist on , the display backlight is displayed. REMEMBER: Using the display backlight on high causes severe drain on medium. To turn the eXplorist on, press the POWER button on accidentally, draining the batteries, you press the POWER button. Changing the Display Backlight Intensity...

Manual - English (for the UK)
Page 32
... present position Elevation of present position Trip Odometer Accuracy of the distance you've travelled. • A graphical battery indicator provides you have the eXplorist connected to seasoned navigators. It also displays a 'charging' icon when you with information on the current condition ..., automatically adjusted from time information supplied from the atomic clocks in the GPS satellites. • A resettable trip odometer to keeps track of position fix Current date and time Battery life indicator Navigation Screens 25 Position Screen The Position screen provides detailed position...
... present position Elevation of present position Trip Odometer Accuracy of the distance you've travelled. • A graphical battery indicator provides you have the eXplorist connected to seasoned navigators. It also displays a 'charging' icon when you with information on the current condition ..., automatically adjusted from time information supplied from the atomic clocks in the GPS satellites. • A resettable trip odometer to keeps track of position fix Current date and time Battery life indicator Navigation Screens 25 Position Screen The Position screen provides detailed position...


