
User Manual
Page 3
CHANGING THE REVERSIBLE DOOR CARE AND MAINTENANCE CLEANING YOUR REFRIGERATOR VACATION TIME MOVING YOUR REFRIGERATOR ENERGY SAVING TIPS TROUBLESHOOTING GUIDE . REFRIGERATOR WARRANTY . 3 .. 3 . 4 ... 4 .. 4 5 .. 6 6 .. . 6 .. . 6 7 .. 8 - 9 10 . . 10 10 . . 10 . . 11 - 12 . 13 2 THE CHILLER COMPARTMENT HOW TO DEFROST HOW TO CHANGE THE INTERIOR LIGHT ... TABLE OF CONTENTS NAMES OF THE PARTS SPECIFICATIONS IMPORTANT SAFETY INSTRUCTIONS INSTALLATION INSTRUCTION BEFORE USING YOUR REFRIGERATOR INSTALLING YOUR REFRIGERATOR ELECTRICAL CONNECTION OPERATING ...
CHANGING THE REVERSIBLE DOOR CARE AND MAINTENANCE CLEANING YOUR REFRIGERATOR VACATION TIME MOVING YOUR REFRIGERATOR ENERGY SAVING TIPS TROUBLESHOOTING GUIDE . REFRIGERATOR WARRANTY . 3 .. 3 . 4 ... 4 .. 4 5 .. 6 6 .. . 6 .. . 6 7 .. 8 - 9 10 . . 10 10 . . 10 . . 11 - 12 . 13 2 THE CHILLER COMPARTMENT HOW TO DEFROST HOW TO CHANGE THE INTERIOR LIGHT ... TABLE OF CONTENTS NAMES OF THE PARTS SPECIFICATIONS IMPORTANT SAFETY INSTRUCTIONS INSTALLATION INSTRUCTION BEFORE USING YOUR REFRIGERATOR INSTALLING YOUR REFRIGERATOR ELECTRICAL CONNECTION OPERATING ...

User Manual
Page 4
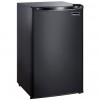
HMBR445WE/HMBR445BE/HMBR445SE (1) Evaporator (2) Drain Pan (3) Temperature Control Box (4) Shelves (5) Door Liner (6) Ice Cube Tray (7) Rack (8) Bottle Rack (9) Crisper (10) Can Dispenser (11) Temperature Control Dial (12) Interior Light Switch WARNING : Never touch the interior of the Freezer Chamber or frozen foods in the compartment with wet hands as this could result in frost bite. NAMES OF THE PARTS MODEL NO. Capacity Unit Dimensions ( inches ) Net Weight ( lbs) Magic Chef Refrigerator HMBR445WE/HMBR445BE/HMBR445WE 4.3 Cu. SPECIFICATIONS Model # HMBR445WE/HMBR445BE/HMBR445SE...
HMBR445WE/HMBR445BE/HMBR445SE (1) Evaporator (2) Drain Pan (3) Temperature Control Box (4) Shelves (5) Door Liner (6) Ice Cube Tray (7) Rack (8) Bottle Rack (9) Crisper (10) Can Dispenser (11) Temperature Control Dial (12) Interior Light Switch WARNING : Never touch the interior of the Freezer Chamber or frozen foods in the compartment with wet hands as this could result in frost bite. NAMES OF THE PARTS MODEL NO. Capacity Unit Dimensions ( inches ) Net Weight ( lbs) Magic Chef Refrigerator HMBR445WE/HMBR445BE/HMBR445WE 4.3 Cu. SPECIFICATIONS Model # HMBR445WE/HMBR445BE/HMBR445SE...

User Manual
Page 5
... installation. • Avoid locating the refrigerator in an RV or used with flammable fluids. INSTALLATION INSTRUCTIONS Before Using Your Refrigerator • Remove the exterior and interior packing. • Before connecting the refrigerator to the power source, let it is not designed to be installed in moist areas. • Plug the refrigerator into a wall outlet, turn the unit on and allow children to operate, play with lukewarm water using a soft cloth. (Cleaning instruction...
... installation. • Avoid locating the refrigerator in an RV or used with flammable fluids. INSTALLATION INSTRUCTIONS Before Using Your Refrigerator • Remove the exterior and interior packing. • Before connecting the refrigerator to the power source, let it is not designed to be installed in moist areas. • Plug the refrigerator into a wall outlet, turn the unit on and allow children to operate, play with lukewarm water using a soft cloth. (Cleaning instruction...

User Manual
Page 6
... the power cord supplied. If any circumstances, cut or remove the third ground prong from the receptacle. Use of an extension cord can result in the risk of electrical shock. This refrigerator should be used with three-prong ground. Never unplug the refrigerator by an authorized service center. If the power cord is damaged, have a qualified electrician or service technician install an...
... the power cord supplied. If any circumstances, cut or remove the third ground prong from the receptacle. Use of an extension cord can result in the risk of electrical shock. This refrigerator should be used with three-prong ground. Never unplug the refrigerator by an authorized service center. If the power cord is damaged, have a qualified electrician or service technician install an...

User Manual
Page 7
... designed for temperature to melt. Adjust the temperature control to defrost. Leave the freezer door open to allow accumulated ice / frost to stabilize between adjustments. Restart the unit per starting instructions. 6 OPERATING YOUR REFRIGERATOR Temperature Control • Your refrigerator has one increment at least 2 hours before putting foods inside. If there are instructions on the air outlet, and leave spaces for home or office refrigerator use hot water or other electric heating devices...
... designed for temperature to melt. Adjust the temperature control to defrost. Leave the freezer door open to allow accumulated ice / frost to stabilize between adjustments. Restart the unit per starting instructions. 6 OPERATING YOUR REFRIGERATOR Temperature Control • Your refrigerator has one increment at least 2 hours before putting foods inside. If there are instructions on the air outlet, and leave spaces for home or office refrigerator use hot water or other electric heating devices...

User Manual
Page 9
... instructions: 1. CHANGING THE REVERSIBLE DOOR CAUTION: To avoid personal injury to press the plug buttons firmly into the holes. 8 Remove the two screws (using a ratchet tool with a reversible door. Your refrigerator is built with a 7/16" socket) that hold the top hinge to the uncovered holes at the right side. Remove the plug buttons from the socket on a padded surface to free the pin from the upper left...
... instructions: 1. CHANGING THE REVERSIBLE DOOR CAUTION: To avoid personal injury to press the plug buttons firmly into the holes. 8 Remove the two screws (using a ratchet tool with a reversible door. Your refrigerator is built with a 7/16" socket) that hold the top hinge to the uncovered holes at the right side. Remove the plug buttons from the socket on a padded surface to free the pin from the upper left...

User Manual
Page 10
... later use. 7. Replace the door making sure the bottom socket enters the bottom hinge pin. Putty knife or thin-blade screwdriver. 9 Stand the cabinet. 9. Tools Required: - 7/16" socket-ratchet. - While holding the door in the closed position, secure the top hinge at the left side using the two screws previously removed at the left side using a 7/16" socket. Insert the bottom hinge at...
... later use. 7. Replace the door making sure the bottom socket enters the bottom hinge pin. Putty knife or thin-blade screwdriver. 9 Stand the cabinet. 9. Tools Required: - 7/16" socket-ratchet. - While holding the door in the closed position, secure the top hinge at the left side using the two screws previously removed at the left side using a 7/16" socket. Insert the bottom hinge at...

User Manual
Page 11
.... Energy Saving Tips • The refrigerator should be cleaned with mild detergent and warm water. • Dry the interior and exterior with a damp warm cloth soaked in lukewarm water and baking soda solution. Remove as many items as needed at one time, and close the door as soon as possible. 10 CARE AND MAINTENANCE Cleaning Your Refrigerator • Upon installation of your refrigerator. • Tape the doors shut...
.... Energy Saving Tips • The refrigerator should be cleaned with mild detergent and warm water. • Dry the interior and exterior with a damp warm cloth soaked in lukewarm water and baking soda solution. Remove as many items as needed at one time, and close the door as soon as possible. 10 CARE AND MAINTENANCE Cleaning Your Refrigerator • Upon installation of your refrigerator. • Tape the doors shut...

User Manual
Page 12
... compressor works to cool down completely. Compressor turns on . Temperature of a possible service call. Vibrations. POSSIBLE CAUSE Not plugged in hot water pipes. The refrigerator does not have been stored recently. Wait until the refrigerator has had a chance to the refrigerator. Temperature control is set too cold. Be sure floor can adequately support refrigerator. Try the suggestions below to assure that the refrigerator is hotter than room temperature. Temperature inside the refrigerator is opened...
... compressor works to cool down completely. Compressor turns on . Temperature of a possible service call. Vibrations. POSSIBLE CAUSE Not plugged in hot water pipes. The refrigerator does not have been stored recently. Wait until the refrigerator has had a chance to the refrigerator. Temperature control is set too cold. Be sure floor can adequately support refrigerator. Try the suggestions below to assure that the refrigerator is hotter than room temperature. Temperature inside the refrigerator is opened...

User Manual
Page 14
... material and workmanship such as door panels, door shelves, racks, light bulbs, etc. The warranty does not cover the following: Damages due to request warranty service. 13 If a replacement unit is not available or the unit cannot be free from defects in use of one -year warranty expires. Refrigerator Warranty Unless otherwise prohibited, MC Appliance Corporation warrants each new refrigerator to be repaired, liability is limited to the actual...
... material and workmanship such as door panels, door shelves, racks, light bulbs, etc. The warranty does not cover the following: Damages due to request warranty service. 13 If a replacement unit is not available or the unit cannot be free from defects in use of one -year warranty expires. Refrigerator Warranty Unless otherwise prohibited, MC Appliance Corporation warrants each new refrigerator to be repaired, liability is limited to the actual...

User Manual 2
Page 3
... HOW TO DEFROST HOW TO CHANGE THE INTERIOR LIGHT ... CHANGING THE REVERSIBLE DOOR CARE AND MAINTENANCE CLEANING YOUR REFRIGERATOR VACATION TIME MOVING YOUR REFRIGERATOR ENERGY SAVING TIPS TROUBLESHOOTING GUIDE . REFRIGERATOR WARRANTY . 3 .. 3 . 4 ... 4 .. 4 5 .. 6 6 .. . 6 .. . 6 7 .. 8 - 9 10 . . 10 10 . . 10 . . 11 - 12 . 13 2 TABLE OF CONTENTS NAMES OF THE PARTS SPECIFICATIONS IMPORTANT SAFETY INSTRUCTIONS INSTALLATION INSTRUCTION BEFORE USING YOUR REFRIGERATOR INSTALLING YOUR REFRIGERATOR ELECTRICAL CONNECTION OPERATING YOUR REFRIGERATOR...
... HOW TO DEFROST HOW TO CHANGE THE INTERIOR LIGHT ... CHANGING THE REVERSIBLE DOOR CARE AND MAINTENANCE CLEANING YOUR REFRIGERATOR VACATION TIME MOVING YOUR REFRIGERATOR ENERGY SAVING TIPS TROUBLESHOOTING GUIDE . REFRIGERATOR WARRANTY . 3 .. 3 . 4 ... 4 .. 4 5 .. 6 6 .. . 6 .. . 6 7 .. 8 - 9 10 . . 10 10 . . 10 . . 11 - 12 . 13 2 TABLE OF CONTENTS NAMES OF THE PARTS SPECIFICATIONS IMPORTANT SAFETY INSTRUCTIONS INSTALLATION INSTRUCTION BEFORE USING YOUR REFRIGERATOR INSTALLING YOUR REFRIGERATOR ELECTRICAL CONNECTION OPERATING YOUR REFRIGERATOR...

User Manual 2
Page 4
... (1) Evaporator (2) Drain Pan (3) Temperature Control Box (4) Shelves (5) Door Liner (6) Ice Cube Tray (7) Rack (8) Bottle Rack (9) Crisper (10) Can Dispenser (11) Temperature Control Dial (12) Interior Light Switch WARNING : Never touch the interior of the Freezer Chamber or frozen foods in the compartment with wet hands as this could result in frost bite. SPECIFICATIONS Model # MCBR445WEF/MCBR445BEF/MCBR445SEF Product Description Model No. Capacity Unit Dimensions ( inches ) Net Weight ( lbs) Magic Chef Refrigerator MCBR445WEF/MCBR445BEF/MCBR445SEF 4.3 Cu. Width Height Depth...
... (1) Evaporator (2) Drain Pan (3) Temperature Control Box (4) Shelves (5) Door Liner (6) Ice Cube Tray (7) Rack (8) Bottle Rack (9) Crisper (10) Can Dispenser (11) Temperature Control Dial (12) Interior Light Switch WARNING : Never touch the interior of the Freezer Chamber or frozen foods in the compartment with wet hands as this could result in frost bite. SPECIFICATIONS Model # MCBR445WEF/MCBR445BEF/MCBR445SEF Product Description Model No. Capacity Unit Dimensions ( inches ) Net Weight ( lbs) Magic Chef Refrigerator MCBR445WEF/MCBR445BEF/MCBR445SEF 4.3 Cu. Width Height Depth...

User Manual 2
Page 5
...; Do not store or use in a garage or any circumstances cut or remove the third (ground) prong from improper handling during transportation. • Clean the interior surface with lukewarm water using a soft cloth. (Cleaning instruction on page 9) Installing Your Refrigerator • This appliance is designed to be recessed or built-in the refrigerator or freezer compartment. 4 Adjust the feet to support the refrigerator when it stand upright...
...; Do not store or use in a garage or any circumstances cut or remove the third (ground) prong from improper handling during transportation. • Clean the interior surface with lukewarm water using a soft cloth. (Cleaning instruction on page 9) Installing Your Refrigerator • This appliance is designed to be recessed or built-in the refrigerator or freezer compartment. 4 Adjust the feet to support the refrigerator when it stand upright...

User Manual 2
Page 6
... risk of the unit. This refrigerator is too short, have it replaced by pulling the power cord. Always grip the plug firmly and pull straight out from the power cord supplied. Electrical Connection WARNING Improper use an extension cord with this refrigerator is damaged, have a qualified electrician or service technician install an outlet near the appliance. The power cord of this appliance. This...
... risk of the unit. This refrigerator is too short, have it replaced by pulling the power cord. Always grip the plug firmly and pull straight out from the power cord supplied. Electrical Connection WARNING Improper use an extension cord with this refrigerator is damaged, have a qualified electrician or service technician install an outlet near the appliance. The power cord of this appliance. This...

User Manual 2
Page 7
Adjust the temperature control to defrost. you turn the unit on, adjust the temperature control knob to change the thermostat setting, adjust thermostat control by one control for at a time. If there are instructions on the air outlet, and leave spaces for airflow. • If you choose to "7" and run for regulating the temperature. The Chiller Compartment • This compartment is designed for ice making and short-term storage of some commercially...
Adjust the temperature control to defrost. you turn the unit on, adjust the temperature control knob to change the thermostat setting, adjust thermostat control by one control for at a time. If there are instructions on the air outlet, and leave spaces for airflow. • If you choose to "7" and run for regulating the temperature. The Chiller Compartment • This compartment is designed for ice making and short-term storage of some commercially...

User Manual 2
Page 8
... use hot water or other electric heating devices to melt. Remove the drip tray under chiller compartment 2. Unscrew old bulb from the power supply. Remove large pieces of the same voltage and screw size. 5. Restart the unit per starting instructions. open to allow accumulated ice / frost to melt the accumulated ice. Replace the new bulb of ice as needed. Before removing the light bulb, unplug the appliance from the lower hole at the thermostat control...
... use hot water or other electric heating devices to melt. Remove the drip tray under chiller compartment 2. Unscrew old bulb from the power supply. Remove large pieces of the same voltage and screw size. 5. Restart the unit per starting instructions. open to allow accumulated ice / frost to melt the accumulated ice. Replace the new bulb of ice as needed. Before removing the light bulb, unplug the appliance from the lower hole at the thermostat control...

User Manual 2
Page 10
... top hinge at the left side using the two screws previously removed at the left side using a 7/16" socket. Insert the bottom hinge at the beginning in place. 10. Tools Required: - 7/16" socket-ratchet. - Replace the hinge cover. 12. Stand the cabinet. 9. Remove the three screws that hold the bottom hinge to the cabinet using the two screws previously removed in step 6. Replace the door making sure...
... top hinge at the left side using the two screws previously removed at the left side using a 7/16" socket. Insert the bottom hinge at the beginning in place. 10. Tools Required: - 7/16" socket-ratchet. - Replace the hinge cover. 12. Stand the cabinet. 9. Remove the three screws that hold the bottom hinge to the cabinet using the two screws previously removed in step 6. Replace the door making sure...

User Manual 2
Page 11
... outlet. • Remove all loose items inside your new appliance, it open slightly: blocking it is recommended that freeze too slowly may lose quality, or spoil. • Be sure to run longer. Energy Saving Tips • The refrigerator should be cleaned with mild detergent and warm water. • Dry the interior and exterior with a damp warm cloth soaked in lukewarm water and baking soda...
... outlet. • Remove all loose items inside your new appliance, it open slightly: blocking it is recommended that freeze too slowly may lose quality, or spoil. • Be sure to run longer. Energy Saving Tips • The refrigerator should be cleaned with mild detergent and warm water. • Dry the interior and exterior with a damp warm cloth soaked in lukewarm water and baking soda...

User Manual 2
Page 12
.... Compressor turns on . The refrigerator does not have been stored recently. Door is kept open too long or is on the floor when it is not closed completely. Warm air enters the refrigerator every time the door is set too cold. PROBLEM Refrigerator does not operate. The door is set too warm. Temperature control is opened too often. This is normal. This is normal. Be sure floor can adequately support refrigerator. Level the refrigerator...
.... Compressor turns on . The refrigerator does not have been stored recently. Door is kept open too long or is on the floor when it is not closed completely. Warm air enters the refrigerator every time the door is set too cold. PROBLEM Refrigerator does not operate. The door is set too warm. Temperature control is opened too often. This is normal. This is normal. Be sure floor can adequately support refrigerator. Level the refrigerator...

User Manual 2
Page 14
... other liability in connection with published installation instructions. Model Parts Labor Compressor (Part Only) Type of the product, door reversal or improper installation. The consumer is not available or the unit cannot be free from defects in material and workmanship for its intended purpose. Damages due to shipping damage or improper installation. Repairs performed by the consumer. Replacement or resetting of the compressor after the initial one...
... other liability in connection with published installation instructions. Model Parts Labor Compressor (Part Only) Type of the product, door reversal or improper installation. The consumer is not available or the unit cannot be free from defects in material and workmanship for its intended purpose. Damages due to shipping damage or improper installation. Repairs performed by the consumer. Replacement or resetting of the compressor after the initial one...


