
User Guide
Page 1
Commercial Gas Hot Plate E-Series User's Manual Model: M12HP / M24HP / M36HP PLEASE READ THIS MANUAL CAREFULLY BEFORE USING YOUR COMMERCIAL GAS HOT PLATE AND KEEP IT FOR FUTURE REFERENCE. 1
Commercial Gas Hot Plate E-Series User's Manual Model: M12HP / M24HP / M36HP PLEASE READ THIS MANUAL CAREFULLY BEFORE USING YOUR COMMERCIAL GAS HOT PLATE AND KEEP IT FOR FUTURE REFERENCE. 1
User Guide
Page 2
... could act as your proof of purchase in the event of registering your product will allow for more efficient warranty service processing when warranty service is to contact you regarding a safety notification or product update. 2. Registering your product include the following: 1. The benefits of insurance loss. PRODUCT REGISTRATION Thank you for purchasing a Magic Chef Commercial product. 2
... could act as your proof of purchase in the event of registering your product will allow for more efficient warranty service processing when warranty service is to contact you regarding a safety notification or product update. 2. Registering your product include the following: 1. The benefits of insurance loss. PRODUCT REGISTRATION Thank you for purchasing a Magic Chef Commercial product. 2
User Guide
Page 3
CONTENTS PRODUCT REGISTRATION 2 PRECAUTIONS 4 IMPORTANT SAFETY INSTRUCTIONS 5 SPECIFICATIONS 7 INSTALLATION INSTRUCTIONS 8 OPERATING INSTRUCTIONS 10 CARE AND MAINTENANCE 13 TROUBLESHOOTING 14 LIMITED WARRANTY 15 3
CONTENTS PRODUCT REGISTRATION 2 PRECAUTIONS 4 IMPORTANT SAFETY INSTRUCTIONS 5 SPECIFICATIONS 7 INSTALLATION INSTRUCTIONS 8 OPERATING INSTRUCTIONS 10 CARE AND MAINTENANCE 13 TROUBLESHOOTING 14 LIMITED WARRANTY 15 3
User Guide
Page 4
...all instructions described in the building. • Immediately call the fire department. • Installation and service must be detected by a qualified installer or service agency. 4 DO NOT store or use gasoline or other flammable vapors and liquids in electric shock...electrical switch. • DO NOT use a gas detector approved by UL or CSA. • For more information, contact your gas supplier or fire department.) • If the gas supplier cannot be reached, call your gas supplier from a phone outside of this user manual may occur. The warnings, cautions and instructions...
...all instructions described in the building. • Immediately call the fire department. • Installation and service must be detected by a qualified installer or service agency. 4 DO NOT store or use gasoline or other flammable vapors and liquids in electric shock...electrical switch. • DO NOT use a gas detector approved by UL or CSA. • For more information, contact your gas supplier or fire department.) • If the gas supplier cannot be reached, call your gas supplier from a phone outside of this user manual may occur. The warnings, cautions and instructions...
User Guide
Page 5
... problems, call a professional service technician to check the unit. 4. This appliance should not be installed in the building. Capital St. CAN/CSA-B149.2 Propane Installation Code...instructions before using gas appliances, basic safety precautions should be operated by any device or touch an electric switch. Use of local codes: National Fuel Gas Code, ANSI-Z223.1/NFPA #54 (latest edition). combustible heat resistant materials, and follow proper safety procedures or does not have the work done by certified professionals. Any self-modification, improper installation...
... problems, call a professional service technician to check the unit. 4. This appliance should not be installed in the building. Capital St. CAN/CSA-B149.2 Propane Installation Code...instructions before using gas appliances, basic safety precautions should be operated by any device or touch an electric switch. Use of local codes: National Fuel Gas Code, ANSI-Z223.1/NFPA #54 (latest edition). combustible heat resistant materials, and follow proper safety procedures or does not have the work done by certified professionals. Any self-modification, improper installation...
User Guide
Page 6
... DO NOT use in any object in the new pipe. DO NOT spray water directly to the air existing in the exhaust vent. Clean the stainless steel surface regularly to prevent damage caused by the appliance incorrectly or improper maintenance may cause damage. 22. All users must be operated... trained cooks and is not intended for 3-5 minutes to a third party, the manual must operate the device complying with the device. When first using . 19. DO NOT damage the control panel with hard or sharp objects. 25. Keep this manual. The manufacturer is for commercial use only, not for use the...
... DO NOT use in any object in the new pipe. DO NOT spray water directly to the air existing in the exhaust vent. Clean the stainless steel surface regularly to prevent damage caused by the appliance incorrectly or improper maintenance may cause damage. 22. All users must be operated... trained cooks and is not intended for 3-5 minutes to a third party, the manual must operate the device complying with the device. When first using . 19. DO NOT damage the control panel with hard or sharp objects. 25. Keep this manual. The manufacturer is for commercial use only, not for use the...
User Guide
Page 7
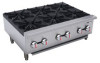
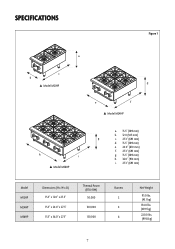
SPECIFICATIONS Figure 1 a c b ▲ Model M12HP d e f ▲ Model M24HP h i ▲ Model M36HP a. 15.3" (389 mm) b. 12.0 (305 mm) g c. 27.3" (693 mm) d. 15.3" (389 mm) e. 24.0" (610 mm) f. 27.3" (693 mm) g. 15.3" (389 mm) h. 36.0" (914 mm) i. 27.3" (693 mm) Model M12HP M24HP M36HP Dimensions (H x W x D) 15.3" x 12.0" x 27.3" 15.3" x 24.0" x 27.3" 15.3" x 36.0" x 27.3" Thermal Power (BTU/KW) 50,000 100,000 150,000 Burners 2 4 6 Net Weight 95.0 lbs. (43.1 kg) 154.0 lbs. (69.9 kg) 220.0 lbs. (99.8 kg) 7
SPECIFICATIONS Figure 1 a c b ▲ Model M12HP d e f ▲ Model M24HP h i ▲ Model M36HP a. 15.3" (389 mm) b. 12.0 (305 mm) g c. 27.3" (693 mm) d. 15.3" (389 mm) e. 24.0" (610 mm) f. 27.3" (693 mm) g. 15.3" (389 mm) h. 36.0" (914 mm) i. 27.3" (693 mm) Model M12HP M24HP M36HP Dimensions (H x W x D) 15.3" x 12.0" x 27.3" 15.3" x 24.0" x 27.3" 15.3" x 36.0" x 27.3" Thermal Power (BTU/KW) 50,000 100,000 150,000 Burners 2 4 6 Net Weight 95.0 lbs. (43.1 kg) 154.0 lbs. (69.9 kg) 220.0 lbs. (99.8 kg) 7
User Guide
Page 8
...the gas installation professional. 12. Record your model and serial numbers for the proper elevation. Model No Serial No 1. Connection of a gas shut-off valve may be set according to be performed by trained professional technicians. They should also test the cooking equipment first...type of the appliance. DO NOT block or interfere with the air intake of the gas flow meter or service regulator to use . 11. The equipment should be stored in the space provided below. INSTALLATION INSTRUCTIONS TRANSPORTATION AND STORAGE During transportation, the cooking equipment should be used...
...the gas installation professional. 12. Record your model and serial numbers for the proper elevation. Model No Serial No 1. Connection of a gas shut-off valve may be set according to be performed by trained professional technicians. They should also test the cooking equipment first...type of the appliance. DO NOT block or interfere with the air intake of the gas flow meter or service regulator to use . 11. The equipment should be stored in the space provided below. INSTALLATION INSTRUCTIONS TRANSPORTATION AND STORAGE During transportation, the cooking equipment should be used...
User Guide
Page 9
Verify the gas type and pressure, and make sure that they conform to those marked on the rating label. 16. If incorrect gas type/pressure is connected, it may affect the performance of the device and create safety hazards. 9
Verify the gas type and pressure, and make sure that they conform to those marked on the rating label. 16. If incorrect gas type/pressure is connected, it may affect the performance of the device and create safety hazards. 9
User Guide
Page 10
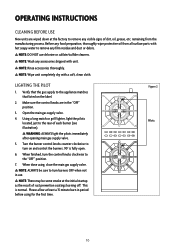
... position. 3. NOTE: Wash any film residue and dust or debris. Verify that listed on and control the burners. 90° is normal. remaining from all surface parts with hot soapy water to the "OFF" position. 7. WARNING: ALWAYS light the pilots immediately after opening main... Pilots 10 NOTE: Rinse accessories thoroughly. OPERATING INSTRUCTIONS CLEANING BEFORE USE New units are in period before using , close the main gas supply valve. NOTE: Wipe unit completely dry with unit. LIGHTING THE PILOT 1. Make sure the control knobs are wiped down at the factory to turn ...
... position. 3. NOTE: Wash any film residue and dust or debris. Verify that listed on and control the burners. 90° is normal. remaining from all surface parts with hot soapy water to the "OFF" position. 7. WARNING: ALWAYS light the pilots immediately after opening main... Pilots 10 NOTE: Rinse accessories thoroughly. OPERATING INSTRUCTIONS CLEANING BEFORE USE New units are in period before using , close the main gas supply valve. NOTE: Wipe unit completely dry with unit. LIGHTING THE PILOT 1. Make sure the control knobs are wiped down at the factory to turn ...
User Guide
Page 11
... check and repair or replace all gas control knobs. 3. Turn on the equipment has been factory adjusted. Before using for the first time. 11 DO NOT rotate it with tools. Force or improper maintenance may be rotated manually, DO NOT rotate or repair it with force. Please allow at least a 15 minute burn in correct installation. 1. Check the...
... check and repair or replace all gas control knobs. 3. Turn on the equipment has been factory adjusted. Before using for the first time. 11 DO NOT rotate it with tools. Force or improper maintenance may be rotated manually, DO NOT rotate or repair it with force. Please allow at least a 15 minute burn in correct installation. 1. Check the...
User Guide
Page 12
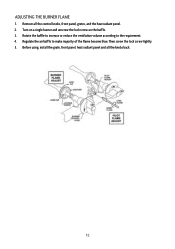
Turn on a single burner and unscrew the lock screw on the baffle. 3. Regulate the air baffle to the requirement. 4. ADJUSTING THE BURNER FLAME 1. Remove all the knobs back. 12 Rotate the baffle to increase or reduce the ventilation volume according to make majority of the flame become blue. Then screw the lock screw tightly. 5. Before using, install the grate, front panel, heat radiant panel and all the control knobs, front panel, grates, and the heat radiant panel. 2.
Turn on a single burner and unscrew the lock screw on the baffle. 3. Regulate the air baffle to the requirement. 4. ADJUSTING THE BURNER FLAME 1. Remove all the knobs back. 12 Rotate the baffle to increase or reduce the ventilation volume according to make majority of the flame become blue. Then screw the lock screw tightly. 5. Before using, install the grate, front panel, heat radiant panel and all the control knobs, front panel, grates, and the heat radiant panel. 2.
User Guide
Page 13
...Clean the front panel and drip tray at least twice a day or as needed . 3. The hotplate should be aware that the device is level and there is turned off the appliance and make sure that most parts of the hotplate and store in a well ventilated area. 11. CARE AND MAINTENANCE ROUTINE INSPECTION Before using...When not in the same direction as the finish. 6. DO NOT clean stainless steel surfaces with clean water. (Do not spray water directly at the appliance during cleaning.) 5. DO NOT modify the ventilation for a long period, thoroughly clean all local standards. 13 Please...
...Clean the front panel and drip tray at least twice a day or as needed . 3. The hotplate should be aware that the device is level and there is turned off the appliance and make sure that most parts of the hotplate and store in a well ventilated area. 11. CARE AND MAINTENANCE ROUTINE INSPECTION Before using...When not in the same direction as the finish. 6. DO NOT clean stainless steel surfaces with clean water. (Do not spray water directly at the appliance during cleaning.) 5. DO NOT modify the ventilation for a long period, thoroughly clean all local standards. 13 Please...

User Guide
Page 14
Adjust pilot to allow for service) Burner valves adjusted too high Faulty ventilation Overrated gas pressure Improperly adjusted burner Burner valves improperly adjusted Improperly adjusted burner Appliance is not level Faulty Ventilation Pilot flame is set too low. TROUBLESHOOTING Too much top heat Uneven heating Pilot outage Low gas pressure. (Call for gas flow Obstruction in pilot orifice Low gas pressure 14
Adjust pilot to allow for service) Burner valves adjusted too high Faulty ventilation Overrated gas pressure Improperly adjusted burner Burner valves improperly adjusted Improperly adjusted burner Appliance is not level Faulty Ventilation Pilot flame is set too low. TROUBLESHOOTING Too much top heat Uneven heating Pilot outage Low gas pressure. (Call for gas flow Obstruction in pilot orifice Low gas pressure 14
User Guide
Page 15
... turntable, roller guide, light bulbs, etc. • Repairs performed by unauthorized service agents. • Service calls that do not involve defects in connection with published installation instructions. • Refunds for non repairable products are limited to the price paid for the unit per the sales receipt. • This warranty is non transferable. This warranty gives you specific legal rights...
... turntable, roller guide, light bulbs, etc. • Repairs performed by unauthorized service agents. • Service calls that do not involve defects in connection with published installation instructions. • Refunds for non repairable products are limited to the price paid for the unit per the sales receipt. • This warranty is non transferable. This warranty gives you specific legal rights...

User Guide
Page 16
d/b/a MC Appliance Corporation. All rights reserved. Magic Chef®logo is a registered trademark of CNA International, Inc. CNA International, Inc. www.mcappliance.com 16 Printed in China
d/b/a MC Appliance Corporation. All rights reserved. Magic Chef®logo is a registered trademark of CNA International, Inc. CNA International, Inc. www.mcappliance.com 16 Printed in China
Warranty Information
Page 1
...price paid for all implied warranties including merchantability and fitness for a period of purchase. Parts & Labor One Year One Year One Year Type of MC Appliance Corporation. A copy of MC Appliance Corporation. This warranty covers appliances in use of the product or improper installation. • Replacement... request warranty service or order parts. 15 A refund or replacement will be free from state to state. Any and all transportation expenses to return the unit to our factory prior to receiving a replacement unit or refund. This warranty gives you specific legal rights,...
...price paid for all implied warranties including merchantability and fitness for a period of purchase. Parts & Labor One Year One Year One Year Type of MC Appliance Corporation. A copy of MC Appliance Corporation. This warranty covers appliances in use of the product or improper installation. • Replacement... request warranty service or order parts. 15 A refund or replacement will be free from state to state. Any and all transportation expenses to return the unit to our factory prior to receiving a replacement unit or refund. This warranty gives you specific legal rights,...