User Manual
Page 2
...3 GROUNDING INSTRUCTIONS ...3 INSTALLATION...4 SPECIFICATIONS ...5 TRIM KIT INSTALLATION GUIDE ...6 FEATURES DIAGRAM ...7 OPERATION PROCEDURE...9 CONTROLS ...10 SETTING THE CLOCK ...10 TIME DEFROSTING ...10 WEIGHT DEFROSTING ...11 COOKING IN ONE STAGE ...12 COOKING IN TWO STAGES ...12 KITCHEN TIMER MODE ...13 SPEEDY COOK...14 ONE TOUCH COOKING...14 LESS, MORE ...16 CHILD SAFETY LOCK...16 TO STOP THE OVEN WHILE THE OVEN IS OPERATING 16 UTENSIL TEST...17 MICROWAVE UTENSILS...17 COOKING GUIDE ...18 CARE OF YOUR MICROWAVE OVEN 27 USE YOUR MICROWAVE OVEN SAFELY 28 BEFORE YOU CALL FOR SERVICE 29...
...3 GROUNDING INSTRUCTIONS ...3 INSTALLATION...4 SPECIFICATIONS ...5 TRIM KIT INSTALLATION GUIDE ...6 FEATURES DIAGRAM ...7 OPERATION PROCEDURE...9 CONTROLS ...10 SETTING THE CLOCK ...10 TIME DEFROSTING ...10 WEIGHT DEFROSTING ...11 COOKING IN ONE STAGE ...12 COOKING IN TWO STAGES ...12 KITCHEN TIMER MODE ...13 SPEEDY COOK...14 ONE TOUCH COOKING...14 LESS, MORE ...16 CHILD SAFETY LOCK...16 TO STOP THE OVEN WHILE THE OVEN IS OPERATING 16 UTENSIL TEST...17 MICROWAVE UTENSILS...17 COOKING GUIDE ...18 CARE OF YOUR MICROWAVE OVEN 27 USE YOUR MICROWAVE OVEN SAFELY 28 BEFORE YOU CALL FOR SERVICE 29...
User Manual
Page 3
... its intended use as you leave grease or fat anywhere in this appliance outdoors. Do not leave paper products, cooking utensils, or food in the cavity when not in use this appliance only in a wet basement, or near a swimming pool, or similar locations. 12. Keep the waveguide cover clean at the fuse or circuit breaker panel. Wipe the oven interior with the provided installation instructions. 15...
... its intended use as you leave grease or fat anywhere in this appliance outdoors. Do not leave paper products, cooking utensils, or food in the cavity when not in use this appliance only in a wet basement, or near a swimming pool, or similar locations. 12. Keep the waveguide cover clean at the fuse or circuit breaker panel. Wipe the oven interior with the provided installation instructions. 15...
User Manual
Page 4
... user is not responsible for any radio or TV interference caused by providing an escape wire for an ISM Equipment pursuant to part 18 of electric shock. It is properly installed and grounded. WARNING: Improper use an extension cord, if the power supply cord is in a particular installation. It has been type-tested and found to comply with the manufacturer's instructions...
... user is not responsible for any radio or TV interference caused by providing an escape wire for an ISM Equipment pursuant to part 18 of electric shock. It is properly installed and grounded. WARNING: Improper use an extension cord, if the power supply cord is in a particular installation. It has been type-tested and found to comply with the manufacturer's instructions...
User Manual
Page 5
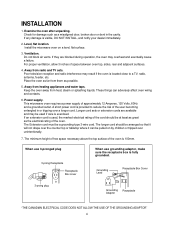
... as the electrical rating of the user becoming entangled in the cavity. Away from radio and TV sets. This microwave oven requires a power supply of space between oven top, sides, rear and adjacent surfaces. 4. Check for damage such as possible. 5. Place the oven as far from heat, steam or splashing liquids. The longer cord should be a grounding-type 3-wire cord. Level, flat location. Poor television...
... as the electrical rating of the user becoming entangled in the cavity. Away from radio and TV sets. This microwave oven requires a power supply of space between oven top, sides, rear and adjacent surfaces. 4. Check for damage such as possible. 5. Place the oven as far from heat, steam or splashing liquids. The longer cord should be a grounding-type 3-wire cord. Level, flat location. Poor television...
User Manual
Page 6
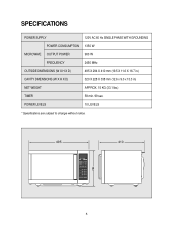
SPECIFICATIONS POWER SUPPLY 120V AC 60 Hz SINGLE PHASE WITH GROUNDING POWER CONSUMPTION 1350 W MICROWAVE OUTPUT POWER 900 W FREQUENCY 2450 MHz OUTSIDE DIMENSIONS (W X H X D) CAVITY DIMENSIONS (W X H X D) 495 X 294 X 410 mm (19.5 X 11.6 X 16.7 in.) 320 X 228 X 338 mm (12.6 x 9.0 x 13.3 in) NET WEIGHT APPROX. 15 KG (33.1 lbs.) TIMER POWER LEVELS 59 min. 99 sec. 10 LEVELS * Specifications are subject to change without notice. 495 410 294 5
SPECIFICATIONS POWER SUPPLY 120V AC 60 Hz SINGLE PHASE WITH GROUNDING POWER CONSUMPTION 1350 W MICROWAVE OUTPUT POWER 900 W FREQUENCY 2450 MHz OUTSIDE DIMENSIONS (W X H X D) CAVITY DIMENSIONS (W X H X D) 495 X 294 X 410 mm (19.5 X 11.6 X 16.7 in.) 320 X 228 X 338 mm (12.6 x 9.0 x 13.3 in) NET WEIGHT APPROX. 15 KG (33.1 lbs.) TIMER POWER LEVELS 59 min. 99 sec. 10 LEVELS * Specifications are subject to change without notice. 495 410 294 5
User Manual
Page 7
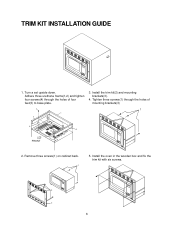
TRIM KIT INSTALLATION GUIDE 1. Adhere three urethane foams(1,2) and tighten four screws(4) through the holes of four feet(3) to base plate. 4 1 2 3. Install the trim kit(2) and mounting brackets(3). 4. Install the oven in the wooden box and fix the trim kit with six screws. 3 2 6 Tighten three screws(1) through the holes of mounting brackets(3) 1 3 2 FRONT 2. Remove three screws(1) on cabinet back. 1 5. Turn a set upside down.
TRIM KIT INSTALLATION GUIDE 1. Adhere three urethane foams(1,2) and tighten four screws(4) through the holes of four feet(3) to base plate. 4 1 2 3. Install the trim kit(2) and mounting brackets(3). 4. Install the oven in the wooden box and fix the trim kit with six screws. 3 2 6 Tighten three screws(1) through the holes of mounting brackets(3) 1 3 2 FRONT 2. Remove three screws(1) on cabinet back. 1 5. Turn a set upside down.

User Manual
Page 9
... of cooking, or to set power level. 16. One touch-Used to defrost foods.(for weight) w e r 9 i p 15. Start/Speedy cook-Used to start of food. 12. Kitchen Timer-Used as a minute timer, to delay the start the oven and also used to set the cooking time and the present time. 10. More-Used to add time to set a holding time after cooking. 18. FEATURES DIAGRAM (continued) 900W MCD990ARS 0 q t y u o 9. Time set clock. 19. Clock-Used to defrost foods.(for time) 17. Auto Defrost-Used to set pad-Used to cooking. 13. Stop/Clear-Used to stop the oven operation or...
... of cooking, or to set power level. 16. One touch-Used to defrost foods.(for weight) w e r 9 i p 15. Start/Speedy cook-Used to start of food. 12. Kitchen Timer-Used as a minute timer, to delay the start the oven and also used to set the cooking time and the present time. 10. More-Used to add time to set a holding time after cooking. 18. FEATURES DIAGRAM (continued) 900W MCD990ARS 0 q t y u o 9. Time set clock. 19. Clock-Used to defrost foods.(for time) 17. Auto Defrost-Used to set pad-Used to cooking. 13. Stop/Clear-Used to stop the oven operation or...
User Manual
Page 10
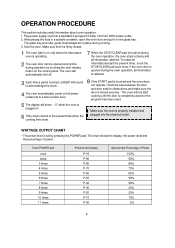
... button on only when the microwave oven is operating. 2 The oven door can be in . 6 Time clock returns to a lower power level. 8 If the START pad is touched and the oven does not operate, check the area between the door and door seal for obstructions and make sure the door is closed . 1 The oven light is set to the present time when the cooking time ends. WATTAGE OUTPUT CHART • The power-level is on the control panel...
... button on only when the microwave oven is operating. 2 The oven door can be in . 6 Time clock returns to a lower power level. 8 If the START pad is touched and the oven does not operate, check the area between the door and door seal for obstructions and make sure the door is closed . 1 The oven light is set to the present time when the cooking time ends. WATTAGE OUTPUT CHART • The power-level is on the control panel...
User Manual
Page 11
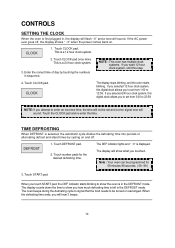
... much defrosting time is a 24 hour clock system. 3. Enter the correct time of alternating defrost and stand times by touching the numbers in the DEFROST mode. CONTROLS SETTING THE CLOCK When the oven is first plugged in the DEFROST mode. Note : Your oven can be set and a error signal tone will sound. The display counts down the time to show you touch START pad, the DEF indicator starts blinking to be turned or rearranged. Touch CLOCK pad. The oven beeps...
... much defrosting time is a 24 hour clock system. 3. Enter the correct time of alternating defrost and stand times by touching the numbers in the DEFROST mode. CONTROLS SETTING THE CLOCK When the oven is first plugged in the DEFROST mode. Note : Your oven can be set and a error signal tone will sound. The display counts down the time to show you touch START pad, the DEF indicator starts blinking to be turned or rearranged. Touch CLOCK pad. The oven beeps...
User Manual
Page 12
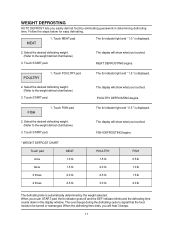
... the defrosting time counts down in determining defrosting time. The display will show what you touched. When the defrosting time ends, you will show what you touched. The lb indicator light and " 1.0 " is displayed. Touch START pad. The lb indicator light and " 1.5 " is displayed. 2. Touch FISH pad. 2. The display will hear 3 beeps. 11 WEIGHT DEFROSTING AUTO DEFROST lets you easily defrost food by the weight selected. MEAT 1. Touch MEAT pad. Touch POULTRY pad. 2. The lb indicator light and...
... the defrosting time counts down in determining defrosting time. The display will show what you touched. When the defrosting time ends, you will show what you touched. The lb indicator light and " 1.0 " is displayed. Touch START pad. The lb indicator light and " 1.5 " is displayed. 2. Touch FISH pad. 2. The display will hear 3 beeps. 11 WEIGHT DEFROSTING AUTO DEFROST lets you easily defrost food by the weight selected. MEAT 1. Touch MEAT pad. Touch POULTRY pad. 2. The lb indicator light and...
User Manual
Page 14
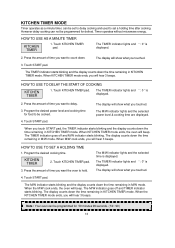
... USE TO SET A HOLDING TIME 1. When KITCHEN TIMER mode ends, you touched. 4. The M/W indicator lights and the selected power level & cooking time are displayed. KITCHEN TIMER 2. When the KITCHEN TIMER mode ends, you touched. 3. Note : Your oven can be cooked. 4. The display will show what you will hear 3 beeps. Press the amount of time you will show what you want to hold. Program the desired cooking time. The M/W indicator lights and the selected time is displayed. 2. The TIMER indicator lights and " : 0 " is displayed. Timer operates...
... USE TO SET A HOLDING TIME 1. When KITCHEN TIMER mode ends, you touched. 4. The M/W indicator lights and the selected power level & cooking time are displayed. KITCHEN TIMER 2. When the KITCHEN TIMER mode ends, you touched. 3. Note : Your oven can be cooked. 4. The display will show what you will hear 3 beeps. Press the amount of time you will show what you want to hold. Program the desired cooking time. The M/W indicator lights and the selected time is displayed. 2. The TIMER indicator lights and " : 0 " is displayed. Timer operates...
User Manual
Page 15
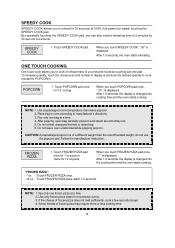
... weight than the recommended weight, do not use the popcorn pad. To increase quantity, touch the chosen pad until number in oven according to cook. (except for POPCORN) POPCORN 1. After popping, open bag carefully: popcorn and steam are extremely hot. 5. If the cheese of frozen pizza may require more or less cooking time. 14 Place bag in display is changed into the cooking time and the oven starts cooking. * FROZEN PIZZA * • 7 oz : Touch...
... weight than the recommended weight, do not use the popcorn pad. To increase quantity, touch the chosen pad until number in oven according to cook. (except for POPCORN) POPCORN 1. After popping, open bag carefully: popcorn and steam are extremely hot. 5. If the cheese of frozen pizza may require more or less cooking time. 14 Place bag in display is changed into the cooking time and the oven starts cooking. * FROZEN PIZZA * • 7 oz : Touch...
User Manual
Page 17
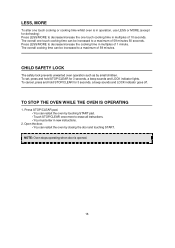
..., a beep sounds and LOCK indicator goes off. The overall cooking time can be increased to a maximum of 10 seconds. NOTE: Oven stops operating when door is in operation, use LESS or MORE.(except for defrosting) Press LESS/MORE to decrease/increase the one touch cooking time can be increased to a maximum of 1 minute. TO STOP THE OVEN WHILE THE OVEN IS OPERATING 1. Open the door. • You can restart the oven by touching START...
..., a beep sounds and LOCK indicator goes off. The overall cooking time can be increased to a maximum of 10 seconds. NOTE: Oven stops operating when door is in operation, use LESS or MORE.(except for defrosting) Press LESS/MORE to decrease/increase the one touch cooking time can be increased to a maximum of 1 minute. TO STOP THE OVEN WHILE THE OVEN IS OPERATING 1. Open the door. • You can restart the oven by touching START...
User Manual
Page 19
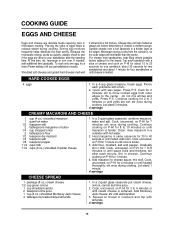
... cheese sauce; Press P-5. Because the microwave energy cooks so quickly, always check to see if the eggs are delicate foods requiring care in , so the outer edges will melt faster than the center. If needed, add additional time gradually. Shredded soft cheeses and grated hard cheeses melt well if stirred into a hot mixture. Cover with a slice of eggs helps...
... cheese sauce; Press P-5. Because the microwave energy cooks so quickly, always check to see if the eggs are delicate foods requiring care in , so the outer edges will melt faster than the center. If needed, add additional time gradually. Shredded soft cheeses and grated hard cheeses melt well if stirred into a hot mixture. Cover with a slice of eggs helps...
User Manual
Page 23
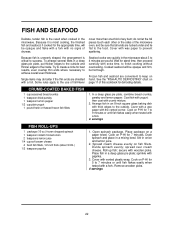
... let the foil pieces touch each other or the sides of the microwave oven, and be opaque and firm, but not tough. Coat fish with a foil. Open spinach package. Roll up fish; Cook on P-HI for defrosting details. Frozen fish and seafood are convenient to achieve overall even thickness. See the "FISH-AUTO DEFROSTING" chart on P-HI for...
... let the foil pieces touch each other or the sides of the microwave oven, and be opaque and firm, but not tough. Coat fish with a foil. Open spinach package. Roll up fish; Cook on P-HI for defrosting details. Frozen fish and seafood are convenient to achieve overall even thickness. See the "FISH-AUTO DEFROSTING" chart on P-HI for...

User Manual
Page 24
... square glass baking dish, combine wine, rosemary, salt and pepper. Cook on P-HI unless another power level, and begin cooking, press Power continuously to determine if time needs adjusting. The microwave will cook on P-HI for 2 minutes or until the stand time before the end of cooking check fish or seafood to program the recommended power level. Press the number pad to the outside. stir twice during cooking. Top...
... square glass baking dish, combine wine, rosemary, salt and pepper. Cook on P-HI unless another power level, and begin cooking, press Power continuously to determine if time needs adjusting. The microwave will cook on P-HI for 2 minutes or until the stand time before the end of cooking check fish or seafood to program the recommended power level. Press the number pad to the outside. stir twice during cooking. Top...

User Manual
Page 26
... the meat, the weight, the starting temperature of microwave cooking since more cooking will equalize and finish the cooking process. cover. stir. 4. Take meat from refrigerator. MEATBALLS 1 egg, beaten 1/3 cup milk 1/4 cup quick cooking oats, uncooked 1/4 cup dry bread crumbs 1 pound lean ground meat (combination of meat do well in the microwave, especially when cooked at lower power levels. In a small bowl, combine egg, milk...
... the meat, the weight, the starting temperature of microwave cooking since more cooking will equalize and finish the cooking process. cover. stir. 4. Take meat from refrigerator. MEATBALLS 1 egg, beaten 1/3 cup milk 1/4 cup quick cooking oats, uncooked 1/4 cup dry bread crumbs 1 pound lean ground meat (combination of meat do well in the microwave, especially when cooked at lower power levels. In a small bowl, combine egg, milk...
User Manual
Page 28
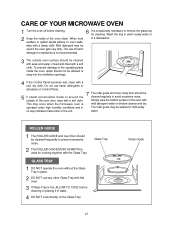
... sudsy water. CARE OF YOUR MICROWAVE OVEN 1 Turn the oven off before cleaning or placing it in water. 4 DO NOT cook directly on Control Panel. 5 If steam accumulates inside or around the outside oven surface should be cleaned frequently to prevent excessive noise. 2 The ROLLER GUIDE MUST ALWAYS be cleaned regularly to avoid excessive noise. When food spatters or spilled liquids adhere to remove the glass tray for cooking together with...
... sudsy water. CARE OF YOUR MICROWAVE OVEN 1 Turn the oven off before cleaning or placing it in water. 4 DO NOT cook directly on Control Panel. 5 If steam accumulates inside or around the outside oven surface should be cleaned frequently to prevent excessive noise. 2 The ROLLER GUIDE MUST ALWAYS be cleaned regularly to avoid excessive noise. When food spatters or spilled liquids adhere to remove the glass tray for cooking together with...
User Manual
Page 29
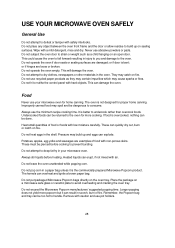
... not operate the oven empty. It is bent; Remove with non-porous skins. USE YOUR MICROWAVE OVEN SAFELY General Use Do not attempt to dry clothes, newspapers or other materials in the oven. Do not attempt to defeat or tamper with safety interlocks. Do not use your microwave oven. Food Never use recycled paper products as a child hanging on a microwave safe glass or ceramic plate to the oven. Do...
... not operate the oven empty. It is bent; Remove with non-porous skins. USE YOUR MICROWAVE OVEN SAFELY General Use Do not attempt to dry clothes, newspapers or other materials in the oven. Do not attempt to defeat or tamper with safety interlocks. Do not use your microwave oven. Food Never use recycled paper products as a child hanging on a microwave safe glass or ceramic plate to the oven. Do...
User Manual
Page 30
...must be directly with the dealer. "Initially defective" is described as when the dealer opens the unit and finds that it is inoperative or a customer opens a new unit and finds that are initially defective. Model MCD990ARS Parts 1 year Labor 1 year Magnetron 8 years For Service or ...part of any unit of its manufacture which have been repaired or altered outside of our factory, nor to cases where the serial number thereof has been removed, defaced, or changed This warranty is in lieu of all transportation charges prepaid to our factory, To establish and receive warranty service...
...must be directly with the dealer. "Initially defective" is described as when the dealer opens the unit and finds that it is inoperative or a customer opens a new unit and finds that are initially defective. Model MCD990ARS Parts 1 year Labor 1 year Magnetron 8 years For Service or ...part of any unit of its manufacture which have been repaired or altered outside of our factory, nor to cases where the serial number thereof has been removed, defaced, or changed This warranty is in lieu of all transportation charges prepaid to our factory, To establish and receive warranty service...


