User Manual
Page 1
Magic Chef SO RIGHT AT HOME TM MICROWAVE OVEN MCD991ARS OPERATING INSTRUCTIONS v II Before operating this oven, please read these instructions completely.
Magic Chef SO RIGHT AT HOME TM MICROWAVE OVEN MCD991ARS OPERATING INSTRUCTIONS v II Before operating this oven, please read these instructions completely.
User Manual
Page 4
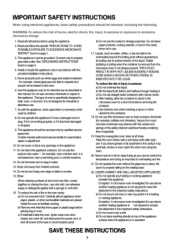
... when used by qualified service personnel. Keep the waveguide cover clean at the fuse or circuit breaker panel. d) Do not store anything directly on top of oven is specifically designed to persons: a) Do not overheat the liquid. for a short time before placing bag in operation. Do not cover or block any openings on page 5. 4. Keep cord away from paper or plastic bags before removing the container. Carefully attend...
... when used by qualified service personnel. Keep the waveguide cover clean at the fuse or circuit breaker panel. d) Do not store anything directly on top of oven is specifically designed to persons: a) Do not overheat the liquid. for a short time before placing bag in operation. Do not cover or block any openings on page 5. 4. Keep cord away from paper or plastic bags before removing the container. Carefully attend...
User Manual
Page 6
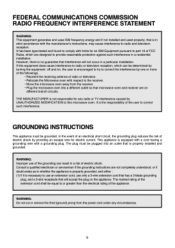
... a particular installation. WARNING: Do not cut or remove the third (ground) prong from the receiver. • Plug the microwave oven into an outlet that microwave oven and receiver are designed to the receiver. • Move the microwave oven away from the power cord under any radio or TV interference caused by turning the equipment off and on different branch circuits. If this microwave oven. It...
... a particular installation. WARNING: Do not cut or remove the third (ground) prong from the receiver. • Plug the microwave oven into an outlet that microwave oven and receiver are designed to the receiver. • Move the microwave oven away from the power cord under any radio or TV interference caused by turning the equipment off and on different branch circuits. If this microwave oven. It...
User Manual
Page 8
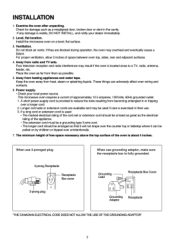
... the counter top or tabletop where it can adversely affect oven wiring and contacts. 6. Longer cord sets or extension cords are blocked during operation, the oven may result if the oven is visible, DO NOT INSTALL, and notify your local power source. The minimum height of free space necessary above the top surface of the cord set or extension cord should be pulled on a level, flat...
... the counter top or tabletop where it can adversely affect oven wiring and contacts. 6. Longer cord sets or extension cords are blocked during operation, the oven may result if the oven is visible, DO NOT INSTALL, and notify your local power source. The minimum height of free space necessary above the top surface of the cord set or extension cord should be pulled on a level, flat...
User Manual
Page 9
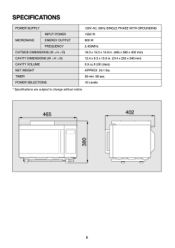
SPECIFICATIONS POWER SUPPLY INPUT POWER MICROWAVE ENERGY OUTPUT FREQUENCY OUTSIDE DIMENSIONS (W x H x D) CAVITY DIMENSIONS (W x H x D) CAVITY VOLUME NET WEIGHT TIMER POWER SELECTIONS 120V AC, 60Hz SINGLE PHASE WITH GROUNDING 1350 W 900 W 2,450MHz 18.3 x 15.0 x 15.8 in. (465 x 380 x 402 mm) 12.4 x 9.3 x 13.6 in. (314 x 235 x 346 mm) 0.9 cu.ft (26 Liters) APPROX. 24.1 lbs. 59 min. 99 sec. 10 Levels * Specifications are subject to change without notice. 465 402 co Co 8
SPECIFICATIONS POWER SUPPLY INPUT POWER MICROWAVE ENERGY OUTPUT FREQUENCY OUTSIDE DIMENSIONS (W x H x D) CAVITY DIMENSIONS (W x H x D) CAVITY VOLUME NET WEIGHT TIMER POWER SELECTIONS 120V AC, 60Hz SINGLE PHASE WITH GROUNDING 1350 W 900 W 2,450MHz 18.3 x 15.0 x 15.8 in. (465 x 380 x 402 mm) 12.4 x 9.3 x 13.6 in. (314 x 235 x 346 mm) 0.9 cu.ft (26 Liters) APPROX. 24.1 lbs. 59 min. 99 sec. 10 Levels * Specifications are subject to change without notice. 465 402 co Co 8
User Manual
Page 10
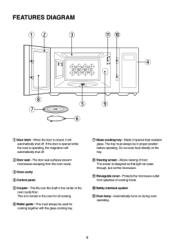
...; Door seal - When the door is to remain in the center of cooking foods. ® Safety interlock system ()Oven lamp - Protects the microwave outlet from the oven cavity. © Oven cavity ® Control panel © Coupler - This must always be used for all cooking. ® Roller guide - This fits over the shaft in the oven for cooking together with the glass cooking tray. ©Glass cooking tray - FEATURES DIAGRAM mm O O © Door latch - Made of food.
...; Door seal - When the door is to remain in the center of cooking foods. ® Safety interlock system ()Oven lamp - Protects the microwave outlet from the oven cavity. © Oven cavity ® Control panel © Coupler - This must always be used for all cooking. ® Roller guide - This fits over the shaft in the oven for cooking together with the glass cooking tray. ©Glass cooking tray - FEATURES DIAGRAM mm O O © Door latch - Made of food.
User Manual
Page 11
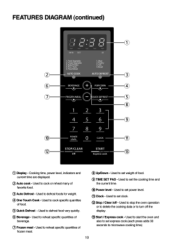
...food. &TIME SET PAD - Meat 2. Used to defrost foods for weight. ® One Touch Cook - O Beverage - Used to set weight of favorite food. °Auto Defrost - Used to set express cook.(each press adds 30 seconds to reheat specific quantities of food. ()Quick Defrost - Used to microwave cooking time) 10 Bread AUTO DEFROST BEVERAGE POPCORN FROZEN MEAL QUICK DEFROST 1 2 3 4 5 6 7 8 9 POWER LEVEL 0 CLOCK STOP/CLEAR Off START Express cook O ED O O 11 13 0 Display - Used to defrost food very quickly. ® Up/Down - Used to set power level. Used...
...food. &TIME SET PAD - Meat 2. Used to defrost foods for weight. ® One Touch Cook - O Beverage - Used to set weight of favorite food. °Auto Defrost - Used to set express cook.(each press adds 30 seconds to reheat specific quantities of food. ()Quick Defrost - Used to microwave cooking time) 10 Bread AUTO DEFROST BEVERAGE POPCORN FROZEN MEAL QUICK DEFROST 1 2 3 4 5 6 7 8 9 POWER LEVEL 0 CLOCK STOP/CLEAR Off START Express cook O ED O O 11 13 0 Display - Used to defrost food very quickly. ® Up/Down - Used to set power level. Used...
User Manual
Page 12
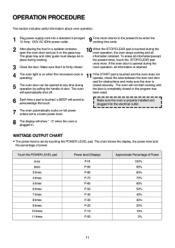
... oven stops cooking and all information is retained. 4 11 The oven light is set to a lower power level. WATTAGE OUTPUT CHART • The power-level is on full power unless set by pulling the handle of door. Time clock returns to acknowledge the touch. 7 The oven automatically cooks on when the microwave oven is touched, a BEEP will sound to the present time when the cooking time ends. 2 After placing the food in . The oven closed . been reset. 6 Each time a pad is operating. L J 8 The display...
... oven stops cooking and all information is retained. 4 11 The oven light is set to a lower power level. WATTAGE OUTPUT CHART • The power-level is on full power unless set by pulling the handle of door. Time clock returns to acknowledge the touch. 7 The oven automatically cooks on when the microwave oven is touched, a BEEP will sound to the present time when the cooking time ends. 2 After placing the food in . The oven closed . been reset. 6 Each time a pad is operating. L J 8 The display...
User Manual
Page 13
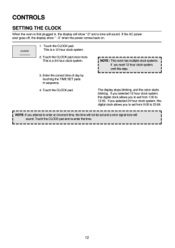
... touching the TIME SET pads in , the display will show " : 0" when the power comes back on. Touch the CLOCK pad and re-enter the time. This is a 12 hour clock system. 2. If the AC power ever goes off, the display show ":0" and a tone will sound. Touch the CLOCK pad. r NOTE: If you want 12 hour clock system, I omit this step. 3. The display stops blinking, and the colon starts...
... touching the TIME SET pads in , the display will show " : 0" when the power comes back on. Touch the CLOCK pad and re-enter the time. This is a 12 hour clock system. 2. If the AC power ever goes off, the display show ":0" and a tone will sound. Touch the CLOCK pad. r NOTE: If you want 12 hour clock system, I omit this step. 3. The display stops blinking, and the colon starts...
User Manual
Page 14
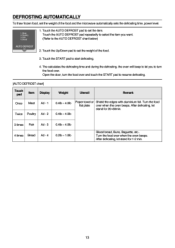
Poultry 3. Fish 4. Touch the AUTO DEFROST pad to set the weight of the food and the microwave automatically sets the defrosting time, power level. 1. After defrosting, let stand for 1-2 min. 13 Meat 2. Turn the food flat plate over when the oven beeps. Bread 1. Turn the food over when the oven beeps. Touch the START pad to resume defrosting. [AUTO DEFROST chart] Touch pad Item Display Once Meat Ad -1 Twice Poultry Ad - 2 Weight Utensil Remark 0.4lb - 4.0lb 0.4lb -. 4.0lb Paper towel or...
Poultry 3. Fish 4. Touch the AUTO DEFROST pad to set the weight of the food and the microwave automatically sets the defrosting time, power level. 1. After defrosting, let stand for 1-2 min. 13 Meat 2. Turn the food flat plate over when the oven beeps. Bread 1. Turn the food over when the oven beeps. Touch the START pad to resume defrosting. [AUTO DEFROST chart] Touch pad Item Display Once Meat Ad -1 Twice Poultry Ad - 2 Weight Utensil Remark 0.4lb - 4.0lb 0.4lb -. 4.0lb Paper towel or...
User Manual
Page 15
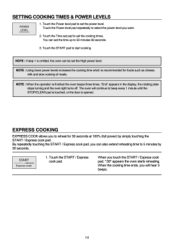
...% (full power) by 30 seconds. NOTE : If step 1 is finished the oven beeps three times, "End" appears in the display, the rotating plate stops turning and the oven light turns off. The oven will hear 3 beeps. 14 Touch the START pad to 5 minutes by simply touching the START / Express cook pad. Touch the START / Express cook pad. NOTE : When the operation is omitted, the oven can also extend reheating time to start cooking. When you want. 2. SETTING COOKING TIMES & POWER LEVELS POWER LEVEL 1.
...% (full power) by 30 seconds. NOTE : If step 1 is finished the oven beeps three times, "End" appears in the display, the rotating plate stops turning and the oven light turns off. The oven will hear 3 beeps. 14 Touch the START pad to 5 minutes by simply touching the START / Express cook pad. Touch the START / Express cook pad. NOTE : When the operation is omitted, the oven can also extend reheating time to start cooking. When you want. 2. SETTING COOKING TIMES & POWER LEVELS POWER LEVEL 1.
User Manual
Page 16
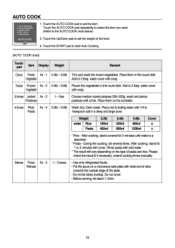
... - 0.8lb Trim and wash the mixed vegetables. Touch the START pad to the AUTO COOK chart below) 2. water cover with wrap. 3 times Jacket Ac - 3 Potatoes 1 - 3ea Choose medium sized potatoes 200-250g. water cover Vegetable with wrap. Please check the result & if necessary, extend cooking times manually. 5times Pizza Ac - 5 Reheat 1 - 3 pices • Use only refrigerated foods. • Put the pizza on the turntable. 4 times Rice...
... - 0.8lb Trim and wash the mixed vegetables. Touch the START pad to the AUTO COOK chart below) 2. water cover with wrap. 3 times Jacket Ac - 3 Potatoes 1 - 3ea Choose medium sized potatoes 200-250g. water cover Vegetable with wrap. Please check the result & if necessary, extend cooking times manually. 5times Pizza Ac - 5 Reheat 1 - 3 pices • Use only refrigerated foods. • Put the pizza on the turntable. 4 times Rice...
User Manual
Page 17
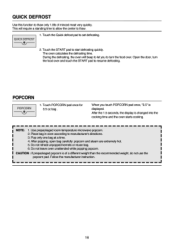
... displayed. POPCORN POPCORN • 1. r 1 NOTE: 1. CAUTION : If prepackaged popcorn is changed into the cooking time and the oven starts cooking. Follow the manufacturer instruction. 16 Touch the START pad to set defrosting. 2. Pop only one bag at a time. 4. The oven calculates the defrosting time. Do not leave oven unattended while popping popcorn. QUICK DEFROST Use this function to thaw only 1.0lb of a different weight than the recommended weight, do not use the popcorn pad. Touch the Quick defrost pad to start defrosting quickly. Open the door, turn...
... displayed. POPCORN POPCORN • 1. r 1 NOTE: 1. CAUTION : If prepackaged popcorn is changed into the cooking time and the oven starts cooking. Follow the manufacturer instruction. 16 Touch the START pad to set defrosting. 2. Pop only one bag at a time. 4. The oven calculates the defrosting time. Do not leave oven unattended while popping popcorn. QUICK DEFROST Use this function to thaw only 1.0lb of a different weight than the recommended weight, do not use the popcorn pad. Touch the Quick defrost pad to start defrosting quickly. Open the door, turn...

User Manual
Page 18
BEVERAGE BEVERAGE • 1. FROZEN MEAL FROZEN MEAL f 1. Touch the Frozen meal pad. Touch the Up/Down pad to select the quantity of the food. Touch the Up/Down pad to set a weight from 1 cup to start cooking. Touch the START pad to 3 cups. (200m1/cup) 3. Touch the Beverage pad. Touch the START pad to 1.0lb every 0.2lb. 3. The display shows "A--1". 2. The display shows "A--2". 2. You can set the weight of food from 0.6lb to start cooking. 17
BEVERAGE BEVERAGE • 1. FROZEN MEAL FROZEN MEAL f 1. Touch the Frozen meal pad. Touch the Up/Down pad to select the quantity of the food. Touch the Up/Down pad to set a weight from 1 cup to start cooking. Touch the START pad to 3 cups. (200m1/cup) 3. Touch the Beverage pad. Touch the START pad to 1.0lb every 0.2lb. 3. The display shows "A--1". 2. The display shows "A--2". 2. You can set the weight of food from 0.6lb to start cooking. 17
User Manual
Page 19
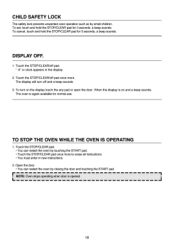
... a beep sounds. CHILD SAFETY LOCK The safety lock prevents unwanted oven operation such as by touching the START pad. • Touch the STOP/CLEAR pad once more . To set, touch and hold the STOP/CLEAR pad for 3 seconds, a beep sounds. Touch the STOP/CLEAR/off and a beep sounds. 3. TO STOP THE OVEN WHILE THE OVEN IS OPERATING 1. Open the door. [• You can restart the oven by small children. DISPLAY OFF. 1. The oven is opened. 18 " :0" or clock appears in new instructions...
... a beep sounds. CHILD SAFETY LOCK The safety lock prevents unwanted oven operation such as by touching the START pad. • Touch the STOP/CLEAR pad once more . To set, touch and hold the STOP/CLEAR pad for 3 seconds, a beep sounds. Touch the STOP/CLEAR/off and a beep sounds. 3. TO STOP THE OVEN WHILE THE OVEN IS OPERATING 1. Open the door. [• You can restart the oven by small children. DISPLAY OFF. 1. The oven is opened. 18 " :0" or clock appears in new instructions...
User Manual
Page 20
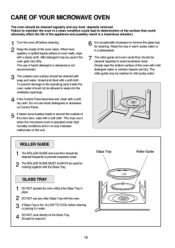
... to remove the glass tray for cleaning. e ED 5 If steam accumulates inside or around the outside oven surface should not be allowed to seep into the ventilation openings. 6 It is operated under high humidity conditions and in a hazardous situation. 1 Turn the oven off before cleaning or placing it in water. 4 DO NOT cook directly on Control Panel. CARE OF YOUR MICROWAVE OVEN The oven should be cleaned regularly and any other Glass Tray...
... to remove the glass tray for cleaning. e ED 5 If steam accumulates inside or around the outside oven surface should not be allowed to seep into the ventilation openings. 6 It is operated under high humidity conditions and in a hazardous situation. 1 Turn the oven off before cleaning or placing it in water. 4 DO NOT cook directly on Control Panel. CARE OF YOUR MICROWAVE OVEN The oven should be cleaned regularly and any other Glass Tray...
User Manual
Page 21
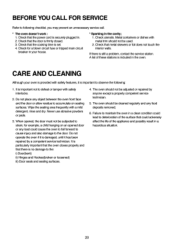
... or foil does not touch the interior walls. Metal containers or dishes with safety features, it has been repaired by anyone except a properly competent service technician. 5. It is important to observe the following checklist, you may prevent an unnecessary service call. * The oven doesn't work : 1. Wipe the sealing area frequently with safety interlocks. 2. When opened door or any object between...
... or foil does not touch the interior walls. Metal containers or dishes with safety features, it has been repaired by anyone except a properly competent service technician. 5. It is important to observe the following checklist, you may prevent an unnecessary service call. * The oven doesn't work : 1. Wipe the sealing area frequently with safety interlocks. 2. When opened door or any object between...
User Manual
Page 22
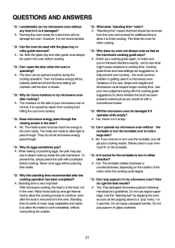
... not pop popcorn in the size, shape and weights and dimensions could require longer cooking time. the most common problem in the oven. A : Yes. Many foods build up inside to check whether the food has been properly cooked just as you will maintain until the door is in the food, not in getting used with a conventional cooker. * Q : Will the microwave oven be opened anytime during the cooking operation. A : Check your...
... not pop popcorn in the size, shape and weights and dimensions could require longer cooking time. the most common problem in the oven. A : Yes. Many foods build up inside to check whether the food has been properly cooked just as you will maintain until the door is in the food, not in getting used with a conventional cooker. * Q : Will the microwave oven be opened anytime during the cooking operation. A : Check your...
User Manual
Page 23
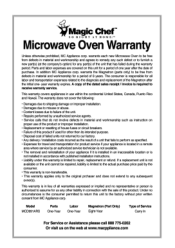
... to receive warranty service. Parts and labor expenses are covered on this unit to the diagnosis and replacement of the Magnetron after the initial one year after the date of 8 years. This warranty is in lieu of the unit. • Repairs performed by the consumer. • This warranty is authorized to furnish a new part(s) (at www.macppliance.com Magic Chef Microwave Oven Warranty Unless otherwise...
... to receive warranty service. Parts and labor expenses are covered on this unit to the diagnosis and replacement of the Magnetron after the initial one year after the date of 8 years. This warranty is in lieu of the unit. • Repairs performed by the consumer. • This warranty is authorized to furnish a new part(s) (at www.macppliance.com Magic Chef Microwave Oven Warranty Unless otherwise...


