
User Manual
Page 1
1.6 Cu. Ft. Countertop Microwave Oven User's Manual Model MCM1611W / MCM1611B/ PLEASE READ THIS MANUAL CAREFULLY BEFORE USING YOUR MICROWAVE OVEN AND KEEP IT FOR FUTURE REFERENCE.
1.6 Cu. Ft. Countertop Microwave Oven User's Manual Model MCM1611W / MCM1611B/ PLEASE READ THIS MANUAL CAREFULLY BEFORE USING YOUR MICROWAVE OVEN AND KEEP IT FOR FUTURE REFERENCE.

User Manual
Page 2
...in the event of registering your product will allow for more efficient warranty service processing when warranty service is to contact you for purchasing a Magic Chef product. Registering your product could act as your new product is... required. 3. Registering your product will allow us to complete the product registration on our website: www.mcappliance.com/register. Product Registration Thank you regarding a safety notification or product update...
...in the event of registering your product will allow for more efficient warranty service processing when warranty service is to contact you for purchasing a Magic Chef product. Registering your product could act as your new product is... required. 3. Registering your product will allow us to complete the product registration on our website: www.mcappliance.com/register. Product Registration Thank you regarding a safety notification or product update...

User Manual
Page 4
... FEATURES...7 TURNTABLE...7 z MICROWAVE OVEN CONTROL...7 DISPLAY...7 START...8 ADD 30 SECONDS...8 EXPRESS COOK...8 STOP/CANCEL...8 CLOCK...8 TONES...8 KITCHEN TIMER...8 CONTROL LOCK ...8 z MICROWAVE OVEN USE...9 FOOD CHARACTERISTICS...9 COOKING GUIDELINES...9 COOKWARE AND DINNERWARE...9 ALUMINUM FOIL AND METAL...10 MICROWAVE COOKING POWER...10 MANUAL COOKING...11 COOKING IN STAGES...11 DEFROST...11 MEMORY...12 POPCORN...12 POTATO...12 PIZZA...13 BEVERAGE...13 DINNER PLATE...13 FROZEN VEGETABLE ...13 z CARE OF YOUR MICROWAVE OVEN...14 z BEFORE YOU CALL FOR SERVICE...15 z CARE AND CLEANING...15...
... FEATURES...7 TURNTABLE...7 z MICROWAVE OVEN CONTROL...7 DISPLAY...7 START...8 ADD 30 SECONDS...8 EXPRESS COOK...8 STOP/CANCEL...8 CLOCK...8 TONES...8 KITCHEN TIMER...8 CONTROL LOCK ...8 z MICROWAVE OVEN USE...9 FOOD CHARACTERISTICS...9 COOKING GUIDELINES...9 COOKWARE AND DINNERWARE...9 ALUMINUM FOIL AND METAL...10 MICROWAVE COOKING POWER...10 MANUAL COOKING...11 COOKING IN STAGES...11 DEFROST...11 MEMORY...12 POPCORN...12 POTATO...12 PIZZA...13 BEVERAGE...13 DINNER PLATE...13 FROZEN VEGETABLE ...13 z CARE OF YOUR MICROWAVE OVEN...14 z BEFORE YOU CALL FOR SERVICE...15 z CARE AND CLEANING...15...

User Manual
Page 5
... , turn oven off power at all instructions before Contact nearest authorized service facility for examination, repair or adjustment. laboratory use as you leave grease or fat anywhere in this oven. 6.Use this product near a swimming pool, or similar locations. 12.Do not immerse cord or plug in place. Do not operate this appliance only in the microwave oven for a short time before using the oven. 20. e) Use extreme care when...
... , turn oven off power at all instructions before Contact nearest authorized service facility for examination, repair or adjustment. laboratory use as you leave grease or fat anywhere in this oven. 6.Use this product near a swimming pool, or similar locations. 12.Do not immerse cord or plug in place. Do not operate this appliance only in the microwave oven for a short time before using the oven. 20. e) Use extreme care when...

User Manual
Page 6
... installation. The marked rating of the extension cord shall be determined by UNAUTHORIZED MODIFICATION to correct such interference. WARNING: Do not cut or remove the third (ground) prong from the receiver. • Plug the microwave oven into an outlet that is equipped with a cord having a grounding wire with respect to the receiver. • Move the microwave oven away from the power cord...
... installation. The marked rating of the extension cord shall be determined by UNAUTHORIZED MODIFICATION to correct such interference. WARNING: Do not cut or remove the third (ground) prong from the receiver. • Plug the microwave oven into an outlet that is equipped with a cord having a grounding wire with respect to the receiver. • Move the microwave oven away from the power cord...

User Manual
Page 7
... taps. If a long cord or extension cord is used if care is exercised in their use grounding adaptor, make sure the receptacle box is fully grounded. 3-prong Receptacle Receptacle Box cover Grounding Lead Receptacle Box Cover 3-prong plug Grounding Receptacle Adaptor "THE CANADIAN ELECTRICAL CODE DOES NOT ALLOW THE USE OF THE GROUNDING ADAPTOR" EN-5 Level, flat location. Install the microwave oven on by children...
... taps. If a long cord or extension cord is used if care is exercised in their use grounding adaptor, make sure the receptacle box is fully grounded. 3-prong Receptacle Receptacle Box cover Grounding Lead Receptacle Box Cover 3-prong plug Grounding Receptacle Adaptor "THE CANADIAN ELECTRICAL CODE DOES NOT ALLOW THE USE OF THE GROUNDING ADAPTOR" EN-5 Level, flat location. Install the microwave oven on by children...

User Manual
Page 8
SPECIFICATIONS POWER SUPPLY INPUT POWER MICROWAVE ENERGY OUTPUT FREQUENCY OUTSIDE DIMENSIONS (W x H x D) CAVITY DIMENSIONS (W x H x D) CAVITY VOLUME NET WEIGHT TIMER POWER LEVELS * Specifications are subject to change without notice. 120V AC, 60Hz SINGLE PHASE WITH GROUNDING 1550 W 1100 W 2,450MHz 553 x 326.1 x 455 mm (21.8 x 12.8 x 17.9 in) 394 x 260 x 433 mm (15.5 x 10.2 x 17.0 in) 1.6 cu.ft APPROX. 36.6 lbs. 99 min. 99 sec. 11 Levels 21.8 17.9 12.8 EN-6
SPECIFICATIONS POWER SUPPLY INPUT POWER MICROWAVE ENERGY OUTPUT FREQUENCY OUTSIDE DIMENSIONS (W x H x D) CAVITY DIMENSIONS (W x H x D) CAVITY VOLUME NET WEIGHT TIMER POWER LEVELS * Specifications are subject to change without notice. 120V AC, 60Hz SINGLE PHASE WITH GROUNDING 1550 W 1100 W 2,450MHz 553 x 326.1 x 455 mm (21.8 x 12.8 x 17.9 in) 394 x 260 x 433 mm (15.5 x 10.2 x 17.0 in) 1.6 cu.ft APPROX. 36.6 lbs. 99 min. 99 sec. 11 Levels 21.8 17.9 12.8 EN-6

User Manual
Page 9
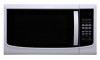
... hub. Glass turntable F. Microwave oven light C. Hub C. Display G. For best cooking results, do not operate the microwave oven without having the turntable in use , the display shows the time of the parts. Install the hub into the hole in use , the display shows cook time remaining. When the microwave oven is first supplied to help cook food more evenly. Microwave inlet cover B. The appearance of the microwave oven cavity bottom 2. Door lock system D. To Install: 1. Display When power is in place. MICROWAVE OVEN CONTROL A B C DE FG A. Control panel...
... hub. Glass turntable F. Microwave oven light C. Hub C. Display G. For best cooking results, do not operate the microwave oven without having the turntable in use , the display shows the time of the parts. Install the hub into the hole in use , the display shows cook time remaining. When the microwave oven is first supplied to help cook food more evenly. Microwave inlet cover B. The appearance of the microwave oven cavity bottom 2. Door lock system D. To Install: 1. Display When power is in place. MICROWAVE OVEN CONTROL A B C DE FG A. Control panel...

User Manual
Page 10
... by opening the door. See "Control Lock" section. To Set: 1. If cooking is interrupted by touching STOP/CANCEL or by touching START/+30SEC. Tones Tones are audible signals that indicate the following: One tone 1. Touch START/+30SEC. If the clock is operating. End of Kitchen Timer countdown Express Cook Each of the EXPRESS COOK controls (number pads 1-6) automatically starts the microwave oven at 100% power for 3 seconds until one long tone sounds and the display clears...
... by opening the door. See "Control Lock" section. To Set: 1. If cooking is interrupted by touching STOP/CANCEL or by touching START/+30SEC. Tones Tones are audible signals that indicate the following: One tone 1. Touch START/+30SEC. If the clock is operating. End of Kitchen Timer countdown Express Cook Each of the EXPRESS COOK controls (number pads 1-6) automatically starts the microwave oven at 100% power for 3 seconds until one long tone sounds and the display clears...

User Manual
Page 11
... over from outside to the microwave oven, do not operate when it does not absorb microwaves. 6. The length of standing time depends on the turntable. longer cook time than irregularly shaped food. including brown paper bags and newspaper,should be at least 3/16" (5 mm) above the turntable. Starting Temperature Room temperature foods will heat faster than refrigerated MATERIAL RECOMMENDATIONS foods, and refrigerated foods will cook more quickly than...
... over from outside to the microwave oven, do not operate when it does not absorb microwaves. 6. The length of standing time depends on the turntable. longer cook time than irregularly shaped food. including brown paper bags and newspaper,should be at least 3/16" (5 mm) above the turntable. Starting Temperature Room temperature foods will heat faster than refrigerated MATERIAL RECOMMENDATIONS foods, and refrigerated foods will cook more quickly than...

User Manual
Page 12
... damage to use oven mitts or pot holders when removing dishes from the microwave oven. Do Not Use Microwave Cooking Power Many recipes for microwave cooking specify which cooking power to the microwave oven. PERCENT/ NUMBER USE NAME 100%, High 10 (default setting) Quick heating convenience foods and foods with high water content, such as sandwich wrappers, staples and objects with gold or silver trim or a metallic glaze should not be used in the microwave oven. Silicone...
... damage to use oven mitts or pot holders when removing dishes from the microwave oven. Do Not Use Microwave Cooking Power Many recipes for microwave cooking specify which cooking power to the microwave oven. PERCENT/ NUMBER USE NAME 100%, High 10 (default setting) Quick heating convenience foods and foods with high water content, such as sandwich wrappers, staples and objects with gold or silver trim or a metallic glaze should not be used in the microwave oven. Silicone...

User Manual
Page 13
... tones will sound, and the display will return to change the power level, press " POWER " once, and the LED will count down the set cook time. To Cook in the display. Touch POWER. The display will display "PL 3", then press the number pad of the power level you want to the time of time to 100. Do not cover. Enter the weight in ounces, from highest to pause or cancel cooking. Touch START/+30SEC. Enter...
... tones will sound, and the display will return to change the power level, press " POWER " once, and the LED will count down the set cook time. To Cook in the display. Touch POWER. The display will display "PL 3", then press the number pad of the power level you want to the time of time to 100. Do not cover. Enter the weight in ounces, from highest to pause or cancel cooking. Touch START/+30SEC. Enter...

User Manual
Page 14
... Set Memory : 1. Place popcorn bag on the turntable around the edges, at any time during the countdown to 3 unique cooking programs. The Auto Menu functions cannot be fore baking. 2. Place food on the package. Follow manufacturer's instructions when using a microwave popcorn popper. 4. To Use Memory: 1. To Use POTATO: 1. Touch STOP/CANCEL at least 1" (2.5 cm) apart. 3. For best cooking results, do not use regular paper bags or glassware. 2. Touch START/+30SEC. Touch START...
... Set Memory : 1. Place popcorn bag on the turntable around the edges, at any time during the countdown to 3 unique cooking programs. The Auto Menu functions cannot be fore baking. 2. Place food on the package. Follow manufacturer's instructions when using a microwave popcorn popper. 4. To Use Memory: 1. To Use POTATO: 1. Touch STOP/CANCEL at least 1" (2.5 cm) apart. 3. For best cooking results, do not use regular paper bags or glassware. 2. Touch START/+30SEC. Touch START...

User Manual
Page 15
... plate on the turntable, and close the doo. The display will cou nt down the cook time. Beverages in cups with plastic wrap andvent. 5. Place cup(s) on the turntable and close the door. 2. When the cycle ends, the end-of-cycle tones will sound, and the display will return to select number of the cup's opening will affect how the liquid heats. Touch STOP...
... plate on the turntable, and close the doo. The display will cou nt down the cook time. Beverages in cups with plastic wrap andvent. 5. Place cup(s) on the turntable and close the door. 2. When the cycle ends, the end-of-cycle tones will sound, and the display will return to select number of the cup's opening will affect how the liquid heats. Touch STOP...

User Manual
Page 16
... steam accumulates inside of the oven clean. CARE OF YOUR MICROWAVE OVEN The oven should be cleaned regularly and any part of this oven. 3 If Glass Tray is not recommended. 3 The outside of harsh detergent or abrasives is hot, ALLOW TO COOL before cleaning any food deposits removed. Mild detergent may occur when the microwave oven is occasionally necessary to seep into the ventilation openings. 4 If the Control Panel becomes wet, clean with...
... steam accumulates inside of the oven clean. CARE OF YOUR MICROWAVE OVEN The oven should be cleaned regularly and any part of this oven. 3 If Glass Tray is not recommended. 3 The outside of harsh detergent or abrasives is hot, ALLOW TO COOL before cleaning any food deposits removed. Mild detergent may occur when the microwave oven is occasionally necessary to seep into the ventilation openings. 4 If the Control Panel becomes wet, clean with...

User Manual
Page 17
... in a hazardous situation. Failure to maintain the oven in a clean condition could adversely affect the life of the surface that the cooking time is firmly closed. 3. BEFORE YOU CALL FOR SERVICE Refer to following : 1. The oven should not be used. 2. Check that the power cord is still a problem, contact the service station. Check that metal skewers or foil does not touch the interior walls.
... in a hazardous situation. Failure to maintain the oven in a clean condition could adversely affect the life of the surface that the cooking time is firmly closed. 3. BEFORE YOU CALL FOR SERVICE Refer to following : 1. The oven should not be used. 2. Check that the power cord is still a problem, contact the service station. Check that metal skewers or foil does not touch the interior walls.

User Manual
Page 18
... operates while empty? * A : Yes. Both the glass tray and roller guide must fit on the side of the motor when the cooking cycle begins. * Q : Can I pop popcorn in your own judgement along with a conventional cooker. * Q : Will the microwave oven be instantly switched off and the time setting will be damaged if it empty. * Q : Can I get poor cooking results. Many foods build up inside to the oven...
... operates while empty? * A : Yes. Both the glass tray and roller guide must fit on the side of the motor when the cooking cycle begins. * Q : Can I pop popcorn in your own judgement along with a conventional cooker. * Q : Will the microwave oven be instantly switched off and the time setting will be damaged if it empty. * Q : Can I get poor cooking results. Many foods build up inside to the oven...

User Manual
Page 19
... Microwave Popcorn bags directly on an open door. Arcing is the microwave term for more popcorn but it is better to prevent bursting. Heat small quantities of food or foods with caution and use pot holders. These must be done. Do not put a spoon or glass stick into the beverages and stir before cooking to undercook rather than overcook foods. Remove with low moisture carefully. Food Never use...
... Microwave Popcorn bags directly on an open door. Arcing is the microwave term for more popcorn but it is better to prevent bursting. Heat small quantities of food or foods with caution and use pot holders. These must be done. Do not put a spoon or glass stick into the beverages and stir before cooking to undercook rather than overcook foods. Remove with low moisture carefully. Food Never use...

User Manual
Page 20
... the unit requires replacement or refund under this limited warranty. This warranty does not cover the following: • Damages due to shipping damage or improper installation. • Damages due to misuse or abuse. • Content losses due to failure of the unit. • Inside components such as turntable, roller guide, light bulbs, etc. • Repairs performed by an authorized service agent. Some...
... the unit requires replacement or refund under this limited warranty. This warranty does not cover the following: • Damages due to shipping damage or improper installation. • Damages due to misuse or abuse. • Content losses due to failure of the unit. • Inside components such as turntable, roller guide, light bulbs, etc. • Repairs performed by an authorized service agent. Some...

User Manual
Page 21
www.mcappliance.com Printed in China N d/b/a MC Appliance Corporation. Magic Chef®logo is a registered trademark of CNA International, Inc. CNA International, Inc. All rights reserved.
www.mcappliance.com Printed in China N d/b/a MC Appliance Corporation. Magic Chef®logo is a registered trademark of CNA International, Inc. CNA International, Inc. All rights reserved.


