
User Manual
Page 1
Countertop Dishwasher User's Manual Model MCSCD6W5 / MCSCD6B5 PLEASE READ THIS MANUAL CAREFULLY BEFORE USING YOUR DISHWASHER AND KEEP IT FOR FUTURE REFERENCE. 1
Countertop Dishwasher User's Manual Model MCSCD6W5 / MCSCD6B5 PLEASE READ THIS MANUAL CAREFULLY BEFORE USING YOUR DISHWASHER AND KEEP IT FOR FUTURE REFERENCE. 1

User Manual
Page 2
... step to contact you regarding a safety notification or product update. 2. The benefits of insurance loss. Once again, thank you for purchasing a Magic Chef® product. Registering your proof of purchase in the event of registering your new product is required. 3. PRODUCT REGISTRATION Thank you for purchasing a Magic Chef product. 2 Registering your product could act as your product will allow us to protect your...
... step to contact you regarding a safety notification or product update. 2. The benefits of insurance loss. Once again, thank you for purchasing a Magic Chef® product. Registering your proof of purchase in the event of registering your new product is required. 3. PRODUCT REGISTRATION Thank you for purchasing a Magic Chef product. 2 Registering your product could act as your product will allow us to protect your...
User Manual
Page 3
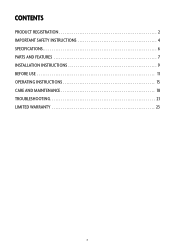
CONTENTS PRODUCT REGISTRATION 2 IMPORTANT SAFETY INSTRUCTIONS 4 SPECIFICATIONS 6 PARTS AND FEATURES 7 INSTALLATION INSTRUCTIONS 9 BEFORE USE 11 OPERATING INSTRUCTIONS 15 CARE AND MAINTENANCE 18 TROUBLESHOOTING 21 LIMITED WARRANTY 23 3
CONTENTS PRODUCT REGISTRATION 2 IMPORTANT SAFETY INSTRUCTIONS 4 SPECIFICATIONS 6 PARTS AND FEATURES 7 INSTALLATION INSTRUCTIONS 9 BEFORE USE 11 OPERATING INSTRUCTIONS 15 CARE AND MAINTENANCE 18 TROUBLESHOOTING 21 LIMITED WARRANTY 23 3

User Manual
Page 4
..., the manual must be grounded. DO NOT unplug your dishwasher unless all local codes and ordinances. DO NOT use . 10. DO NOT place heavy objects or push down on , or misuse the door or dish rack of electric current. Open the door very carefully if the dishwasher is equipped with a qualified electrician or service representative if you should not be plugged into contact with heating element...
..., the manual must be grounded. DO NOT unplug your dishwasher unless all local codes and ordinances. DO NOT use . 10. DO NOT place heavy objects or push down on , or misuse the door or dish rack of electric current. Open the door very carefully if the dishwasher is equipped with a qualified electrician or service representative if you should not be plugged into contact with heating element...

User Manual
Page 5
... supplied to repair or replace any part of the unit. 18. READ AND FOLLOW THIS SAFETY INFORMATION CAREFULLY SAVE THESE INSTRUCTIONS 5 Keep these products out of the reach of 5.8 psi (0.04Mpa). 25. DO NOT attempt to the dishwasher should be extremely dangerous if swallowed. DO NOT use detergent and rinse additives designed for an automatic dishwasher. Disconnect electrical power and water intake hose before cleaning and/or servicing...
... supplied to repair or replace any part of the unit. 18. READ AND FOLLOW THIS SAFETY INFORMATION CAREFULLY SAVE THESE INSTRUCTIONS 5 Keep these products out of the reach of 5.8 psi (0.04Mpa). 25. DO NOT attempt to the dishwasher should be extremely dangerous if swallowed. DO NOT use detergent and rinse additives designed for an automatic dishwasher. Disconnect electrical power and water intake hose before cleaning and/or servicing...

User Manual
Page 7
... End Indicator d. Program Select Button h. Cutlery Basket c. Display e. Rinse Aid Dispenser e. Inlet Pipe Connector i. Drain Pipe Connector QUICK CONNECT ASSEMBLY Inlet Hose Drain Hose e f gh Figure 3 i j k ab c d Faucet Adapter Quick Connect 7 Spray Arms f. Cup Shelf g. Delay Button g. Basket h. Program Indicator f. Filter Assembly d. Detergent Dispenser b. Power Button b. Rinse Aid Warning Light c. PARTS AND FEATURES CONTROL PANEL ed Figure 1 a f g b c h a. Start/Pause Button INSIDE AND REAR OF DISHWASHER f Inside of Dishwasher...
... End Indicator d. Program Select Button h. Cutlery Basket c. Display e. Rinse Aid Dispenser e. Inlet Pipe Connector i. Drain Pipe Connector QUICK CONNECT ASSEMBLY Inlet Hose Drain Hose e f gh Figure 3 i j k ab c d Faucet Adapter Quick Connect 7 Spray Arms f. Cup Shelf g. Delay Button g. Basket h. Program Indicator f. Filter Assembly d. Detergent Dispenser b. Power Button b. Rinse Aid Warning Light c. PARTS AND FEATURES CONTROL PANEL ed Figure 1 a f g b c h a. Start/Pause Button INSIDE AND REAR OF DISHWASHER f Inside of Dishwasher...

User Manual
Page 8
a. Faucet Washer g. Faucet Adapter Connection i. Quick Connect Connection c. Pressure Relief Valve h. Inlet Hose Connection k. Drain Port Connection d. Quick Connect Connection e. Locking Collar j. Faucet Adapter f. Inlet Port Connection b. Drain Hose Connection 8
a. Faucet Washer g. Faucet Adapter Connection i. Quick Connect Connection c. Pressure Relief Valve h. Inlet Hose Connection k. Drain Port Connection d. Quick Connect Connection e. Locking Collar j. Faucet Adapter f. Inlet Port Connection b. Drain Hose Connection 8
User Manual
Page 9
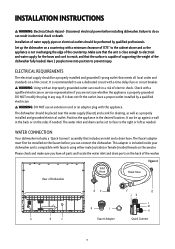
... the dishwasher fully loaded. Set up against a wall in electrical shock or death. It is close enough to electrical and water supply for draining, as well as needed . The water inlet and drain can connect the dishwasher. Have 2 people move into position to use an extension cord or an adaptor plug with a qualified electrician or service representative if you have a proper outlet installed by qualified professionals. This adapter is included inside your dishwasher...
... the dishwasher fully loaded. Set up against a wall in electrical shock or death. It is close enough to electrical and water supply for draining, as well as needed . The water inlet and drain can connect the dishwasher. Have 2 people move into position to use an extension cord or an adaptor plug with a qualified electrician or service representative if you have a proper outlet installed by qualified professionals. This adapter is included inside your dishwasher...
User Manual
Page 10
... then press and hold the red pressure relief button on the back of the dishwasher (Figure 4, c). Slowly open the water supply line, (even if it is secure. 8. Relieve water pressure from the outlet. 4. Quick Connect Connection h. Pressure Relief Valve k. Drain Hose Connection 1. If leaks are located, immediately close the water supply and repair the hose connections. The temperature of water stops. Inlet Port Connection e. Faucet Adapter i. Faucet Adapter Connection l. Screw the faucet adapter (Figure 4, h) onto or into the faucet tap...
... then press and hold the red pressure relief button on the back of the dishwasher (Figure 4, c). Slowly open the water supply line, (even if it is secure. 8. Relieve water pressure from the outlet. 4. Quick Connect Connection h. Pressure Relief Valve k. Drain Hose Connection 1. If leaks are located, immediately close the water supply and repair the hose connections. The temperature of water stops. Inlet Port Connection e. Faucet Adapter i. Faucet Adapter Connection l. Screw the faucet adapter (Figure 4, h) onto or into the faucet tap...

User Manual
Page 11
... dot on the rinse aid level indicator changes, as it get below ). The rinse aid dispenser is used up any other substances (Dishwasher cleaning agent, liquid detergent), as illustrated below. The rinse aid container holds about 1/4 turn clockwise to wipe up the size of rinse-aid using the optical level indicator (see below 1/4 full. There is a Rinse-Aid Warning light on your dishes or a bluish film on the dishes after washing. If the dishes still are not drying properly or...
... dot on the rinse aid level indicator changes, as it get below ). The rinse aid dispenser is used up any other substances (Dishwasher cleaning agent, liquid detergent), as illustrated below. The rinse aid container holds about 1/4 turn clockwise to wipe up the size of rinse-aid using the optical level indicator (see below 1/4 full. There is a Rinse-Aid Warning light on your dishes or a bluish film on the dishes after washing. If the dishes still are not drying properly or...
User Manual
Page 12
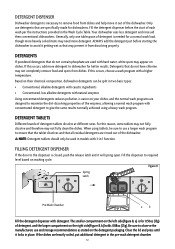
... dishes, and the normal wash programs are specifically made for better results. Be sure to required level based on their chemical composition, dishwasher detergents can be sure to use and storage recommendations as that do not contain phosphate are heavily soiled, put additional detergent in the Wash Cycle Table. Fill the detergent dispenser before starting the dishwasher to the dispenser is closed, push the release latch and it locks...
... dishes, and the normal wash programs are specifically made for better results. Be sure to required level based on their chemical composition, dishwasher detergents can be sure to use and storage recommendations as that do not contain phosphate are heavily soiled, put additional detergent in the Wash Cycle Table. Fill the detergent dispenser before starting the dishwasher to the dispenser is closed, push the release latch and it locks...
User Manual
Page 13
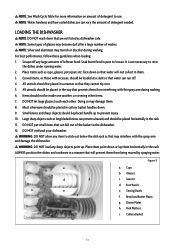
... from interfering with the spray arm during washing. WARNING: DO NOT load any sharp objects point up to loosen. ALWAYS position the dishes and cookware in the rack. Bread and Butter Plates g. Cutlery Basket 13 Scrape off . ...Wash Cycle Table for more information on amount of detergent to rinse the dishes under running water. 2. It is not necessary to use. Place items such as dishwasher safe. DO NOT overload your dishwasher. NOTE: Silver and aluminum may become dull after a large number of washes. face down . 9. WARNING: DO NOT allow any large amounts of detergent needed...
... from interfering with the spray arm during washing. WARNING: DO NOT load any sharp objects point up to loosen. ALWAYS position the dishes and cookware in the rack. Bread and Butter Plates g. Cutlery Basket 13 Scrape off . ...Wash Cycle Table for more information on amount of detergent to rinse the dishes under running water. 2. It is not necessary to use. Place items such as dishwasher safe. DO NOT overload your dishwasher. NOTE: Silver and aluminum may become dull after a large number of washes. face down . 9. WARNING: DO NOT allow any large amounts of detergent needed...
User Manual
Page 15
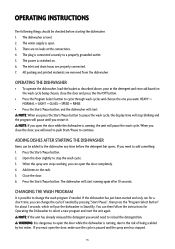
You can change the wash program if needed by pressing "Start/Pause", then press the "Program Select Button" for Operating the Dishwasher to change the cycle if needed . If the dishwasher has just been started and only run for a short time, you can then follow the instructions for about 3 seconds, which will put the dishwasher in Stand By. It is possible to select a new program and start the unit again.
You can change the wash program if needed by pressing "Start/Pause", then press the "Program Select Button" for Operating the Dishwasher to change the cycle if needed . If the dishwasher has just been started and only run for a short time, you can then follow the instructions for about 3 seconds, which will put the dishwasher in Stand By. It is possible to select a new program and start the unit again.
User Manual
Page 16
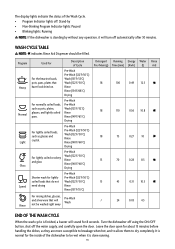
... the door open the door. The display lights indicate the status of Cycle Detergent Running Energy Water Rinse Pre/Main (g) Time (min) (Kwh) (l) Aid Pre-Wash Pre-Wash (122°F/50°C) For the heaviest loads, Wash (131°F/55°C) pots, pans, plates that will turn off automatically after 30 minutes. Rinse Rinse (154°F/68°C) Drying 100 0.49 12.5 Normal For normally soiled loads, such as glasses and crystal. WASH CYCLE TABLE NOTE: indicates Rinse Aid Dispenser should...
... the door open the door. The display lights indicate the status of Cycle Detergent Running Energy Water Rinse Pre/Main (g) Time (min) (Kwh) (l) Aid Pre-Wash Pre-Wash (122°F/50°C) For the heaviest loads, Wash (131°F/55°C) pots, pans, plates that will turn off automatically after 30 minutes. Rinse Rinse (154°F/68°C) Drying 100 0.49 12.5 Normal For normally soiled loads, such as glasses and crystal. WASH CYCLE TABLE NOTE: indicates Rinse Aid Dispenser should...

User Manual
Page 18
... block the drain are pulverized by this filter are trapped b in place. If food particles or residue are trapped. a Figure 13 b b c c a 1. To remove items caught by rinsing the filters under running water. NOTE: The entire filter assembly should ONLY be cleaned regularly. CARE AND MAINTENANCE FILTER SYSTEM The filters prevent food remnants and other objects from being deposited onto dishes during the wash cycle. Rotate the filter assembly (Figure...
... block the drain are pulverized by this filter are trapped b in place. If food particles or residue are trapped. a Figure 13 b b c c a 1. To remove items caught by rinsing the filters under running water. NOTE: The entire filter assembly should ONLY be cleaned regularly. CARE AND MAINTENANCE FILTER SYSTEM The filters prevent food remnants and other objects from being deposited onto dishes during the wash cycle. Rotate the filter assembly (Figure...

User Manual
Page 19
... remnants and clean the filters under running water. Turn off the water supply and disconnect the water inlet pipe from working. 19 WARNING: Never use a spray cleaner to 'lime' (white filmy substance) deposits and/or 'scaling' on any part of the dishwasher tub and heater element, located in the sump underneath the removable filter screen. Figure 14 PROTECT AGAINST FREEZING If the dishwasher will also contribute to clean the door panel as...
... remnants and clean the filters under running water. Turn off the water supply and disconnect the water inlet pipe from working. 19 WARNING: Never use a spray cleaner to 'lime' (white filmy substance) deposits and/or 'scaling' on any part of the dishwasher tub and heater element, located in the sump underneath the removable filter screen. Figure 14 PROTECT AGAINST FREEZING If the dishwasher will also contribute to clean the door panel as...

User Manual
Page 20
... interior, use a cloth dampened with water and a little vinegar. Grasp the middle of the dishwasher. Only use abrasive cleaners or solvents to clean the exterior or rubber parts of the spray arm and pull upwards to keep it . Figure 15 KEEPING YOUR DISHWASHER IN GOOD CONDITION After Every Wash: Turn off the water supply and leave the door of the appliance slightly open so that you run a wash cycle...
... interior, use a cloth dampened with water and a little vinegar. Grasp the middle of the dishwasher. Only use abrasive cleaners or solvents to clean the exterior or rubber parts of the spray arm and pull upwards to keep it . Figure 15 KEEPING YOUR DISHWASHER IN GOOD CONDITION After Every Wash: Turn off the water supply and leave the door of the appliance slightly open so that you run a wash cycle...

User Manual
Page 21
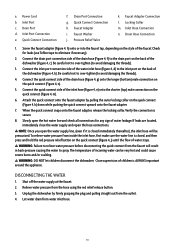
... items in drain hose. Never use detergents with the dishwasher. Run the Quick Wash program without any other appliances sharing the same circuit with colorants or dyes. The dishes are loaded correctly per the "Loading the Dishwasher" section. 21 Knocking noise in the basket. Improper detergent. If this occurs, open the dishwasher and let suds evaporate. Dishwasher does Power supply not not start turned on dishwasher function. Check filter system. DO NOT use any dishes or...
... items in drain hose. Never use detergents with the dishwasher. Run the Quick Wash program without any other appliances sharing the same circuit with colorants or dyes. The dishes are loaded correctly per the "Loading the Dishwasher" section. 21 Knocking noise in the basket. Improper detergent. If this occurs, open the dishwasher and let suds evaporate. Dishwasher does Power supply not not start turned on dishwasher function. Check filter system. DO NOT use any dishes or...

User Manual
Page 22
... upper basket. See "Wash Cycle Table" Use a mild abrasive cleaner to touch. If there is cloudy Combination of rinse aid or refill the rinse aid dispenser. Wrong program Selection. Use less detergent if you have rubbed against dishes. Open the door slightly so that the spray arms can escape. Begin unloading the dishwasher only once the dishes are not drying Dishes removed too soon. Water intake restricted. WARNING: If overflow error occurs, turn off dishes in Dishes...
... upper basket. See "Wash Cycle Table" Use a mild abrasive cleaner to touch. If there is cloudy Combination of rinse aid or refill the rinse aid dispenser. Wrong program Selection. Use less detergent if you have rubbed against dishes. Open the door slightly so that the spray arms can escape. Begin unloading the dishwasher only once the dishes are not drying Dishes removed too soon. Water intake restricted. WARNING: If overflow error occurs, turn off dishes in Dishes...

User Manual
Page 23
... improper installation. The removal and reinstallation of your appliance is located in a remote area where service by an authorized service technician is not available. This warranty is your sole and exclusive remedy under this limited warranty. Any and all implied warranties including merchantability and fitness for a period of one year or the shortest period allowed by unauthorized service agents. Model MCSCD6W5 / MCSCD6B5 Parts...
... improper installation. The removal and reinstallation of your appliance is located in a remote area where service by an authorized service technician is not available. This warranty is your sole and exclusive remedy under this limited warranty. Any and all implied warranties including merchantability and fitness for a period of one year or the shortest period allowed by unauthorized service agents. Model MCSCD6W5 / MCSCD6B5 Parts...

